

Quick Start Guide
GB
Guide de démarrage rapide
FR
Schnellstartanleitung
DE
Guía de inicio rápido
ES
Introductiehandleiding
NL
Guida rapida
IT
English
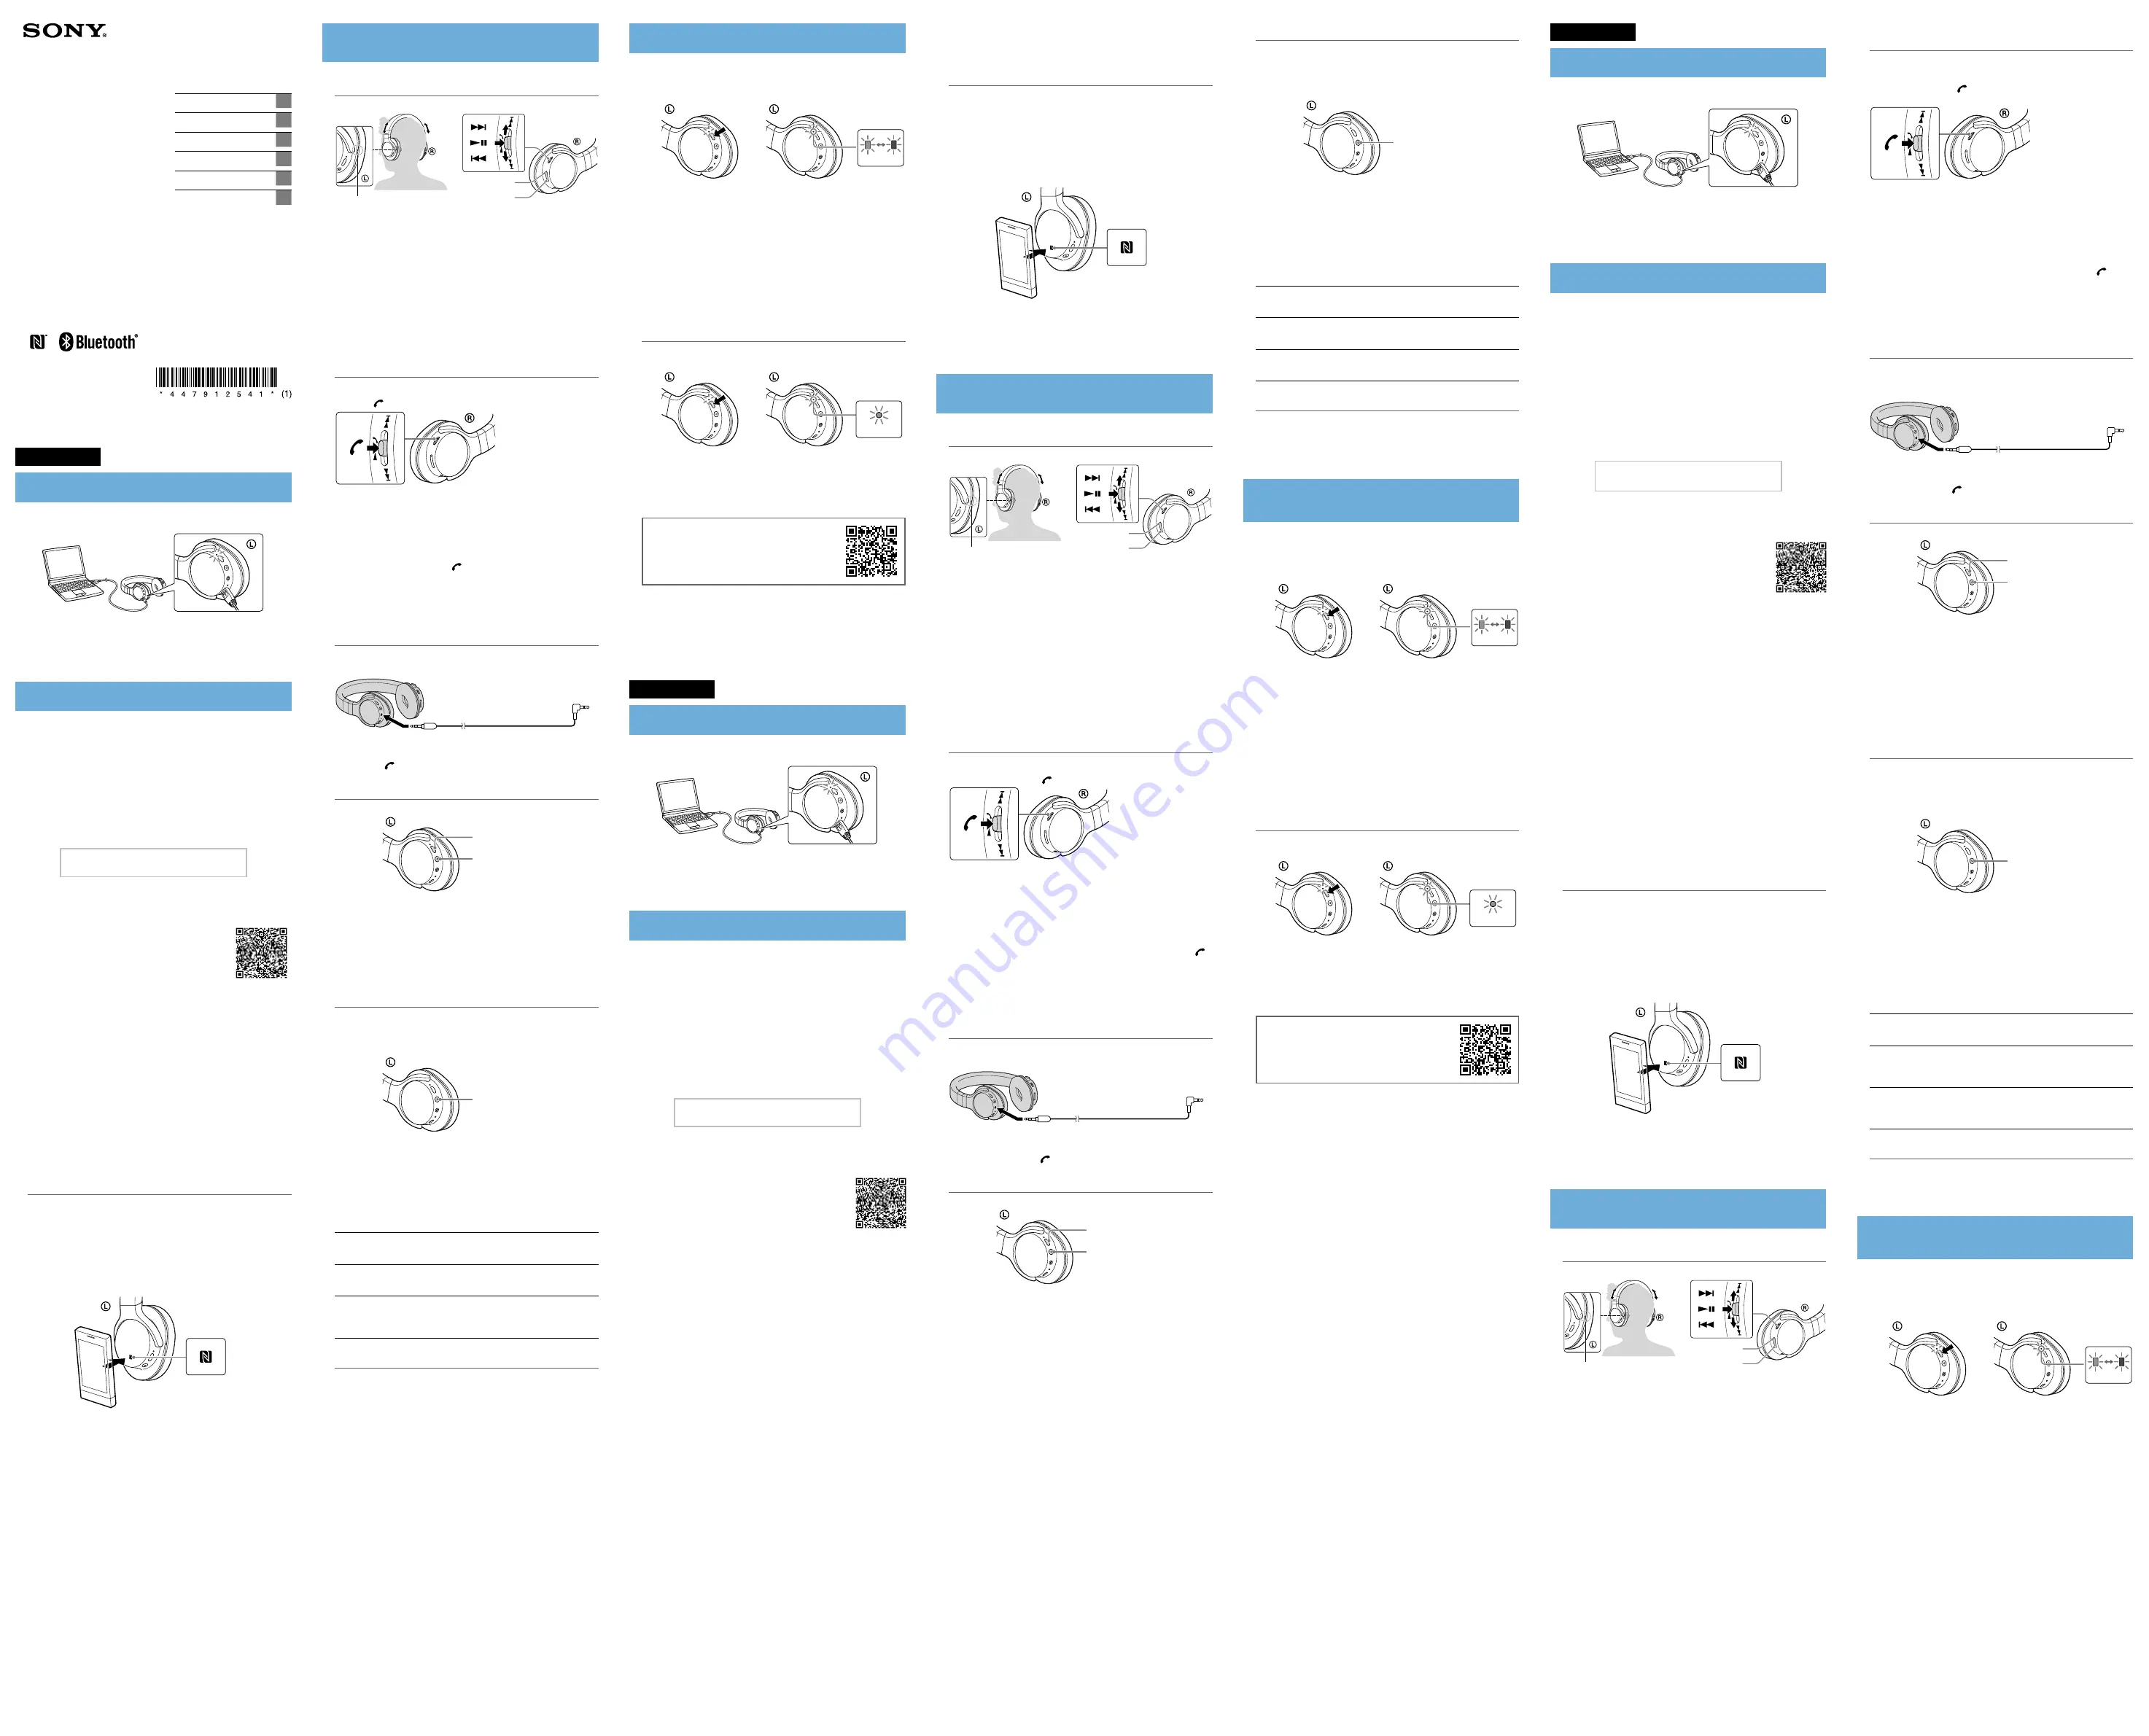
Charging the unit
Connect the unit and the computer booted using the micro-USB cable
supplied.
When the unit and the computer are connected, charging starts and
the indicator (red) lights up. Charging is completed in about 2.5 hours
at most and the indicator (red) goes off automatically.
Use the micro-USB cable supplied. You may not be able to charge the unit with
other cables.
One-touch connection with a smartphone (NFC)
Refer to the “Pairing and connecting with the BLUETOOTH
device” section to connect to a BLUETOOTH device that
is not compatible with the one-touch connection (NFC
function).
NFC (Near Field Communication) is a technology enabling short-range
wireless communication between various devices, such as mobile
phones and IC tags. Thanks to the NFC function, data communication
can be achieved easily just by touching the relevant symbol or
designated location on NFC compatible devices.
By using the NFC function, the unit is turned on automatically and then
paired and connected with a BLUETOOTH device.
Compatible smartphones
ˎ
ˎ
Smartphones with the NFC function built-in
(OS: Android 2.3.3 or later, excluding Android 3.x)
Preparation on the smartphone
1 Download and install the app “NFC Easy Connect” on the
smartphone.
Access the following Web site:
https://play.google.com/store/apps/
details?id=com.sony.easyconnect
By the two-dimensional code:
Use a two-dimensional code reader app.
Tip
If your smartphone has an NFC function, such as that of Android 4.1 or later,
you may not need to install “NFC Easy Connect” to connect the unit with
your smartphone by one touch. In that case, you do not need to perform this
step. The operation and specifications may be different from the description
here. For details, refer to the manual supplied with your smartphone.
2 Set the smartphone so that the NFC function can be used.
For details, refer to the instructions of the smartphone.
About “NFC Easy Connect” App
“NFC Easy Connect” is Sony’s original app for Android Phone available
at Google Play Store.
To find out more about the functions, search for “NFC Easy Connect”
and download the free app.
The App may not be available in some countries and/or regions.
Connecting with the smartphone by one-
touch functions
By touching the unit with the smartphone, the unit is turned on
automatically and then proceeds to pairing and BLUETOOTH connection.
1
Unlock the screen of the smartphone.
If you installed the app “NFC Easy Connect” in the smartphone, start
the app “NFC Easy Connect.”
2
Touch this unit with the smartphone.
Touch the smartphone on the N marked part of this unit.
Refer to the manual of the smartphone for the designated location to
be touched on the smartphone.
Follow the on-screen instructions to complete the connection.
To disconnect, touch the smartphone again.
You can select the sound from other NFC compatible BLUETOOTH
devices. For details, refer to the Help Guide.
Listening and Calling
Operate the unit after making BLUETOOTH connection with your BLUETOOTH
device.
Listening to music
Profile: A2DP, AVRCP
Start playback on the BLUETOOTH device.
VOLUME −
The left unit of the headset has a
tactile dot.
Play/pause: Press
.
Stop: Hold
down.
Next/previous: Press
/
.
Fast forward/fast reverse:
Hold
/
down.
Note
The available functions may vary depending on the BLUETOOTH device. When
you operate the button illustrated above, it may operate differently or may not
work at all.
The sound quality is set to the standard mode (SBC high quality mode) before
shipment. When you connect a BLUETOOTH device compatible with AAC or
aptX, you can change the setting as described in the Help Guide to enjoy music
playback at a higher level of sound quality.
Making a call/Receiving a call
Profile: HSP, HFP
Operate your mobile phone to make a call.
Press the button on the unit when an incoming call arrives.
Operate in the same way when an incoming call arrives while you are
listening to the music.
The music playback pauses during a call and resumes automatically when
the call is over.
Note
Music playback may not resume automatically with some BLUETOOTH devices.
To terminate a call, press the button on the unit again.
Volume for a call and listening to music can be adjusted
independently.
Using the unit by connecting the supplied
cord
You can use the unit as ordinary wired noise canceling
headphones by connecting the supplied cord.
Supplied cord
Notes
ˎ
ˎ
Make sure you insert the plug firmly.
ˎ
ˎ
The BLUETOOTH function is disabled.
ˎ
ˎ
/−,
/
and
/
buttons cannot be used.
Using the noise canceling
Enter the noise canceling mode on this unit.
POWER
NC
Press and hold the POWER button for about 2 seconds when the unit is
turned off. When the unit and the noise canceling function have turned on,
the NC button lights up. The noise canceling mode is set to NC mode B.
To turn off the noise canceling function
ˎ
ˎ
When using via the BLUETOOTH connection: Press the NC button. NC button
goes off. (To turn on the function, press the NC button again.)
ˎ
ˎ
When the supplied cord is connected: Press the POWER button for more than
2 seconds. (The power and the noise canceling function is turned off.)
Using the AI noise canceling
AI Noise Canceling is a useful function that automatically selects one of
the noise canceling modes. This function provides the most effective noise
canceling mode by immediately analyzing ambient sound components.
Press and hold the NC button.
NC
When the unit is on, press and hold the NC button until beep
sounds come from the headphones. The unit starts analyzing
ambient sound components (approx. 3 seconds).
During analysis, sound volume from the headphones is
lowered and NC button blinks.
When analysis is completed, the most effective noise
canceling mode is set automatically, and sound volume from
the headphones returns to the normal.
Noise canceling mode types
NC Mode A:
Reduces noise containing a large amount of middle to low
frequency sounds. Ambient noise in the environment is
effectively reduced.
NC Mode B:
Reduces noise containing a large amount of super low
frequency sounds. For example, background noise heard
mainly on a bus or a train is effectively reduced.
NC Mode C:
Reduces noise of relatively quiet and wide range of
frequency sounds. Background noise mainly present in
an office environment (PCs, copiers, etc.) is effectively
reduced.
After use
1 Terminate the BLUETOOTH connection by operating the
BLUETOOTH device.
2 Press and hold the POWER button for about 2 seconds.
The indicator (blue) goes off and the headset turns off.
Pairing and connecting with the BLUETOOTH device
Before pairing, charge this unit.
1
Place the BLUETOOTH device within 1 meter of this unit.
2
Enter pairing mode on this unit.
Blue
Red
Press and hold the POWER
button for more than
7 seconds.
Make sure that the indicator flashes
blue and red alternately after you
release the button.
3
Perform the pairing procedure on the BLUETOOTH device
to detect this unit.
When the list of detected devices appears on the display of the
BLUETOOTH device, select “MDR-ZX750BN.”
If passkey input is required on the display of a BLUETOOTH device,
input “0000.”
4
Make the BLUETOOTH connection from the BLUETOOTH
device.
Connecting with the paired device
1
Turn on the unit.
Blue
Press and hold the POWER
button for about 2 seconds
while this unit is turned off.
Make sure that the indicator flashes
blue after you release the button.
2
Make the BLUETOOTH connection from the BLUETOOTH
device.
On how to operate the unit in detail, please read
the Help Guide on your computer or smartphone.
http://rd1.sony.net/help/mdr/zx750bn/
ce/
ˎ
ˎ
The BLUETOOTH word mark and logos are owned by the Bluetooth SIG, Inc.
and any use of such marks by Sony Corporation is under license.
ˎ
ˎ
The N Mark is a trademark or registered trademark of NFC Forum, Inc. in the
United States and in other countries.
ˎ
ˎ
Android is a trademark of Google Inc.
ˎ
ˎ
The aptX® mark and the aptX logo are trade marks of CSR plc or one of its
group companies and may be registered in one or more jurisdictions.
ˎ
ˎ
Other trademarks and trade names are those of their respective owners.
Français
Chargement de l’appareil
Après avoir démarré l’ordinateur, raccordez-le ainsi que l’appareil à l’aide
du câble micro-USB fourni.
Une fois l’appareil et l’ordinateur raccordés, le chargement démarre
et le témoin (rouge) s’allume. Le chargement dure environ 2,5 heures
au maximum et le témoin (rouge) s’éteint automatiquement.
Utilisez le câble micro-USB fourni. Vous risquez de ne pas pouvoir charger
l’appareil avec d’autres câbles.
Connexion par simple contact avec un smartphone
(NFC)
Reportez-vous à la section « Pairage et connexion avec
le périphérique BLUETOOTH » pour vous connecter à un
périphérique BLUETOOTH qui n’est pas compatible avec la
connexion par simple contact (fonction NFC).
NFC (Near Field Communication) est une technologie permettant
d’établir une communication sans fil à courte portée entre divers
périphériques, tels que des téléphones portables et des étiquettes
électroniques. Grâce à la fonction NFC, la communication de données
peut être réalisée facilement en touchant simplement le symbole
pertinent ou l’emplacement désigné sur les périphériques compatibles
avec NFC.
À l’aide de la fonction NFC, l’appareil est mis automatiquement sous
tension, puis apparié et connecté à un périphérique BLUETOOTH.
Smartphones compatibles
ˎ
ˎ
Smartphones avec la fonction NFC intégrée
(SE : Android 2.3.3 ou ultérieur, sauf Android 3.x)
Préparation sur le smartphone
1 Téléchargez et installez l’application « Connexion NFC
facile » sur le smartphone.
Consultez le site Web suivant :
https://play.google.com/store/apps/details?id=com.
sony.easyconnect
Par code en deux dimensions :
Utilisez une application de lecture de code en deux
dimensions.
Conseil
Si votre smartphone est équipé d’une fonction NFC, telle que Android 4.1 ou
version ultérieure, il n’est peut-être pas nécessaire d’installer « Connexion
NFC facile » pour connecter l’appareil à votre smartphone par simple contact.
Dans ce cas, il est inutile d’exécuter cette étape. Le fonctionnement et les
spécifications peuvent différer de la présente description. Pour obtenir des
détails, reportez-vous au manuel fourni avec votre smartphone.
2 Réglez le smartphone pour que la fonction NFC puisse
être utilisée.
Pour plus de détails, consultez les instructions du smartphone.
À propos de l’application « Connexion NFC facile »
« Connexion NFC facile » est une application Sony originale pour
Android disponible sur Google Play Store.
Pour en savoir plus sur ces fonctions, cherchez « Connexion NFC facile »
et téléchargez l’application gratuite.
Il est possible que l’application ne soit pas disponible dans certains
pays et/ou dans certaines régions.
Connexion avec le smartphone à l’aide
des fonctions par simple contact
La mise en contact de l’appareil avec le smartphone met
automatiquement l’appareil sous tension, puis celui-ci procède au pairage
et à la connexion BLUETOOTH.
1
Déverrouillez l’écran du smartphone.
Si vous avez installé l’application « Connexion NFC facile » dans le
smartphone, démarrez l’application « Connexion NFC facile ».
2
Mettez l’appareil en contact avec le smartphone.
Placez le smartphone sur la partie marquée d’un N sur l’appareil.
Pour savoir quel emplacement toucher sur le smartphone, reportez-
vous au manuel du smartphone.
Suivez les instructions à l’écran pour terminer la connexion.
Pour déconnecter, mettez de nouveau le smartphone en contact avec
l’appareil.
Vous pouvez sélectionner le son à partir d’autres périphériques
BLUETOOTH compatibles NFC. Pour plus de détails, reportez-vous au
Manuel d’aide.
Écoute et appel
Utilisez l’appareil après avoir établi la connexion BLUETOOTH avec votre
périphérique BLUETOOTH.
Écoute de musique
Profil : A2DP, AVRCP
Démarrez la lecture sur le périphérique BLUETOOTH.
VOLUME −
L’écouteur gauche du casque
comporte un point tactile.
Lecture/pause : appuyez sur
.
Arrêt : maintenez la touche
enfoncée.
Suivant/précédent : appuyez sur
/
.
Avance rapide/retour rapide :
maintenez les touches
/
enfoncées.
Remarque
Les fonctions disponibles peuvent varier selon le périphérique BLUETOOTH
utilisé. Lorsque vous appuyez sur la touche illustrée ci-dessus, elle peut
effectuer différentes fonctions ou ne pas fonctionner du tout.
La qualité sonore est définie en mode standard (mode haute qualité SBC) en
usine. Lorsque vous connectez un périphérique BLUETOOTH compatible avec
AAC ou aptX, vous pouvez modifier le réglage, comme décrit dans le Manuel
d’aide pour écouter de la musique à un niveau de qualité sonore plus élevé.
Passer un appel/Recevoir un appel
Profil : HSP, HFP
Utilisez votre téléphone portable pour passer un appel.
Appuyez sur le bouton sur l’appareil lors d’un appel entrant.
Procédez de la même façon lors d’un appel entrant tandis que vous
écoutez de la musique.
La lecture s’interrompt lors d’un appel et reprend automatiquement une
fois l’appel terminé.
Remarque
La lecture de musique peut ne pas reprendre automatiquement avec certains
périphériques BLUETOOTH.
Pour mettre fin à un appel, appuyez à nouveau sur le bouton
sur l’appareil.
Vous pouvez régler de manière indépendante le volume d’un
appel et celui de la musique lue.
Utilisation de l’appareil à l’aide du cordon
fourni
Pour utiliser l’appareil comme un casque d’écoute antibruit filaire
classique, raccordez le cordon fourni.
Cordon fourni
Remarques
ˎ
ˎ
Veillez à insérer fermement la fiche.
ˎ
ˎ
La fonction BLUETOOTH est désactivée.
ˎ
ˎ
Les boutons /−,
/
et
/
ne peuvent pas être utilisés.
Utilisation de la fonction antibruit
Sélectionnez le mode antibruit sur cet appareil.
POWER
NC
Appuyez sur le bouton POWER et maintenez-le enfoncé environ
2 secondes lorsque l’appareil est hors tension. Lorsque l’appareil et la
fonction antibruit sont activés, le bouton NC s’allume. Le mode antibruit
est réglé sur NC, mode B.
Pour désactiver la fonction antibruit
ˎ
ˎ
Via une connexion BLUETOOTH : Appuyez sur le bouton NC. Le bouton NC
disparaît. (Pour activer la fonction, appuyez à nouveau sur le bouton NC.)
ˎ
ˎ
Si le cordon fourni est raccordé : Appuyez sur le bouton POWER plus de
2 secondes. (L’alimentation et la fonction antibruit sont désactivées.)
Utilisation de la fonction antibruit AI
La fonction antibruit AI est utile et permet de sélectionner
automatiquement l’un des modes antibruit proposés. Cette fonction
offre le mode antibruit le plus efficace en analysant immédiatement les
composants sonores ambiants.
Appuyez sur le bouton NC et maintenez-le enfoncé.
NC
Lorsque l’appareil est allumé, appuyez sur le bouton NC et
maintenez-le enfoncé jusqu’à ce que le casque d’écoute
émette un bip. L’appareil commence à analyser les
composants sonores ambiants (environ 3 secondes).
Lors de l’analyse, le volume sonore du casque d’écoute est
plus faible et le bouton NC clignote.
Une fois l’analyse terminée, le mode antibruit le plus efficace
est défini automatiquement et le volume sonore du casque
d’écoute est rétabli à son niveau normal.
Types de mode antibruit
Mode A NC :
Réduit le bruit contenant de nombreux sons de moyenne
à basse fréquence. Le bruit ambiant de l’environnement
est efficacement réduit.
Mode B NC :
Réduit le bruit contenant de nombreux sons de très basse
fréquence. Par exemple, le bruit de fond perçu principalement
depuis un bus ou un train est efficacement réduit.
Mode C NC :
Réduit le bruit d’une large gamme de sons relativement
bas. Dans un environnement bureautique, le bruit de fond
(ordinateurs, copieurs, etc.) est efficacement réduit.
Après utilisation
1 Mettez fin à la connexion BLUETOOTH en utilisant le
périphérique BLUETOOTH.
2 Appuyez sur le bouton POWER et maintenez-le enfoncé
environ 2 secondes.
Le témoin (bleu) s’éteint et le casque est mis hors tension.
Pairage et connexion avec le périphérique
BLUETOOTH
Avant le pairage, chargez l’appareil.
1
Placez le périphérique BLUETOOTH dans un rayon de
1 mètre de l’appareil.
2
Entrez en mode de pairage sur l’appareil.
Bleu Rouge
Appuyez sur le bouton
POWER et maintenez-le
enfoncé pendant plus de 7
secondes.
Vérifiez que le témoin clignote
alternativement en bleu et en rouge
lorsque vous relâchez le bouton.
3
Effectuez la procédure de pairage sur le périphérique
BLUETOOTH pour détecter cet appareil.
Lorsque la liste de périphériques détectés apparaît sur l’écran du
périphérique BLUETOOTH, sélectionnez « MDR-ZX750BN ».
Si un code est demandé sur l’écran d’un périphérique BLUETOOTH,
saisissez « 0000 ».
4
Établissez la connexion BLUETOOTH à partir du
périphérique BLUETOOTH.
Connexion au périphérique apparié
1
Mettez l’appareil sous tension.
Bleu
Appuyez sur le bouton POWER
et maintenez-le enfoncé
environ 2 secondes lorsque
l’appareil est hors tension.
Vérifiez que le témoin clignote en
bleu lorsque vous relâchez le bouton.
2
Établissez la connexion BLUETOOTH à partir du
périphérique BLUETOOTH.
Pour des détails sur le fonctionnement de
l’appareil, veuillez lire le Manuel d’aide sur votre
ordinateur ou votre smartphone.
http://rd1.sony.net/help/mdr/zx750bn/
ce/
ˎ
ˎ
La marque de mot BLUETOOTH et les logos sont la propriété de Bluetooth SIG,
Inc. et l’utilisation de ces marques par Sony Corporation est effectuée sous
licence.
ˎ
ˎ
N Mark est une marque commerciale ou une marque déposée de NFC Forum,
Inc. aux États-Unis et dans d’autres pays.
ˎ
ˎ
Android est une marque commerciale de Google Inc.
ˎ
ˎ
La marque aptX® et le logo aptX sont des marques commerciales de CSR plc
ou d’une des sociétés de son groupe, et ils peuvent être déposés dans une ou
plusieurs juridictions.
ˎ
ˎ
Les autres marques commerciales et noms commerciaux appartiennent à leurs
propriétaires respectifs.
Deutsch
Laden des Geräts
Verbinden Sie das Gerät und den hochgefahrenen Computer mit dem
mitgelieferten micro-USB-Kabel.
Sobald das Gerät und der Computer miteinander verbunden sind,
beginnt der Ladevorgang und die (rote) Anzeige leuchtet auf. Das
Aufladen ist nach etwa höchstens 2,5 Stunden abgeschlossen, und
die (rote) Anzeige erlischt automatisch.
Verwenden Sie das mitgelieferte micro-USB-Kabel. Das Gerät kann mit anderen
Kabeln möglicherweise nicht geladen werden.
One-touch connection mit einem Smartphone
(NFC)
Lesen Sie im Abschnitt „Pairing und Verbindung mit
dem BLUETOOTH-Gerät“ nach, um ein BLUETOOTH-Gerät
anzuschließen, das nicht mit der One-touch connection
(NFC-Funktion) kompatibel ist.
NFC (Near Field Communication) ist eine Technologie, die auf kurze
Distanz eine drahtlose Kommunikation zwischen verschiedenen
Geräten wie beispielsweise Mobiltelefonen und IC Tags ermöglicht.
Durch die NFC-Funktion lässt sich völlig unkompliziert eine
Datenübertragung vornehmen, indem einfach das relevante Symbol
oder die dafür vorgesehene Position an NFC-kompatiblen Geräten
berührt wird.
Mithilfe der NFC-Funktion wird das Gerät automatisch eingeschaltet
und dann mit einem BLUETOOTH-Gerät über das Pairing gekoppelt und
verbunden.
Kompatible Smartphones
ˎ
ˎ
Smartphones mit integrierter NFC-Funktion
(Betriebssystem: Android 2.3.3 oder höher, außer
Android 3.x)
Vorbereitung des Smartphones
1 Laden Sie die App „NFC-Schnellverbindung“ auf das
Smartphone herunter und installieren Sie sie.
Rufen Sie die folgende Website auf:
https://play.google.com/store/apps/details?id=com.
sony.easyconnect
Über den zweidimensionalen Code:
Verwenden Sie eine App zum Lesen von
zweidimensionalen Codes.
Tipp
Wenn Ihr Smartphone über eine NFC-Funktion verfügt, wie zum Beispiel
von Android 4.1 oder höher, müssen Sie „NFC-Schnellverbindung“
möglicherweise nicht installieren, um das Gerät mit einer Berührung mit
dem Smartphone zu verbinden. In diesem Fall müssen Sie diesen Schritt
nicht ausführen. Die Bedienung und die technischen Daten können
von der vorliegenden Beschreibung abweichen. Sie finden ausführliche
Informationen hierzu im Begleithandbuch Ihres Smartphones.
2 Stellen Sie das Smartphone so ein, dass die NFC-Funktion
genutzt werden kann.
Sie finden ausführliche Informationen hierzu in der
Bedienungsanleitung des Smartphone.
App „NFC-Schnellverbindung“
„NFC-Schnellverbindung“ ist eine Original-App von Sony für das
Android Phone, die im Google Play Store erhältlich ist.
Wenn Sie weitere Informationen zu den Funktionen wünschen, suchen
Sie nach „NFC-Schnellverbindung“, und laden Sie die kostenlose App
herunter.
In manchen Ländern oder Regionen steht diese Anwendung
möglicherweise nicht für den Download zur Verfügung.
Herstellen einer Verbindung zum
Smartphone mit One-touch functions
Wenn das Gerät mit dem Smartphone berührt wird, schaltet es sich
automatisch ein und fährt anschließend mit dem Pairing und der
BLUETOOTH-Verbindung fort.
1
Entsperren Sie den Bildschirm des Smartphones.
Wenn Sie die App „NFC-Schnellverbindung“ auf dem Smartphone
installiert haben, starten Sie die App „NFC-Schnellverbindung“.
2
Berühren Sie dieses Gerät mit dem Smartphone.
Berühren Sie mit dem Smartphone den dem mit N gekennzeichneten
Bereich dieses Geräts.
Informationen zu der zu berührenden Position Ihres Smartphones
finden Sie in der Bedienungsanleitung.
Befolgen Sie die angezeigten Anweisungen, um die Verbindung
herzustellen.
Wenn Sie die Verbindung trennen möchten, berühren Sie das
Smartphone erneut.
Sie können den Sound von anderen NFC-kompatiblen BLUETOOTH-
Geräten wählen. Einzelheiten entnehmen Sie der Hilfe.
Wiedergeben von Musik und Telefonieren
Bedienen Sie das Gerät, sobald eine BLUETOOTH-Verbindung mit Ihrem
BLUETOOTH-Gerät besteht.
Wiedergeben von Musik
Profil: A2DP, AVRCP
Starten Sie die Wiedergabe am BLUETOOTH-Gerät.
VOLUME −
Die linke Einheit des Headsets
weist einen deutlich spürbaren
Punkt auf.
Wiedergabe/Pause: Drücken Sie
.
Stopp: Halten Sie
gedrückt.
Vorwärts/Zurück: Drücken Sie
/
.
Schneller Vorlauf/schneller Rücklauf:
Halten Sie
/
gedrückt.
Hinweis
Die verfügbaren Funktionen können abhängig vom BLUETOOTH-Gerät variieren.
Wenn Sie die oben abgebildete Taste bedienen, kann sie anders reagieren oder
möglicherweise überhaupt nicht reagieren.
Die Klangqualität wird standardmäßig vor der Auslieferung auf den
Standardmodus (SBC-High-Quality-Modus) eingestellt. Wenn Sie ein
BLUETOOTH-Gerät anschließen, das mit AAC oder aptX kompatibel ist, können
Sie die Einstellung wie in der Hilfe beschrieben ändern, um die Musikwiedergabe
mit einer besseren Klangqualität zu genießen.
© 2014 Sony Corporation Printed in Malaysia
MDR-ZX750BN
Wireless
Noise Canceling
Stereo Headset
4-479-125-
41
(1)
Anrufen/Entgegennehmen eines Anrufs
Profil: HSP, HFP
Wenn Sie einen Anruf tätigen möchten, müssen Sie Ihr
Mobiltelefon bedienen.
Drücken Sie die Taste am Gerät, wenn Sie einen Anruf
erhalten.
Wenn Sie während der Wiedergabe von Musik einen Anruf erhalten, gehen
Sie ebenso vor.
Während eines Anrufs wird die Musikwiedergabe angehalten und
automatisch fortgesetzt, sobald der Anruf beendet ist.
Hinweis
Die Musikwiedergabe wird bei manchen BLUETOOTH-Geräten möglicherweise
nicht automatisch fortgesetzt.
Drücken Sie zum Beenden eines Anrufs erneut die Taste am
Gerät.
Die Lautstärke für einen Anruf und für die Musikwiedergabe kann
jeweils separat angepasst werden.
Verwenden des Geräts durch Anschluss
des mitgelieferten Kabels
Wenn Sie das mitgelieferte Kabel anschließen, können
Sie die Kopfhörer auch als verkabelte Kopfhörer mit
Rauschunterdrückung einsetzen.
Mitgeliefertes Kabel
Hinweise
ˎ
ˎ
Sie müssen den Stecker fest einfügen.
ˎ
ˎ
Die BLUETOOTH-Funktion ist deaktiviert.
ˎ
ˎ
Die Tasten /−,
/
und
/
können nicht verwendet werden.
Verwendung der Rauschunterdrückung
Schalten Sie den Rauschunterdrückungsmodus der Kopfhörer ein.
POWER
NC
Halten Sie bei ausgeschalteten Kopfhörern die POWER-Taste
etwa 2 Sekunden lang gedrückt. Wenn die Kopfhörer und die
Rauschunterdrückung eingeschaltet wurden, leuchtet die NC-Taste auf. Der
Rauschunterdrückungmodus ist auf NC-Modus B eingestellt.
So schalten Sie die Rauschunterdrückung aus
ˎ
ˎ
Bei Verwendung einer BLUETOOTH-Verbindung: Drücken Sie die NC-Taste. Die
NC-Taste erlischt. (Um die Funktion einzuschalten, drücken Sie die NC-Taste
erneut.)
ˎ
ˎ
Bei Verwendung des mitgelieferten Kabels: Halten Sie die POWER-Taste mehr
als 2 Sekunden lang gedrückt. (Die Kopfhörer und die Rauschunterdrückung
werden ausgeschaltet.)
Verwendung der Al-Rauschunterdrückung
Die AI-Rauschunterdrückung ist eine praktische Funktion, bei der
automatisch einer der Rauschunterdrückungmodi gewählt wird. Diese
Funktion bietet den effizientesten Rauschunterdrückungmodus, da die
Umweltgeräuschkomponenten unmittelbar analysiert werden.
Halten Sie die NC-Taste gedrückt.
NC
Halten Sie die NC-Taste bei eingeschaltetem Gerät gedrückt,
bis der Kopfhörer ein akustisches Signal ausgibt. Das Gerät
beginnt, die Umweltgeräuschkomponenten zu analysieren
(ca. 3 Sekunden).
Während der Analyse wird der Lautstärkepegel des
Kopfhörers gesenkt und die NC-Taste blinkt.
Sobald die Analyse abgeschlossen ist, wird der effektivste
Rauschunterdrückungmodus automatisch gewählt und der
Lautstärkepegel des Kopfhörers wird wieder auf den zuvor
eingestellten Wert angehoben.
Rauschunterdrückungmodi
NC-Modus A:
Senkt Geräusche, die aus vielen mittel- bis
niederfrequenten Tönen bestehen. Die
Umgebungsgeräusche werden wirkungsvoll reduziert.
NC-Modus B:
Senkt Geräusche, die aus vielen sehr niederfrequenten
Tönen bestehen. Beispielsweise Hintergrundgeräusche,
die hauptsächlich in einem Bus oder Zug zu hören sind,
werden effektiv gesenkt.
NC-Modus C:
Senkt die Geräusche relativ leiser Töne und eines breiten
Frequenzbereichs. Hintergrundgeräusche, wie sie
hauptsächlich in einer Büroumgebung (PC, Kopierer usw.)
anzutreffen sind, werden effektiv reduziert.
Nach der Verwendung
1 Beenden Sie die BLUETOOTH-Verbindung durch Bedienen
des BLUETOOTH-Geräts.
2 Halten Sie die POWER-Taste etwa 2 Sekunden lang gedrückt.
Die (blaue) Anzeige erlischt, und das Headset wird abgeschaltet.
Pairing und Verbindung mit dem BLUETOOTH-
Gerät
Vor dem Pairing muss dieses Gerät geladen werden.
1
Platzieren Sie das BLUETOOTH-Gerät maximal 1 m von
diesem Gerät entfernt.
2
Wechseln Sie an diesem Gerät in den Pairing-Modus.
Blau
Rot
Halten Sie die Taste POWER
mehr als 7 Sekunden
gedrückt.
Nach dem Loslassen der Taste muss
die Anzeige abwechselnd blau und
rot blinken.
3
Führen Sie den Pairing-Prozess bei dem BLUETOOTH-
Gerät durch, so dass es dieses Gerät erkennt.
Wenn die Liste der erkannten Geräte im Display des BLUETOOTH-
Geräts angezeigt wird, wählen Sie „MDR-ZX750BN“ aus.
Wenn Sie im Display des BLUETOOTH-Geräts zur Eingabe eines
Passworts aufgefordert werden, geben Sie „0000“ ein.
4
Starten Sie am BLUETOOTH-Gerät das Herstellen der
BLUETOOTH-Verbindung.


