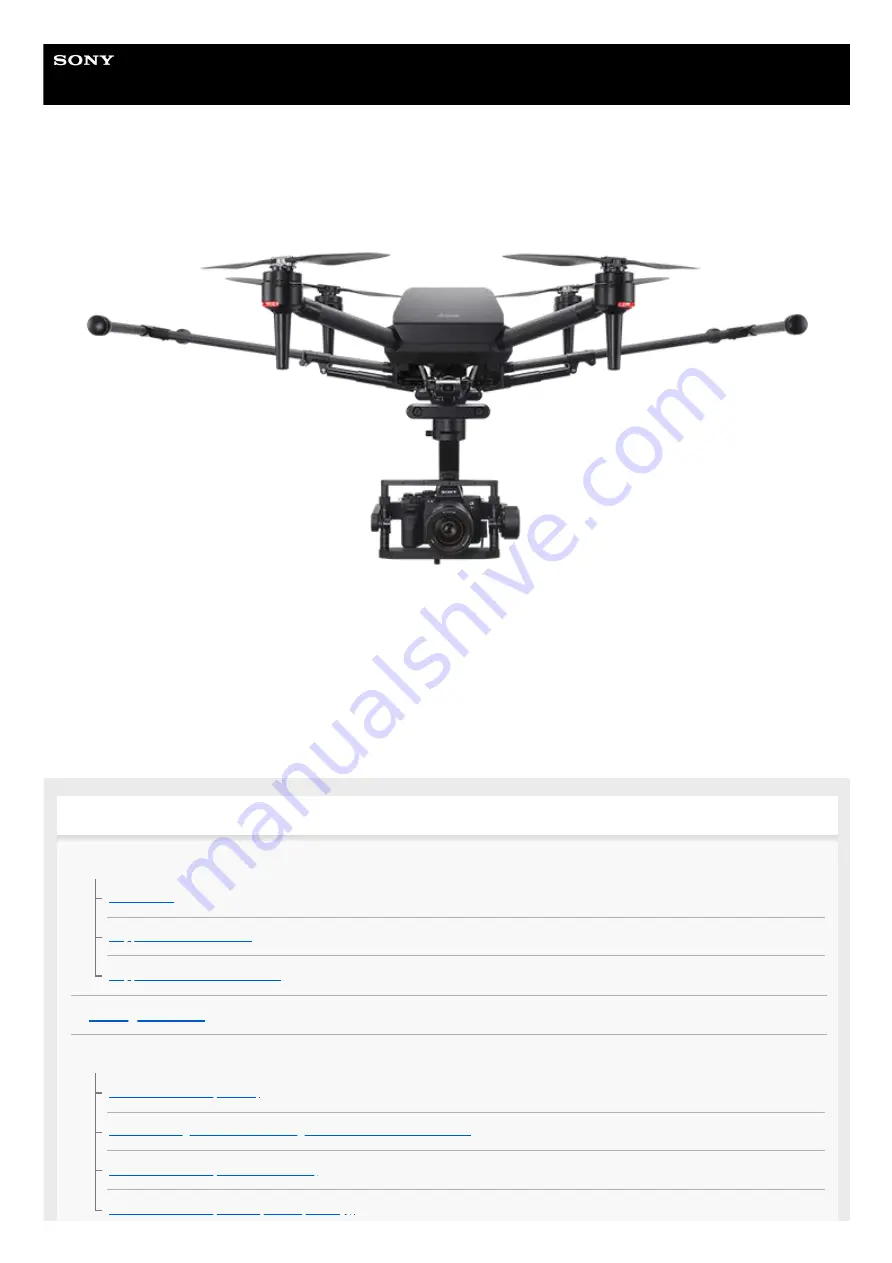
background image

Help Guide

Airpeak S1

ARS-S1

This manual explains the basic usage of ARS-S1.

Operating an aircraft in the United States is subject to federal law and regulations. State and local ordinances may also
apply to certain operations. When operating an aircraft, it is the remote pilot/operator's responsibility to always comply
with applicable laws, regulations, and ordinances.

Before first use

About this product

Introduction

Supported mobile devices

Supported cameras and lenses

Package contents

Guide to parts and controls

Parts and controls (Aircraft)

Detection range of the infrared range sensors and stereo cameras

Parts and controls (Remote controller)

Parts and controls (Gimbal (sold separately))

1

Summary of Contents for ARS-S1

Page 1: ...aircraft it is the remote pilot operator s responsibility to always comply with applicable laws regulations and ordinances Before first use About this product Introduction Supported mobile devices Supported cameras and lenses Package contents Guide to parts and controls Parts and controls Aircraft Detection range of the infrared range sensors and stereo cameras Parts and controls Remote controller...

Page 2: ...onnecting cables to the aircraft Attaching the damping plate to the aircraft Attaching landing gear Attaching the propellers Preparing the gimbal and a camera Mounting the gimbal on the aircraft Configuring settings on the camera Mounting a camera on the gimbal Connecting cables between the camera and gimbal Adjusting the balance of the gimbal Adjusting the gimbal parameters Preparing the remote c...

Page 3: ...sibilities Flight environment Airspace flight restricted functions Preflight checks Precautions during flights Making a flight plan Creating projects and missions Setting the flight area for a project Setting geofences Setting a flight path mission Viewing flight logs Creating a new mission using a flight log Turning the power on off Turning the aircraft on off Turning the remote controller on off...

Page 4: ...Home Landing gear operation Executing an emergency motor stop Shooting Relationship between the remote controller and the flight screen Parts for shooting operations Maintaining the devices Checking the status of the devices Calibrating the sensors of the aircraft Calibrating the remote controller Updating the system software Before disposing of this product Precautions General Information Trouble...

Page 5: ...flows with automation Create sophisticated flight plans with the web app Airpeak Base Besides automated flights based on flight plans you can use past flight logs to automatically fly the same routes you have flown System configuration This product consists of the following Aircraft A camera can be mounted using a 3 axis gimbal sold separately hereafter gimbal Remote controller dedicated mobile ap...

Page 6: ...eak Base Airpeak Plus and any other Airpeak or third party network services content operating systems or software are subject to terms and conditions and may be changed interrupted or discontinued at any time Fees registration and credit card information may also be required Screen images and illustrations in this Help Guide web manual may vary from the actual product Design and specifications are...

Page 7: ...peak S1 ARS S1 Supported mobile devices Visit the support site for details on mobile devices you can use https electronics sony com airpeak support compatibility 5 027 737 11 1 Copyright 2021 Sony Group Corporation 7 ...

Page 8: ... ARS S1 Supported cameras and lenses Visit the support site for details on camera bodies and lenses you can use https electronics sony com airpeak support compatibility 5 027 737 11 1 Copyright 2021 Sony Group Corporation 8 ...

Page 9: ...s Contact the place of purchase or Sony Customer Support if any components are missing Quantities are indicated in parentheses Note Please retain the cushionings as they will be used when assembling the aircraft Bottom cushioning Top cushioning 9 ...

Page 10: ...AC adapter for remote controller 1 power cord 1 1 Remote controller 1 2 Battery pack 2 3 Aircraft 1 4 Cables Power cable aircraft gimbal 1 Control cable aircraft gimbal 1 5 10 ...

Page 11: ...icro USB cable gimbal camera 1 a Micro USB USB Type C cable gimbal camera 1 b USB Type C AC adapter for battery charger 1 power cord 1 6 Battery charger 1 7 Calibration board 1 8 Landing gear 2 9 Propeller CW clockwise rotation 2 1 10 11 ...

Page 12: ... cable gimbal computer 1 Hot shoe extension 1 Hex screw 10 including two spare screws Hex wrench 1 5 027 737 11 1 Copyright 2021 Sony Group Corporation c Hub silver Propeller CCW counterclockwise rotation 2 1 d Hub black 11 Startup Guide 1 Warranty 1 12 Not capable of being folded 1 Quick release is preinstalled 1 12 ...

Page 13: ...Help Guide Airpeak S1 ARS S1 Parts and controls Aircraft The locations of the parts and controls of the aircraft are shown below Front Rear 13 ...

Page 14: ...rom this camera are displayed in the FPV view in the Airpeak Flight App 7 Forward facing stereo camera Detects objects in front and measures the distance to them 8 Camera sold separately 9 Landing gear 10 Gimbal Main gimbal sold separately 11 Side facing stereo cameras Detect objects on the left and right and measure the distance to them 12 GNSS Global Navigation Satellite System antenna built in ...

Page 15: ...t status LEDs Rear LEDs Indicate the status of the aircraft Status notifications Warning notifications 19 LED color LED indication Status of the aircraft Green yellow and red Blinking alternately The aircraft is starting up Green Blinking slowly GNSS Global Navigation Satellite System signals are being used for positioning Green Blinking twice repeatedly The Vision Positioning is being used for po...

Page 16: ... signal from the remote controller has been lost Red Blinking twice repeatedly The battery level of the aircraft is low Red Blinking fast The battery level of the aircraft is almost depleted Red Lit up A fatal error has occurred If the aircraft is in flight land it immediately Backward facing stereo camera Detects objects to the rear and measures the distance to them 20 Downward facing stereo came...

Page 17: ... to them Note To ensure flight stability and safety do not block the infrared range sensors or stereo cameras Detection range of the infrared range sensors The detection range of the infrared range sensors is as shown in the illustrations below Objects in the gray areas in the illustrations are outside the detection range which means they cannot be detected Be cautious when you fly the aircraft Si...

Page 18: ...meras is as shown in the illustrations below Objects in the gray areas in the illustrations are outside the detection range which means they cannot be detected Be cautious when you fly the aircraft Front view a 80 b 54 m Side view The left side is the front of the aircraft a 80 b 54 m Top view 18 ...

Page 19: ... a 80 b 54 m Related Topic Parts and controls Aircraft Calibrating the sensors of the aircraft 5 027 737 11 1 Copyright 2021 Sony Group Corporation 19 ...

Page 20: ...Help Guide Airpeak S1 ARS S1 Parts and controls Remote controller The locations of the parts and controls of the remote controller are shown below 20 ...

Page 21: ...as occurred in the remote controller Yellow Blinking There has been no operation for more than 5 minutes The remote controller will enter a standby state if you leave it without performing any operation Cyan Lit up In the system software transfer mode Cyan Blinking twice repeatedly Waiting for the completion of linking with the aircraft Green red and yellow Blinking alternately Updating system sof...

Page 22: ...50 One lit up Approx 25 Blinking fast Low Off None Control sticks Control the aircraft and gimbal sold separately 7 Lever heads The lever heads of this product are compatible with the following product Manufacturer Futaba Corporation Part Number EBT2277 Part Name Gold Stick Ends URL https futabausa com product ebt2277 8 Mobile device holder Mount the mobile device on which you have installed the A...

Page 23: ...posure index of the camera sold separately by turning the control dial after pressing this button 18 Control dial Adjusts the aperture value F value of the camera 19 Antenna built in 20 C3 Custom 3 button Assign the desired function to this button in the setting menu of the Airpeak Flight App The following functions are assigned by default Adjust the shutter speed of the camera by turning the cont...

Page 24: ...ons of the parts and controls of the gimbal sold separately are shown below Pan motor 1 Pan adjustment 2 Tilt top bar 3 Tilt vertical adjustment 4 Tilt front back adjustment 5 Tilt motor 6 Roll motor 7 Top camera screw 8 Status LED 9 LED color LED indication Status of the gimbal 24 ...

Page 25: ...nking Under calibration White Lit up Starting the motor or IMU Yellow Blinking The motor or IMU is in a standby state Green Blinking In the lock mode 2 Green Lit up In the follow mode 3 Blue Blinking The gimbal is starting up so it cannot accept remote operations Purple Blinking Being operated remotely IMU Inertial Measurement Unit 1 Lock mode The camera orientation shooting direction will remain ...

Page 26: ...Airpeak Plus and any other Airpeak or third party network services content operating systems or software are subject to terms and conditions and may be changed interrupted or discontinued at any time Fees registration and credit card information may also be required The Airpeak Base App Home page The items displayed on the App Home page are described below Some functions of this app may include pa...

Page 27: ... screen Based on the log information from the Airpeak Flight App the aircrafts and remote controllers used for flights are automatically displayed and can be managed 7 Projects Click to display the Projects screen You can manage a flight plan consisting of multiple missions and geofences as a project 8 Logbook Click to display the Logbook screen You can check flight logs that record the flight pat...

Page 28: ...t the terms of use and privacy policy Carefully read and agree to the terms of use and privacy policy displayed during the initial setup process before proceeding Airpeak Flight Airpeak Base Airpeak Plus and any other Airpeak or third party network services content operating systems or software are subject to terms and conditions and may be changed interrupted or discontinued at any time Fees regi...

Page 29: ...e a Sony account After you submit a request to create a new account with the basic information you entered such as your user ID email address and password you will receive a message by email for email address validation Follow the instructions in the email to finish creating the account You can also sign in with a Sony account if you have one 2 Sign in to the Airpeak Flight App Sign in with the us...

Page 30: ... flight you can check the flight path execute the mission and check the status of the aircraft and other devices in flight with this app The display examples in this Help Guide are for when using a tablet device Screen flow of the Airpeak Flight App App Home page This page is displayed when you start the app When you launch the app for the first time the initial setup screens are displayed before ...

Page 31: ...ing this icon 2 Update notifications Notify when updates to the system software airspace database system etc are required before flight 3 Connection status of the devices Displays the connection status of the aircraft and remote controller 4 Project information Displays the project name and flight location of the selected project The project selection screen appears when you tap on the information...

Page 32: ... packs can be charged at room temperature If the difference between the remaining battery level in the two battery packs is 20 or more the aircraft motor will not start Charging the built in remote controller battery Connect the power cord to the AC adapter for battery charger 1 Connect the AC adapter to the power port of the battery charger 2 Place the battery packs in the battery charger The bat...

Page 33: ... packs in the aircraft 5 027 737 11 1 Copyright 2021 Sony Group Corporation Connect the power cord to the AC adapter for remote controller 1 Open the power port cover of the remote controller and connect the AC adapter to the power port 2 Firmly insert the plug of the power cord into the wall outlet The battery level LEDs flash during charging and go off when the battery is fully charged 3 33 ...

Page 34: ... and then recharge it Immediately after purchase The battery pack has been left for a long time The battery pack has been left inserted into a device for a long time Note that if all of the battery level LEDs blink or stay turned off even when the battery pack is charged for a second time a battery pack or battery charger abnormality may have occurred Stop using them and contact your Sony dealer R...

Page 35: ...ls are enough for the flights you have planned To unload a battery pack press the BATTERY RELEASE lever and remove it Load the battery packs in the aircraft Insert firmly until the battery packs click and lock into place 1 Confirm that the battery packs are loaded correctly Battery packs are not loaded correctly if a yellow line is visible and the BATTERY RELEASE lever has not returned to the orig...

Page 36: ...Related Topic Charging the batteries 5 027 737 11 1 Copyright 2021 Sony Group Corporation 36 ...

Page 37: ...e down on the cushioning Be careful to keep the propeller attachment points of each motor off the surface 1 Connect the cables to the connection hub on the aircraft Control cable aircraft gimbal Power cable aircraft gimbal USB Type C cable aircraft gimbal Front of aircraft Connect the control cable aircraft gimbal to the control port Insert fully until the plug locks into place Rear of aircraft 2 ...

Page 38: ...pyright 2021 Sony Group Corporation Connect the power cable aircraft gimbal to the POWER port Insert fully until the plug locks into place Connect the USB Type C cable aircraft gimbal to the USB port You can also connect the USB Type C cable aircraft gimbal to the EXT port 38 ...

Page 39: ...ow surface faces down and the arrow points toward the front of the aircraft 2 While maintaining the same orientation place the damping plate on the attachment points of the aircraft 3 Use the hex wrench H2 5 mm and hex screws included in the gimbal set sold separately to attach the damping plate at two positions on each leg eight in total 4 Insert the plugs at the other ends of the cables connecte...

Page 40: ... be sure to tighten the screws with a torque of 1 5 0 5 Nm Related Topic Mounting the gimbal on the aircraft 5 027 737 11 1 Copyright 2021 Sony Group Corporation Connect the control cable aircraft gimbal to the control port Insert fully until the plug locks into place Rear of aircraft Connect the power cable aircraft gimbal to the POWER port Insert fully until the plug locks into place Connect the...

Page 41: ...he ball detent and insert the landing gear Make sure that the ball detent is fully engaged 2 Turn the lever to lock the landing gear Turn both landing gear levers below the dotted line as shown below 3 Repeat steps 2 and 3 to attach the other landing gear 4 Turn the aircraft over Holding the aircraft securely by two frame arms turn it over 5 41 ...

Page 42: ...rms place it upside down on the cushioning Be careful to keep the propeller attachment points of each motor off the surface 1 Turn the landing gear lever to unlock it 2 Press in the ball detent and remove the landing gear 3 Turn the landing gear levers until they are positioned in place When storing the aircraft in the outer box turn both landing gear levers below the dotted line as shown below 4 ...

Page 43: ...et injured by the edges Make sure the aircraft is off Confirm that the power status LED on the aircraft is off 1 Check the propeller hub Propeller CW a Top side of the propeller b Underside of the propeller c Hub silver Propeller CCW d Top side of the propeller e Underside of the propeller f Hub black 2 Attach the propellers CW to the motors with silver hubs Place the propeller on the propeller at...

Page 44: ...ching the propellers make sure that the stickers on the motors are not damaged If the stickers on the motors are peeled off or the adhesive layers of the stickers are exposed the propellers may not have been attached properly and pose a risk of crash Refrain from using the aircraft and contact Sony Customer Support To remove the propellers g Silver Attach the propellers CCW to the motors with blac...

Page 45: ...it your fingers Battery packs are still hot immediately after use Handle with care Also be careful not to drop the battery packs 2 Remove the propellers CW Press the propeller hub against the metal part of the motor and turn the propeller clockwise to remove it Hold the motor firmly in place with your other hand to prevent it from turning 3 Remove the propellers CCW Press the propeller hub against...

Page 46: ...5 027 737 11 1 Copyright 2021 Sony Group Corporation 46 ...

Page 47: ...ED on the aircraft is off 1 With the marks on the gimbal and quick release aligned attach the gimbal 2 Turn the ring toward Lock Turn the ring until it clicks and locks into place 3 Make sure the aircraft is off 1 Hold down the gimbal detach button on the quick release and turn the ring toward Unlock The gimbal will come off the quick release 2 47 ...

Page 48: ...tched or damaged if the gimbal rotates or drops Be sure to remove the gimbal after use Leaving it attached to the aircraft may damage the damping rubber of the damping plate Related Topic Attaching the damping plate to the aircraft 5 027 737 11 1 Copyright 2021 Sony Group Corporation 48 ...

Page 49: ...e for recording images Be sure to set the Bluetooth function of the camera to Off If it is set to On it may affect the wireless transmission function 5 027 737 11 1 Copyright 2021 Sony Group Corporation Open the battery cover and insert a battery pack 1 Open the memory card cover and insert a memory card 2 Configure the following setting items on the camera For setting instructions refer to the ca...

Page 50: ...era plate to the tripod socket on the bottom of the camera Tighten the thumbscrew to secure it firmly 1 Attach the hot shoe adapter to the camera When using a camera with a short height such as the ILME FX3 or ILCE 7C attach the hot shoe extension to the hot shoe adapter The hot shoe extension is included in the gimbal set sold separately 2 Place the camera in the gimbal 3 50 ...

Page 51: ... the tilt top bar to make it higher 2 Place the camera in the gimbal from the front Slide the camera plate attached to the camera into the groove on the bottom part of the frame 3 Secure the camera in the gimbal 4 Lower the tilt top bar and then tighten the locking screws on both sides 1 Tighten the top camera screw on the hot shoe adapter screw 2 Tighten the lever on the bottom of the frame to se...

Page 52: ... with the frame of the gimbal Route the USB cable so that it does not come into contact with the gimbal frame Related Topic Mounting a camera on the gimbal 5 027 737 11 1 Copyright 2021 Sony Group Corporation Insert the plug of the included USB Type C cable gimbal camera or micro USB cable gimbal camera in the camera USB port Connect the USB cable that matches your camera port 1 Insert the other e...

Page 53: ...essories you want to use Adjust the balance of the tilt axis Adjust the horizontal and vertical balances of the tilt axis Horizontal balance adjustment of the tilt axis Vertical balance adjustment of the tilt axis 1 Loosen the top camera screw and bottom lever and then slide the camera plate forward or backward to adjust the balance 1 After adjusting the balance firmly tighten the top camera screw...

Page 54: ...ance of the roll axis 2 Loosen the lever and slide the roll frame left and right to adjust the balance 1 After adjusting the balance firmly tighten the lever 2 Rotate the roll frame by about 45 to check if the balance is adjusted properly If properly adjusted the roll frame will stay still 3 Adjust the balance of the pan axis 3 Loosen the lever and slide the pan frame back and forth to adjust the ...

Page 55: ...e aircraft upside down Doing so may deteriorate or damage the damping rubber of the damping plate Related Topic Connecting cables between the camera and gimbal Adjusting the gimbal parameters 5 027 737 11 1 Copyright 2021 Sony Group Corporation 55 ...

Page 56: ... Adjusting the gimbal parameters The gimbal parameters need to be adjusted Visit the support site for details on adjustment http electronics sony com airpeak p gblt3 settings 5 027 737 11 1 Copyright 2021 Sony Group Corporation 56 ...

Page 57: ...ice holder 1 Place the mobile device on the mobile device holder and adjust the holder height 2 Lower the lever to secure the mobile device 3 Stabilize the mobile device holder Tighten the screw at the base of the holder by turning it with a coin or tool 4 Connect the cable included with your mobile device to the remote controller USB port USB A and the mobile device port If your mobile device did...

Page 58: ...r in the middle of the mobile device holder and then mount the smartphone Note Mobile devices may fall off unless they are correctly secured with the lever Related Topic Supported mobile devices 5 027 737 11 1 Copyright 2021 Sony Group Corporation 58 ...

Page 59: ...lly go into a standby state You can stop the alarm by performing an operation such as moving the control stick pressing a button etc If you notice any damage to the remote controller antenna contact Sony Customer Support It may not be possible to operate the aircraft You need to link the remote controller and aircraft when you replace the remote controller or are using a new one When you turn off ...

Page 60: ...Related Topic Linking the aircraft and remote controller Selecting the wireless channel 5 027 737 11 1 Copyright 2021 Sony Group Corporation 60 ...

Page 61: ...and hold the Power button for at least 2 seconds to turn on the power After startup the status LED stops flashing and remains on 1 On the aircraft press and hold the Power button for at least 2 seconds to turn on the power After startup the power status LED stops flashing and remains on 2 Start the Airpeak Flight App and follow the instructions on the screen to perform Initial setup 3 When the Lin...

Page 62: ...5 027 737 11 1 Copyright 2021 Sony Group Corporation 62 ...

Page 63: ...hover when you release the control sticks to return them to the central position Alt Altitude In this mode the flight altitude is maintained The obstacle brake and Vision Positioning functions are disabled The aircraft position is not automatically maintained and the aircraft is easily drifted by the wind so skillful stick operations are required to control the aircraft You can adjust the tilt ang...

Page 64: ...comes available again the flight mode will automatically return to the designated mode Related Topic Parts and controls Remote controller Features of the Airpeak Flight App Selecting the operating mode of the control sticks Adjusting the sensitivity of the control sticks Parts for flight operations Controlling the aircraft with the remote controller manual flight 5 027 737 11 1 Copyright 2021 Sony...

Page 65: ...e page The flight screen will be displayed 1 Tap Settings in the top right of the screen 2 Tap Aircraft in the displayed setting menu 3 Tap Sensors Radio 4 Select Auto or Manual for Channel selection method Auto The optimum channel is set automatically Manual Select the desired channel in the Channel menu You can check the Received signal level dBm for each channel on the congestion status graph f...

Page 66: ...he Airpeak Flight App Home page The flight screen will be displayed 3 Tap Settings in the top right of the screen 4 Tap Remote controller in the displayed setting menu 5 Tap Connection 6 Tap Main for Operation role The remote controller you are operating will be set as the main controller 7 Tap Link for Link to aircraft The remote controller you are operating will be linked with the aircraft as th...

Page 67: ...u reset Operation mode to Single on the main controller the sub controller becomes disconnected from the aircraft Related Topic Selecting the operating mode of the control sticks Attaching a mobile device to the remote controller Linking the aircraft and remote controller 5 027 737 11 1 Copyright 2021 Sony Group Corporation 67 ...

Page 68: ... displayed 1 Tap Settings in the top right of the screen 2 Tap Remote controller in the displayed setting menu 3 Tap Sticks and then select a mode in the Stick operating mode menu The operations assigned in each mode are as follows 4 Aircraft operation Mode 1 Mode 2 Changing the altitude of the aircraft Tilt the right stick up and down Tilt the left stick up and down Moving the aircraft back and f...

Page 69: ...ls Remote controller Features of the Airpeak Flight App Controlling the aircraft with two remote controllers dual operation mode Adjusting the sensitivity of the control sticks 5 027 737 11 1 Copyright 2021 Sony Group Corporation 69 ...

Page 70: ...n the Airpeak Flight App Home page The flight screen will be displayed 1 Tap Settings in the top right of the screen 2 Tap Remote controller in the displayed setting menu 3 Tap Sticks 4 Set the values for Output characteristics You can set the amount of movement along each axis Ascent Descent speed Left turn Right turn rate Forward Backward Left Right speed with respect to the input from the contr...

Page 71: ...5 027 737 11 1 Copyright 2021 Sony Group Corporation 71 ...

Page 72: ...irpeak Flight App Controlling the aircraft with two remote controllers dual operation mode 5 027 737 11 1 Copyright 2021 Sony Group Corporation Tap Start flight on the Airpeak Flight App Home page The flight screen will be displayed 1 Tap Settings in the top right of the screen 2 Tap Remote controller in the displayed setting menu 3 Tap Buttons Controls 4 Select the function that you want to assig...

Page 73: ...ng menu 3 Tap Main control 4 Set the following items Gimbal control mode Lock The camera orientation shooting direction will remain the same even if the aircraft turns Follow The camera orientation shooting direction follows the panning left right movement of the aircraft Maximum speed Pan Tilt Roll You can set the maximum speed of movement along each axis Smoothness Pan Tilt Roll You can set the ...

Page 74: ...t no warnings cautions or dialogs are displayed 2 Tap Start flight on the Airpeak Flight App Home page 1 Tap Settings in the top right of the screen The setting menu will be displayed Check the status of these items in the Aircraft and Remote controller categories Aircraft status Flight mode Aircraft Flight mode Maximum flight altitude Aircraft Safety functions Maximum altitude Wireless performanc...

Page 75: ...vacy of others and comply with state and local privacy laws and regulations as well as the reasonable expectation of privacy of the shooting location Do not use this product for any illegal or improper purposes Do not use this product for abuse harassment stalking intimidation or infringement upon the legal rights of others such as privacy or publicity rights Do not allow the aircraft to trespass ...

Page 76: ... following environments or under the following conditions Areas where transparent objects such as water or glass are present or where highly reflective objects such as mirrors are present When no objects that show clear surface patterns are present within an altitude of 20 m 66 feet or more and a circumference of 20 m 66 feet Areas where regular patterns are continuously present Areas exposed to s...

Page 77: ...on can be performed safely Do not fly the aircraft from a moving vehicle unless you comply with federal regulations to do so and determine such an operation can be performed safely To avoid affecting the service life of the motors do not launch or land the aircraft in sandy or dusty areas Do not load anything onto the aircraft other than the camera and other accessories as stated in the product in...

Page 78: ...ou fly the aircraft be sure to make flight decisions based on the latest and official information It is important that you update the airspace database system saved in the aircraft and the Airpeak Flight App on a regular basis especially before flying in a new location Geofence zones You can create geofences with the Airpeak Base App and fly the aircraft only within the geofence zones About flight...

Page 79: ...ordance with the regulations of each country or region and user attributes You can update the airspace database system in the setting menu of the Airpeak Flight App Settings General Maintenance Related Topic Features of the Airpeak Flight App Setting the flight area for a project Setting geofences 5 027 737 11 1 Copyright 2021 Sony Group Corporation Geofence zones Geofences created in the Airpeak ...

Page 80: ...ly tightened Confirm that aircraft motors are free of problems and work correctly Confirm that the aircraft s stereo cameras infrared range sensors and FPV gimbal camera are free of dirt and debris Confirm that there are no problems with gimbal operation Calibrate the compass IMU Inertial Measurement Unit and stereo cameras when prompted to do so in the Airpeak Flight App Do not calibrate the comp...

Page 81: ...or malfunction of the stereo cameras or infrared range sensors Check the version numbers of the Airpeak Flight App and system software of the aircraft and remote controller to confirm that they are up to date Related Topic Features of the Airpeak Flight App Charging the batteries Loading battery packs in the aircraft Attaching the damping plate to the aircraft Attaching the propellers 5 027 737 11...

Page 82: ...t with great caution If the flight is unstable land the aircraft immediately and then check for any dirt on the sensors and calibrate them Since the video transmission signal may be delayed or lost due to interference the wireless transmission settings of the Airpeak Flight App Aircraft Sensors Radio should be changed carefully with a full understanding of the changes After landing first stop the ...

Page 83: ...aircraft to an appropriate landing point while maintaining altitude operate the remote controller to perform ascent while the aircraft is descending If a battery level warning appears on the Airpeak Flight App screen land the aircraft at the Home Point or a landing point immediately If the battery packs run out of battery during flight the aircraft may crash onto the ground including private prope...

Page 84: ...eck airspace The Set flight location and flight date screen will be displayed 5 Click on Flight date on the right side of the screen and set the flight date 6 Click on Add flight area at the bottom left of the screen and then click on the map A polygon will appear on the map indicating the flight area 7 Edit the flight area Drag Point on the edge of the flight area to form the desired shape 8 Clic...

Page 85: ...85 ...

Page 86: ... editing screen will be displayed 3 Click on Add shape at the bottom left of the screen and select Circle or Polygon and then click on the map A circle or polygon will appear on the map indicating a geofence zone 4 Edit the geofence To edit a circle To set the radius and maximum altitude click within the geofence zone and then set the values at the bottom of the screen The same maximum altitude va...

Page 87: ...ence 5 Delete point Click to delete the selected point 6 Add flight area Select Circle or Polygon and click on the map to place a geofence The inside of the circle or polygon area is defined as a geofence zone 7 Radius Adjust the radius of the circle This item does not appear when Polygon is selected 8 Altitude Adjust the maximum altitude The aircraft will fly without exceeding this altitude 9 Zoo...

Page 88: ...e flight duration Finish action Set a finish action for the aircraft The mission edit screen will be displayed 4 Set a keyframe to the flight start position The keyframe will be set to the flight start position 5 Make sure that the indicator is at the 0 position of the elapsed time scale 1 Drag Aircraft to the desired position on the map 2 Click on Set 3 Drag the indicator over the elapsed time sc...

Page 89: ...aft as 0 and the roll axis displays the horizontal direction of the aircraft as 0 Related Topic Setting the flight area for a project Setting geofences Flying the aircraft along a set path automated flight 5 027 737 11 1 Copyright 2021 Sony Group Corporation Repeat steps 6 and 7 to set more keyframes 8 Click on Check errors when you have finished creating the flight path If errors are displayed cl...

Page 90: ...ight log screen 2 Flight log name 3 Flight log information Flight location flight date and time 4 Map The flight path is indicated as a line The icons on the map represent the following information Home Point Start or end location of video recording Photographed location Aircraft position 5 Export Click to save the flight log as a ULOG ESP or JSON file ULOG Format for reimporting as a flight log t...

Page 91: ... details panel Top Show Hide Click to show hide the flight log details panel Distance Click to display the flight distance recorded in the flight log Zoom in map Click to zoom in on the map Zoom out map Click to zoom out on the map Select map layers Click to select information to overlay on the map 10 Flight log details panel Bottom The aircraft s position speed etc is displayed 11 Timeline panel ...

Page 92: ...t path automated flight 5 027 737 11 1 Copyright 2021 Sony Group Corporation Click on Logbook on the Airpeak Base App Home page 1 Click on the flight log that you want to reuse 2 Click on Convert at the top right of the flight log screen 3 In the dialog select the project to which you want to add a new mission and then click on Convert The flight log will be saved as a new mission for the selected...

Page 93: ...aft for at least 2 seconds The aircraft is turned off and the power status LED on the aircraft turns off 5 027 737 11 1 Copyright 2021 Sony Group Corporation Press and hold the Power button on the aircraft for at least 2 seconds The aircraft is turned on After startup the power status LED stops flashing and remains on 1 93 ...

Page 94: ... for at least 5 seconds The remote controller is turned off and the status LED on the remote controller turns off 5 027 737 11 1 Copyright 2021 Sony Group Corporation Press and hold the Power button on the remote controller for at least 2 seconds The remote controller is turned on After startup the status LED stops flashing and remains on 1 94 ...

Page 95: ...ide is for flight functions and the right side is for shooting functions Related Topic Parts for flight operations Parts for shooting operations 5 027 737 11 1 Copyright 2021 Sony Group Corporation Flight operations These parts are used for flight operations such as takeoff landing gimbal settings etc 1 Camera operations These parts are used for camera operations such as taking videos and photos s...

Page 96: ...rations are described below Control sticks Control the orientation and movement of the aircraft There are two stick operating modes Mode 2 default setting and Mode 1 1 Automated flight pause button Press to pause the aircraft s movement during automated flight if necessary to ensure safety 2 Control lever Tilts the gimbal up down 3 Flight mode switch Selects the flight mode 1 2 3 4 96 ...

Page 97: ...ation Indication of the number and signal strength of positioning satellites such as GNSS Global Navigation Satellite System Indication of the signal strength of the remote controller 3 Remaining battery level Indication of the remaining flight time and remaining battery of the aircraft Indicates the remaining flight time until forced landing due to insufficient battery power The remaining battery...

Page 98: ...l control mode Auto control landing gear Toggles the automatic landing gear control function on and off with each tap Vision Positioning Toggles the Vision Positioning function on and off with each tap FPV Tap to display the FPV view in a sub screen 7 RTH Return to Home Tap to automatically return the aircraft to the Home Point 8 Landing gear up down Tap to raise or lower the landing gear 9 Obstac...

Page 99: ...99 ...

Page 100: ... the sub screens and the full screen Related Topic Parts for flight operations Parts for shooting operations 5 027 737 11 1 Copyright 2021 Sony Group Corporation Tap Start flight on the Airpeak Flight App Home page The flight screen will be displayed with the camera view in full screen 1 To display the FPV view tap FPV To display the map view tap Map The FPV view will appear in the sub screen at t...

Page 101: ... take off position 3 Tilt the left and right control sticks on the remote controller either inward and downward or outward and downward at the same time The motors will start and the propellers start rotating 1 Operate the control sticks on the remote controller to make the aircraft ascend 2 On the flight screen in the Airpeak Flight App tap Auto take off and follow the instructions on the screen ...

Page 102: ... Copyright 2021 Sony Group Corporation Automated landing Operate the control sticks on the remote controller to make the aircraft descend The landing gear will lower when the aircraft descends to a certain height above the ground 1 Keep operating the control sticks until the aircraft lands and the motors stop After the motors stop release the control sticks to return them to the central position 2...

Page 103: ...ce it on a flat surface 5 Tap Start flight on the Airpeak Flight App Home page The flight screen will be displayed 6 Tap Automated flight menu 7 In the Flight functions menu tap Mission Flight 8 In the mission list tap the mission according to which you want to fly the aircraft A map that shows the flight path of the selected mission will be displayed on the screen 9 In the Edit flight path menu c...

Page 104: ... the automated flight The aircraft will hover Adjusting the flight path manually You can make fine adjustments to the flight path with the control sticks on the remote controller during an automated flight The flight path will move in parallel in the direction in which the control stick is operated Related Topic Features of the Airpeak Flight App Selecting the operating mode of the control sticks ...

Page 105: ...the aircraft and place it on a flat surface 4 Tap Start flight on the Airpeak Flight App Home page The flight screen will be displayed 5 Tap Automated flight menu 6 In the Flight functions menu tap Mission Flight 7 In the mission list tap the mission that you created in advance A map that shows the flight path of the selected mission will be displayed on the screen 8 In the Edit flight path menu c...

Page 106: ...op the automated flight The aircraft will hover Adjusting the flight path manually You can make fine adjustments to the flight path with the control sticks on the remote controller during an automated flight The flight path will move in parallel in the direction in which the control stick is operated Related Topic Selecting the operating mode of the control sticks Adjusting the sensitivity of the ...

Page 107: ...ovement of the aircraft when there is poor communication between the aircraft and the remote controller can be set in the setting menu for the Airpeak Flight App Settings Aircraft Safety functions If an obstacle is detected in front of the aircraft during RTH Return to Home the aircraft will ascend 3 meters vertically to avoid the obstacle Related Topic Parts for flight operations 5 027 737 11 1 C...

Page 108: ...ccording to the altitude of the aircraft Raise or lower the landing gear manually when Auto control landing gear is set to off To raise or lower the landing gear manually Tap Raise the landing gear or Lower the landing gear on the flight screen of the Airpeak Flight App and follow the instructions on the screen Related Topic Parts and controls Aircraft Parts for flight operations 5 027 737 11 1 Co...

Page 109: ...of the Airpeak Flight App tap Settings Aircraft Safety functions and turn off the Execute emergency motor stop switch Related Topic Parts for flight operations 5 027 737 11 1 Copyright 2021 Sony Group Corporation Tilt the left and right control sticks on the remote controller either inward and downward or outward and downward at the same time The motors and propellers will stop The aircraft will f...

Page 110: ...ide is for flight functions and the right side is for shooting functions Related Topic Parts for flight operations Parts for shooting operations 5 027 737 11 1 Copyright 2021 Sony Group Corporation Flight operations These parts are used for flight operations such as takeoff landing gimbal settings etc 1 Camera operations These parts are used for camera operations such as taking videos and photos s...

Page 111: ...Flight screen the Airpeak Flight App The items on the flight screen used for shooting operations are described below MOVIE button Press to start stop video recording 1 Control dial Turn to change the setting values of the camera 2 C1 Custom 1 C2 Custom 2 C3 Custom 3 C4 Custom 4 buttons Assign the functions for operating the aircraft camera and gimbal to these buttons in the setting menu of the Air...

Page 112: ...cates the remaining flight time until forced landing due to insufficient battery power The remaining battery level of the aircraft is indicated as a numerical value and a bar The red area shows the remaining amount set for Aircraft Batteries Start forced landing in the setting menu and the yellow area shows the remaining amount set for Battery life alert The triangle mark indicates the minimum bat...

Page 113: ...mmended exposure index of the camera A larger number increases the sensitivity as well as noise Aperture Adjusts the aperture value F value of the camera The subject and its foreground and background are all in focus with a larger F value Map Tap to display the map view in a sub screen 7 Elapsed recording time Displays the elapsed recording time during video recording 8 Movie recording Tap to star...

Page 114: ...k Flight App and displayed on the Devices screen of the Airpeak Base App You can check the usage status maintenance information etc of each device on this screen 5 027 737 11 1 Copyright 2021 Sony Group Corporation Click on Devices on the Airpeak Base App Home page 1 On the Devices screen click on the device whose information you want to check 2 Check the usage status maintenance information etc 3...

Page 115: ...ation of the aircraft Stereo camera Multiple cameras capture objects three dimensionally and assess the distances to the objects and their moving speeds Related Topic Calibrating the remote controller 5 027 737 11 1 Copyright 2021 Sony Group Corporation IMU Inertial Measurement Unit 1 Tap Start flight on the Airpeak Flight App Home page The flight screen will be displayed 1 Tap Settings in the top...

Page 116: ... the sensitivity of the control sticks Calibrating the sensors of the aircraft 5 027 737 11 1 Copyright 2021 Sony Group Corporation Tap Start flight on the Airpeak Flight App Home page The flight screen will be displayed 1 Tap Settings in the top right of the screen 2 Tap Remote controller in the displayed setting menu 3 Tap Details 4 Tap Start for Calibrate remote controller 5 Follow the instruct...

Page 117: ...tem software update is available a notification will be displayed on the Airpeak Flight App Home page Related Topic Features of the Airpeak Flight App 5 027 737 11 1 Copyright 2021 Sony Group Corporation Tap Start flight on the Airpeak Flight App Home page The flight screen will be displayed 1 Tap Settings in the top right of the screen 2 Tap General in the displayed setting menu 3 Tap Maintenance...

Page 118: ...roduct Before disposing of the Airpeak including the remote controller and or battery charger visit https www sony com ecotrade Recycling information for all products including batteries can be found 5 027 737 11 1 Copyright 2021 Sony Group Corporation 118 ...

Page 119: ...ay cause damage or injury Installing external devices The aircraft USB port can supply up to 500 mA of current If overcurrent conditions exceeding 500 mA occur while an external device is installed it may affect flight performance Maintenance and storage The recommended ambient temperature range for storage is 18 C 64 F to 30 C 86 F Thoroughly wipe off any water that has adhered to the aircraft be...

Page 120: ...ebsite for a solution https www sony com electronics support Caution when carrying the unit When carrying the unit take care not to drop it If the unit is dropped this may cause damage to the unit or injuries Battery Pack Charging the battery pack Before using the battery pack be sure to charge it with a Sony dedicated battery charger or a Sony device with a battery charging function a device capa...

Page 121: ...Related Topic Parts and controls Aircraft Parts and controls Remote controller Turning the aircraft on off Turning the remote controller on off 5 027 737 11 1 Copyright 2021 Sony Group Corporation 121 ...

Page 122: ...5 027 737 11 1 Copyright 2021 Sony Group Corporation Cycle the power Remote controller Turn off the power and then turn it back on after about 1 minute Aircraft Turn off the power and remove both battery packs After about 1 minute reinsert the battery packs and turn the power back on 1 Check the additional information on our Customer Support Website https www sony com electronics support 2 122 ...

Page 123: ...c registered in the U S and other countries Use of the Made for Apple badge means that an accessory has been designed to connect specifically to the Apple product s identified in the badge and has been certified by the developer to meet Apple performance standards Apple is not responsible for the operation of this device or its compliance with safety and regulatory standards Please note that use o...

Reviews: