Sony A2770 - SPP Cordless Phone, Operating Instructions Manual
The Sony A2770 - SPP Cordless Phone is a versatile and reliable communication device that offers seamless connectivity. Enhance your user experience by downloading the comprehensive Operating Instructions Manual for free from our website, providing step-by-step details on how to fully utilize this fantastic product.
Share
Download


Reviews:
No comments
Related manuals for A2770 - SPP Cordless Phone

KX-TS520FX
Brand: Panasonic Pages: 2

KX-TD500CE
Brand: Panasonic Pages: 280

KXTVS100 - VOICE MAIL SYSTEM
Brand: Panasonic Pages: 91

KX-T336
Brand: Panasonic Pages: 872

Easa-Phone VA-208
Brand: Panasonic Pages: 45

Easa-Phone VA-208
Brand: Panasonic Pages: 45

KX-TH102M
Brand: Panasonic Pages: 128

KX-TD308
Brand: Panasonic Pages: 408

KS 416
Brand: Orchid Telecom Pages: 25

TP170WP
Brand: Oricom Pages: 24

VN08D
Brand: Vertical Networks Pages: 37

3600 Series 3618
Brand: Videx Pages: 8

Top A47 ISDN
Brand: Swisscom Pages: 110

D1779-12BT
Brand: Uniden Pages: 28

CARE80
Brand: Oricom Pages: 18

FS 800 E
Brand: Husqvarna Pages: 15

7151-NDM
Brand: Home Decorators Collection Pages: 7
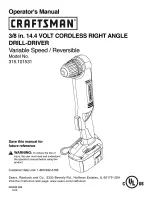
315.101531
Brand: Craftsman Pages: 18


