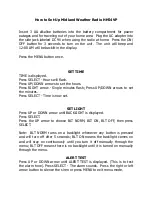
Cell Phone
Adapter Cable
Hand
Crank
Antenna
Flashlight
Power
Switch
Flashlight
Lens
Speaker
Cellphone
Jack
Solar
Panel
Tuning
Indicator
Charging
Indicator
Tuning
Knob
Band
Selector
Volume
& On/Off
Knob
Headphone
Jack
AC Input
(on body)
Mini USB Adapter
(for AC Charging)
SolaDyne™ Radio & Flashlight #7410
IMPORTANT SAFEGUARDS
Read all instructions before operating
Do not point the light directly into eyes
•
Do not store at temperatures above 120°F (49°C) or below 15°F (-9°C)
•
To reduce the risk of electric shock, do not submerge this flashlight or its accessories in any liquid.
•
Unit is water resistant but not water proof.
Turn off all lights and radio features before charging
•
For maximum battery efficiency, never completely deplete stored power. Charging frequently will
•
ensure good battery life.
Store in a clean dry place when not in use
•
Administer close supervision when using around children
•
Note: This equipment has been tested and found to comply with the limits for a Class B digital device,
pursuant to Part 15 of the FCC Rules. These limits are designed to provide reasonable protection against
harmful interference in a residential installation. This equipment generates, uses, and can radiate radio
frequency energy and, if not installed and used in accordance with the instructions, may cause harmful
interference to radio communications. However, there is no guarantee that interference will not occur in a
particular installation. If this equipment does cause harmful interference to radio or television reception,
which can be determined by turning the equipment off and on, the user is encouraged to try to correct the
interference by one or more of the following measures:
• Reorient or relocate the receiving antenna.
• Increase the separation between the equipment and receiver.
• Connect the equipment into an outlet on a circuit different from that to which the receiver is connected.
• Consult the dealer or an experienced radio/TV technician for help.
PARTS IDENTIFICATION
CHARGING
Note: To conserve power while charging, turn off all light and radio features. Before and after storing for
long periods of time, we recommend charging the unit for at least 3-5 minutes to maintain the condition of
the rechargeable battery.
Solar Charging:
Place the unit outside with the SOLAR PANEL in direct sunlight for maximum effectiveness.
1.
On a bright sunny day (>86,000 LUX) it will fully charge within 10-12 hours. Charging in partial sunlight
2.
and cloudy weather will charge at a slower rate.
Dynamo Charging:
Open the
1.
HAND CRANk and rotate steadily clockwise at approximately 130 cycles/minute.
The green LED CHARGING INDICATOR will illuminate on the radio dial to indicate the unit is charging.
2.
Longer wind-up times will yield longer power duration.
3.
Close the HAND CRANk.
4.
AC Charging (adapter not included):
Please refer to the specifications section on the back for compatible AD/DC power adapter information.
Athena Brands, Inc. offers an accessory charging adapter (model #7990) available on our website www.
athenabrands.com or by calling 800-272-8603.
The unit is equipped with a mini USB input. An adapter is included so that a charger that features a
1.
universal tip may be used (such as our #7990 adapter) instead of one with a mini USB plug.
Locate the AC
2.
INPUT jACk on the side of the unit as indicated by the electrical symbol on the rubber input
cover.
Plug the
3.
mINI USB ADAPTER into the INPUT jACk.
Plug the DC output plug from the AC/DC adapter into the DC input jack of the mini USB adapter.
4.
Insert the 120V AC adapter into an electrical socket.
5.
The green LED CHARGING INDICATOR will illuminate on the radio dial to indicate the unit is charging.
6.
Allow 8-10 hours to achieve a full charge. It will not harm the rechargeable battery if the AC adapter is
7.
left plugged in. It will continue to trickle charge.
OPERATION
AM/FM Radio:
Extend the
1.
ANTENNA and adjust as needed to obtain the best reception.
Turn the
2.
VolUMe knob clockwise to turn on and for volume control.
Select either the Am or Fm band using the BAND SELECTOR.
3.
Tune to the desired station using the TUNING kNOB. When a station comes in clear, the TUNING
4.
INDICAToR will illuminate green. Adjust the antenna as needed.
Because of the effective solar charging system, the radio may be operated even while solar charging in
5.
direct sunlight.
Headphones (not included) may be used for personal listening. Plug your favorite headphones into the
6.
HEADPHONE INPUT jACk identified by the headphone icon on the rubber input cover.
Flashlight:
Press the POWER button on and off for flashlight operation.
1.
Cell Phone Charging:
Plug the smaller diameter end of the CELL PHONE ADAPTER CORD into the
1.
CELL PHONE INPUT jack
identified by the cell phone icon on the rubber input cover.
Plug the other end into your cell phone. A universal Nokia
2.
®
adapter is provided. Adapter tips for other
model phones plug directly into the Nokia adapter. Additional tips are available at electronic and mobile
phone stores (not included).
To charge, follow the dynamo charging instructions above.
3.