
Register and install
In order to install the required software and activate your license, first make sure your computer has internet access. Use any
browser to visit the page
www.softube.com/console1-install
. Here, you will be guided through all the necessary steps. You will be
asked to enter the unique license code that was included in the box (on a paper that looks almost like this!)
CONSOLE 1
LOW TYPE
BELL
HIGH TYPE
CUT
LOW MID Q
1.9
HIGH MID Q
1.8
LOW MID FREQ
0.41 kHz
HIGH MID FREQ
3.6 kHz
LOW MID GAIN
-14 dB
HIGH MID GAIN
14.6 dB
HIGH FREQUENCY
16.0 kHz
HIGH GAIN
0.0 dB
LOW FREQ
200 Hz
LOW GAIN
15.8 dB
ATTACK
0.02 ms
RATIO
4.0
PARALLEL
12 %
RELEASE
358 ms
THRESHOLD
-28 dB
SIDECHAIN
FILTERS
HIGH CUT
OFF
LOW CUT
135 Hz
INPUT GAIN
14.0 dB
FILTERS TO
COMPRESSOR
PHASE INVERT
DRIVE
DYN. SHAPE →
EQUALIZER →
COMPRESSOR
7.8
CHARACTER
-5.0
VOLUME
-10.8 dB
PAN
L
R
0
SOLO
MUTE
GATE RELEASE
0.6 s
GATE
-35 dB
GATE HARD
SUSTAIN
-9.0 dB
PUNCH
12.3 dB
20
15
-15
-6
0
6
50
100
200
500
1k
2k
5k
10k
20k
-20
-6
0
6
20 dB
-20
10
6
3
0 dB
Drums (2)
Input
Dynamic Shape
Equalizer
Compressor
Output
Drums OH
2
BD
1
Clave
3
Tamb
4
Claps 1
5
Claps 2
6
Claps 3
7
―
8
Bass
9
―
10
Piano
11
Piano Solo
12
―
13
Guitar
14
―
15
Vocals
16
―
17
Reverb
18
Ambiance
19
Master
20
+6
0
-6
-12
-24
-60
+6
0
-6
-12
-24
-60
Solid State Logic SL 4000 E
CONSOLE 1
Drums OH
2
RATIO
4.0
PARALLEL
12 %
SIDECHAIN
FILTERS
―
17
Reverb
18
Setting up your first Console 1 session
When you have gone through the registration process on Softube’s
web site, you are ready to set up your basic Console 1 session.
Connect the Console 1 hardware to an unoccupied USB port on your
computer. The Softube logo in your computer’s control panel will turn
from grey to black.
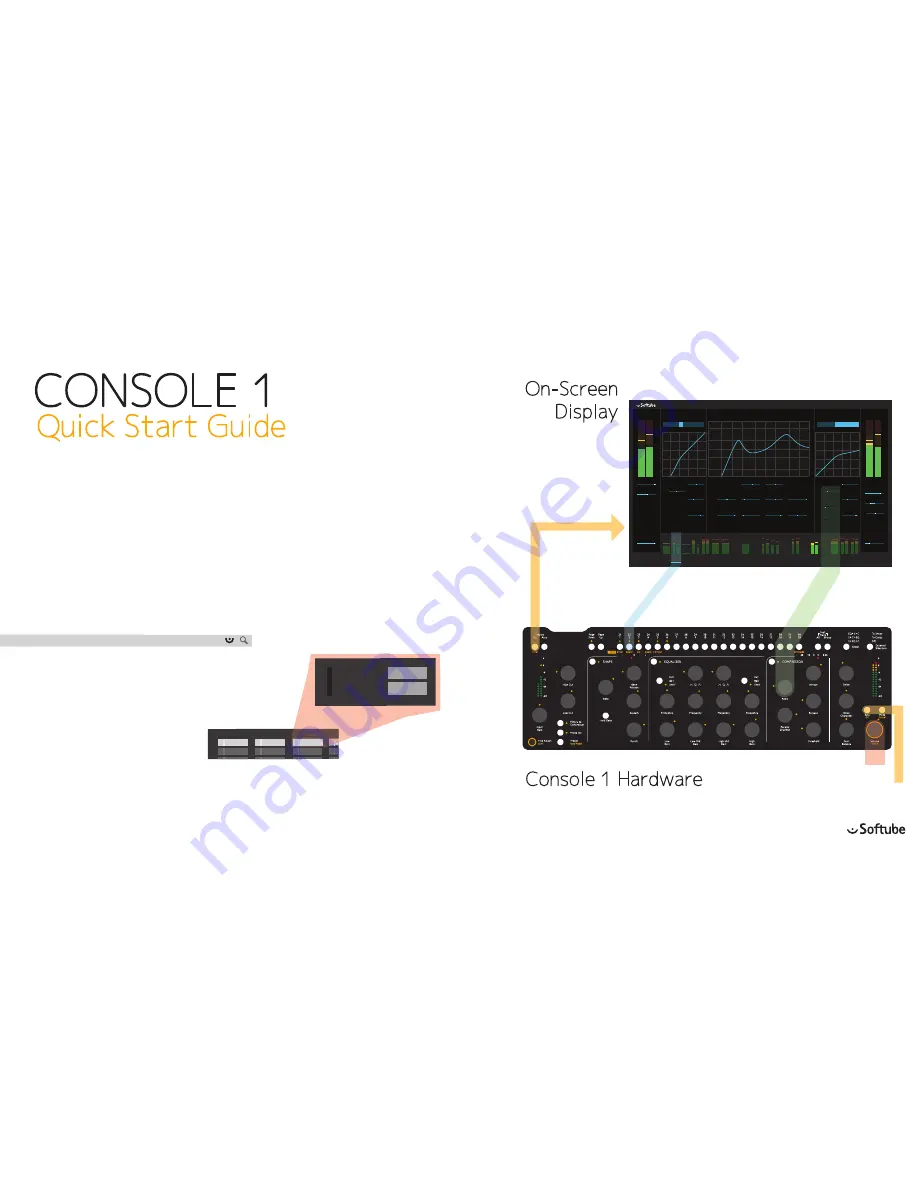
On-Screen
Display
Quick Start Guide
Console 1 Hardware
CONSOLE 1 STATUS ICON
ADJUST THE OUTPUT
VOLUME
SOLO AND MUTE
Launch your preferred digital audio workstation (DAW) application.
Console 1 runs with any host that supports VST2, VST3, AAX and
Audio Units plug-in formats.
Launch an empty session in your DAW.
Insert the Console 1 plug-in on as many
tracks as you like. We recommend inserting
it on all tracks, aux channels and busses.
The audio on any track where you have
inserted the Console 1 plug-in will be
routed into the Console 1 system and back
to the same DAW channel.
Console 1
•
•
•
•
Console 1
•
•
•
•
Console 1
•
•
•
•
Console 1
•
•
•
•
INSERTS
INSERTS
INSERTS
INSERTS
Console 1
•
Console 1
•
INSERTS
INSERTS
2
Drums OH
Show Knobs
Solo Safe
Console 1
•
INSERT PLUG-IN ON
EACH TRACK
Open plug-in to set track
name and number.
METER BRIDGE wih the selected track highlighted.
Settings for the selected track
SELECT THE TRACK YOU
WANT TO WORK WITH
Corresponds to the track
numbers in the meter bridge
of the On-Screen Display.
ADJUST THE CURRENT TRACK
Use knobs and buttons to adjust the
settings. Each knob has a corresponding
read-out on the On-Screen display.
TOGGLE ON AND OFF THE
ON-SCREEN DISPLAY
We recommend that you open the Console 1 plug-in on all busses and
aux channels, and activate Solo Safe on these by clicking this button
in the plug-in window. If your DAW doesn’t support automatically
transferring the track name and number to the Console 1 system,
please open the Console 1 plug-in on each track to set these.
If you play back music from your DAW, you should now see the
meters in Console 1’s meter bridge display the levels of the corre-
sponding tracks.
On the right you’ll find basic operating instructions. For detailed
instructions on how to use Console 1, please refer to the manual.
You will find it by clicking on the Console 1 Status Icon.
© 2014 Softube AB. All Rights Reserved.


