background image

MantaMate Tutorial Walkthrough 


With a Manta Controller: 


MONOPHONIC KEYBOARD –  


Change to preset 01. 


Connect 1A output to the v/oct input of an oscillator. 


Connect the 1B output to an envelope generator gate input. 


Connect the 1C output to the cutoff frequency of a filter. 


Connect the oscillator output to the filter input, and the filter output to a VCA, with 
the envelope generator controlling the VCA amplitude.  


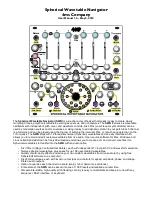
Figure 1: MantaMate monophonic keyboard example patch


Play around! The values of the two sliders will come out 2B and 2C, and a trigger will 
come out 2A, so you can add those controls and extend your patch. 


The filter will be controlled by the surface area you are covering on the hexagon that is 
currently active (outputting pitch information). 


Try touching the top-left and top-right round buttons on the Manta. These will 
transpose up and down by an octave. The amount of transposition will be shown on the 
7-segment display of the MantaMate (with the red LED to the left of the display 
lighting to indicate negative numbers). 


Try holding down the bottom-right round button while touching the top-left and top-
right buttons. This will transpose by a semitone.  


You can change the 

hexmap

, which is how the pitches are mapped to the hexagons, by 

entering the Left Option Menu. Enter the Left Option Menu by holding down the 
bottom-left round button on the Manta. While holding this button down, touch one of 
the hexagons on the left side of the bottom row. There are six different built-in 

hexmaps


available there. To create your own 

hexmap

, look at the instructions in the full manual.  


DUOPHONIC/POLYPHONIC KEYBOARD – 


Change to preset 02. 

Summary of Contents for MantaMate

Page 1: ...tive outputting pitch information Try touching the top left and top right round buttons on the Manta These will transpose up and down by an octave The amount of transposition will be shown on the 7 se...

Page 2: ...hat the voltage on output 1C will change as the MantaMate arpeggiates to show the current surface area covered on the currently stepped hexagon play around with having some hexagons more covered than...

Page 3: ...Figure 2 Keyboard Left Option Menu...

Page 4: ...le VCO VCF VCA with and EG controlling the VCA and 1A 1B 1C controlling the VCO freq EG trig and VCF freq respectively One difference is that you should use the trigger input on the envelope generator...

Page 5: ...ing that you are currently editing that step You can also hold down a Lower Hexagon and touch more Lower Hexagons to select multiple steps to edit Touch one of the lit up Upper Hexagons Notice that th...

Page 6: ...n E and F and touch the top slider while holding it down you will set the glide time for the pitch of that step which applies to the glide TO that step Doing the same and touching the bottom slider wi...

Page 7: ...on Menu by holding down the bottom left round button and touching the top right Upper Hexagon That will present you with another page which is exactly the same as the first but it relates to the secon...

Page 8: ...Mode Left Option Menu We call the bank of 13 stored compositions a Composition To locally store the current sequence into your current Composition hold down the bottom left round button to enter Left...

Page 9: ...on flash memory that will be retained even when the device is powered down You can test it out by turning the MantaMate off and on again and then navigating to your saved preset TURNING A SEQUENCER IN...

Page 10: ...get the feel for recognizing it The different preference modes are all explained in the manual Once you are in the Internal Clock Preference it should display 00 on the 7 segment display with both of...

Page 11: ...controlled by the two sliders and four possible trigger outputs selectable by the four lit up upper hexagons Activate some steps by touching them while in Play Mode top right round button is amber The...

Page 12: ...k trigger output is very useful Try Presets 01 and 02 These are similar to Preset 00 but the random voltage outputs are put through a comparator so that random Gates and Triggers come out instead CLOC...

Page 13: ...own the P button and pressing the DOWN button That will subtly change some of the values in the current patterns Try it out with drum modules plugged into the outputs and you can get really nice varia...

Page 14: ...needed for the monophonic pitch handling If you want to save the learned MIDI CCs you can save a preset by pressing S 7 segment will flash and then selecting which present number you want to save to T...

Page 15: ...knob controller output directly to CVs To do that go to Preset 5 This preset doesn t have the first few outputs taken up by pitch handling If the device doesn t automatically put out CC s 1 12 then us...

Reviews: