SNBC BTP-L42II, User Manual
The SNBC BTP-L42II User Manual is available for free download from our website. This comprehensive manual provides step-by-step instructions for optimal utilization of the product. Empower yourself with the knowledge to maximize the capabilities of your SNBC BTP-L42II printer, easily accessible at manualshive.com.
Share
Download


Reviews:
No comments
Related manuals for BTP-L42II

BT-650-C
Brand: Fametech Pages: 40

epos
Brand: Tolino Pages: 79

Sentinel-Prox DC-1023
Brand: AWID Pages: 12

RT214
Brand: RTscan Pages: 28

Gryphon I GM440 Series
Brand: Datalogic Pages: 350

Gryphon M 00 Series
Brand: Datalogic Pages: 18
BTScan
Brand: IDTECH Pages: 73
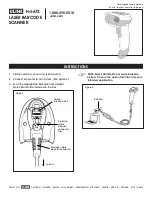
H-6672
Brand: U-Line Pages: 3

Z-8082 Lite
Brand: Zebex Pages: 22

SL5000r MP
Brand: Printronix Pages: 26

VEB620
Brand: ViewSonic Pages: 73

Barcode Reader P4 BCR
Brand: Banner Pages: 2

PRX-5
Brand: Viking Pages: 4

AP5.4
Brand: Avery Dennison Pages: 26

FS5100D
Brand: RIOTEC Pages: 2

Gryphon I CHR-GM40
Brand: Datalogic Pages: 20

Gryphon i
Brand: Datalogic Pages: 28

Z-3100
Brand: Zebex Pages: 8


