background image

1

DesignView Presentation System is a product of Skyline Exhibits

Patents Pending

©2011 Skyline Exhibits

DesignView

®

 Presentation System

SET UP

InSTrUcTIonS

Table of ConTenTs

SET UP ........................................................................................................... 2  
DraPE ............................................................................................................ 3
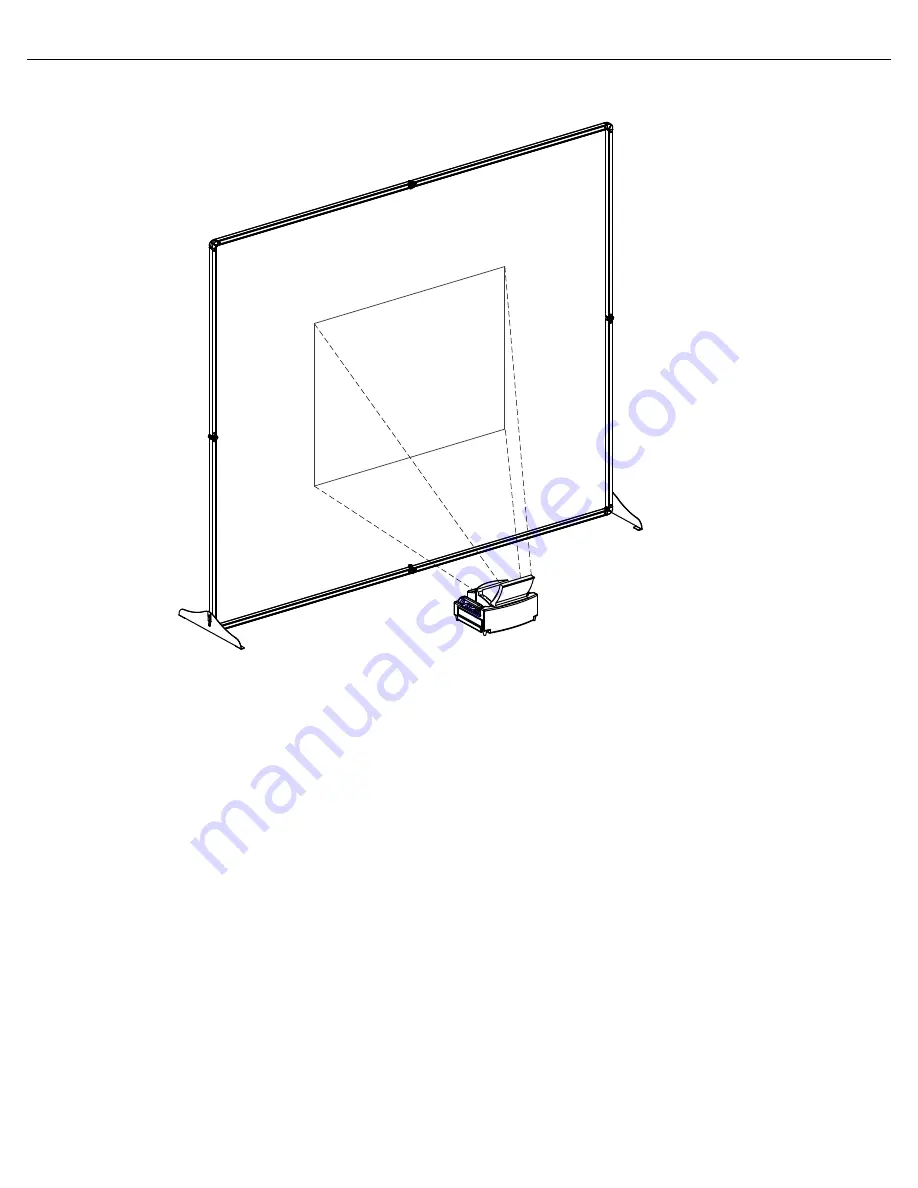
ImagE ProjEcTIon ....................................................................................... 5
TaKEDoWn ................................................................................................ 10
ScrEEn rEPlacEmEnT ................................................................................. 12

rEmoVal ...................................................................................................... 12
InSTallaTIon ............................................................................................... 13

aPPEnDIX - nEc ProjEcTor................................................................................14

Pn 32675-f

Summary of Contents for DesignView

Page 1: ...line Exhibits Patents Pending 2011 Skyline Exhibits DesignView Presentation System SET UP Instructions Table of Contents Set Up 2 Drape 3 Image Projection 5 tAKEDOWN 10 Screen Replacement 12 Removal 12 Installation 13 APPENDIX NEC PROJECTOR 14 PN 32675 F ...

Page 2: ...olded in this manner the front of the unit with the fabric will be on top Short Sections are verticals Unpack parts Put feet aside 1 2 Corners 180º Before setting up the DesignView Presentation System for the first time read these instructions carefully Although this product has been designed for safety injury could occur if certain precautions are not followed Lay frame and fabric on a drop cloth...

Page 3: ...ll on corners numbered 2 and 5 Make sure the bracket is not protruding past the corners For best adhesion results apply corner brackets 24 72 hrs before using the Design View System FABRIC DRAPE Recommended for brighter venues optional The drape will be in stalled after the frame is unfolded before it s tipped up to put the feet on 2 5 5 Place frame with the graphic side down Drape 3 Thread the fi...

Page 4: ...DesignView Presentation System SET UP Drape 4 Slide fabric banner over first pole 5 Insert second pole into fabric on opposite corner 6 Proceed to thread the second pole into the nut making sure it is both straight tight Corner 2 7 Attach the feet and unfold the frame per set up instructions 5 2 Back view ...

Page 5: ...e front and the button heads face up Install feet onto the button heads of the lower vertical frame sections Button Heads Lift one of the upper corners of the frame above the feet to unfold that side Only unfold one side at a time Pull hinge to the outside of the frame until you hear 2 clicks and the locking knob is fully engaged U p p er Corner Yes No 2 2 5 5 4 4 1 1 3 3 6 6 2 Clicks ...

Page 6: ...DesignView Presentation System is a product of Skyline Exhibits Patents Pending 2011 Skyline Exhibits DesignView Presentation System SET UP 2 Clicks 5 Repeat Step 4 for the last vertical side 2 5 4 1 3 6 ...

Page 7: ...For example if your projection area white space is a diagonal video size of 100 254 cm place the rear of your projector distance A 34 86 cm away from the screen The projector should be placed on the case for the three smallest screen sizes 3 Plug power cord into projector and AC outlet Dukane 8101H Projector Support Resources 1 These quick Start instructions are meant to serve as a supplemental re...

Page 8: ...mote control to the active sensor in the front of the projector to assure it receives the signal For details review the Operating Guide on the MONITOR OUT COMPUTER IN2 COMPUTER IN1 CONTROL AUDIO OUT S VIDEO Y CB PB CR PR VIDEO L R AUDIO IN3 AUDIO IN 1 2 RGB OUT AUDIO OUT AUDIO OUT RS 232C Y CB PB CR PR COMPONENT VIDEO OUT R L T U O O I D U A R L T U O O I D U A R L T U O O I D U A S VIDEO OUT VIDE...

Page 9: ... or decreases the displayed image will move up or down Smaller images will move less than larger ones The screen height may have to be changed using the adjustable feet if the projector is moved The distance between the screen and projector cannot be changed without changing image size 8 To Display and switch the image press the VIDEO or COMPUTER button on the remote to see the image from one of t...

Page 10: ...ew screens 10 ADJUST THE PROJECTOR FOCUS AS NEEDED Use the FOCUS and FOCUS buttons on the projector or remote control to adjust the screen focus are set up for a 4 3 ratio 12 ZOOM by using the D ZOOM and the D ZOOM buttons on the remote control to adjust the screen size 13 Adjust the projected picture position by pressing the POSITION button on the remote control using the arrow buttons Press the ...

Page 11: ...l or projector The POWER OFF dialog appears on the screen for 5 seconds Confirm that the lens door will not hit anything when closing Then press the STANDBY ON button again while the message appears The projection lamp will go off lens door will close and the POWER indicator will begin to blink orange NOTE To cool the projector wait until the POWER indicator turns a steady orange before turning th...

Page 12: ...nd side Push frame out while pulling pin to release hinge Fold frame inward Brace When hinge releases hold onto upper section and fold the side down The hinges have a tension lock To release the tension brace the bottom of the frame with your foot and push outward on the section of the frame above the hinge while pulling the locking pin of the hinge out 2 5 4 1 3 6 1 ...

Page 13: ...front side is down Applying slight downward pressure on the horizontal hinges to release tension pull both locking pins out Lift up with the locking pins to fold the frame Frame can then be packed in the case 3 Remove Feet by lifting up on locking pin and sliding feet off of button heads Make sure to lay frame and fabric on a drop cloth or clean area to avoid soiling the fabric ...

Page 14: ...abric Removing existing fabric 1 Open the frame and find the loop tab along the bottom front right of your fabric Pull it gently If the loop has been removed or broken after long term use pull on the side tab of the fabric located next to the locking knob 2 Pull fabric off the frame starting at the tab or locking knob hinge area Remove the fabric by gently pulling until it is no longer attached ...

Page 15: ...ttom of the frame will have the button heads for attaching the feet 4 Corners first Insert the rubber strip into the outside slot of the frame in the four corner areas first On the final corner it helps to hold one side of the corner while inserting the other side so the first side does not slip Make sure you insert the rubber strip into the outside slot of the frame 5 Hinge areas next Insert the ...

Page 16: ...grid below CHOOSE YOUR VIDEO SIZE SETUP FLOOR INFO DIAGONAL VIDEO SIZE WHEN FABRIC IS STRETCHED ON FRAME APPROXIMATE EXHIBIT SPACE NEEDED DISTANCE FROM SCREEN TO FAR SIDE OF PROJECTOR 50 127 cm 18 00 45 7 cm 66 7 169 4 cm 24 25 61 6 cm 75 190 5 cm 27 50 69 9 cm 92 233 7 cm 33 38 84 8 cm 100 254 cm 36 50 92 7 cm For example if your projection area white space is a diagonal video size of 50 127 cm p...

Page 17: ...AGE FITS THE WIDTH OF THE SCREEN Note that as the size of the image increases or decreases the displayed image will move up or down Smaller images will move less than larger ones THE SCREEN HEIGHT WILL HAVE TO BE CHANGED USING THE ADJUSTABLE FEET IF THE PROJECTOR IS MOVED The distance between the screen and projector cannot be changed without changing image size 7 PRESS THE MENU BUTTON TO SEE THE ...

Page 18: ...tive to the projection area white space and parallel to the screen Leveling feet can be adjusted to account for floor variability 90º Parallel Align centers of projector and screen 9 ENSURE THAT THE PROJECTOR IS LEVEL by selecting SET UP from the screen menu then select TILT INDICATOR If the projector needs to be leveled adjust the projector feet until both tilt indicators are centered Tilting the...

Page 19: ...ur computer or DVD player select input source Computer Input or S Video Input and start your presentation 12 SHUTTING DOWN THE PROJECTOR Press the Power button twice Wait until the power indicator light is red before closing the mirror lid COMPUTER INPUT S VIDEO INPUT Projector Support Resources 1 Please refer to the instructions enclosed with the projector as they include additional information o...

Page 20: ...F this varies from computer to computer 4 How do I mute the picture Press Picture Mute on the Remote Control with the HTML page over the LAN or when using a control system via RS232 5 How do I magnify the image On models with this feature image magnification can be controlled by pressing the or magnification button on the remote control 6 How do I set up the Auto adjust in the menu The auto adjust...

Page 21: ...ginal settings Go to Menu and select RESET 3 What do I do if the image is not displaying on the screen but is displaying in your computer a Press Function F8 this varies from computer to computer b Adjust the screen proportion see directions below 4 What do I do if the image displayed Screen Proportion appears to be the wrong a Check the Screen Ratio b Open Display click START point to SETTINGS cl...

Reviews: