01646
OFF
ON
1
2
3
4
1 2 3
LOW
MED
1 2 3
HIGH
1 2 3
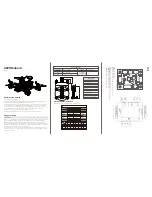
POWERING UP AND PAIRING
(WITH ALTITUDE ON)
FLYING GUIDE
VIDEO STUNT DRONE
Press
Auto Launch
to launch a few feet off the ground.
Press the directional
Thumbstick
to fly in any direction.
Press the
Altitude
button to fly 12” higher or lower.
Press the
Auto Land
button to land.
Turn Drone on.
Quickly place drone on flat surface.
Turn on remote.
Wait for flashing green light to turn solid.
Online Video
Instructions & Flying
Tips available now at
SKYVIPER.COM
FLIGHT SENSITIVITY SWITCH
The Drone’s responsiveness may be adjusted on the Controller to match your flying skills.
There are three choices: 1 LOW sensitivity 2 MEDIUM sensitivity 3 HIGH sensitivity
It is best to start in the low sensitivity position until you have mastered flying. Flight sensitivity
can be adjusted before or during flight.
Forward/
Backward Trim
Power On/
Off Switch
Power Indicator LED
Video and photo
Recording buttons
Rotation Trim
Left/Right Trim
Stunt Button
THROTTLE/
ROTATION STICK
Press up to
fly forward
Press down
to fly
backward
Press left
to fly left
Press right
to fly right
DIRECTION STICK
Press up
to lift
Press down
to descend
Press
left to rotate
counter-
clockwise
Press
left to rotate
clockwise
DIRECTION STICK
• Push the direction stick forward to fly forward or
away from you (Green blade in front). Push
backwards to fly backward. The further you push,
the faster the drone will fly in that direction.
• Push the direction stick left to fly left. Push right
to fly right. The further you push, the faster
the drone will fly sideways.
AUTO LAUNCH/LAND BUTTON
• Press the auto launch
button to launch a few feet
from the ground.
(Exact height may vary.)
• Press the auto land button
to land the drone by itself.
ALTITUDE BUTTONS
• Press the up or down arrow to adjust
the drone’s altitude. The drone will lift
or lower approximately 12” each time
the up or down arrow is pressed.
(Distance may vary.)
• Hold the up or down buttons for
continuous lift or descent.
TOGGLE INTO MANUAL FLIGHT WHILE IN AUTO-HOVER
• Hold stunt button and press auto land/auto launch button
and a tone will sound from the remote. Make sure your
throttle stick is in the down position.
• After the tone is heard, move the throttle stick up until
the drone starts to rise. (If throttle is not matched in
5 seconds then manual flight will be cancelled.)
TOGGLE INTO AUTO HOVER WHILE IN MANUAL FLIGHT
• Press either the up or down altitude locking button to
toggle back into auto hover. (Your drone will hover at the
current throttle speed.)
TOGGLE INTO MANUAL FLIGHT BEFORE TAKE-OFF
• Hold stunt button and press auto land/auto launch button
and a tone will sound from the remote. Make sure your
throttle stick is in the down position.
• Push the throttle stick up to begin manual flight.
THROTTLE/ROTATION STICK
• While in manual flight mode push the throttle
stick forward to make drone lift.
• The further you push the throttle stick, the
faster you lift.
Up and down controls only apply to manual
flight mode.
(
(
•
When launching the drone, face the same
direction as the drone. Green blades and green
LEDs should be in front.
•
If your drone drifts in any direction when you are
hovering, you will need to make Trim
adjustments to correct the driving. Trim
adjustments are sometimes needed when the
drone is first flown after purchase. See TRIM
ADJUSTMENTS section for details.
•
Practice launching, hovering and landing before
attempting to learn other moves.
•
Flying 2 to 3 feet above the ground will reduce
ground turbulence and make flying easier.
•
When first attempting to fly in different
directions, start by tapping the direction stick
until you have a feel for it. Always move controls
slowly until you become comfortable operating
the drone.
•
Once you’ve mastered flying in directions,
practice rotational controls. Spinning and
keeping drone facing the same direction as you
makes flying easier and more intuitive.
•
Stay 2 to 3 feet away from walls and ceilings
as drone will be drawn towards them if you fly
too close.
•
If propeller blades come in contact with
another object or you crash, throttle down or
auto land immediately to prevent possible or
further damage.
•
If anything prevents drone’s blades from
spinning or they become jammed, throttle
down or auto land immediately. Do not attempt
to fly until obstruction has been removed and
damage fixed.
•
Should something prevent drone’s blades from
spinning, drone may auto shutdown. LiPo
battery will need to be unplugged then
reconnected to restore flying power.
•
If the drone flies too far away, beyond the
control range of the remote, the drone will
auto-land to prevent the drone from flying away
out of control.
016
46