Sirius XM RAdio MIRGE, User Manual
Get easy access to the user manual for the Sirius XM Radio MIRGE. Download this invaluable manual for free from our website, providing comprehensive instructions on how to maximize your listening experience. Discover step-by-step guidelines and unleash the full potential of this remarkable product.
Share
Download


Reviews:
No comments
Related manuals for MIRGE
RT2
Brand: gatso Pages: 11

IP100H
Brand: Icom Pages: 57
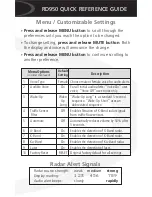
rd950
Brand: K40 Pages: 2

RX-8
Brand: Zartek Pages: 17

DIR3510SCBTX
Brand: Hama Pages: 120

AJ-C2500
Brand: Akai Pages: 48

ProTravel PT-50
Brand: Sangean Pages: 56

GT-3WP
Brand: SAIN SONIC Pages: 18

Fulbourn II FUL-DAB-BLK-2
Brand: MAJORITY Pages: 27

XKP W Series
Brand: FAAC Pages: 20

TK5
Brand: Intaride Pages: 4

R9921
Brand: Roberts Pages: 28

Classic 999
Brand: Roberts Pages: 24

UBC125XLT
Brand: Uniden Pages: 72

SP-600-JX
Brand: Hammarlund Pages: 31

WR-12BT
Brand: Sangean Pages: 14

G-300
Brand: Midland Pages: 8

VX-5500V
Brand: Vertex Standard Pages: 4


