background image

CV-1 8 x 22 VGA Digital Camera Binocular

®

Summary of Contents for Captureview Cv-1 8x22 VGA

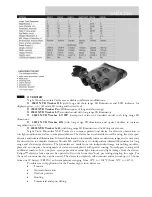
Page 1: ...CV 1 8 x 22 VGA Digital Camera Binocular ...

Page 2: ......

Page 3: ...ideo 13 Operations 14 Use the Mode and Shutter Button 14 Use the Camera Mode 15 Change the Camera Resolution 15 Use the Video Mode 16 Erase Delete Pictures or Video 16 Find Out How Many Pictures You ve Taken 17 Use the Self Timer 17 Find Out How Much Power is Left in the Battery 18 Find Out Why CaptureView is Beeping 19 Download Pictures 19 Install Image Editing Software 21 Other Software and Syst...

Page 4: ...Start Turn on camera Press and hold down Mode for 3 seconds Press the Shutter You ve taken a picture Point at something interesting 2 Install 2 AAA batter ies not included 1 3 4 How to start taking pictures 4 ...

Page 5: ... installed on your PC and can be found on the included CD Rom Enjoy your photos Open Ulead Photo Express to view edit and print your pictures Install Ulead Photo Express Insert the CD click on Ulead Photo Express and follow the on screen instructions 6 Plug in Connect CaptureView to your PC or Mac OS 9 0 or higher using the included USB cable 5 7 8 How to download your pictures USB Cable ...

Page 6: ...6 g e f g b b f Features h Fig 1 Top View 1 Eyepieces 2 Mode Button 3 Shutter Button 4 LCD Panel 5 Objective Lens 6 Barrel Fig 2 Front View 7 Camera Lens c d ...

Page 7: ...i j Fig 3 Bottom View 8 Diopter Scale on right eyepiece 9 Focus knob 10 Battery Compartment Lid push forward and lift to remove Fig 4 Rear View 11 USB Port 1 Features 7 1 ...

Page 8: ...tatus for ease in performing desired operations Important Note Images in the camera will be lost if the batteries are depleted or if the batteries are removed for more than 60 seconds Accordingly change the batteries when they run low Images will be maintained in memory for approximately 60 seconds when changing batteries To conserve battery life remove batteries after downloading images to a comp...

Page 9: ...eyeglasses fold down the rubber eyecups and hold the eyepieces up against your glasses How to Use Your Binocular If you want to Do this Fold down 1 Hold CaptureView up to your eyes in the normal viewing position Use both hands to hold each barrel firmly 2 Pull the barrels apart or push the barrels together until you see a single circular field with both of your eyes Barrel Barrel 9 ...

Page 10: ...e that is at least 50 feet 15m away 3 Looking with only your left eye rotate the Focus Knob until the object you are viewing is focused 4 Looking with only your right eye rotate the Diopter Scale until the object you are viewing is focused 5 Now looking with both eyes rotate the Focus Knob to focus on both far and near objects If you want to Do this Diopter scale Focus knob ...

Page 11: ...ures and video Depending on the available light and your distance from the object captured images may not appear as bright or centered as viewed through the binoculars CaptureView has a fixed focus you cannot focus the camera manually and takes focused pictures even if the image in the binoculars is out of focus Battery compartment Press and hold the Mode button for 3 to 5 seconds to turn on the c...

Page 12: ... the binocular but keep in mind that the camera has a fixed focus and is not affected by the focus knob 3 Hold CaptureView steady and press the Shutter button Note that the counter advances For example if the counter reads 016 this means that this is your sixteenth picture Taking Pictures and Video If you want to Do this The amount of pictures you can take High Resolution 640 x 480 360 Low Resolut...

Page 13: ...he camera now captures a movie 5 The counter keeps counting in seconds as you capture the movie Press the Shutter button again to stop recording the movie Note that the counter stops and the number of pictures advances by one a movie counts as one object Taking Pictures and Video If you want to Do this The maximum length of a video Up to 200 seconds The length of video will decrease if you have al...

Page 14: ...creen in the following order Camera Video Resolution Self timer Erase Last Image Erase All Images The next press returns you to the Camera icon Press the Shutter button when the desired icon is displayed to select an operation Use the Shutter button to take a picture and to begin or end the recording of a movie Operations If you want to Do this Camera Video Hi Res Lo Res Operation Icons Self Timer...

Page 15: ... Select a Resolution setting before taking a still image 1 The first time you turn on the camera it displays the High Resolution icon This is the default setting 2 To change the resolution keep pressing the Mode button until the Low Resolution icon displays Then press the Shutter button to select Low Resolution Low resolution allows you to capture more images with your camera Operations If you wan...

Page 16: ...r button again to stop recording Erase Last Keep pressing the Mode button until the Erase Last Image icon displays and then press the Shutter button The icon flashes Press the Shutter button again to erase the last captured image or movie Erase All Keep pressing the Mode button until the Erase All Image icon displays and then press the Shutter button The icon flashes Press the Shutter button again...

Page 17: ...the counter Use the Self timer Check out the LCD Counter The counter displays the number of pictures or videos taken from 0 to 999 Keep pressing the Mode button until the Self timer icon displays and press the Shutter button The camera then pauses for about 10 seconds It sends out 6 slow and then 6 fast warning beeps before taking the picture Operations If you want to Do this 888 Counter Display S...

Page 18: ...batteries before your images are deleted Check the battery indicators on the display Listen for the following patterns Power on Two short high beeps Wake up One long high beep Sleep One short high beep Takes a picture One short high beep Failed to take picture due to insufficient memory Three short high beeps Low battery Six short high beeps beeps only when power is On Self timer Sends out 6 slow ...

Page 19: ...atically installs on your PC No drivers are needed Just attach one end of the USB cable to the camera s USB port and the other end to your PC s USB port Your PC considers the camera as a mass storage device and displays it like a hard drive You can then copy your still pictures or video to your com puter or even copy files to the memory on the camera If you want to Do this USB Port 19 ...

Page 20: ... can browse the camera s memory as if it were a hard drive 4 If CaptureView does not appear in Windows Explorer it might be using a drive letter that has already been assigned by your PC e g C D E etc Use Windows Disk Manager program to change the drive letter to an unassigned letter e g K 5 You may now copy images or files from the camera s memory to your PC just as you would with any external ha...

Page 21: ... 4 After you click Finish the Ulead Photo Express icon appears on your desktop 5 Double click the icon to launch the program You can now view edit and print your images Photo Express allows you to browse the camera s memory as if it were a hard drive If you want to Do this 21 Note If you are connected to the internet and you click on the Meade logo on the splash screen you will go to meade com ...

Page 22: ...duct Documents link in the Download section of their homepage to find a link for the Photo Express manual Windows 98SE Win Me Win 2000 Win XP Note If using Windows 98ME or higher CaptureView automatically installs on your PC No drivers are needed If using Windows 98SE or lower drivers must be installed on your PC and can be found on the included CD Rom 200MHz or equivalent processor or faster 64MB...

Page 23: ...batteries To conserve battery life remove batteries after downloading images to a computer There is continual battery drainage even when CaptureView is turned off Be sure CaptureView is off before changing batteries 3 Avoid dropping CaptureView Do not disassemble CaptureView It is very important to use the following connection and disconnection procedures to download pictures 1 Only connect Captur...

Page 24: ...timum camera range 49 ft to infinity Memory 16MB SDRAM Storage capacity at each resolution 640 x 480 360 images 320 x 240 1600 images Operating system requirements Windows 98SE 2000 Me XP Operating environment 41 to 104 F 5 to 40 C 20 85 relative humidity non condensing Interface type USB Display Icon LCD Weight 9 7 oz 276g Product dimensions 4 75 W x 2 4 H x 4 25 D Batteries user supplied Two x A...

Page 25: ...f one year from the date of original retail purchase This warranty gives you specific rights You may have other rights which vary from state to state Simmons reserves the right to change product specifications or to discontinue productions without prior notice This warranty supersedes all previous Simmons binocular warranties Any return made in the U S A under this limited warranty must follow thi...

Page 26: ......

Page 27: ......

Page 28: ...82 244 01020 v1 0 02 04 Simmons Outdoor Corporation 6001 OAK CANYON IRVINE CALIFORNIA 92618 949 451 1450 www simmonsoptics com ...

Reviews: