bitte aufbewahren
veuillez conserver
si prega di conservarle
please keep
por favor, guardar
por favor, guardar
lütfen saklayýnýz
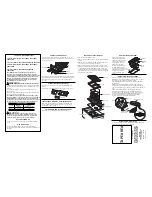
Assembly instructions
Einbauanleitung
Notice de montage
Istruzioni di Montaggio
Instrucciones de montaje
Instruçoes de montagem
пожалуйста, сохраните данное руководство
Montaj talimatlarý
Руководство по монтажу
1
s.v.p. bewaren
Installatievoorschrift
~
.
-
.
43 53
~31
~60
en
de
fr
it
es
pt
nl
tr
ru
~
Summary of Contents for ER926SB70D/07
Page 2: ...2 4 4a 4b 3 70 ...
Page 3: ...5 6 7 8 7a 7c 8a 7b ...
Page 4: ...9 ...
Page 5: ...10 10 a 11 ...