Sharp SX68N7, Operation Manual
The Sharp SX68N7 Operation Manual is available for download absolutely free on our website. This comprehensive manual provides detailed instructions and guidelines for the optimal use of your Sharp SX68N7. Enhance your user experience by accessing the manual at manualshive.com.
Share
Download


Reviews:
No comments
Related manuals for SX68N7

TS24
Brand: XOCECO Pages: 43

TK2716D
Brand: XOCECO Pages: 37

PH-42R6
Brand: XOCECO Pages: 42

PS-32HU35
Brand: XOCECO Pages: 28

MD2268-32
Brand: Mounting Dream Pages: 12
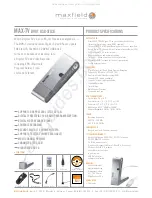
MAX-TV
Brand: Maxfield Pages: 3

VM-SL10D
Brand: WilTec Pages: 5

i2i Stream
Brand: Aerielle Pages: 2

DCOR2SC
Brand: Paradigm Pages: 8

6626LG
Brand: Sylvania Pages: 72

98R754
Brand: TCL Pages: 18

AT 1503L CD
Brand: Akura Pages: 19

DTQ 20D4AS
Brand: Daewoo Pages: 14

LDDDQ12WB
Brand: LD Pages: 6

L15V26B
Brand: Zenith Pages: 56

PR1396
Brand: Magnavox Pages: 8

LPAB10
Brand: HAMPTON BAY Pages: 8

LED22VH60
Brand: VIORE Pages: 26


