

Using the PW-TC980 for the fi rst time
First, insert the rechargeable batteries, and ensure that they are charged before use.
①
②
1
Remove the battery cover on the
reverse side of the unit.
To remove the battery cover, slide it in the
direction indicated by the arrow
①
while
pressing the
symbol on the battery
cover, and then pull it up in the direction
indicated by the arrow
②
.
2
Insert the supplied rechargeable
battery (EA-BL14).
Insert the rechargeable battery into the battery
housing at an angle, and then slightly press
the terminal end of the battery and completely
press down the opposite side.
• Do not touch the terminals of the rechargeable battery or the unit.
• Do not insert the rechargeable battery reversely. Confi rm orientation. Do
not force the battery. This can cause problems such as breakage.
3
Replace the battery cover.
4
Connect the (EA-80A) AC adapter in the order of
①
and then
②
.
When the charge lamp will light red, the charging has started.
Ĭ
ĭ
AC adapter connector
Charge lamp
Power outlet
(AC)
5
When charging is complete, the charge lamp will turn off.
• A complete charge will normally take approximately 5.5 hours (the
charging time can change depending on operating temperature and
conditions).
6
Remove the AC adapter from the connector and the outlet.
7
Open the unit and press
入/切
to turn on the
power.
After a while, the calibration screen
for the touch pad appears on the
display (main display).
8
Pull out the stylus and use it to accurately touch each center
of the four “+” characters displayed on the touch pad on
the display (main display). Then do the same to the four “+”
characters displayed on the handwriting pad.
Stylus
Pull out the
stylus to use.
Back of
the unit
• When calibration is fi nished the LCD contrast adjustment screen is displayed.
9
Adjust the LCD contrast of the handwriting pad by touching
or
on the pad.
10
After these adjustments, press
検索/決定
.
The key sound (beep) on/off screen appears.
11
Press
Y
or
N
to turn the key sound on/off.
The kana entry screen appears.
12
Press
Y
to select alphabet character input or press
N
to
select Japanese input.
The date/time settings screen is displayed.
13
Select the date items using
or
, and then enter “
年
”
(year), “
月
” (month) and “
日
” (day) (e.g.
June 8th, 2009
→
09
06 08) using the number buttons on the handwriting pad.
Confi rm that the cursor is on “AM
(午前)
” or “PM
(午後)
”,
and then select one of them using
or
.
Press
, select the time items using
or
and then
enter “
時
” (hour) and “
分
” (minute) (e.g.
3:25
→
03 25).
14
Confi rm that the information entered is correct and press
検索/決定
.
The menu display appears.
Viewing 1Seg TV contents
First, set channels for which there is reception (channel selection list
settings).
Example: Setting up channels in “
関西エリア
/
大阪府
/
大阪
”
(Kansai area/Osaka pref./Osaka).
1
Extend the antenna.
●
F u l l y e x t e n d t h e
antenna. If the antenna
is not fully extended,
it may not stand up
straight because it is
not locked in position.
2
Press
.
Channel setting confi rmation
window is displayed.
3
Press
Y
.
4
Press the numeric key
to select the area.
5
Then, press
to select
the prefecture.
6
Finally, select the region by
pressing
.
Channel select list set-up
confi rmation window is displayed.
7
Press
Y
. Channel selection
starts.
8
When done, channel
selection list is displayed,
and the region name “
大阪
”
is registered.
9
Select a channel by using the numeric keys (
to
), or
by touching the channel name.
The selected TV program is displayed.
●
Channels can also be selected by using
or
and pressing
検索/決定
.
Using 1Seg TV
1
Fully extend the antenna.
2
Press
.
The TV content is displayed.
●
Use the numeric keys (
to
), or
and
to select a
channel.
●
To adjust the volume, use
音量小
and/or
音量大
.
Perform channel selection list settings on the dictionary screen.
1
Fully extend the antenna.
2
Press
.
The TV content is displayed.
3
Press
メニュー
.
The TV settings menu is displayed.
4
Select “channel selection
list settings” and press
検索/決定
(or touch the
menu item to select it).
The channel selection settings list appears.
5
Select the settings and edit menu items from the on the right
side of the screen to adjust the settings (For details, refer to
the Instruction Manual).
Using the channel selection list
1
While in the TV viewing
mode, press
.
The channel selection list appears.
2
Use
and
to select
an area.
3
Select a channel by using the numeric keys (
to
), or
by touching the channel name.
The selected TV program is displayed.
Adjusting the display size
1
While in the TV viewing
mode, press
メニュー
.
2
Select “
画面設定
” and
press
検索/決定
(or
touch the menu item to
select it)
.
Touching the screen in the TV viewing mode will also switch the display size.
3
Use
and
to select the display size and press
検索/決定
(or touch the menu item to select it).
The window confi guration screen appears.
QUICK REFERENCE
PW-TC980
ELECTRONIC DICTIONARY
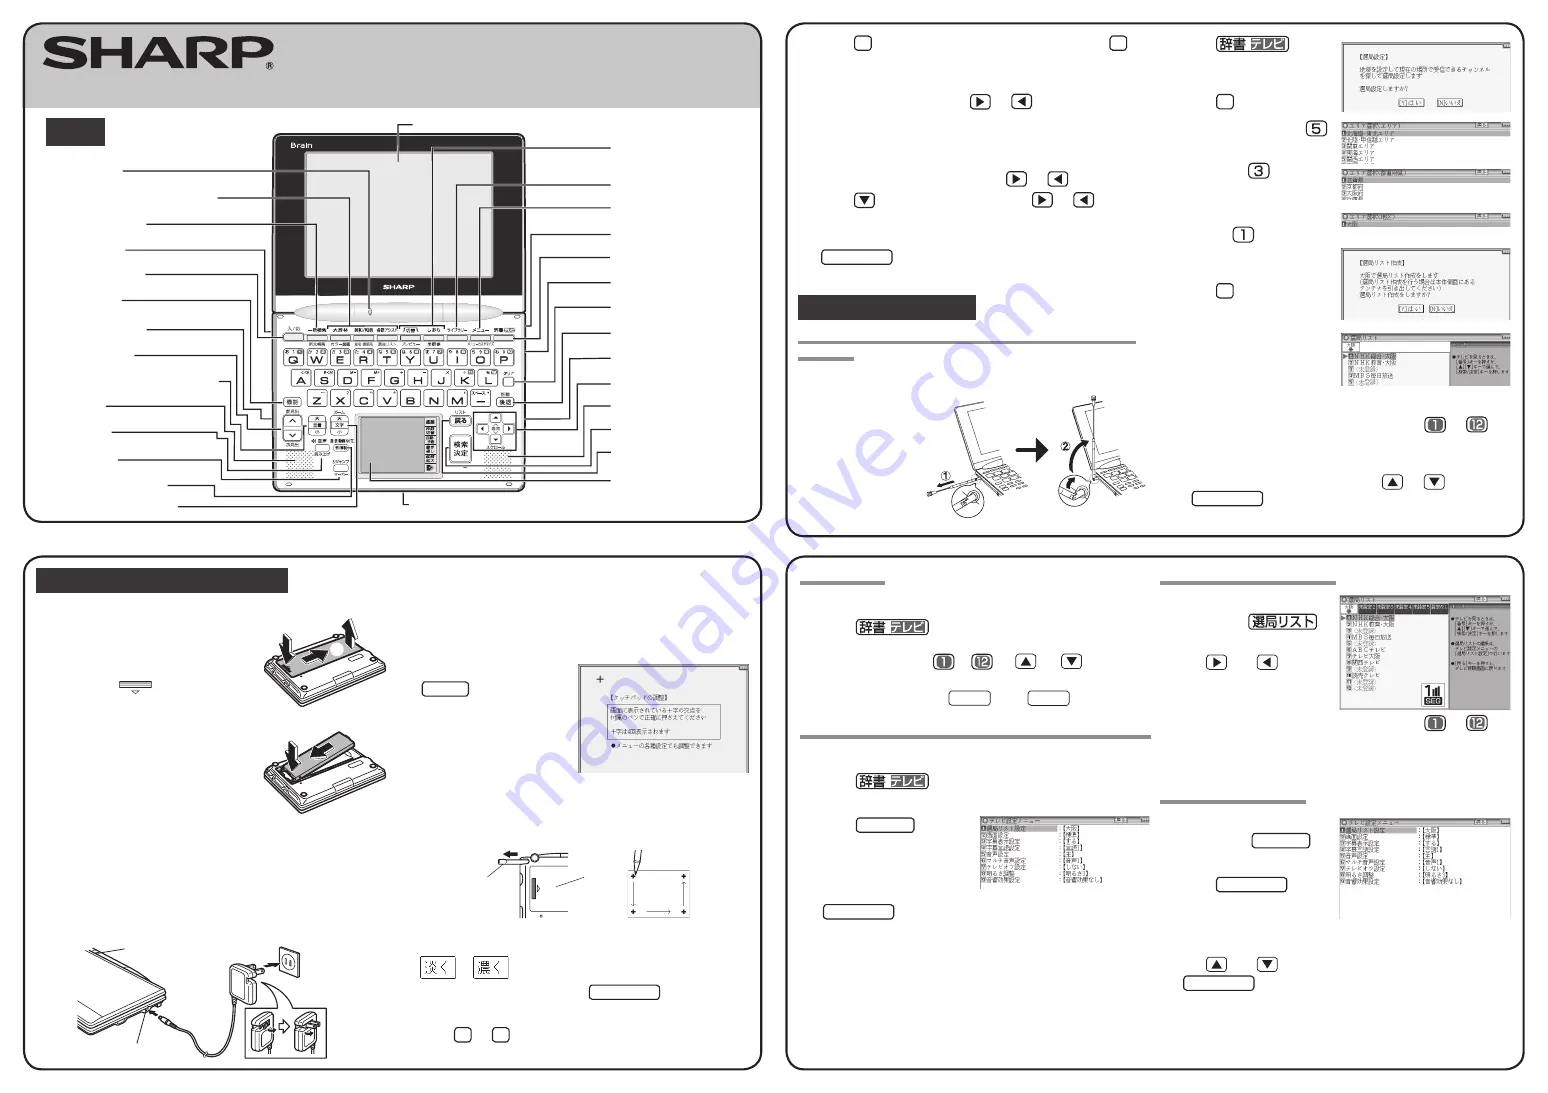
Layout
PRINTED IN
CHINA
08LSP(TINSE1466EHZZ) 0GS9702620////
Display (Main display) / touch pad
Charge lamp
Selection keys for contents/functions
Global search keys
Antenna (side)
Power ON/OFF key
Function key
Earphone jack (side)
Page scroll keys
Speaker
Volume control keys (volume up/down)
Audio key
S-jump key
Character size change keys
Example/explanation key
Handwriting pad
Card slot (Front)
Escape key
Search/enter key
Speaker
USB connector (side)
AC adapter connector (side)
Dictionary/TV switch keys
Stylus holder (side)
Menu key
Cursor keys
Back space key
Clear key
Library key
Utility keys for
dictionaries/functions


