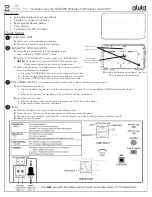
Layout
QUICK REFERENCE
PW-AT780
Handwriting pad
Page scroll keys
Speaker
Back space key
Clear key
Cursor keys
Escape key
Search/enter key
Card slot
(side)
Menu key
Backlight key
Utility keys for
dictionaries and
functions
Stylus holder
(side)
Function key
Power ON/OFF key
Global search key
Selection key for
contents
Speaker
Display
(Main display)
Earphone jack
(side)
Character size
change keys
Audio key
Volume control keys
(volume up/down)
Using the PW-AT780 for the first time
Insert the supplied batteries before using the PW-AT780.
Inserting the batteries
1
Set the battery replacement switch on
the bottom of the unit to the “
解除(交
換時)
” position.
2
Remove the battery cover by sliding it
in the direction indicated by the arrow.
Ribbon tab for removing
the batteries
3
Make sure the battery polarity is
correct.
• Insert the batteries over the ribbon tab,
being sure not to cover the end of the tab.
4
Insert the battery cover horizontally
when putting it back in place.
5
Set the battery replacement switch to
the “
ロック(使用時)
” position.
6
Open the unit and press
入/切
to turn on the power.
After displaying the message “Welcome to Papyrus World”, the calibration
screen for the handwriting pad appears.
If the power cannot be switched on, perform the following procedure.
• Make sure the battery replacement switch is in the “
ロック(使用時)
”
position and press
入/切
again.
• If the power still cannot be switched on, try performing steps
1
through
6
in the above procedure once more.
7
Pull out the stylus and use it to accurately touch each center
of the four “+” characters displayed on the handwriting pad.
Stylus
Back of
the unit
• Touching each center of the four “+” characters displays the LCD contrast adjustment screen.
8
Adjust the LCD contrast of the main display by pressing
淡く
(
)
or
濃く
(
)
.
9
Adjust the LCD contrast of the handwriting pad by touching
or
on the pad.
10
After these adjustments, press
検索/決定
.
The key sound (beep) on/off screen appears.
11
Press
Y
or
N
to turn the key sound on/off.
The kana entry screen appears.
12
Press
Y
to select alphabet character input or press
N
to
select Japanese input.
The battery type selection screen appears.
13
Select the battery type (“
アルカリ乾電池
(alkaline dry cell)
”)
using
or
and then press
検索/決定
.
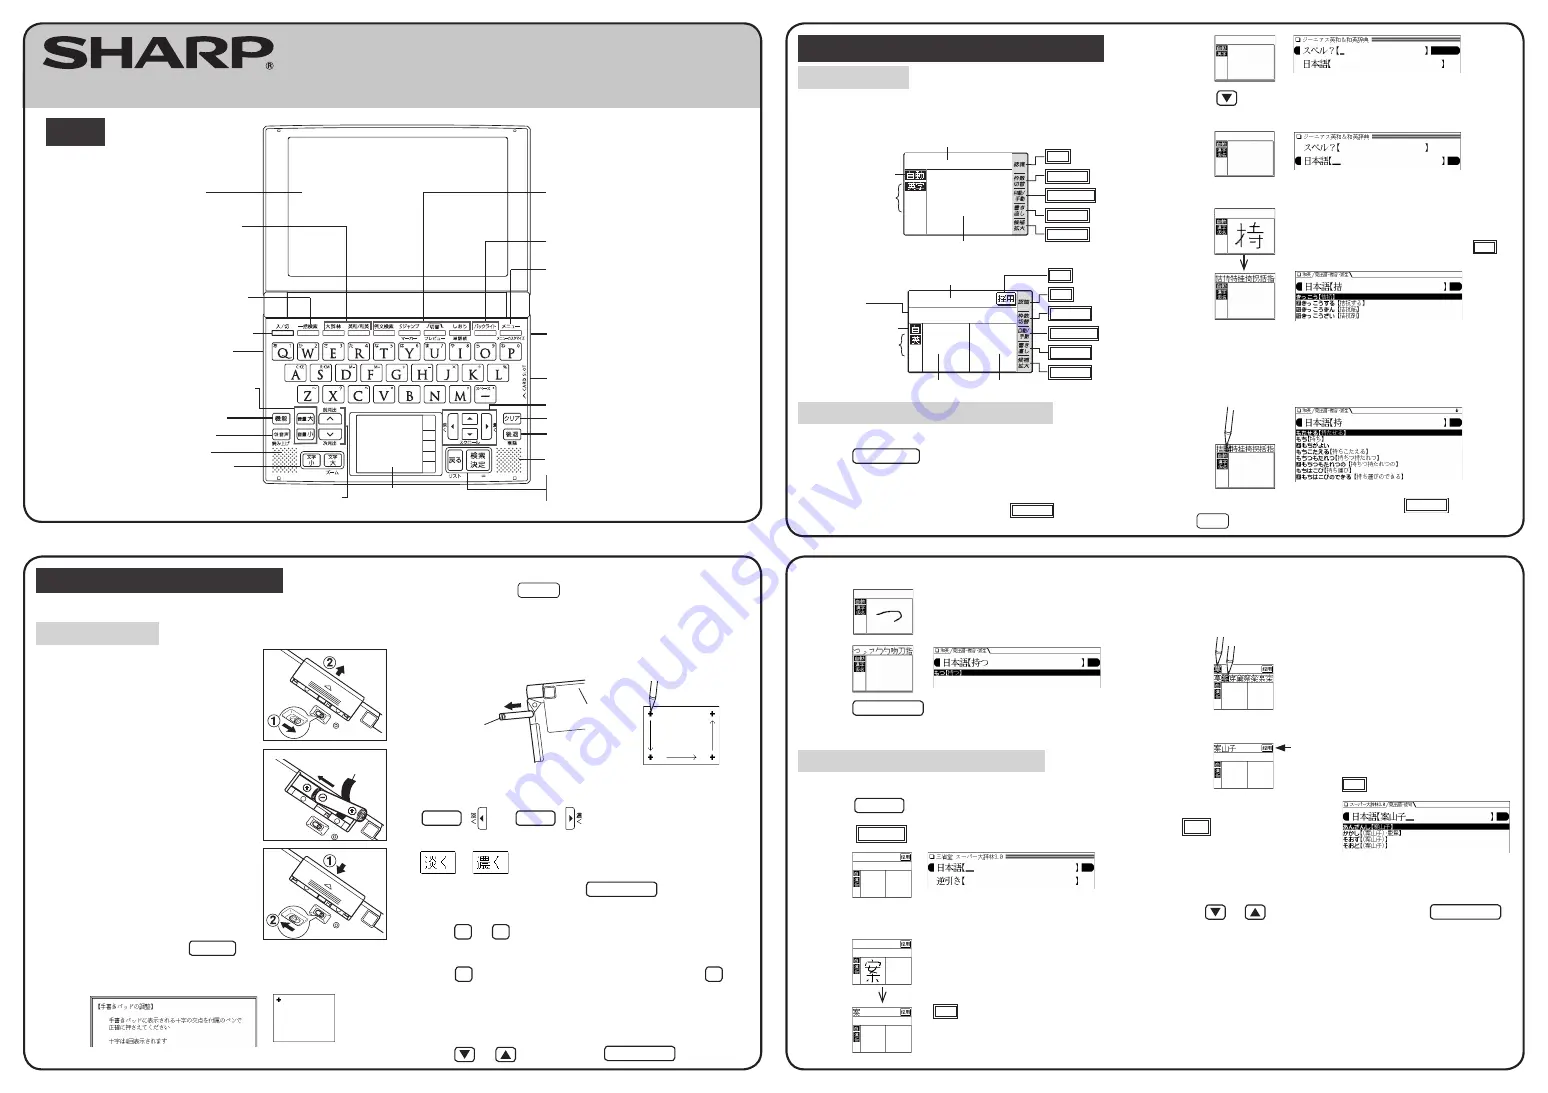
Entering characters using the handwriting pad
Parts and functions
The handwriting pad is set to enter characters when the cursor is in any part of
the character entry area.
[Single-frame pad]
Candidate list display area
Character entry type
indicator
Automatic/manual
recognition indicator
Handwriting area (frame)
認識
button
枠数切替
button
自動/手動
button
書き直し
button
候補拡大
button
[Dual-frame pad]
Character entry display area
Character entry type
indicator
Automatic/manual
recognition indicator
Handwriting areas (frames)
認識
button
枠数切替
button
自動/手動
button
書き直し
button
候補拡大
button
採用
button
Candidate list
display area
Entering characters using the single-frame pad
Example: Enter a Japanese word “
持つ
” from a Japanese-English dictionary
1
Press
英和/和英
.
The
ジーニアス英和
&
和英辞典
entry/selection screen appears.
The handwriting pad is set to the English character entry mode.
• If the dual-frame pad is displayed, touch
枠数切替
to switch to the
single-frame pad.
2
Press
to move the cursor to the Japanese entry area.
The handwriting pad is now switched to enter kanji and kana.
3
Use the stylus to draw “
持
” in the handwriting area.
4
If the character in the entry area is not the one you desired,
use the stylus to touch and select the desired character in the
list.
The character in the entry area changes.
• If you cannot find the character in the list, touch
書き直し
or press
後退
to erase it and redraw it on the pad.
The character shown in the candidate list display area is
also placed in the entry area so that the dictionary search
can proceed.
• When the manual recognition is used, press
認識
to
have the dictionary recognize the entry.
5
Likewise, enter “
つ
” in the entry area.
6
Press
検索/決定
.
The details screen appears.
Entering characters using the dual-frame pad
Example: Enter a Japanese word “
案山子
” (
かかし
) from
スーパー大辞林
.
1
Press
大辞林
.
2
Touch
枠数切替
to switch to the dual-frame pad.
3
Use the stylus to draw “
案
” in either of the framed areas.
4
If a character is recognized incorrectly, use the stylus to touch
the character. In the candidate list display area, find and touch
the character that you want to replace it with.
①
②
5
Repeat steps 3 and 4 to enter “
山
” and “
子
”.
Up to six characters can be accommodated.
6
After entering the word, touch
採用
to transfer it to the
dictionary’s entry field.
You can then proceed with the
dictionary search.
7
Use
or
to select a candidate and press
検索/決定
.
The details screen is displayed.
• The character in the entry display area is
replaced with the character selected in the
candidate list display.
• For longer words, enter up to six characters and
touch
採用
to transfer the entries to the entry field.
• When you start drawing, the previous entry
is confirmed and then erased.
ELECTRONIC DICTIONARY
When automatic recognition is used, the entry is
recognized within one to two seconds after the stylus
is moved away from the handwriting pad, and the
candidate character appears in the entry display area.
When the recognition is used, you need to touch
認識
to have the dictionary recognize the entry.
When you enter two or more characters, the entry is
recognized immediately after you start writing the next
character in the other framed area.
PRINTED IN CHINA
08ESP(TCADZ0269EHZZ) 0GS9702290////