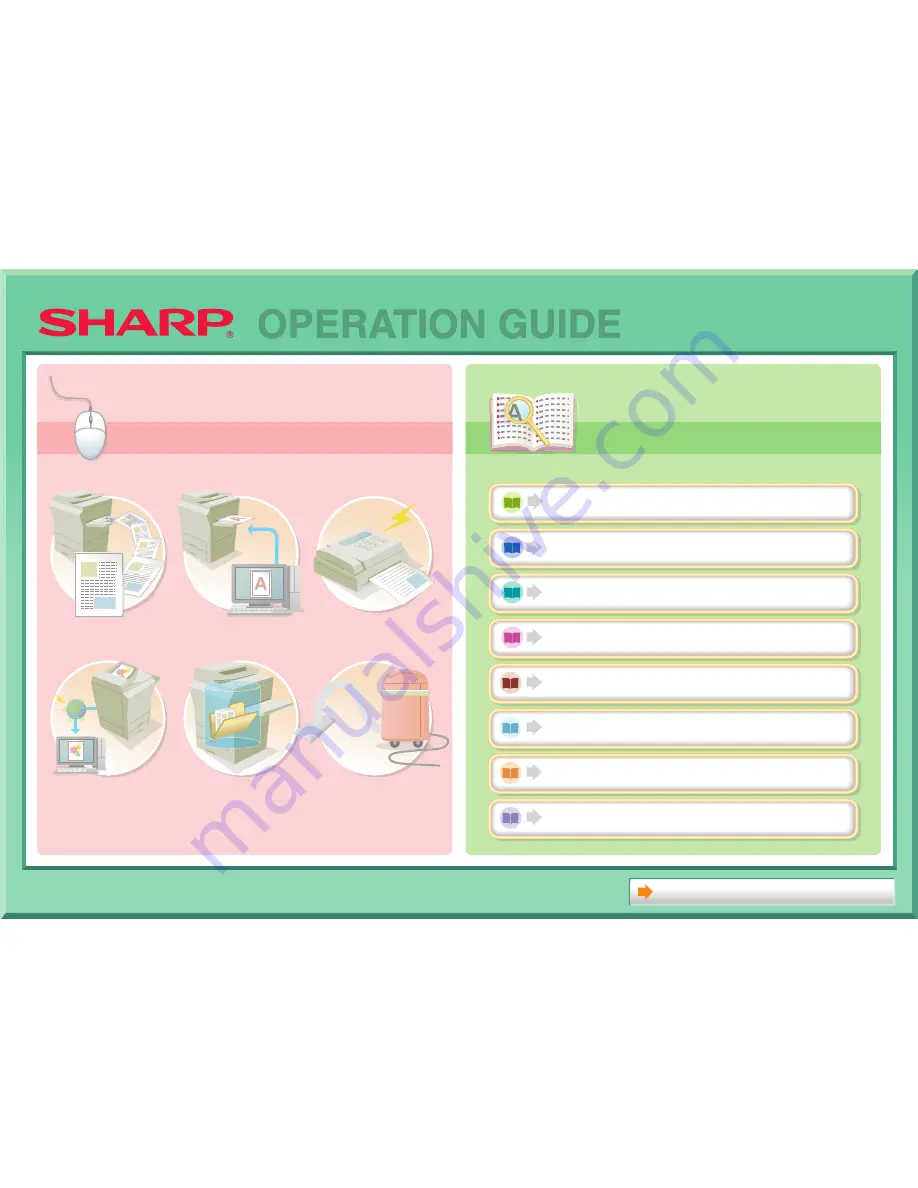
background image

COPIER

PRINTER

FACSIMILE

SCANNER / INTERNET FAX

DOCUMENT FILING

TROUBLESHOOTING

BEFORE USING THE MACHINE

SYSTEM SETTINGS

About Operation Guide

MAKE A COPY

PRINT A DOCUMENT

SEND A FAX

SCAN AN IMAGE /

SEND AN INTERNET FAX

SAVE A JOB AND

REUSE IT LATER

MAINTAIN

THE MACHINE

Search based on 
what you want to do

Search based on 
what you want to do

Search using the 
table of contents

Search using the 
table of contents

OPERATION GUIDE

Summary of Contents for MX-2010U

Page 1: ...ETTINGS About Operation Guide MAKE A COPY PRINT A DOCUMENT SEND A FAX SCAN AN IMAGE SEND AN INTERNET FAX SAVE A JOB AND REUSE IT LATER MAINTAIN THE MACHINE Search based on what you want to do Search based on what you want to do Search using the table of contents Search using the table of contents OPERATION GUIDE ...

Page 2: ...A COPY Conserve Reduce copy mistakes Make a copy of this type of original Make a copy on this type of paper 2010 04 04 Add the date or page numbers Assemble output into a pamphlet Other convenient functions ...

Page 3: ...Conserve Copy on both sides of the paper Copy multiple pages on one side of one sheet of paper Copy on the front and back of a card ...

Page 4: ...Reduce copy mistakes Print one set of copies for proofing Check the number of scanned pages before making copies ...

Page 5: ...l Mixed colour and black white originals More original pages than can be loaded at once Mixed size originals Bulky original shadows appear at edges Bound original such as a book one page at a time Book or pamphlet make facing page copies ...

Page 6: ...Make a copy on this type of paper Envelopes and other special media A3 wide paper Tab Paper Transparency film ...

Page 7: ...Add the date or page numbers 2010 04 04 Add the date Add a stamp 9 10 11 Add the page number ABCDEFG Add text ...

Page 8: ...Assemble output into a pamphlet Create a stapled pamphlet Staple output Create a blank margin for punching Punch holes in output ...

Page 9: ...e a large poster z Make a mirror image copy z Copy onto the centre of the paper z Make a negative copy Convenient functions z Use two machines simultaneously z Give priority to a copy job z Check the status of a reserved job z Insert covers inserts in copy output z Copy a thin original z Adjust the colour ...

Page 10: ...PRINT A DOCUMENT Conserve Print without a computer Print attractive output Assemble output into a pamphlet Print on this type of paper Add text or an image Other convenient functions ...

Page 11: ...Conserve Print on both sides of the paper Print multiple pages on one side of the paper ...

Page 12: ...Print without a computer FTP Print a file on an FTP Print a file in a USB memory device Print a file in a network folder Print a file stored in the machine ...

Page 13: ...Print attractive output Print matching the size of the paper Adjust the brightness and contrast Print using colour settings suitable for the data Bring out faint text and lines Select the print mode ...

Page 14: ...Assemble output into a pamphlet Create a stapled pamphlet Staple output Create a blank margin for punching Punch holes in output Print specific pages on the front side of the paper ...

Page 15: ...Print on this type of paper Envelopes Tab Paper Transparency film Print specific pages on different paper Rotate the image 180 degrees ...

Page 16: ...Add text or an image Add a watermark to print data Overlay an image on the print data Overlay a fixed form on the print data ...

Page 17: ...t a mirror image Security is important z Print confidentially z Print an encrypted PDF file Functions used for specific purposes z Print an invoice copy z Create a large poster Convenient functions z Give priority to a print job z Use two machines simultaneously z Store frequently used print settings z Store a print job ...

Page 18: ...SEND A FAX Conserve Send this type of document Preventtransmissionto the wrong destination Send a clear document Save trouble Security is important Other convenient functions ...

Page 19: ...Conserve Send when the rate is lowest Check received data before printing Send two original pages as a single page Relay a transmission through a branch office ...

Page 20: ... document Bulky original shadows appear at edges Bound original such as a book one page at a time More original pages than can be loaded at once Mixed size originals Original printed on both sides ID card or other card ...

Page 21: ...Prevent transmission to the wrong destination Check the destination once more before sending Check the result of transmission Check the log of previous transmissions Stamp scanned original pages ...

Page 22: ...Send a clear document Adjust the exposure Adjust the image quality Specify the size before sending Send without shadows at the edges ...

Page 23: ...end to multiple destinations XXXX 6789 XXXX 9874 XXXX 4567 XXXX 5432 XXXX 9999 View the transmission log XXXX 6 78 9 XXXX 9 87 4 XXXX 4 56 7 XXXX 5 43 2 XXXX 9 99 9 Easily specify an address search number Bound original such as a book one page at a time ...

Page 24: ...s important Check the destination once more before sending Send confidentially Print protected reception data Initiate reception of a document from a sending machine Send a document at the other machine s request ...

Page 25: ... functions z Forward a received fax to a network address z Print a list of addresses Convenient functions z Send a thin original z Select a transmission destination from a global address book z Give priority to a transmission z Use an extension phone ...

Page 26: ...AN AN IMAGE SEND AN INTERNET FAX Send a clear image Send this type of document Preventtransmissionto the wrong destination Send a smaller file Save trouble Scan from my computer Other convenient functions ...

Page 27: ...Send a clear image Adjust the contrast or image quality Adjust the resolution before sending Send without shadows at the edges Suppress the background of a transmitted document ...

Page 28: ...document Bulky original shadows appear at edges Bound original such as a book one page at a time More original pages than can be loaded at once Mixed size originals Original printed on both sides Original with background ...

Page 29: ...Prevent transmission to the wrong destination Check the result of transmission Check the log of previous transmissions Stamp scanned original pages ...

Page 30: ...Send a smaller file Send at low resolution Compress a file before sending Reduce an image before sending Send an image in black white Send two original pages as a single page ID or other card ...

Page 31: ... aaa aa aa co bb b b b bb c ccc cc cc co ddd dd dd c eee ee ee co View the transmission log aa a a a a a c bbb bb bb cc c c c c c c ddd dd dd ee e e e ee e Easily specify an address search number Send an Internet fax from a computer Bound original such as a book one page at a time ...

Page 32: ... received fax to a network address z Print a list of transmission destinations Convenient functions z Scan a thin original z Select a transmission destination from a global address book z Send at a specified time z Give priority to a transmission z Send in USB memory mode ...

Page 33: ...SAVE A JOB AND REUSE IT LATER Search for a file Organize my files Save an important document Print a batch of files ...

Page 34: ...Search for a file abc Search for a file using a keyword Search by checking the contents of files ...

Page 35: ...Organize my files Delete a file Delete all files Periodically delete files Change the folder ...

Page 36: ...MAINTAIN THE MACHINE Clean the machine Replace a toner cartridge Replace the staple cartridge Replace the stamp cartridge Replace the waste toner box Dispose of punch waste ...

Page 37: ...lean the machine Clean the document glass and automatic document feeder Clean the main charger of the photoconductive drum Clean the original feed roller Clean the bypass feed roller Clean the laser unit ...

Page 38: ... a regular table of contents The following explanation assumes that Adobe Reader 8 0 is being used Some buttons do not appear in the default state 1 2 3 4 5 Return to top page Return to previously displayed page Menu page Table of contents page Body page Search based on what you want to do Search using the table of contents ...

Page 39: ... that was displayed before the current page 5 Adobe Reader Help button Opens Adobe Reader Help 6 Contents button Displays the contents of each chapter For example if the current page is a page in the body of the printer chapter this button shows the contents of the printer chapter 1 2 3 4 5 6 If a button does not appear refer to Adobe Reader Help to display the button Caution when printing If all ...

Page 40: ...etailed explanations of the procedures for using the print function 4 FACSIMILE This chapter provides detailed explanations of the procedures for using the fax function 5 SCANNER INTERNET FAX This chapter provides detailed explanations of the procedures for using the scanner function and the Internet fax function 6 DOCUMENT FILING This chapter provides detailed explanations of the procedures for u...

Page 41: ...e of the product or its options or failures due to incorrect operation of the product and its options or other failures or for any damage that occurs due to use of the product Warning Reproduction adaptation or translation of the contents of the manual without prior written permission is prohibited except as allowed under copyright laws All information in this manual is subject to change without n...

Page 42: ... ITEMS RECORDED IN THE JOB LOG 1 24 LOADING PAPER IMPORTANT POINTS ABOUT PAPER 1 27 NAMES AND LOCATIONS OF TRAYS 1 27 THE MEANING OF R IN PAPER SIZES 1 27 USEABLE PAPER 1 28 TRAY SETTINGS FOR TRAY 1 TO 4 1 30 LOADING PAPER AND CHANGING THE PAPER SIZE 1 30 LOADING PAPER IN THE BYPASS TRAY 1 32 IMPORTANT POINTS WHEN USING THE BYPASS TRAY 1 33 ORIGINALS PLACING THE ORIGINAL 1 35 PLACING ORIGINALS IN ...

Page 43: ...RGER OF THE PHOTOCONDUCTIVE DRUM 1 51 CLEANING THE PT CHARGER OF THE PRIMARY TRANSFER BELT 1 54 CLEANING THE BYPASS FEED ROLLER 1 56 CLEANING THE ORIGINAL FEED ROLLER 1 56 CLEANING THE LASER UNIT 1 57 REPLACING THE TONER CARTRIDGES 1 61 REPLACING THE WASTE TONER BOX 1 64 REPLACING THE STAMP CARTRIDGE 1 66 ENTERING TEXT FUNCTIONS OF THE MAIN KEYS 1 67 ...

Page 44: ...page 1 35 2 Front cover Open this cover to switch the main power switch to On or Off or to replace a toner cartridge TURNING THE POWER ON AND OFF page 1 15 REPLACING THE TONER CARTRIDGES page 1 61 3 Output tray centre tray Output is delivered to this tray 4 Operation panel This is used to select functions and enter the number of copies OPERATION PANEL page 1 8 5 Exit tray unit right tray When inst...

Page 45: ...e 8 Tray 1 This holds paper TRAY SETTINGS FOR TRAY 1 TO 4 page 1 30 9 Tray 2 when a paper drawer is installed This holds paper TRAY SETTINGS FOR TRAY 1 TO 4 page 1 30 10 Tray 3 when a paper drawer is installed This holds paper TRAY SETTINGS FOR TRAY 1 TO 4 page 1 30 11 Tray 4 when a paper drawer is installed This holds paper TRAY SETTINGS FOR TRAY 1 TO 4 page 1 30 Peripheral device 7 9 8 10 11 ...

Page 46: ...wer switch This is used to power on the machine When using the fax or Internet fax functions keep this switch in the on position TURNING THE POWER ON AND OFF page 1 15 19 Waste toner box This collects excess toner that remains after printing REPLACING THE WASTE TONER BOX page 1 64 20 Waste toner box release lever Move this lever when you need to release the waste toner box lock to replace the wast...

Page 47: ...der tray Place originals in this tray 1 sided originals must be placed face up PLACING THE ORIGINAL page 1 35 5 Original exit tray Originals are delivered to this tray after scanning 6 Scanning area Originals placed in the document feeder tray are scanned here REGULAR MAINTENANCE page 1 49 7 Original size detector This detects the size of an original placed on the document glass PLACING THE ORIGIN...

Page 48: ...rk For the LAN cable use a shielded type cable 4 Service only connector 5 Power plug 6 Extension phone socket When the fax function of the machine is used an extension phone can be connected to this socket 7 Telephone line socket When the fax function of the machine is used the telephone line is connected to this socket When the fax expansion kit is installed 1 2 3 4 5 Caution This connector is fo...

Page 49: ...indicator This blinks while print data is being received and lights steadily while printing is taking place 5 Numeric keys These are used to enter the number of copies fax numbers and other numerical values These keys are also used to enter numeric value settings except for the system settings 6 CLEAR key Press this key to return the number of copies to 0 7 HOME key Touch this key to display the h...

Page 50: ...ressed to send tone signals on a pulse dial line USER AUTHENTICATION page 1 17 15 P key When using the copy function press this key to use a job program When using the fax function this key can be used when dialling 16 CLEAR ALL key Press this key to return to the initial operation state Use this key when you wish to cancel all settings that have been selected and start operation from the initial ...

Page 51: ... a value To make a value change quickly keep your finger on the key 3 Touch this key to cancel a setting 4 Touch the OK key to enter and save a setting Example 3 1 Some items in the special modes screen are selected by simply touching the key of the item To cancel a selected item touch the highlighted key once again so that it is no longer highlighted 2 When settings extend over multiple screens t...

Page 52: ...lect Auto A4 Plain Auto A4 Full Colour OK 1 1 Function Review Margin Shift Erase Shift Right Front 10mm Back 10mm Edge 10mm Centre 10mm Covers Inserts Front 2 Sided Back Insert Insertion A 10 Page B 10 Page Exposure Auto Copy Ratio 100 Plain A3 3 1 2 A4R B4 4 A4 A4 OK OK OK Cancel Cancel 25 432 mm 25 297 mm 420 X Y 297 297 Original Size Input Enter value via the 10 key 25 297 The touch panel scree...

Page 53: ... number of copies completed and the job status appear Jobs cannot be manipulated in this screen Jobs can only be manipulated in the job status screen For details see the chapters for each of the functions in this manual 3 MFP Status display This shows machine system information Maintenance Information This shows machine maintenance information by means of codes Preview Job Status MFP Status Job St...

Page 54: ...4 1 2 3 Print job Copy job Scan to E mail job Scan to FTP job Scan to Network Folder job Scan to Desktop job Fax transmission job Fax reception job PC Fax transmission job Internet fax transmission job Including Direct SMTP Internet Fax reception job Including Direct SMTP PC I Fax transmission job Broadcast job Inbound routing job Scan to HDD file print job Tandem copy print job Metadata send job ...

Page 55: ...anel When touched the following screen appears next to the key Touch the key or the key to adjust the brightness When finished touch the brightness adjustment key again to close the screen This appears when the data security kit is being used The icon appears when the machine is communicating with an external application ...

Page 56: ...ndicator POWER key When turning off the main power switch ensure that each of the lamps on the operation panel has been turned off In the event that the main power is suddenly interrupted due to a power failure or other reason turn the machine power back on and then turn it off in the correct order If the machine is left for a long time with the main power having been turned off prior to the POWER...

Page 57: ...uto Power Shut Off Timer in the system settings administrator This mode provides the lowest level of power consumption Considerably more power is saved than in preheat mode however the wakeup time is longer This mode can be disabled in the system settings administrator The machine automatically wakes up and resumes normal operation when a print job is received or when the blinking POWER SAVE key i...

Page 58: ...og in to use the machine There are different types of user authentication and each type has a different login method For more information see the explanations of the login methods AUTHENTICATION BY USER NUMBER see below AUTHENTICATION BY LOGIN NAME PASSWORD page 1 19 AUTHENTICATION BY USER NUMBER The following procedure is used to log in using a user number received from the administrator of the m...

Page 59: ...an 8 digit number this step is not necessary Login takes place automatically after the user number is entered 3 When you have finished using the machine and are ready to log out press the LOGOUT key However note that the LOGOUT key cannot be used to log out when a fax number is being entered in fax mode as the key is used for fax number entry If a preset duration of time elapses after the machine ...

Page 60: ...ey Use this key if you have not been stored in User List in the system settings administrator and are only using LDAP authentication A text entry screen will appear Enter your login name B User selection keys Touch your user name that has been stored in User List in the system settings administrator C Back key Touch this key to return to the login screen D Index tabs All users appear on the All ta...

Page 61: ...inistrator and in the LDAP server use the password stored in the LDAP server When an LDAP server has been stored Auth to can be changed If you are logging in using a user selection key The LDAP server was stored when your user information was stored and thus the LDAP server will appear as the authentication server when you select your login name Go to step 4 When logging in using the Direct Entry ...

Page 62: ... for fax number entry If a preset duration of time elapses after the machine is last used the Auto Clear function will activate When Auto Clear activates logout takes place automatically However when PC Scan mode is used logout does not take place when the LOGOUT key is pressed and Auto Clear does not operate Change to a different mode on the machine and then log out The administrator can clear th...

Page 63: ...ars when user authentication is enabled on the machine This function requires the hard disk drive Shortcuts to functions can be registered as keys in the my menu screen When a shortcut key is touched the screen for that function appears Register frequently used functions in the my menu screen to quickly and conveniently access those functions When user authentication is used the my menu screen of ...

Page 64: ...ommended VNC software RealVNC The procedure for using this function is as follows Example RealVNC 1 Connect from the computer to the machine 1 Start the VNC viewer 2 Enter the IP address of the machine in the Server entry box 3 Click the OK button 2 Follow the prompts on the operation panel of the machine to permit the connection When the machine is connected to the remote software appears on the ...

Page 65: ...tion is used 6 Starting Date Time The date and time the job was started 7 Completing Date Time The date and time the job was completed 8 Black White Total Count For a print job the total count is recorded For a send job the number of transmitted black white pages is recorded When a broadcast transmission is summarized the total number of pages is recorded For a scan to HDD job the number of stored...

Page 66: ... image send job 30 Transmission Type Transmission type of an image send job 31 Administrative Serial Number Administrative serial number of an image send job 32 Broadcast number Broadcast number of an image send job 33 Entry Order Reservation order for broadcast transmission of an image send job For a serial polling job this is used to correlate communication with printing 34 File Type File format...

Page 67: ...es that duplex was disabled in Paper Type 50 Paper Property Fixed Paper Side Indicates that fixed side was specified in Paper Type 51 Paper Property Disable Staple Indicates that stapling was disabled in Paper Type 52 Paper Property Disable Punch Indicates that punching was disabled in Paper Type 53 Duplex Setup Indicates the duplex setting 54 Resolution Indicates the scanning resolution 55 Machin...

Page 68: ...ntal orientation To differentiate between vertical and horizontal orientations paper sizes in the horizontal orientation will be followed by an R for example A4R 8 1 2 x 11 R Sizes that can be placed only in the horizontal orientation A3W A3 B4 12 x 18 11 x 17 8 1 2 x 14 8 1 2 x 13 do not include the R in their size indication LOADING PAPER Horizontal orientation R is appended Vertical orientation...

Page 69: ...nched paper must meet the same specifications as plain paper Contact your dealer or nearest authorised service representative for advice on using these types of paper Types of paper that can be used in each tray The following types of paper can be loaded in each tray 1 Heavy paper 1 is heavy paper up to 209 g m2 110 lbs index and Heavy paper 2 is heavy paper up to 256 g m2 140 lbs index 2 Thin pap...

Page 70: ...aper Stapled paper Damp paper Curled paper Paper on which either the print side or the reverse side has been printed on by another printer or multifunction device Paper with a wave like pattern due to moisture absorption Non recommended paper Iron on transfer paper Japanese paper Perforated paper Various types of plain paper and special media are sold Some types cannot be used with the machine Con...

Page 71: ...next step 2 Adjust the guide plates A and B by squeezing their lock levers and sliding them to match the vertical and horizontal dimensions of the paper to be loaded The guide plates A and B are slidable Slide each guide plate while squeezing its lock lever 3 Fan the paper Fan the paper well before loading it If the paper is not fanned multiple sheets may feed at once and cause a misfeed 4 Insert ...

Page 72: ...ge the Paper Tray Settings in the system settings If these settings are not configured correctly automatic paper selection will not operate correctly and printing may take place on the wrong size or type of paper or a misfeed may occur Do not place heavy objects on the tray or press down on the tray System Settings Paper Tray Settings page 7 13 Change these settings when you change the size or typ...

Page 73: ...l out the bypass tray extension Pull the bypass tray extension all the way out Do not place heavy objects on the bypass tray or press down on the tray 2 Set the bypass tray guides to the width of the paper 3 Insert the paper along the bypass tray guides all the way into the bypass tray until it stops Load the paper with the print side face down Do not force the paper in If the bypass tray guides a...

Page 74: ...tray with the print side face down Inserting transparency film Place paper that is A5 7 1 4 x 10 1 2 or smaller in the horizontal orientation Use only tab paper that is made of paper Tab paper made of a material other than paper film etc cannot be used To print on the tabs of tab paper In copy mode use Tab Copy in the special modes In print mode use the tab print function Use SHARP recommended tra...

Page 75: ... Envelopes with metal clasps plastic hooks or ribbon hooks envelopes closed with string envelopes with windows or backing envelopes with an uneven front surface due to embossing double layer envelopes envelopes with an adhesive for sealing hand made envelopes envelopes with air inside envelopes with creases or fold marks torn or damaged envelopes Envelopes with an incorrectly aligned corner gluing...

Page 76: ... without using Slow Scan Mode may result in original misfeeds When Slow Scan Mode is selected automatic 2 sided scanning is not possible ORIGINALS Minimum original size Maximum original size Standard sizes Minimum size that can be automatically detected A5 148 mm height x 210 mm width 5 1 2 height x 8 1 2 width Non standard sizes Minimum size that can be specified manually 131 mm height x 140 mm w...

Page 77: ...e you are using Before inserting originals into the document feeder tray be sure to remove any staples or paper clips If originals have damp spots due to correction fluid ink or pasteup glue wait until the originals are dry before making copies Otherwise the interior of the document feeder or the document glass may be soiled Do not use the following originals Incorrect original size detection orig...

Page 78: ...original Place the original face down in the far left corner of the document glass The original should always be placed in the far left corner regardless of its size Align the top left corner of the original with the tip of the mark Do not place any objects under the original size detector Closing the automatic document feeder with an object underneath may damage the original size detector and pre...

Page 79: ...der 3 Close the automatic document feeder After placing the original be sure to close the automatic document feeder If left open parts outside of the original will be copied black causing excessive use of toner 2 1 Caution Close the automatic document feeder slowly Abruptly closing the automatic document feeder may damage it Take care that your fingers are not pinched when closing the automatic do...

Page 80: ...e staple function and offset function Punch module MX PN11A MX PN11B MX PN11C MX PN11D Punches holes in copies and other output Requires a finisher Printer expansion kit MX PB14 Adds a PCL6 printer function To install this kit the hard disk drive is required Barcode font kit MX PF10 Adds barcode fonts to the machine To use the Barcode font kit the printer expansion kit MX PB14 is required PS3 expa...

Page 81: ...ocuments and computer files Sharpdesk 5 licence kit MX USX5 Sharpdesk 10 licence kit MX US10 Sharpdesk 50 licence kit MX US50 Sharpdesk 100 licence kit MX USA0 Stamp unit AR SU1 This stamps each original page after it is scanned in image send mode Hard disk expansion kit MX HD10 Add a hard disk drive and add functions Some options may not be available in some countries and regions Product name Pro...

Page 82: ...R 8K and 16KR sizes 2 Lever Use this to move the finisher in order to remove a paper misfeed replace staples or remove a staple jam 3 Staple case This holds the staple cartridge Pull the case out to replace the staple cartridge remove a staple jam or remove the punch scrap case 4 Staple case release lever Use this to remove the staple case 5 Punch waste box when a punch module is installed This ho...

Page 83: ...artridge 1 Open the cover 2 While pressing the lever over to the left slide the finisher to the left until it stops Gently slide the finisher until it stops 3 Lower the staple case release lever and remove the staple case Pull the staple case out to the right 4 Remove the empty staple cartridge from the staple case 5 Insert a new staple cartridge into the staple case as shown Push the staple cartr...

Page 84: ...staple case in until it clicks into place 7 Slide the finisher back to the right Gently slide the finisher back to the right until it locks into its original position 8 Close the cover Make a test print or copy in staple sort mode to verify that stapling takes place correctly ...

Page 85: ...ch waste box Follow the steps below to discard the punch waste Finisher 1 Open the cover 2 While pressing the lever over to the left slide the finisher to the left until it stops Gently slide the finisher until it stops 3 Grasp the punch waste box handle gently pull out the box and discard the punch waste Discard the punch waste in a plastic bag or other container taking care not to let the waste ...

Page 86: ...1 45 BEFORE USING THE MACHINE Contents 5 Slide the finisher back to the right Gently slide the finisher back to the right until it locks into its original position 6 Close the cover ...

Page 87: ...ation is selected in the Web pages of the machine the machine retrieves the operation screen from the registered URL Control of the operation screen is performed by the standard application and Scan to FTP Scan to Network Folder and HTTPS transmission can be executed Standard application setup To enable a general application in the Web pages of the machine click Application Settings in the adminis...

Page 88: ...tion mode When the Enable Authentication by External Server checkbox is selected in External Account Setting of Sharp OSA Settings in the system settings administrator the machine enters external authentication mode When the machine is powered on in external authentication mode the machine accesses the external account application and displays the login screen The login screen also appears when th...

Page 89: ...ings administrator The setting change will take effect after the machine is restarted To restart the machine see TURNING THE POWER ON AND OFF page 1 15 External count mode When only the External Account Control setting is enabled in External Account Setting of Sharp OSA Settings in the system settings administrator the machine enters external count mode Unlike external authentication mode when the...

Page 90: ...f coloured lines or white lines appear in images scanned using the automatic document feeder clean the scanning area the thin long glass next to the document glass To clean this area use the glass cleaner that is stored in the automatic document feeder After using the glass cleaner be sure to return it to its storage position Examples of lines in the image MAINTENANCE Warning Do not use a flammabl...

Page 91: ...BEFORE USING THE MACHINE Contents 1 Open the automatic document feeder and remove the glass cleaner 2 Clean the document scanning area on the document glass with the glass cleaner 3 Replace the glass cleaner ...

Page 92: ...that charges the drum 1 Open the front cover 2 Release the waste toner box Move the lock of the waste toner box to the release position Release the lock of the waste toner box and let it fall forward as far as it will go as shown in the figure 3 Remove the waste toner box Hold the box by both hands and lift it up slowly If the waste toner box falls too far forward it will not be possible to remove...

Page 93: ...of the claw 3 Unfasten the charger cleaner rotating around the boss from the claw on the left side 5 Clean the main charger 1 Gently push the charger cleaner all the way in 2 Gently pull the charger cleaner out Insert so that the cleaning location label A and the charger cleaner label B are oriented as shown 6 Repeat step 4 with each of the other main chargers There are a total of 4 places to be c...

Page 94: ...aw 8 Mount the waste toner box Insert it in a direction slanting from the top towards the bottom A direction opposite to that at the time of mounting it 9 Push the waste toner box into the machine Push the waste toner box firmly in until it clicks into place 10 Lock the waste toner box Move the lock of the waste toner box to the lock position 11 Close the front cover If this does not solve the pro...

Page 95: ... waste toner box to the release position Release the lock of the waste toner box and let it fall forward as far as it will go as shown in the figure 3 Remove the waste toner box Hold the box by both hands and lift it up slowly If the waste toner box falls too far forward it will not be possible to remove it Remove the box when it is at an angle of about 30 degrees 4 Clean the PT charger 1 Slowly p...

Page 96: ...anting from the top towards the bottom A direction opposite to that at the time of mounting it 6 Push the waste toner box in till the innermost point Push it in until it clicks into place 7 Lock the waste toner box Move the lock of the waste toner box to the lock position 8 Close the front cover ...

Page 97: ...h the bypass tray wipe the surface of the feed roller with a clean soft cloth moistened with water or a neutral detergent CLEANING THE ORIGINAL FEED ROLLER If lines or other dirt appear on the scanned original when the automatic document feeder is used wipe the surface of the roller with a clean soft cloth moistened with water or a neutral detergent ...

Page 98: ... jobs If the above problems occur follow the steps below to clean the laser unit 1 Open the front cover 2 Take out the cleaning tool for the laser unit The cleaning tool is attached to the front cover 1 Pull the right side of the cleaning instrument and unfasten it from the claw 2 Place it in the front spread across the top of the claw 3 Unfasten the cleaning instrument rotating around the boss fr...

Page 99: ...cleaning tool 1 Firmly grasp the tool close to where the cleaner is attached 2 Use your other hand to press down on the hook that secures the cleaner and remove the cleaner Put the removed cleaner back on the inner cover After replacing the cleaner be sure to close the inner cover 6 Attach the new cleaner to the cleaning tool 1 Align the cleaner hook with the attachment hole in the cleaning tool 2...

Page 100: ...2 Insert the cleaning tool all the way into the hole and then pull it back out Pull the cleaning tool out until you feel the tip of the tool leave the cleaning surface of the laser unit 3 Repeat step 2 two or three times and then remove the cleaning tool 8 Repeat step 7 to clean all holes in the laser unit 4 holes There are a total of 4 holes to be cleaned in the laser unit including the hole clea...

Page 101: ...t after putting it on the boss and hook its edge the side where the cleaner is fixed to the claw on the left side 2 Place the right hand side of the cleaning instrument on the front side spread across the top of the claw 3 Hook the cleaning instrument to the claw 10 Close the front cover 1 Boss 2 3 ...

Page 102: ...emains black and white printing will still be possible Be sure to install 4 toner cartridges Y M C Bk OK Change the toner cartridge Ready to scan for copy OK Change the toner cartridge Ready to scan for copy Colours that are running low or have run out of toner are indicated in Yellow toner Magenta toner Cyan toner Black toner Replace the toner cartridges of the indicated colours Y M C Bk If you c...

Page 103: ...dge is pulled out abruptly toner may spill out Example Replacing the yellow toner cartridge Hold the toner cartridge with both hands as shown and pull it out of the machine 3 Remove a new toner cartridge from its package and shake it horizontally five or six times 4 Gently insert the new toner cartridge horizontally A toner cartridge of a different colour cannot be installed Be sure to install a t...

Page 104: ...ner cartridge other than a SHARP recommended toner cartridge is used the machine may not attain full quality and performance and there is a risk of damage to the machine Be sure to use a SHARP recommended toner cartridge Keep the used toner cartridge in a plastic bag do not discard it Your service technician will collect the used toner cartridge To view the approximate amount of toner remaining co...

Page 105: ...e the used waste toner box Move the lock of the waste toner box to the release position Release the lock of the waste toner box and let it fall forward as far as it will go as shown in the figure Keep the replacement cleaner that has not been used Store it on the left of the new waste toner box 3 Remove the waste toner box Hold the box by both hands and lift it up slowly If the waste toner box fal...

Page 106: ...ste toner box Insert the box from above at a slant The direction opposite to when you removed it 6 Push the waste toner box into the machine Push the box in until it clicks into place 7 Lock the waste toner box Move the lock of the waste toner box to the lock position 8 Close the front cover Caution Do not throw the waste toner box into a fire Toner may fly and cause burns Store the waste toner bo...

Page 107: ...lled on the automatic document feeder and the stamp has become faint replace the stamp cartridge AR SV1 Supplies Stamp cartridge 2 in package AR SV1 1 Open the document feeder tray 2 Remove the stamp cartridge while pushing it downwards 3 Install a new stamp cartridge 4 Close the document feeder tray ...

Page 108: ...ry depending on your country or region Touch this key to enter a line break when entering the body text of an e mail message This key will vary depending on your country or region Touch this key to delete the characters to the left of the cursor one character at a time Touch this key to temporarily change the key layout of character entry mode to a different language Select the key layout that you...

Page 109: ...can be entered A number of characters greater than cannot be entered On some keyboards that show the English alphabet the AltGr screen continues to appear until the AltGr key is touched to remove the highlighting The key is only displayed in limited countries and regions The key is a shortcut key to switch the keyboard between the language of your region and English The key layouts that can be sel...

Page 110: ...6 ENLARGING REDUCING THE LENGTH AND WIDTH SEPARATELY XY Zoom 2 28 ORIGINAL SIZES 2 29 SPECIFYING THE ORIGINAL SIZE 2 29 STORING FREQUENTLY USED ORIGINAL SIZES 2 30 OUTPUT 2 33 OUTPUT MODES 2 35 MAKING COPIES USING THE BYPASS TRAY 2 38 SPECIAL MODES SPECIAL MODES 2 41 ADDING MARGINS Margin Shift 2 44 ERASING PERIPHERAL SHADOWS Erase 2 46 COPYING EACH FACING PAGE OF A BOUND DOCUMENT Dual Page Copy 2...

Page 111: ... IN COPIES RGB Adjust 2 118 ADJUSTING THE SHARPNESS OF AN IMAGE Sharpness 2 119 WHITENING FAINT COLOURS IN COPIES Suppress Background 2 120 ADJUSTING THE COLOUR Colour Balance 2 122 ADJUSTING THE BRIGHTNESS OF A COPY Brightness 2 124 ADJUSTING THE INTENSITY OF A COPY Intensity 2 125 CHECKING COPIES BEFORE PRINTING Proof Copy 2 126 CHECKING THE NUMBER OF SCANNED ORIGINAL SHEETS BEFORE COPYING Origi...

Page 112: ... CHANGING THE EXPOSURE AND ORIGINAL IMAGE TYPE page 2 23 5 Copy Ratio key This shows the current copy ratio Touch this key to adjust the copy ratio REDUCTION ENLARGEMENT ZOOM page 2 25 6 Original key Touch this key to enter the original size manually When an original is placed the detected original size is displayed If the original size is set manually the set size appears ORIGINAL SIZES page 2 29...

Page 113: ...le and Quick File keys that appear when the Special Modes key is touched For information on the document filing function see 6 DOCUMENT FILING The hard disk drive is required 15 Preview key Touch to view a preview image of a copy in the touch panel before printing the copy CHECKING A PREVIEW IMAGE OF A COPY Preview page 2 138 Tray during paper feeding Do not pull out a tray while paper is being fe...

Page 114: ...the screen touch the OK key System Settings Administrator Customize Key Setting Registration is performed in System Settings Operation Settings Customize Key Setting in the Web page menu Colour Mode Special Modes 2 Sided Copy Output Erase Brightness Margin Shift Copy Ratio 100 Original Paper Select Auto A4 Plain Auto Full Colour Exposure Auto A4 Preview Plain A3 3 1 2 A4R B4 4 A4 A4 These 3 keys c...

Page 115: ...before the original is placed Basic copy settings Select the basic copy settings The main settings are as follows Colour mode COPY COLOUR MODES page 2 21 Exposure and original type CHANGING THE EXPOSURE AND ORIGINAL IMAGE TYPE page 2 23 Copy ratio REDUCTION ENLARGEMENT ZOOM page 2 25 Original size ORIGINAL SIZES page 2 29 Paper Settings PAPER TRAYS page 2 11 2 sided copy settings Select settings a...

Page 116: ...h as Margin Shift and Erase SPECIAL MODES page 2 41 Number of copies sets setting Set the number of copies number of sets Start copying Start scanning the original s and making copies Press the COLOUR START key or the BLACK WHITE START key OK Output Sort Right Tray Offset Offset Tray Staple Sort Group Saddle Stitch Punch Fold Special Modes 1 2 Card Shot Multi Shot OK Dual Page Copy Tandem Copy Tab...

Page 117: ... 5 To store a copy job using the document filing function select copy settings and then touch the File key or the Quick File key To cancel all settings press the CLEAR ALL key When the CLEAR ALL key is pressed all settings selected to that point are cleared and you will return to the base screen To stop scanning of the original and copying press the STOP key When the STOP key is pressed a message ...

Page 118: ...x 13 1 2 A3 A4 A4R A5 B4 B5 B5R 8 1 2 x 11 11 x 17 216 mm x 343 mm 8 1 2 x 13 1 2 Inch 1 11 x 17 8 1 2 x 14 8 1 2 x 11 8 1 2 x 11 R 5 1 2 x 8 1 2 11 x 17 8 1 2 x 14 8 1 2 x 11 8 1 2 x 11 R 5 1 2 x 8 1 2 A4 A3 Inch 2 11 x 17 8 1 2 x 13 216 mm x 330 mm 8 1 2 x 11 8 1 2 x 11 R 5 1 2 x 8 1 2 11 x 17 8 1 2 x 13 216 mm x 330 mm 8 1 2 x 11 8 1 2 x 11 R 5 1 2 x 8 1 2 A4 A3 Inch 3 11 x 17 8 1 2 x 13 2 5 21...

Page 119: ...n Copy If the orientation of the original and paper are different the original image will be automatically rotated 90 degrees to match the paper When an image is rotated a message is displayed Example This function operates in both auto paper selection mode and auto image mode Rotation can be disabled using Rotation Copy Setting in the System Settings Administrator a b c abc Document glass Documen...

Page 120: ...nd there is another tray that has the same size and type of paper that tray will be automatically selected and the copy job will continue To return to automatic paper tray selection after selecting a tray manually press the CLEAR ALL key System Settings Administrator Initial Status Settings Paper Tray Use this setting to change the tray that is selected by default Colour Mode Special Modes 2 Sided...

Page 121: ...cument feeder tray The stack of originals must not be higher than the indicator line on the tray 2 Check the paper to be used and the colour mode Make sure that the desired paper tray and colour mode are selected To change the paper tray touch the Paper Select key PAPER TRAYS page 2 11 To change the colour mode touch the Colour Mode key COPY COLOUR MODES page 2 21 Depending on the size of the plac...

Page 122: ... copies If an incorrect number of copies is set Press the CLEAR key and then enter the correct number 4 Press the COLOUR START key or the BLACK WHITE START key Even if a colour mode is selected copying will take place in black and white if the BLACK WHITE START key is pressed To cancel scanning of the original and copying Press the STOP key Plain 7 A4 Special Modes 2 Sided Copy ...

Page 123: ...f toner Do not place any objects under the original size detector Closing the automatic document feeder with an object underneath may damage the original size detector plate and prevent correct detection of the document size 2 Check the paper to be used and the colour mode Make sure that the desired paper tray and colour mode are selected To change the paper tray touch the Paper Select key PAPER T...

Page 124: ...originals have been scanned In this case go to the next step Even if a colour mode is selected copying will take place in black and white if the BLACK WHITE START key is pressed 5 Remove the original and place the next original and then press the COLOUR START key or the BLACK WHITE START key Repeat this step until all originals have been scanned For the second original and following originals use ...

Page 125: ...e 1 Touch the key of the desired mode Automatic 2 sided copying of 1 sided originals Automatic 2 sided copying of 2 sided originals When the document cover is installed this key is not displayed 1 sided copying of 2 sided originals When the document cover is installed this key is not displayed 2 Touch the OK key To make 2 sided copies of a 1 sided portrait original placed horizontally or to invert...

Page 126: ... set If you are only making a single copy the copy can be made with the copy number display showing 0 If an incorrect number of copies is set Press the CLEAR key and then enter the correct number 6 Press the COLOUR START key or the BLACK WHITE START key To cancel scanning of the original and copying Press the STOP key Originals Binding Change is used Binding Change is not used The reverse side is ...

Page 127: ...r If left open parts outside of the original will be copied black causing excessive use of toner Do not place any objects under the original size detector Closing the automatic document feeder with an object underneath may damage the original size detector plate and prevent correct detection of the document size 2 Touch the 2 Sided Copy key Originals Copies Original size detector A4R 8 1 2 x 11 R ...

Page 128: ...page 2 21 Depending on the size of the placed original there may be cases where the same size of paper as the original is not selected automatically In this event change the paper size manually 5 Set the number of copies number of sets with the numeric keys Up to 999 copies sets can be set A single copy can be made even if 0 appears for the number of copies If an incorrect number of copies is set ...

Page 129: ...scanned For the second original and following originals use the same START key as you did for the first original 8 Touch the Read End key To cancel scanning of the original and copying Press the STOP key System Settings Administrator Initial Status Settings 2 Sided Copy The default 2 sided copy mode can be changed Read End Place next original Press Start When finished press Read End ...

Page 130: ...copied in full colour Auto The machine automatically detects whether each original is colour or black white and switches the mode appropriately full colour for a colour original or black white for a black white original Single Colour The original is copied in the selected colour only All colours in the original are changed to the selected colour which can be selected from red green blue cyan magen...

Page 131: ...TE START key as appropriate to manually switch between colour and black white Copying takes place in black white when the BLACK WHITE START key is pressed regardless of the colour mode setting System Settings Administrator Initial Status Settings Colour Mode This is used to change the default colour mode setting System Settings Administrator Detect Standard in Auto Colour Mode When the colour mode...

Page 132: ... image type select keys Colour Mode Special Modes 2 Sided Copy Output File Quick File Copy Ratio 100 Original Paper Select Auto A4 Plain Auto Full Colour Exposure Auto A4 Preview Plain A3 3 1 2 A4R B4 4 A4 A4 Exposure OK Manual Original Image Type 1 3 5 Text Prtd Photo Photo Text Photo Map Text Printed Photo Light Original Scan Resolution Auto Mode Description Text Text Prtd Photo Printed photo Te...

Page 133: ...e image does not seem quite right If the image seems too light or too dark when Auto is selected the exposure level can be adjusted using Copy Exposure Adjustment in the system settings administrator To change the resolution When making a full size black white copy you can press the Scan Resolution key to select the scanning resolution Numbers that can be selected for the document glass are differ...

Page 134: ...iginal from to is displayed change the orientation of the original as indicated in the message For a non standard size original the size must be entered in order to use Auto Image To cancel automatic ratio selection Touch the Auto Image key so that it is no longer highlighted To return the ratio to 100 To return the ratio setting to 100 touch the Copy Ratio key to display the ratio menu and then t...

Page 135: ...an be set to show any ratio using Add or Change Extra Preset Ratios in the system settings administrator To quickly select a ratio touch a reduction or enlargement key to select a ratio close to the desired ratio and then use the zoom keys for fine adjustment The zoom keys can be used to select any ratio from 25 to 400 in increments of 1 Touch the key to increase the ratio or the key to decrease t...

Page 136: ...urn the ratio setting to 100 touch the Copy Ratio key to display the ratio menu and then touch the 100 key System Settings Administrator Add or Change Extra Preset Ratios Two enlargement preset ratios 101 to 400 and two reduction preset ratios 25 to 99 can be added An added preset ratio can also be changed Copy Ratio OK Auto Image XY Zoom 115 122 141 70 81 86 100 Zoom 75 A4 B5 A3 B4 B5 A5 B4 A4 B4...

Page 137: ...he ratio from 25 to 400 in increments of 1 3 Touch the Y key and set the Y vertical ratio in the same way as the X key 4 Touch the OK key After touching the OK key make sure that a paper size suitable for the ratio is selected To quickly select a ratio touch a preset ratio key A to select a ratio close to the desired ratio and then use the zoom keys B for fine adjustment As an alternative to touch...

Page 138: ...ey 2 Touch the OK key Specifying an inch original size 1 Touch the AB Inch key 2 Touch the appropriate original size key 3 Touch the OK key Specifying a non standard original size Original OK A5 A5R B5 Size Input A4R 216x340 216x343 A4 B5R B4 A3 Custom Size Inch Auto Manual AB Manual 1 2 5 x8 5 x8 R 8 x11 8 x14 8 x13 8 x13 8 x11R 11x17 Custom Size Original OK Size Input Inch Auto Manual AB Manual ...

Page 139: ...2 to 17 can be entered If the horizontal dimension of the original is less than 140 mm 5 1 2 use the document glass 2 Enter the Y vertical dimension of the original Touch the Y height numeric value display key to open a number entry screen Enter the height of the original with the numeric keys and touch the OK key in the number entry screen When the document glass is used a number from 25 mm to 29...

Page 140: ... of the original with the numeric keys and touch the OK key in the number entry screen A dimension from 25 mm to 432 mm 1 to 17 can be entered 2 Enter the Y vertical dimension of the original Touch the Y height numeric value display key to open a number entry screen Enter the height of the original with the numeric keys and touch the OK key in the number entry screen A dimension from 25 mm to 297 ...

Page 141: ... the Custom Size key 2 Retrieve the desired stored original size 1 Touch the Recall tab 2 Touch the key of the original size that you wish to retrieve 3 Touch the OK key To cancel the operation Press the CLEAR ALL key A5 A5R B5 216x340 A4R 216x343 A4 A3 B5R B4 Custom Size Original OK Size Input Inch AB A4 Auto Manual X254 Y210 Custom Size Original OK OK Recall Store Delete 3 2 1 ...

Page 142: ...when the staple sort function is selected Offset function page 2 35 3 Sort key This is used to sort collate output into sets Sort mode page 2 35 4 Staple Sort key This is used to sort output into sets staple each set and deliver the sets to the tray Note that the sets will not be offset in the output tray When this function is selected three keys will appear for selecting the staple position Stapl...

Page 143: ...depending on what peripheral devices are installed In addition it may not be possible to select some keys depending what peripheral devices are installed If your screen is different from the screen of previous page see the screens that follow Example The screen when a finisher is not installed Right Tray Offset Tray Sort Group Offset Output OK ...

Page 144: ...or document filing is full copying of a large number of originals using the sort function will be impeded Delete unneeded files from the Quick File Folder Sort Output Originals Output Set the number of copies 5 Touch the Output key Touch the Sort key Press the COLOUR START key or the BLACK WHITE START key The group function is automatically selected when an original is placed on the document glass...

Page 145: ... positions Vertically oriented paper Horizontally oriented paper 1 staple at top left corner Applicable paper sizes A4 B5 8 1 2 x 11 16K Number of sheets that can be stapled Max 50 sheets Finisher Applicable paper sizes A3 B4 A4R 11 x 17 8 1 2 x 14 8 1 2 x 13 1 2 8 1 2 x 13 2 5 8 1 2 x 13 8 1 2 x 11 R 8K 16KR Number of sheets that can be stapled A3 B4 11 x 17 8 1 2 x 14 8 1 2 x 13 1 2 8 1 2 x 13 2...

Page 146: ...Original placement orientation for the staple sort and punch functions When using the staple sort function or the punch function the original must be placed as shown below to enable stapling or punching in the desired position on the paper Staple sort Punch Document feeder tray Document glass Document feeder tray Document glass One staple top Two staples One staple bottom Original 1 Punch position...

Page 147: ...feeder If left open parts outside of the original will be copied black causing excessive use of toner 2 Place paper in the bypass tray Insert the paper with print side face down However if the paper type is Letter Head or Pre Printed load the paper with the print side face up If Disabling of Duplex is enabled in the system settings administrator load the paper in the normal way face up in trays 1 ...

Page 148: ...s key can be touched to display the 16K 16KR and 8K keys Touch one of these keys if you loaded the corresponding size of paper 2 Touch the OK key When Envelope is selected specify the size of the envelope When finished touch the OK key If tab paper is selected check the size Touch the Auto Inch key or the Auto AB key When you have finished checking changing the setting touch the OK key Paper Selec...

Page 149: ...ied If you placed the originals on the document glass scan each page one page at a time When using sort mode change originals and press the START key Repeat until all pages have been scanned and then press the Read End key For the second original and following originals use the same START key as you did for the first original To cancel scanning of the original and copying Press the STOP key Paper ...

Page 150: ...is key is not displayed 6 Tandem Copy key USING TWO MACHINES TO MAKE A LARGE NUMBER OF COPIES Tandem Copy page 2 56 The hard disk drive is required 7 Covers Inserts key USING A DIFFERENT PAPER TYPE FOR COVERS Covers Inserts page 2 59 When the document cover is installed this key is not displayed 8 Transparency Inserts key ADDING INSERTS WHEN COPYING ON TRANSPARENCY FILM Transparency Inserts page 2...

Page 151: ...ER OF SCANNED ORIGINAL SHEETS BEFORE COPYING Original Count page 2 129 8 Mixed Size Original key COPYING ORIGINALS OF DIFFERENT SIZES Mixed Size Original page 2 131 When the document cover is installed this key is not displayed 9 Slow Scan Mode key COPYING THIN ORIGINALS Slow Scan Mode page 2 134 When the document cover is installed this key is not displayed Special Modes 2 2 OK Image Edit Quick F...

Page 152: ...l mode settings and return to the special modes menu screen Touch this key when you wish to continue selecting other special mode settings C During selection of special mode settings this key returns you to the special modes menu screen without saving the settings When settings have been completed this cancels the settings and returns you to the special modes menu screen Special Modes OK 10 Margin...

Page 153: ...for the string holes so the image is not cut off 1 1 1 Place the original Place the original face up in the document feeder tray or face down on the document glass 2 Select the special modes 1 Touch the Special Modes key 2 Touch the Margin Shift key Special modes menu 1st screen page 2 41 3 Set the margin shift 1 Touch the margin shift position Select one of the three positions 2 Set the amount of...

Page 154: ...scanned and then touch the Read End key For the second original and following originals use the same START key as you did for the first original To cancel scanning of the original and copying Press the STOP key Rotation copy cannot be used in combination with margin shift To cancel the margin shift setting Touch the Cancel key in the screen of step 3 System Settings Administrator Initial Margin Sh...

Page 155: ...hadows appear here Not using the erase function Using the erase function Shadows appear on the copy Shadows do not appear on the copy 1 Place the original Place the original face up in the document feeder tray or face down on the document glass 2 Select the special modes 1 Touch the Special Modes key 2 Touch the Erase key Special modes menu 1st screen page 2 41 Edge Erase Centre Erase Edge Centre ...

Page 156: ...glass to copy multiple original pages copying will take place as you scan each original If you have selected sort mode change originals and press the START key Repeat until all pages have been scanned and then touch the Read End key For the second original and following originals use the same START key as you did for the first original To cancel scanning of the original and copying Press the STOP ...

Page 157: ...on the document glass Align the centre of the original with the appropriate size mark 2 Select A4 8 1 2 x 11 size paper Select the paper as explained in PAPER TRAYS page 2 11 5 6 5 6 Book or bound document The facing pages are copied onto 2 separate pages A3 11 x 17 Size mark The page on this side is copied first Centreline of A3 original Centreline of 11 x 17 original Centreline of original Colou...

Page 158: ...al and following originals use the same START key as you did for the first original To cancel scanning of the original and copying Press the STOP key When using dual page copy the original must be placed on the document glass To erase shadows caused by the binding of a book or other bound document use the erase function However note that Centre Erase and Edge Centre Erase cannot be used To cancel ...

Page 159: ...amphlet Pamphlet copy using 8 original pages 1 Place the original Place the original face up in the document feeder tray or face down on the document glass If the originals are 2 sided place them in the document feeder tray 2 Select the special modes 1 Touch the Special Modes key 2 Touch the Pamphlet Copy key Special modes menu 1st screen page 2 41 7 2 2 3 4 5 6 7 5 3 7 5 4 Originals 7 2 7 5 3 5 4...

Page 160: ...elected paper tray for the cover is displayed B The size and type of paper in the currently selected tray is displayed To change the paper tray for the cover touch the Paper Tray key When the Paper Tray key is touched a tray selection screen appears Select the paper tray for the cover in the tray selection screen and touch the OK key 3 Touch the OK key If the cover will be copied on label sheets t...

Page 161: ... or other bound original use the book copy function When the pamphlet copy function is selected 2 sided copying mode is automatically selected When settings are selected that prevent 2 sided copying the pamphlet copy function cannot be used Scan the originals in order from the first page to the last page The order of copying will be automatically adjusted by the machine Four original pages will be...

Page 162: ...n sets divide the sheets so that no set has more than the number of paper that can be loaded and then scan from the set with the first page The settings that you select for the first set can be used for all remaining sets Sorting the copies of a large number of originals into 2 sets 1 Insert the originals face up in the document feeder tray Insert the originals all the way into the document feeder...

Page 163: ... set of originals If you need to change the copy setting follow the steps in Changing the copy settings for each set of originals To cancel scanning Press the STOP key All scanned data will be cleared 5 Touch the Read End key To cancel copying Press the STOP key If the Quick File Folder of document filing mode is full copying in job build mode will be impeded Delete unneeded files from the Quick F...

Page 164: ...l size cannot be changed manually with the Original key If the automatic original detection function is operating the original size will be detected for each set of originals placed When the bypass tray is selected it is not possible to change the paper type If XY Zoom was set for the ratio when the previous original was scanned it will not be possible to change the ratio When Job Build is used in...

Page 165: ...ured in the system settings administrator When configuring the system settings in the master machine the IP address of the slave machine is required For the port number it is best to use the initial setting 50001 Unless you experience difficulty with this setting do not change the port number The tandem settings should be configured by your network administrator If the master machine and slave mac...

Page 166: ...e originals and press the START key Repeat until all pages have been scanned and then touch the Read End key For the second original and following originals use the same START key as you did for the first original The following screen appears when the START key is pressed After the message appears tandem copying begins If tandem copying is not possible the following screen appears To have the mast...

Page 167: ... machine tandem copying is possible User authentication is enabled in the slave machine but not in the master machine tandem copying is not possible If tandem copying is performed without setting the number of copies A message will appear and the master machine and slave machine will each make one set of copies total of two sets To cancel tandem copy Touch the Tandem Copy key in the screen of step...

Page 168: ...d inserts Load the cover insert paper in the tray before using the cover insert function Before selecting the cover insert function place the originals in the document feeder tray select 1 sided or 2 sided copying and select the number of copies and any other desired copy settings When these settings have been completed perform the procedure to select covers inserts The originals must be scanned u...

Page 169: ...ls face up in the document feeder tray Insert the originals all the way into the document feeder tray Multiple originals can be placed in the document feeder tray The stack of originals must not be higher than the indicator line on the tray The document glass cannot be used 2 Select the special modes 1 Touch the Special Modes key 2 Touch the Covers Inserts key Special modes menu 1st screen page 2 ...

Page 170: ...lection screen and touch the OK key 4 Touch the OK key If the cover will be copied on label sheets transparency film and tab paper cannot be used If not copied on tab paper can be inserted To cancel cover settings Touch the Cancel key 5 If you wish to insert a back cover touch the Back Cover key The screen of step 4 appears The procedures are the same as for the front cover Follow the procedures i...

Page 171: ...OLOUR START key or the BLACK WHITE START key Copying of the originals in the document feeder tray begins To cancel scanning and copying Press the STOP key The document glass cannot be used Cover settings cannot be selected if insertion of covers and inserts is disabled in the system settings administrator To cancel cover sheet insertion Touch the Cancel key in the screen of step 3 Special Modes OK...

Page 172: ...ocument feeder tray Insert the originals all the way into the document feeder tray Multiple originals can be placed in the document feeder tray The stack of originals must not be higher than the indicator line on the tray The document glass cannot be used 2 Select the special modes 1 Touch the Special Modes key 2 Touch the Covers Inserts key Special modes menu 1st screen page 2 41 3 Touch the Inse...

Page 173: ...ouch the OK key 4 Touch the OK key If both sides of the insert will be copied on label sheets transparency film and tab paper cannot be used If not copied on tab paper can be inserted 5 If you wish to insert a different type of insert sheet touch the Insertion Type B key The screen of step 4 appears Settings are selected in the same way as for insert type A Follow the procedures in step 4 When fol...

Page 174: ... sided originals page 2 155 The CLEAR key can be pressed to return the setting of the selected item to the default value If you make a mistake press the CLEAR key and then enter the correct number 3 Touch the Enter key C This shows the total number of inserts Up to 100 insert sheets can be inserted To insert multiple inserts touch the Enter key after entering each insertion page number insertion p...

Page 175: ... Use the same size of paper for the inserts as for the copies Up to 100 insert sheets can be added Note that two insert sheets cannot be inserted between the same two pages When performing 2 sided copying of 2 sided originals an insert cannot be added between the front and reverse sides of an original page Cover insert settings cannot be selected if insertion of covers and inserts is disabled in t...

Page 176: ...5 1 Select the special modes 1 Touch the Special Modes key 2 Touch the Covers Inserts key Special modes menu 1st screen page 2 41 2 Touch the Page Layout key 12 11 10 9 8 7 6 5 4 3 2 1 12 11 10 9 8 7 6 5 4 3 2 1 4th page insert A 7th page insert B 9th page insert B 12th page insert A 5th page insert A 7th page insert B 9th page insert B 12th page insert A Special Modes OK Cancel OK Front Cover Bac...

Page 177: ...Insertion Type B key and go to step 5 To cancel touch the Cancel key Icons Copy on front side only Copy on reverse side only 2 sided copy Do not copy For inserts the insertion page also appears represents a page number Copy only on front side at page 2 sided copy at page Insert without copying at page 4 Change the front back cover settings The settings are changed in the same way as they are initi...

Page 178: ... changing the settings touch the OK key and return to step 3 6 Touch the OK key You will return to the base screen of copy mode Covers Inserts Insertion Amend OK Insertion Type B Insertion Type A 5 Insertion Total 4 A4 Plain Tray 1 Bypass Tray A4 Plain Enter Insertion Page Special Modes OK Cancel OK Front Cover Back Cover Insertion Type B Insertion Type A Insertion Settings Tray Settings Inserts S...

Page 179: ...tray Place the transparency film face down on the bypass tray When placing the transparency film the rounded corner of the film should be At the front and left if the film is oriented horizontally At the back and left if the film is oriented vertically After loading the transparency film configure the bypass tray settings as explained in MAKING COPIES USING THE BYPASS TRAY page 2 38 2 Place the or...

Page 180: ...elected paper tray paper size and paper type are indicated here 5 Press the COLOUR START key or the BLACK WHITE START key Copying will begin To cancel scanning and copying Press the STOP key The number of copies cannot be selected in this mode When performing 2 sided copying only 2 sided to 1 sided mode can be used To cancel the transparency inserts setting Touch the Cancel key in the screen of st...

Page 181: ...ginal pages onto one sheet This function is convenient when you wish to present multiple pages in a compact format or show a view of all pages in a document 2in1 copying 4in1 copying B A A B D C B A A B C D 1 Place the original Place the original face up in the document feeder tray or face down on the document glass 2 Select the special modes 1 Touch the Special Modes key 2 Touch the Multi Shot ke...

Page 182: ...RT key Repeat until all pages have been scanned and then touch the Read End key For the second original and following originals use the same START key as you did for the first original To cancel scanning and copying Press the STOP key When using the multi shot function the appropriate copy ratio will be automatically set based on the original size paper size and the number of originals to be copie...

Page 183: ...function is convenient for arranging copies into an attractive booklet or pamphlet 1 Select the special modes 1 Touch the Special Modes key 2 Touch the Book Copy key Special modes menu 1st screen page 2 41 C 3 B 2 A 1 D 4 A 1 B 2 C 3 D 4 3 1 2nd page Back cover Originals Cover Inside of cover 3rd page 1st page 4th page Inside of back cover Place the original The copies are in the same layout as th...

Page 184: ...ntly selected tray is displayed In the example screen A3 11 x 17 size plain paper is loaded in the bypass tray To change the paper tray for the cover touch the Paper Tray key When the Paper Tray key is touched a tray selection screen appears Select the desired paper tray in the tray selection screen and touch the OK key 3 Touch the OK key If the cover will be copied on label sheets transparency fi...

Page 185: ...ollowing order Opened inside of front cover and 1st page Opened 2nd and 3rd page Opened last page and inside of back cover To cancel scanning Press the STOP key 7 Place the next pair of opened pages and press the COLOUR START key or the BLACK WHITE START key Repeat this step until all original pages have been scanned For the second original and following originals use the same START key as you did...

Page 186: ...e automatically added at the end if the total number of original pages is not a multiple of four When book copy is selected 2 sided copying is automatically selected When settings are selected that prevent 2 sided copying the book copy function cannot be used To cancel book copy Touch the Cancel key in the screen of step 2 Read End Place next original Press Start When finished press Read End ...

Page 187: ...ying with a left binding Originals Placing the originals Loading tab paper Document feeder tray Insert the originals so that the side with no tab text enters first Load the tab paper so that the tab on the first sheet is toward you Document glass Place so that the side with the tab text is on the left GHI DEF ABC GHI DEF ABC ABC Prepare originals that match the tab positions The image is shifted b...

Page 188: ... up in the document feeder tray or face down on the document glass 2 Select the special modes 1 Touch the Special Modes key 2 Touch the Tab Copy key Special modes menu 1st screen page 2 41 3 Set the tab width 1 Set the image shift width tab width with the keys 0 mm to 20 mm 0 to 5 8 can be entered You can also directly touch a numeric value display key to change a number with the numeric keys 2 To...

Page 189: ...ying will begin If you are using the document glass to copy multiple original pages copying will take place as you scan each original If you have selected sort mode change originals and press the START key Repeat until all pages have been scanned and then touch the Read End key For the second original and following originals use the same START key as you did for the first original To cancel scanni...

Page 190: ...ot Select the paper as explained in PAPER TRAYS page 2 11 2 Place the original face down on the document glass 3 Select the special modes 1 Touch the Special Modes key 2 Touch the Card Shot key Special modes menu 1st screen page 2 41 Front Back Originals Copies Example of an A4 8 1 2 x 11 size portrait copy Example of an A4 8 1 2 x 11 size landscape copy Colour Mode Special Modes 2 Sided Copy Outp...

Page 191: ...ings in the system settings administrator 2 Touch the OK key You will return to the base screen of copy mode Make sure that the entered dimensions appear in the Original key 5 Press the COLOUR START key or the BLACK WHITE START key to scan the front side of the card To cancel scanning Press the STOP key 6 Turn the card over and press the COLOUR START key or the BLACK WHITE START key to scan the re...

Page 192: ...g this function To cancel card shot Touch the Cancel key in the screen of step 4 System Settings Administrator Card Shot Settings This is used to set the values to which the size returns when the Size Reset key is pressed 25 mm to 210 mm 1 to 8 1 2 can be entered for both the horizontal and vertical dimensions The factory default settings are 86 mm 3 3 8 for X the width and 54 mm 2 1 8 for Y the h...

Page 193: ...ering A 1 position only Text A 6 positions Watermark Centre of paper If the selected stamp content of one position overlaps the stamp content of another position priority will be given in the following order watermark right side left side centre Content that is hidden due to overlapping will not be printed Text will be printed at the preset size regardless of the copy ratio or paper size setting T...

Page 194: ...at show the print positions will appear as follows depending on the state of the settings The above key is the top left key The appearance of each key varies depending on the position of the key Date and Page Numbering cannot be selected in multiple positions If the Date key or Page Numbering key is touched when Date or Page Numbering has already been selected for a position a message will appear ...

Page 195: ...t binding of the originals 2 Select stamp settings for covers inserts If you do not want to print the stamp items on covers inserts touch the checkbox to remove the checkmark 3 Touch the OK key You will return to the base screen of copy mode To edit a stamp position or delete a stamp item touch the Layout key CHECKING THE STAMP LAYOUT Layout page 2 100 When copying on covers inserts is not selecte...

Page 196: ...and then touch the Read End key For the second original and following originals use the same START key as you did for the first original If you selected printing in colour press the COLOUR START key Even if a colour is selected pressing the BLACK WHITE START key will print the stamp items in black and white If a colour print setting is selected the copy will be counted as a full colour copy even i...

Page 197: ...arator 3 Touch the Print Colour key and select the print colour Touch the desired colour and touch the OK key If you selected a colour other than Bk Black press the COLOUR START key Pressing the BLACK WHITE START key will print the date in black and white If the date is printed in colour on a black and white copy the copy will be included in the full colour count 04 APR 2010 Cancel Print Colour Bk...

Page 198: ...ng Clock in the system settings 5 Select the pages that the date will be printed on and touch the OK key Select printing on the first page only or printing on all pages After touching the OK key continue from step 5 of GENERAL PROCEDURE FOR USING STAMP page 2 85 to complete the copy procedure To cancel the date print setting Touch the Cancel key in the screen of step 2 Cancel Print Colour Bk Black...

Page 199: ...he stamp background Seven colours can be selected for the stamp colour Two stamp sizes can be selected CONFIDENTIAL PRIORITY PRELIMINARY FINAL FOR YOUR INFO DO NOT COPY IMPORTANT COPY URGENT DRAFT TOP SECRET PLEASE REPLY 1 Touch the Stamp key in the stamp selection screen See steps 1 to 4 of GENERAL PROCEDURE FOR USING STAMP page 2 85 2 Touch the key of the stamp that you wish to use CONFIDENTIAL ...

Page 200: ...on all pages After touching the OK key continue from step 5 of GENERAL PROCEDURE FOR USING STAMP page 2 85 to complete the copy procedure The stamp text cannot be edited To cancel a stamp setting Touch the Cancel key in the screen of step 2 Cancel OK PRIORITY CONFIDENTIAL DO NOT COPY FOR YOUR INFO DRAFT URGENT FINAL PRELIMINARY COPY IMPORTANT PLEASE REPLY TOP SECRET Print Colour Bk 2 1 3 Larger Sm...

Page 201: ...s and touch the OK key The CLEAR key can be pressed to return the setting of the selected item to the default value If you make a mistake press the CLEAR key and then enter the correct number When 2 sided copying is performed the total pages is the total number of sides of the paper If the final page is blank it is not counted However if a back cover will be added and the Count Back Cover checkbox...

Page 202: ...uto which means that page numbers are automatically printed through the last page based on the First Number and Printing Start from Page settings If the Last Number is set to a number smaller than the Total Pages page numbers are not printed on pages after the page set as the Last Number Printing Starts from Page is used to set the page number from which you want to begin printing page numbers For...

Page 203: ...re 1 sided copies and the inserted sheets are 2 sided copies each body sheet is counted as one page and each inserted sheet is counted as two pages Page numbers are printed on covers inserts if the covers inserts are counted and if they are copied on 8 Touch the OK key 9 Touch the OK key After touching the OK key continue from step 5 of GENERAL PROCEDURE FOR USING STAMP page 2 85 to complete the c...

Page 204: ...other stamp item is set in this changing position the page numbers will alternate sides with this stamp item A stamp item that is in a position not affected by the changing page number position will be printed in its original set position Example When four pages are copied using pamphlet copy and the page number format is 1 2 3 the result is as follows In this example the page number is set at the...

Page 205: ... touch the OK key To store or delete a text string touch the Store Delete key Storing editing and deleting text strings page 2 98 3 Specify the text to be printed 1 Touch the text string that you wish to select You can touch the 5 10 key to switch the number of keys displayed in the screen between 5 and 10 When 5 key display is selected the entire text string appears in each key 2 Touch the OK key...

Page 206: ... on the first page only or printing on all pages After touching the OK key continue from step 5 of GENERAL PROCEDURE FOR USING STAMP page 2 85 to complete the copy procedure Text settings can also be configured in the Web pages Click Application Settings Copy settings and then Text Settings Stamp in the Web page menu To cancel a text setting Touch the Cancel key in the screen of step 2 Cancel Prin...

Page 207: ... the text string is touched the following screen appears When the Amend key is touched a text entry screen appears The stored text string appears in the text entry screen Edit the text When you have finished entering the text touch the OK key The text entry screen will close When the Delete key is touched the stored text is deleted Text settings can also be configured in the Web pages Click Applic...

Page 208: ... screen of step 2 To copy using a stored text string continue from step 2 of PRINTING TEXT ON COPIES Text page 2 96 No 01 AAA AAA No 03 CCC CCC No 04 No 02 BBB BBB No 05 No 07 No 08 No 09 No 10 No 06 1 3 10 5 Store Delete Stamp Text 10 5 Store Delete Stamp Text Back ...

Page 209: ...want to delete or whose position you want to change A maximum of 14 characters appear in each key 3 To change the position of the item touch the Move key To delete the item touch the Delete key If the Move key is touched a screen for selecting the destination position appears If the Delete key is touched the item is deleted Go to step 6 OK Special Modes Special Modes OK Layout Cancel Date Page Num...

Page 210: ...itch the print positions 5 Touch the OK key If you attempt to move the stamp item to a position that is already occupied by another stamp item a message will appear asking you if you wish to overwrite the other stamp item To overwrite the other stamp item touch the Yes key To cancel the move touch the No key 6 Touch the OK key Select the location to move the selected item OK Stamp Move Not selecte...

Page 211: ...rk Seven colours can be selected for the watermark colour The angle of a watermark can be selected in the range 90 degrees to 90 degrees in increments of 45 degrees CONFIDENTIAL PRIORITY PRELIMINARY FINAL FOR YOUR INFO DO NOT COPY IMPORTANT COPY URGENT DRAFT TOP SECRET PLEASE REPLY 1 Touch the Watermark key in the stamp selection screen See steps 1 to 4 of GENERAL PROCEDURE FOR USING STAMP page 2 ...

Page 212: ... pages After touching the OK key continue from step 5 of GENERAL PROCEDURE FOR USING STAMP page 2 85 to complete the copy procedure The watermark text cannot be edited To cancel a watermark setting Touch the Cancel key in the screen of step 2 Cancel OK PRIORITY CONFIDENTIAL DO NOT COPY FOR YOUR INFO DRAFT URGENT FINAL PRELIMINARY COPY IMPORTANT PLEASE REPLY TOP SECRET Print Colour Bk 2 1 3 All Pag...

Page 213: ...AGE Mirror Image page 2 110 4 A3 Full Bleed key 11x17 Full Bleed key COPYING A3 11 x 17 ORIGINALS WITH NO EDGE CUT OFF A3 11 x 17 Full Bleed page 2 111 5 Centring key COPYING IN THE CENTRE OF THE PAPER Centring page 2 113 6 B W Reverse key REVERSING WHITE AND BLACK IN A COPY B W Reverse page 2 115 OK Mirror Image B W Reverse Multi Page Enlargement Centring A3 Full Bleed Photo Repeat OK Special Mod...

Page 214: ...n A4 8 1 2 x 11 size paper 4 copies are made Copying on A3 11 x 17 size paper 8 copies are made Copying on A4 8 1 2 x 11 size paper 8 copies are made Copying on A3 11 x 17 size paper 16 copies are made Copying on A4 8 1 2 x 11 size paper Ratio 95 10 copies are made Copying on A4 8 1 2 x 11 size paper 2 copies are made Copying on A3 11 x 17 size paper 4 copies are made Copying on A4 8 1 2 x 11 size...

Page 215: ...be selected for the paper size 4 Press the COLOUR START key or the BLACK WHITE START key Copying will begin If you have selected sort mode change originals and press the START key Repeat until all pages have been scanned and then touch the Read End key For the second original and following originals use the same START key as you did for the first original To cancel scanning and copying Press the S...

Page 216: ...int it as a composite image using multiple sheets of paper 1 Select the special modes 1 Touch the Special Modes key 2 Touch the keys to switch through the screens 3 Touch the Image Edit key 4 Touch the Multi Page Enlargement key Image Edit KEY page 2 104 Original A4 8 1 2 x 11 size Copy enlarged image on 8 sheets of A3 11 x 17 paper ...

Page 217: ... enlargement sizes shown in the table at left are possible for multi page enlargement An A size original cannot be enlarged to a B size and a B size original cannot be enlarged to an A size To print a borderline around the copy image touch the Border Print key so that it is highlighted 3 Place the original face down on the document glass in the orientation indicated in the screen Ready to scan for...

Page 218: ...lected first a message will appear indicating the original sizes that can be selected If a combination of settings is selected for which multi page enlargement is not possible invalid selection beeps will sound The paper size number of sheets required for the enlarged image and the ratio are automatically selected based on the selected original size and enlargement size The paper size and ratio ca...

Page 219: ...e screen of copy mode 4 Press the COLOUR START key or the BLACK WHITE START key Copying will begin If you are using the document glass to copy multiple original pages copying will take place as you scan each original If you have selected sort mode change originals and press the START key Repeat until all pages have been scanned and then touch the Read End key For the second original and following ...

Page 220: ...the special modes 1 Touch the Special Modes key 2 Touch the keys to switch through the screens 3 Touch the Image Edit key Image Edit KEY page 2 104 3 Select A3 11x17 Full Bleed 1 Touch the A3 Full Bleed or 11x17 Full Bleed key so that it is highlighted 2 Touch the OK key You will return to the special modes screen Touch the OK key to return to the base screen of copy mode A3 11 x 17 size original ...

Page 221: ...ve selected sort mode change originals and press the START key Repeat until all pages have been scanned and then touch the Read End key For the second original and following originals use the same START key as you did for the first original To cancel scanning and copying Press the STOP key The original must be placed on the document glass The copy ratio is 100 when this function is used The ratio ...

Page 222: ... Centring 1 Touch the Centring key so that it is highlighted 2 Touch the OK key You will return to the special modes screen Touch the OK key to return to the base screen of copy mode 4 Press the COLOUR START key or the BLACK WHITE START key Copying will begin If you are using the document glass to copy multiple original pages copying will take place as you scan each original If you have selected s...

Page 223: ... when using the centring function but not enlarged When the original size or the paper size is displayed as a special size this function cannot be used To cancel centring Touch the Centring key in the screen of step 3 so that it is not highlighted ...

Page 224: ...KEY page 2 104 3 Select B W Reverse 1 Touch the B W Reverse key so that it is highlighted 2 Touch the OK key You will return to the special modes screen Touch the OK key to return to the base screen of copy mode 4 Press the BLACK WHITE START key Copying will begin If you are using the document glass to copy multiple original pages copying will take place as you scan each original If you have selec...

Page 225: ...ed the Original Image Type setting for exposure adjustment automatically changes to Text This function is not available in some countries and regions To cancel B W reverse Touch the B W Reverse key in the screen of step 3 so that it is not highlighted ...

Page 226: ...Colour Balance key ADJUSTING THE COLOUR Colour Balance page 2 122 5 Brightness key ADJUSTING THE BRIGHTNESS OF A COPY Brightness page 2 124 6 Intensity key ADJUSTING THE INTENSITY OF A COPY Intensity page 2 125 OK Suppress Background Intensity Sharpness Brightness Colour Balance RGB Adjust OK Special Modes Colour Adjustments Special Modes 2 2 OK Image Edit Quick File Proof Copy Colour Adjustments ...

Page 227: ...er colour the adjustment of the first colour is cancelled 2 Adjust the selected colour Touch the key to strengthen the selected colour or touch the key to weaken the colour 3 Touch the OK key You will return to the special modes screen Touch the OK key to return to the base screen of copy mode 4 Press the COLOUR START key Copying will begin If you are using the document glass to copy multiple orig...

Page 228: ... Soft key or the Sharp key 2 Touch the OK key You will return to the special modes screen Touch the OK key to return to the base screen of copy mode 4 Press the COLOUR START key Copying will begin If you are using the document glass to copy multiple original pages copying will take place as you scan each original If you have selected sort mode change originals and press the COLOUR START key Repeat...

Page 229: ...he Suppress Background key Colour Adjustments KEY page 2 117 3 Select the suppress background setting 1 Adjust the background suppression level Touch the key to suppress only faint background Touch the key to suppress faint to dark background 2 Touch the OK key You will return to the special modes screen Touch the OK key to return to the base screen of copy mode Light areas are suppressed Level Le...

Page 230: ...s copying will take place as you scan each original If you have selected sort mode change originals and press the COLOUR START key Repeat until all pages have been scanned and then touch the Read End key To cancel scanning and copying Press the STOP key To cancel a suppress background setting Touch the Cancel key in the screen of step 3 ...

Page 231: ...t gradations can be adjusted at once OK OK Cancel Colour Adjustments Colour Balance Y M C Bk 1 2 3 4 5 6 7 8 All 1 2 3 4 5 6 7 8 Dark Light C Cyan M Magenta Y Yellow B Black 1 Place the original Place the original face up in the document feeder tray or face down on the document glass 2 Select the special modes 1 Touch the Special Modes key 2 Touch the keys to switch through the screens 3 Touch the...

Page 232: ...n of copy mode To return the colour balance values to the default settings Touch the key The values of all eight gradations will return to the default colour balance values The default colour balance values are set in Initial Colour Balance Setting in the system settings administrator 4 Press the COLOUR START key Copying will begin If you are using the document glass to copy multiple original page...

Page 233: ...the image brighter or the key to make the image darker 2 Touch the OK key You will return to the special modes screen Touch the OK key to return to the base screen of copy mode 4 Press the COLOUR START key Copying will begin If you are using the document glass to copy multiple original pages copying will take place as you scan each original If you have selected sort mode change originals and press...

Page 234: ...uch the OK key You will return to the special modes screen Touch the OK key to return to the base screen of copy mode 4 Press the COLOUR START key Copying will begin If you are using the document glass to copy multiple original pages copying will take place as you scan each original If you have selected sort mode change originals and press the COLOUR START key Repeat until all pages have been scan...

Page 235: ...e document feeder tray or face down on the document glass 2 Select copy settings in the base screen 3 Select Proof Copy 1 Touch the Special Modes key SPECIAL MODES page 2 41 2 Touch the keys to switch through the screens 3 Touch the Proof Copy key so that it is highlighted 4 Touch the OK key A A A A A A A A A A A A A A A A A A A A A A A A A A A A A A A A A A A A A A A A A A A A If OK After adjustm...

Page 236: ...change originals and press the START key Repeat until all pages have been scanned and then touch the Read End key One set of copies will be printed For the second original and following originals use the same START key as you did for the first original To cancel copying Press the STOP key 6 Check the printed set of copies If the copies are acceptable touch the End key If you need to change the set...

Page 237: ...K WHITE START key One set of copies is printed again using the adjusted settings Check the results If further adjustments are needed repeat steps 6 through 8 Repeating Proof Copy does not decrease the remaining number of sets to be printed 9 Touch the End key You will return to the base screen of copy mode and the remaining sets will be printed To cancel scanning and copying Press the STOP key If ...

Page 238: ...ple originals can be placed in the document feeder tray The stack of originals must not be higher than the indicator line on the tray 2 Select Original Count 1 Touch the Special Modes key SPECIAL MODES page 2 41 2 Touch the keys to switch through the screens 3 Touch the Original Count key so that it is highlighted 4 Touch the OK key You will return to the base screen of copy mode 3 Press the COLOU...

Page 239: ...original pages For example when two sided copying is performed using one original the number 1 will appear to indicate that one original sheet was scanned not 2 to indicate the front side page and the reverse side page If the displayed number of original sheets is different from the actual number of original sheets Press the STOP key To cancel the original count mode setting Touch the Original Cou...

Page 240: ...ize originals Same Width Use this setting for originals that are different sizes but have sides that are the same length The originals are inserted in the document feeder tray with the sides that are the same length aligned together on the left A3 and A4 B4 and B5 A4R and A5 11 x 17 and 8 1 2 x 11 8 1 2 x 14 and 8 1 2 x 11 R 8 1 2 x 14 and 5 1 2 x 8 1 2 8 1 2 x 13 and 8 1 2 x 11 R 8 1 2 x 13 and 5...

Page 241: ...o switch through the screens 3 Touch the Mixed Size Original key Special modes menu 2nd screen page 2 42 3 Select Mixed Size Original settings 1 Touch the Same Width key or the Different Width key as appropriate for the originals 2 Touch the OK key You will return to the base screen of copy mode A3 11 x 17 A4 8 1 2 x 11 Place with the sides that are the same length aligned on the left B4 8 1 2 x 1...

Page 242: ...t Width is selected the staple function cannot be used The mixed size original function cannot be used to copy originals that are the same size but are placed in different orientations A4 and A4R 8 1 2 x 11 and 8 1 2 x 11 R etc To cancel the mixed size original setting Touch the Cancel key in the screen of step 3 System Settings Administrator Original Feeding Mode The original feeding mode can be ...

Page 243: ...not be higher than the indicator line on the tray If the originals are inserted with too much force they may crumple and misfeed 2 Select Slow Scan Mode 1 Touch the Special Modes key SPECIAL MODES page 2 41 2 Touch the keys to switch through the screens 3 Touch the Slow Scan Mode key so that it is highlighted 4 Touch the OK key You will return to the base screen of copy mode 3 Press the COLOUR STA...

Page 244: ...automatic 2 sided copying cannot be used To cancel the slow scan mode setting Touch the Slow Scan Mode key in the screen of step 2 so that it is not highlighted System Settings Administrator Original Feeding Mode This is used to have scanning always take place in slow scan mode ...

Page 245: ...errupt key The Interrupt key does not appear while an original is being scanned 2 Place the original Place the original face up in the document feeder tray or face down on the document glass 3 Select copy settings and press the COLOUR START key or the BLACK WHITE START key The interrupt copy job begins 4 When the interrupt copy job is completed the interrupted job resumes To cancel scanning and co...

Page 246: ...ss the Reserve key may appear instead of the Interrupt key Unlike interrupt copy reserve copy does not temporarily stop the job in progress Instead the reserve copy job begins when the job in progress is finished Interrupt copy cannot be used in combination with the following special modes Job Build Tandem Copy Book Copy Card Shot Multi Page Enlargement Original Count If the document glass is used...

Page 247: ...r the BLACK WHITE START key After the original is scanned a preview image of the copy appears in the touch panel The copy is not printed until the Start Copy key is touched in the preview screen 4 Check the preview image and then touch the Start Copy key Copy printing begins For details on the preview screen see PREVIEW SCREEN page 2 140 If you need to change the copy settings touch the Reset key ...

Page 248: ...eration Press the CLEAR ALL key System Settings Administrator Default Preview You can set the default state of the Preview key to always selected highlighted Enable this setting if you wish to check a preview image each time you make a copy ...

Page 249: ...when the entire preview image is displayed in the preview screen 5 Function Rev key Touch to check special mode items 2 sided copying and output settings 6 Display zoom key Use this to set the zoom ratio of the displayed image Changes from the left in the order Full Page Twice 4 Times 8 Times The setting applies to all pages in the file not just the displayed page 7 Display Rotation key This rotat...

Page 250: ... in the print queue the job in progress and reserved jobs can be checked in the job status display B Detail Spool Complete Stop Delete Copy 2 3 4 002 000 Waiting Computer01 002 000 Waiting 0312345678 001 000 Waiting Print Job Job Queue Sets Progress Status Scan to Fax Job Internet Fax Priority 1 1 Job Queue Copy 1 020 001 Copying JOB STATUS When the hard disk drive is not installed Spool is not di...

Page 251: ...e is not installed Spool is not displayed 4 Detail key job queue screen Touch this key to display detailed information on a job 5 Priority key Touch this key to give priority to a selected job 6 Stop Delete key Touch this key to stop or delete a selected job 7 Job list completed jobs screen This shows up to 99 completed jobs The result status of each completed job is shown Copy jobs that used the ...

Page 252: ...job that was cancelled 3 Job name Copy appears for a copy job When user authentication is enabled the name of the user that performed the job appears 4 Number of copies sets entered This shows the number of copies sets specified 5 Number of completed copies This shows the number of copies sets completed 000 appears while the job is waiting in the job queue 6 Status Shows the job status Copy 2 002 ...

Page 253: ...ssage appears to confirm the cancellation Touch the Yes key The selected job key is deleted and printing is cancelled If the job in progress is a copy job you can also press the STOP key to display the above screen To cancel touch the Yes key If you do not want to cancel the selected print job Touch the No key in step 5 JOB STATUS 3 4 Computer02 002 000 Waiting 1 Computer01 020 001 Printing 031234...

Page 254: ... the Print Job tab 2 Change the print job status mode to Job Queue Touch this key to change modes The selected mode will be highlighted 3 Touch the key of the copy job to which you want to give priority 4 Touch the Priority key The job being printed stops and the job selected in 3 is printed JOB STATUS 3 4 Computer02 002 000 Waiting 1 Computer01 020 001 Printing 0312345678 001 000 Waiting Internet...

Page 255: ...the paper ran out the Paper Select key can be pressed to change to a different paper tray When the Paper Select key is pressed the paper tray selection screen appears PAPER TRAYS page 2 11 Touch the key of the tray that has the size of paper that you wish to use and then touch the OK key The stopped copy job will resume JOB STATUS Copy 002 000 Waiting Computer01 002 000 Waiting 0312345678 001 000 ...

Page 256: ... margin shift Select punch hole settings Press the COLOUR START key or the BLACK WHITE START key Press the P key Touch the stored program key Press the COLOUR START key or the BLACK WHITE START key Considerable time is required to copy the drawings each month because the above settings must be selected In addition mistakes are occasionally made when selecting the settings so some copies must be re...

Page 257: ...am When a highlighted numeric key is touched the following screen appears The Store key can be touched to delete the stored settings and store new settings Go to the next step When the Delete key is touched the stored settings are deleted After the deletion is finished touch the Exit key to return to the base screen When Disabling Deletion of Job Programs is enabled in the system settings a stored...

Page 258: ...tered for the name When you have finished touch the OK key You will return to the base screen with the stored information reflected in the screen The number of copies cannot be stored Colour Mode Special Modes 2 Sided Copy Output Copy Ratio 100 Original Paper Select Auto A4 Plain Auto Full Colour Exposure Auto To store make selections and press OK to delete press Cancel Cancel OK Program Name Prev...

Page 259: ...earing in display Front cover Front cover when not copied on Inserts Insert when not copied on Front cover when one side is copied on Insert when one side is copied on Front cover when a 2 sided original is copied on one side of the cover One page is not copied Insert when a 2 sided original is copied on one side of the insert One page is not copied Front cover when both sides are copied on Insert...

Page 260: ...ing copies Front cover Back cover No copying No copying 1 sided copying No copying 2 sided copying No copying No copying 1 sided copying No copying 2 sided copying 1 sided copying 1 sided copying 1 sided copying 2 sided copying 2 sided copying 1 sided copying 2 sided copying 2 sided copying 1 2 3 4 5 6 1 2 3 4 5 6 1 2 3 4 5 6 1 2 3 4 5 6 1 2 3 4 5 6 1 2 3 4 6 5 1 2 3 4 5 6 1 2 3 4 6 5 1 2 3 4 5 6 ...

Page 261: ...ing copies Front cover Back cover No copying No copying 1 sided copying No copying 2 sided copying No copying No copying 1 sided copying No copying 2 sided copying 1 sided copying 1 sided copying 1 sided copying 2 sided copying 2 sided copying 1 sided copying 2 sided copying 2 sided copying 1 2 3 4 5 6 1 2 3 4 5 6 1 2 3 4 5 6 1 2 3 4 5 6 1 2 3 4 5 6 1 2 3 4 6 5 1 2 3 4 5 6 1 2 3 4 6 5 1 2 3 4 5 6 ...

Page 262: ...nt cover Back cover No copying No copying 1 sided copying No copying 2 sided copying No copying No copying 1 sided copying No copying 2 sided copying 1 sided copying 1 sided copying 1 sided copying 2 sided copying 2 sided copying 1 sided copying 2 sided copying 2 sided copying 1 2 3 4 5 6 1 2 3 4 5 6 1 2 3 4 5 6 1 2 3 4 5 6 1 2 3 4 5 6 1 2 3 4 6 5 1 2 3 4 5 6 1 2 3 4 6 5 1 2 3 4 5 6 1 2 3 4 6 5 ...

Page 263: ...es Front cover Back cover No copying No copying 1 sided copying No copying 2 sided copying No copying No copying 1 sided copying No copying 2 sided copying 1 sided copying 1 sided copying 1 sided copying 2 sided copying 2 sided copying 1 sided copying 2 sided copying 2 sided copying 1 2 3 4 5 6 1 2 3 4 5 6 1 3 4 5 6 1 2 3 4 5 6 1 2 3 4 6 1 2 3 4 6 5 1 3 4 6 1 3 4 6 5 1 2 3 4 6 1 2 3 4 6 5 ...

Page 264: ...eet is shown when Insertion Page is set to 3 in the insertion settings of the insert settings in the special modes 1st page 2nd page 3rd page 4th page 5th page 6th page Insert copying condition Resulting copies 1 sided copying Resulting copies 2 sided copying No copying 1 sided copying 2 sided copying 1st page 2nd page 3rd page Insert copying condition Resulting copies 1 sided copying Resulting co...

Page 265: ...ES ON ONE PAGE 3 30 STAPLING OUTPUT PUNCHING HOLES IN OUTPUT 3 32 CONVENIENT PRINTING FUNCTIONS CONVENIENT FUNCTIONS FOR CREATING PAMPHLETS AND POSTERS 3 34 CREATING A PAMPHLET Pamphlet 3 34 INCREASING THE MARGIN Margin Shift 3 36 CREATING A LARGE POSTER Poster Printing 3 37 FUNCTIONS TO ADJUST THE SIZE AND ORIENTATION OF THE IMAGE 3 38 ROTATING THE PRINT IMAGE 180 DEGREES Rotate 180 degrees 3 38 ...

Page 266: ...Document Filing 3 59 PRINTING WITHOUT THE PRINTER DRIVER DIRECTLY PRINTING FROM THE MACHINE 3 62 DIRECTLY PRINTING A FILE ON AN FTP SERVER 3 63 DIRECTLY PRINTING A FILE IN USB MEMORY 3 64 DIRECTLY PRINTING A FILE IN A NETWORK FOLDER 3 66 DIRECTLY PRINTING FROM A COMPUTER 3 69 SUBMIT PRINT JOB 3 69 FTP PRINT 3 69 E MAIL PRINT 3 70 CHECKING THE PRINT STATUS JOB STATUS SCREEN 3 71 SPOOL SCREEN JOB QU...

Page 267: ...Guide Environment Printer driver type Remarks Windows SAPL c This is the SHARP proprietary printer driver The printer driver compresses the data in each print job before sending the job to the machine enabling smooth printing SAPL is an acronym for Sharp Advanced Printing Language Can be used in the standard machine configuration PCL6 The machine supports the Hewlett Packard PCL6 printer control l...

Page 268: ...roperties window 1 Select the printer driver of the machine If the printer drivers appear as icons click the icon of the printer driver to be used If the printer drivers appear as a list select the name of the printer driver to be used from the list 2 Click the Preferences button If you are using Windows 2000 the Preferences button does not appear Click a tab on the Print dialog box to adjust the ...

Page 269: ...tton Make sure the paper size is the same as the paper size set in the software application Up to eight custom paper sizes can be stored Storing a custom paper size makes it easy to specify that size each time you need to use it To store a paper size select Custom Paper or one of User1 to User7 from the pull down menu and click the Custom button 4 Click the Print button Printing begins 1 2 3 ...

Page 270: ...y When other than Auto Select is selected in Paper Type A tray with the specified type of paper and the size specified in Paper Size is used for printing Special media such as envelopes can also be placed in the bypass tray For the procedure for loading paper and other media in the bypass tray see LOADING PAPER IN THE BYPASS TRAY page 1 32 in 1 BEFORE USING THE MACHINE When Enable Detected Paper S...

Page 271: ...Settings in many applications and then perform the following steps 1 Click the Paper tab 2 Select the envelope size from the Paper Size menu 3 Select Bypass Tray from the Paper Source menu of Paper Selection 4 Select Envelope from the Paper Type menu Set the paper type of the bypass tray to Envelope and make sure the envelope is loaded in the bypass tray 2 1 3 4 It is recommended that you do a tes...

Page 272: ...print The information that must be entered varies depending on the authentication method being used so check with the administrator of the machine before printing 1 Open the printer driver properties window from the print window of the software application 1 Select the printer driver of the machine 2 Click the Preferences button The button that is used to open the printer driver properties window ...

Page 273: ...ser information in the dialog box whenever you print 3 Enter the user name and job name as necessary User Name Click the User Name checkbox and enter your user name maximum of 32 characters Your entered user name will appear at the top of the operation panel If you do not enter a user name your computer login name will appear Job Name Click the Job Name checkbox and enter a job name maximum of 30 ...

Page 274: ...er authentication function cannot be used when the PPD file is installed and the Windows standard PS printer driver is used For this reason printing will not be possible if printing by invalid users is prohibited in the system settings administrator The PPD file enables the machine to print using the standard PS printer driver of the operating system System Settings Administrator Disabling of Prin...

Page 275: ... printer driver properties window When a restriction exists on a selected setting an information icon will appear next to the setting Click the icon to view an explanation of the restriction 1 Open the printer driver properties window from the print window of the software application 1 Select the printer driver of the machine 2 Click the Preferences button The button that is used to open the print...

Page 276: ...ab of the printer driver properties window Settings configured on each tab are listed at the time of saving allowing you to check the settings as you save them 1 Open the printer driver properties window from the print window of the software application 1 Select the printer driver of the machine 2 Click the Preferences button The button that is used to open the printer driver properties window usu...

Page 277: ... button 4 Click the OK button 5 Start printing Up to 30 sets of user settings can be saved The following items cannot be saved in user settings A watermark that you created Paper insertion settings Overlay file Tab Paper Print settings on the Special Modes tab PCL6 only The login name password user name and job name entered in the Job Handling tab 3 2 1 ...

Page 278: ...ow from the print window of the software application 1 Select the printer driver of the machine 2 Click the Preferences button The button that is used to open the printer driver properties window usually Properties or Printing Preferences may vary depending on the software application 2 Select the print settings 1 Select the user settings that you wish to use 2 Click the OK button 3 Start printing...

Page 279: ...Windows XP Server 2003 click the start button and then click Printers and Faxes In Windows 2000 click the Start button point to Settings and then select Printers In Windows XP if Printers and Faxes does not appear in the start menu select Control Panel select Printers and Other Hardware and then select Printers and Faxes 2 Open the printer properties window 1 Click the icon of the printer driver o...

Page 280: ...3 16 PRINTER Contents 4 Configure the settings and click the OK button For explanations of the settings see printer driver Help ...

Page 281: ...hine and the machine must be connected to a network To install the PPD file and configure printer driver settings see 3 SETUP IN A MACINTOSH ENVIRONMENT in the Software Setup Guide 1 Select Page Setup from the File menu of TextEdit In Mac OS 9 select Page Setup from the File menu of SimpleText 2 Select paper settings 1 Make sure that the correct printer is selected 2 Select paper settings The pape...

Page 282: ...Cxxxxxx xxxxxx is a sequence of characters that varies depending on the machine model 3 Select print settings In Mac OS X click next to Copies Pages and select the settings that you wish to configure from the pull down menu The corresponding setting screen will appear If the settings do not appear in Mac OS X v10 5 to 10 5 8 and 10 6 to 10 6 2 click next to the printer name In Mac OS 9 click next ...

Page 283: ...3 19 PRINTER Contents 4 Click the Print button Printing begins ...

Page 284: ... used for printing Special media such as envelopes can also be placed in the bypass tray For the procedure for loading paper and other media in the bypass tray see LOADING PAPER IN THE BYPASS TRAY page 1 32 in 1 BEFORE USING THE MACHINE When Enable Detected Paper Size in Bypass Tray disabled by factory default or Enable Selected Paper Type in Bypass Tray enabled by factory default is enabled in th...

Page 285: ... Paper Size menu on the page setup screen In Mac OS 9 select the envelope size from the Paper menu on the page setup screen 2 Click the OK button In the case of media that can only be loaded in a certain orientation such as an envelope you can rotate the image 180 degrees if needed For more information see ROTATING THE PRINT IMAGE 180 DEGREES Rotate 180 degrees page 3 38 2 Select the bypass tray 1...

Page 286: ... machine before printing 1 Select Print from the application s File menu The menu used to execute printing may vary depending on the software application 2 Display the job handling screen 1 Make sure that the machine s printer name is selected 2 Select Job Handling In Mac OS X v10 5 to 10 5 8 and 10 6 to 10 6 2 select Job Handling and then click the Authentication tab in the screen that appears In...

Page 287: ...ppear 3 Click the Print button In Mac OS X you can click the lock button after entering your login name and password or user number to simplify operation the next time you wish to print based on the same user authentication When user authentication is enabled in the system settings administrator printing is possible without entering user information if black and white printing is set in the printe...

Page 288: ...d using Bk Black toner only This is convenient when printing a document that has both colour and black and white pages however the printing speed is slower Color All pages are printed in colour Both colour data and black and white data are printed using Y Yellow M Magenta C Cyan and Bk Black toner Black and White All pages are printed in black and white Colour data such as images or materials for ...

Page 289: ...nt checkbox on the Main tab so that a checkmark appears The Black and White Print checkbox on the Main tab and the Color Mode setting on the Color tab are linked When the Black and White Print checkbox is selected on the Main tab Black and White is also selected on the Color tab 1 Select Color 2 Select the Color Mode that you wish to use Macintosh 1 2 ...

Page 290: ...ting The Print Mode Settings consist of the following two items Normal This mode is suitable for printing data such as regular text or a table High Quality The print quality of colour photos and text is high 1 Click the Advanced tab 2 Select the Print Mode 1 Select Color 2 Select the Print Mode Windows 1 2 Macintosh 1 2 ...

Page 291: ...ect 2 Sided Book or 2 Sided Tablet Paper orientation Print results Vertical Windows Macintosh Windows Macintosh 2 Sided Book Long edged binding Flip on long edge 2 Sided Tablet Short edged binding Flip on short edge Horizontal Windows Macintosh Windows Macintosh 2 Sided Book Short edged binding Flip on short edge 2 Sided Tablet Long edged binding Flip on long edge The pages are printed so that the...

Page 292: ...elect Layout 2 Select Long edged binding or Short edged binding Macintosh 1 2 In Mac OS X v10 2 8 select the settings in Advanced In Mac OS 9 select Output Document Style and then select Flip on long edge or Flip on short edge ...

Page 293: ...ow to print an A4 size document on A3 size paper 1 Click the Paper tab 2 Select the size of the print image for example A4 3 Select Fit To Paper Size 4 Select the actual paper size to be used for printing for example A3 This function can only be used in Mac OS X v10 4 11 v10 5 to 10 5 8 and 10 6 to 10 6 2 1 Select Paper Handling 2 Check the size of the print image for example A4 To change the prin...

Page 294: ...cted the following print results will be obtained depending on the order selected N Up Pages per sheet Print results Left To Right Right To Left Top To Bottom When the print orientation is landscape 2 Up 2 pages per sheet N Up Pages per sheet Right and Down Down and Right Left and Down Down and Left 4 Up 4 pages per sheet The page orders for 6 Up 8 Up 9 Up and 16 Up are the same as for 4 Up In a W...

Page 295: ...you wish to print borderlines click the Border checkbox so that a checkmark appears 4 Select the order of the pages 1 Select Layout 2 Select the number of pages per sheet 3 Select the order of the pages 4 If you wish to print borderlines select the desired type of borderline Windows 2 3 4 1 Macintosh 1 2 3 4 ...

Page 296: ...Right Top 1 Staple 2 Staples Left Right Top To use the staple function a finisher is required To use the punch function a punch module must be installed on the finisher The number of holes that can be punched and the spacing between the holes varies depending on the installed punch module For the maximum number of sheets that can be stapled see SPECIFICATIONS in the Start Guide The maximum number ...

Page 297: ...ck the Punch checkbox so that a checkmark appears 1 Select Printer Features 2 Select the Binding Edge 3 Select the staple function or the punch function For the staple function select the number of staples in the Staple menu For the punch function click the Punch checkbox so that a checkmark appears Windows 3 2 1 Macintosh 1 2 3 In Mac OS X v10 2 8 select the settings in Advanced In Mac OS 9 selec...

Page 298: ...or printing and the steps for opening the printer driver properties window see the following section Windows BASIC PRINTING PROCEDURE page 3 4 Macintosh BASIC PRINTING PROCEDURE page 3 17 CONVENIENT FUNCTIONS FOR CREATING PAMPHLETS AND POSTERS CREATING A PAMPHLET Pamphlet The pamphlet function prints on the front and back of each sheet of paper so that the sheets can be folded and bound to create ...

Page 299: ...er Features 2 Select the Binding Edge 3 Select Tiled Pamphlet or 2 Up Pamphlet Macintosh 3 1 2 In Mac OS X v10 2 8 select from the 2 Side Printing and Binding Edge menus in Advanced In Mac OS 9 select the settings in Output Document Style ...

Page 300: ...e the settings on the Main tab 2 Select the Binding Edge 3 Select the Margin Shift Select from the Margin Shift menu If you wish to configure another numeric setting select the setting from the pull down menu and click the Settings button Click the button or directly enter the number 1 Select Printer Features 2 Select the Binding Edge 3 Select the Margin Shift Windows 3 2 1 Macintosh 3 1 2 In Mac ...

Page 301: ...ise alignment of the edges of the sheets during attachment borderlines can be printed and overlapping edges can be created overlap function This function can be used when the PCL6 or PS printer driver is used 1 Click the Paper tab 2 Select the Poster Printing checkbox and click the Poster Settings button 3 Select poster settings Select the number of sheets of paper to be used from the pull down me...

Page 302: ...one orientation such as envelopes or paper with punch holes In Mac OS X a portrait image cannot be rotated 180 degrees 1 Select the setting on the Main tab 2 Select the Rotate 180 degrees checkbox 1 Select Page Setup from the File menu and click the button In Mac OS 9 select Page Setup from the File menu and select PostScript Options Then select the Flip Horizontal and Flip Vertical checkbox 2 Cli...

Page 303: ...ange the proportions of the image XY Zoom 1 Click the Paper tab 2 Select Zoom and click the Settings button The actual paper size to be used for printing can be selected from the pull down menu 3 Select the zoom ratio Directly enter a number or click the button to change the ratio in increments of 1 You can also select Upper Left or Center for the base point on the paper 1 Select Page Setup from t...

Page 304: ...hen the data includes lines of varying widths you can also print all lines at the minimum width Only for black and white printing This function can be used when the PCL6 and SAPL c printer driver is used 1 Click the Advanced tab 2 Adjust the line width Select a number from the pull down menu Windows 2 1 The units of line width adjustment can be set to Fixed Width or Ratio Click the Compatibility b...

Page 305: ...ick the Advanced tab 2 Select a mirror image setting If you wish to reverse the image horizontally select Horizontal If you wish to reverse the image vertically select Vertical This function can only be used in Mac OS 9 1 Select Page Setup from the File menu and select PostScript Options 2 Select Visual Effects To reverse the image horizontally select Flip Horizontal To reverse the image verticall...

Page 306: ...ns when you do not have image editing software installed on your computer 1 Click the Color tab 2 Click the Color Adjustment button 3 Adjust the colour settings To adjust a setting drag the slide bar or click the or button This function can only be used in Mac OS X v10 3 9 and v10 4 11 1 Select Color 2 Click the Color Adjustment button 3 Select the Color Adjustment checkbox and adjust the colour A...

Page 307: ...such as bitmap images cannot be adjusted This allows you to bring out colour text and lines that are faint and difficult to see when printed in greyscale Text To Black can be selected to print all text other than white text in black Vector To Black can be selected to print all vector graphics other than white lines and areas in black 1 Click the Color tab 2 Select the Text To Black checkbox and or...

Page 308: ...text photos graphs etc Graphics for data with many drawings or illustrations Photo for photo data or data that uses photos CAD for engineering drawing data Scan for data scanned by a scanner Colorimetric Data which needs to be printed in almost the same colours as those on the screen Custom for data to be printed with special settings 3 Select advanced colour settings If you wish to select advance...

Page 309: ...od in a Windows environment ColorSync checkbox Colour management method in a Macintosh environment Source Profile Select the colour profile used to display the image on the computer screen Rendering Intent Standard value used when converting the colour balance of the image displayed on the computer screen to a colour balance that can be printed by the machine Output Profile Selecting a colour prof...

Page 310: ...ur of the print result is not correct it is recommended that you perform Output Level In the following cases in particular be sure to perform Output Level to obtain the machine s colour information before printing When printing for the first time after installing the printer driver After you have performed colour balance adjustment on the machine After you have performed Print Density Level on the...

Page 311: ...gs Select a stored water mark from the pull down menu You can click the Edit button to edit the font colour and select other detailed settings 1 Select Watermarks 2 Click the Watermark checkbox and configure watermark settings Detailed watermark settings can be configured such as selection of the text and editing of the font and colour Adjust the size and angle of the text by dragging the slide ba...

Page 312: ...can be used to stamp the print data with a frequently used image or an icon of your own creation This function can be used when the PCL6 or PS printer driver is used 1 Click the Watermarks tab 2 Select the image stamp setting If an image stamp has already been stored it can be selected from the pull down menu If you have not stored an image stamp click the Image File select the file you wish to us...

Page 313: ...the Edit button 3 Create an overlay file Click the Create Overlay button and specify the name and folder to be used for the overlay file that you wish to create The file will be created when the settings are completed and printing is started Printing with an overlay file 1 Click the Advanced tab Configure the printer driver settings from the application from which you wish to print using the overl...

Page 314: ...d last page on thick paper 1 Click the Special Modes tab 2 Select Different Paper and click the Settings button 3 Select paper insertion settings Select the insertion position paper source and printing method from the corresponding menus Click the Add button to show the selected settings in Information When you have completed the settings click the Save button in User Settings to save the settings...

Page 315: ...and v10 6 to 10 6 2 1 Select Printer Features 2 Select Different Paper 3 Select cover insertion settings Select the print setting paper tray and paper type for the cover page and last page Macintosh 1 3 2 In Mac OS 9 select Different Paper and then select the settings for the cover page and last page ...

Page 316: ...me content on the insert as is printed on the sheet of transparency film select the Printed checkbox Select the paper source and type if needed 1 Select Printer Features 2 Select Transparency Inserts 3 Select transparency insert settings To print the same content on the insert as is printed on the sheet of transparency film select Print in Transparency Inserts Select the paper source and type if n...

Page 317: ...ained with a single selection of the print command As another example if standard paper is loaded in tray 1 and recycled paper is loaded in tray 2 Carbon Copy can simultaneously print one copy for presentation and one copy as a duplicate This function can be used when the PCL6 or PS printer driver is used 1 Click the Special Modes tab 2 Select Carbon Copy and click the Settings button 3 Select the...

Page 318: ...t on the Special Modes tab of the printer driver properties window and detailed settings can be configured such as the size of the tabs the starting position the distance between tabs and the page numbers where tab sheets will be inserted Tab Paper Settings PCL6 PS only Text to be printed on tab papers can be created in a software application and then Tab Paper Settings on the Advanced tab of the ...

Page 319: ...of tab paper the position of the first tab the distance between tabs and the horizontal and vertical dimensions of the tab can be directly entered or changed using the button In addition the size of the tab paper can be selected in Paper Size 4 Select the page settings Specify the pages where you wish to insert tab paper and enter the text that you wish to print on the tabs You can also select the...

Page 320: ... following settings 1 Click the Advanced tab 2 Click the Tab Paper Settings button 3 Select the tab paper settings To shift the image directly enter a number or click the button 4 Select the paper source and type Click the Paper tab and select Bypass Tray for Paper Source and Tab Paper for Paper Type 4 1 2 3 Set Tab Paper for the Paper Type of the bypass tray ...

Page 321: ...he reverse side will be left blank and the page will be printed on the front side of the next sheet of paper This function can be used when the PCL6 printer driver is used 1 Click the Special Modes tab 2 Select Chapter Inserts and click the Settings button 3 Select the chapter settings Enter the page numbers that are to begin chapters in Page Settings Click the Add button and your settings will ap...

Page 322: ...n on the Configuration tab of the printer driver In a Macintosh environment this can be accomplished automatically by clicking the Tandem Settings button This function can be used when the PCL6 or PS printer driver is used 1 Click the Advanced tab 2 Select the Tandem Print checkbox This function can only be used in Mac OS X 1 Select Tandem Print 2 Select the Tandem Print checkbox Example Printing ...

Page 323: ... password is set the password must be entered to print a stored file from the machine Hold Only This setting is used to hold a print job on the machine s hard drive without printing it Hold After Print This setting is used to hold a print job on the machine s hard drive after it is printed Sample Print When a print job is sent to the machine only the first set of copies is printed After checking t...

Page 324: ...s selected Retention Settings will be set to Hold After Print only When Quick File is selected the password entered in Retention Settings is cleared and cannot be used To store a file in a custom folder the custom folder must first be created using Document Filing Control in the system settings administrator If a password has been established for a custom folder enter the Folder Password in the fo...

Page 325: ...PRINTING WHEN THE USER AUTHENTICATION FUNCTION IS ENABLED page 3 22 1 Log into the machine Enter your user number or login name and password in the user authentication screen of the machine 2 Perform print all A confirmation prompt will appear Touch the OK key The print files stored in the quick file folder main folder and custom folder will be printed automatically and then deleted Macintosh 3 1 ...

Page 326: ...d and printed from the operation panel of the machine without using the printer driver PRINTING WITHOUT THE PRINTER DRIVER File Type TIFF JPEG PCL PDF Encrypted PDF PS XPS Extension tiff tif jpeg jpg jpe jfif pcl pdf ps xps Even if the print result is black and white the following types of print jobs will be counted as 4 colour Y Yellow M Magenta C Cyan and Bk Black print jobs To be always counted...

Page 327: ...ish to print The icon appears to the left of keys of files that can be printed The icon is displayed to the left of keys of folders on the FTP server To display the files and folders in a folder touch the key of the folder A total of 100 keys of files and folders can be displayed Touch the key to move up one folder level When you move down a folder level by touching a folder key the key appears in...

Page 328: ...ly 4 Print the selected file 1 Select print conditions If you selected a file PCL PS or XPS in step 3 that includes print settings the settings will be applied 2 Touch the Print key Printing begins When the message appears in the touch panel touch the OK key When you select a PDF file that has a password you must enter the password in the job status screen to begin printing PRINTING AN ENCRYPTED P...

Page 329: ...folder name selection screen Touch the File or Folder Name key to change the order of the files and folders displayed on the screen The order switches between ascending order and descending order each time you touch the key 4 Print the selected file 1 Select print conditions If you selected a file PCL PS or XPS in step 3 that includes print settings the settings will be applied 2 Touch the Print k...

Page 330: ...ou must enter the password in the job status screen to begin printing PRINTING AN ENCRYPTED PDF FILE page 3 74 1 Access the network 1 Touch the DOCUMENT FILING key 2 Touch the Ex Data Access tab 3 Touch the Network Folder key System Settings Administrator Disabling of Network Folder Direct Print This setting is used to disable printing of files in a network folder When this setting is enabled Netw...

Page 331: ...oups 100 servers and 100 network folders can be displayed Touch the key to move up one folder level To return to the workgroup selection screen touch the key To change the sorting order of the displayed keys touch the key that shows or in each screen The order switches between ascending order and descending order each time you touch the key To go to a particular page touch the key that shows the c...

Page 332: ...tween ascending order and descending order each time you touch the key 4 Print the selected file 1 Select print conditions If you selected a file PCL PS or XPS in step 3 that includes print settings the settings will be applied 2 Touch the Print key Printing begins after the selected file is transferred When the message appears in the touch panel touch the OK key When you select a PDF file that ha...

Page 333: ...age menu FTP PRINT You can print a file from your computer by simply dragging and dropping the file onto the FTP server of the machine Configuring settings To enable FTP Print click Application Settings and then Setting for Print from the PC in the Web page menu and configure the port number Administrator rights are required Performing FTP Print Type ftp and then the IP address of the machine in t...

Page 334: ... 3 Can be omitted except when authentication is by user number Function Command name Values Example Copies COPIES 1 999 Staples 1 STAPLEOPTION NONE ONE TWO Punch 2 PUNCH OFF ON Output COLLATE OFF ON 2 sided print DUPLEX OFF TOP LEFT RIGHT Account number 3 ACCOUNTNUMBER Number 5 to 8 digits File type LANGUAGE PCL PCLXL POSTSCRIPT PDF TIFF JPG XPS Paper PAPER Name of available paper A4 LETTER etc Do...

Page 335: ...reen You can check the first four print jobs in the print queue the job in progress and reserved jobs in the job status display B Detail Spool Complete Stop Delete Copy 2 4 002 000 Waiting Copy 002 001 Printing 0312345678 001 000 Waiting Print Job Job Queue Sets Progress Status Scan to Fax Job Internet Fax Priority 1 1 Job Queue Computer01 3 020 000 Waiting 1 JOB STATUS Plain A3 3 1 2 A4R B4 4 A4 ...

Page 336: ...Priority key Touch this key to give priority to a selected job 7 Stop Delete key Touch this key to stop or delete a selected job 8 Job list completed jobs screen This shows up to 99 completed jobs The result status of each completed job is shown 9 Detail key completed jobs screen When a job is shown as a key in the job list the Detail key can be touched to show detailed information on the job 10 C...

Page 337: ... driver to display the name of the user who executed the job 4 Number of sets entered This shows the number of sets specified 5 Number of completed sets This shows the number of sets completed 000 appears while the job is waiting in the job queue 6 Status Shows the job status Computer01 2 002 000 Waiting 1 2 3 4 5 6 Message Status Printing Printing is in progress Waiting The job is waiting to be e...

Page 338: ...entry screen appears Enter the password 32 characters or less and touch the OK key The print job is released and moved to the Job Queue When both a master password and a user password which is used to open the file have been set enter the master password To print an encrypted PDF file using the printer driver enter the password when opening the file on your computer Printing is not possible if you...

Page 339: ...his key to change modes The selected mode will be highlighted 3 Touch the key of the print job to which you want to give priority 4 Touch the Priority key The job being printed stops and the job selected in 3 is printed To check print information on the selected job touch the Detail key JOB STATUS Computer01 Computer02 0312345678 Copy 020 001 020 000 002 000 002 000 Printing Waiting Waiting Waitin...

Page 340: ... The selected job key is deleted and printing is cancelled It is also possible to cancel printing with the STOP key on the operation panel When the STOP key is pressed a message will appear asking you if you want to cancel the job If you do not want to cancel the selected print job Touch the No key in step 5 JOB STATUS Computer01 Computer02 0312345678 Copy 020 001 020 000 002 000 002 000 Printing ...

Page 341: ...Touch the key of the job for which Paper Empty appeared 2 Touch the Detail key 3 Touch the Paper Select key 4 Touch the key of the tray that has the paper you wish to use Printing begins If you changed to a different paper size printing may not take place correctly for example part of the text or image may run off the paper JOB STATUS Computer01 020 001 Paper Empty Priority Spool Job Queue Complet...

Page 342: ... Off Yes Selectable 2 Sided Print Yes Yes Yes Yes Yes Fit To Page Yes Yes Yes No Yes 2 Binding Edge Selectable Selectable Selectable No Yes Black and White Print Yes Yes Yes Yes Yes Staple 3 Yes Yes Yes Yes Yes Punch 3 Yes Yes Yes Yes Yes Paper Paper Size Yes Yes Yes Yes Yes Custom Paper 8 size 8 size 8 size Yes Yes Paper Selection Yes Yes Yes Yes Yes Output tray Yes Yes Yes Yes Yes Convenient pri...

Page 343: ... the hard disk drive Special functions Different Paper Yes 6 Yes Yes No Yes 6 7 Transparency Inserts Yes Yes Yes No Yes Carbon Copy No Yes Yes No No Tab Printing No Yes Yes 8 No No Chapter Inserts No Yes No No No Page Interleave No Yes No No No Tandem Print 14 No Yes Yes No Yes 9 Retention Yes Yes Yes No Yes Document Filing Yes Yes Yes No Yes 9 Colour mode adjusting function Colour Adjustment Yes ...

Page 344: ...rocessing time Printing resolution 600x600 dpi 9600 equivalent x 600dpi Printer driver type SAPL c PCL6 1 PostScript 3 compatible 2 XPS 4 Supported protocols TCP IP IPX SPX NetBEUI EtherTalk 2 Supported client PC operating systems See VERIFYING SYSTEM REQUIREMENTS in the Software Setup Guide Fonts PCL6 1 80 European fonts 28 barcode fonts 3 1 bitmap font PostScript 3 compatible 2 136 European font...

Page 345: ...ON 4 24 CHAIN DIALLING 4 25 BASIC TRANSMISSION METHODS TRANSMISSION METHODS 4 26 PLACEMENT ORIENTATION OF THE ORIGINAL 4 28 AUTOMATIC REDUCTION OF THE TRANSMITTED IMAGE 4 28 TRANSMITTABLE ORIGINAL SIZES 4 29 THE SIZE OF THE PLACED ORIGINAL 4 29 WHEN THE LINE IS BUSY 4 30 WHEN A COMMUNICATION ERROR OCCURS 4 30 FAX DESTINATION CONFIRMATION MODE 4 31 USING THE AUTOMATIC DOCUMENT FEEDER FOR TRANSMISSI...

Page 346: ...NGING THE PRINT SETTINGS FOR THE TRANSACTION REPORT Transaction Report 4 98 ADDING YOUR SENDER INFORMATION TO FAXES Own number sending 4 100 TEMPORARILY CHANGING THE SENDER INFORMATION Own Name Select 4 101 CALLING A FAX MACHINE AND INITIATING RECEPTION Polling 4 102 INITIATING POLLING RECEPTION MANUALLY 4 104 SENDING A FAX WHEN ANOTHER MACHINE POLLS YOUR MACHINE Polling Memory 4 105 RESTRICTING P...

Page 347: ...S SCREEN 4 128 JOB QUEUE SCREEN AND COMPLETED JOB SCREEN 4 129 OPERATION WHEN A JOB IN THE JOB QUEUE IS COMPLETED 4 132 CHECKING A RESERVED JOB OR THE JOB IN PROGRESS 4 133 CHECKING COMPLETED JOBS 4 134 CANCELLING A FAX IN PROGRESS OR A RESERVED FAX 4 135 GIVING PRIORITY TO A RESERVED FAX JOB 4 136 CHECKING THE ACTIVITY LOG Image Sending Activity Report 4 137 IMAGE SENDING ACTIVITY REPORT 4 137 IN...

Page 348: ...machine to the wall telephone socket Connect the end of the line cord that has the core to the LINE socket on the machine Insert the other end the end without the core into a telephone line socket In some countries an adapter is required to connect the telephone line cable to the wall telephone socket as shown in the illustration BEFORE USING THE MACHINE AS A FAX Click LINE socket Core Insert the ...

Page 349: ...the main power switch to the on position and press the POWER key on the operation panel If the fax function will be used and in particular if reception or timer transmission will take place at night always keep the main power switch in the on position You can also set the Dial Mode Setting manually This Setting can only be activated in Canada After setting the dial mode do not change the setting u...

Page 350: ...ault Settings Clock and Clock Adjust and set the year month day hour and minute STORING THE SENDER FAX NUMBER Store the user name and fax number in Sender Data Registration Be sure to configure this information as it is required for communication If Disabling of Clock Adjustment has been enabled in the system settings administrator the date and time cannot be set System Settings Administrator Send...

Page 351: ... following screens can be selected for the initial screen that appears when the IMAGE SEND key is touched Base screen of each mode scan Internet fax fax or data entry mode Address book screen Auto Auto Auto File Quick File Address Review Direct TX Sub Address Address Book USB Mem Scan Fax Internet Fax PC Scan Special Modes Resolution Exposure Original Scan Scan Send Standard Auto Reception Fax Mem...

Page 352: ...ere can be changed to show settings or functions that you prefer Customizing displayed keys page 4 9 8 Preview key Touch to check the image that will be sent in the touch panel before transmission CHECKING THE IMAGE TO BE TRANSMITTED Preview page 4 57 This function requires the hard disk drive 9 Speaker key Pause key Space key Touch this key to dial using the speaker When entering a fax number to ...

Page 353: ...gned to the customized keys Checking what special modes are selected The key appears in the base screen when a special mode or 2 sided scanning is selected The key can be touched to display the selected special modes To close the screen touch the OK key Displaying a program key in the base screen will enable you to call up the program by simply touching the key STORING FAX OPERATIONS Program page ...

Page 354: ... number stored in an one touch key When the Speaker key is touched the PBX Setting is temporarily cancelled and the R key does not appear When the R key is touched before dialling an F code sub address and passcode cannot be used Likewise an one touch key in which an F code sub address and passcode is stored cannot be used System Settings Administrator PBX Setting This is used to enable PBX Settin...

Page 355: ...ey Touch this key to change the index tabs to custom indexes or to display one touch keys by send mode CHANGING THE DISPLAY OF ONE TOUCH KEYS IN THE ADDRESS BOOK SCREEN page 4 12 9 Preview key Touch to check the image that will be sent in the touch panel before transmission page 4 59 This function requires the hard disk drive 10 To key Touch this key to enter a selected destination one touch key R...

Page 356: ...s can be selected for the initial screen that appears when the IMAGE SEND key is touched Base screen of each mode scan Internet fax fax or data entry mode Address book screen System Settings Administrator Address Book Default Selection The following settings are available for the method of sorting the addresses that appear in the address book Index type alphabetical custom Address type all group E...

Page 357: ...ndex tab can be touched to display keys to further narrow the search range For example when the ABCD tab is touched keys from A to D appear If the B key is touched only destinations starting with the letter B will appear To cancel touch the key again Note that the search letter range cannot be narrowed on the Freq tab the etc tab or on a user index tab System Settings Storing group keys page 7 18 ...

Page 358: ...THE ADDRESS BOOK page 4 18 key Use a search number to specify a destination stored in the address book USING A SEARCH NUMBER TO RETRIEVE A DESTINATION page 4 21 Resend key Select a fax number from the last eight destinations used for transmission USING THE RESEND FUNCTION page 4 24 Numeric keys Enter a fax number ENTERING A FAX NUMBER WITH THE NUMERIC KEYS page 4 17 Auto Auto Auto File Quick File ...

Page 359: ...s key to adjust the resolution of the image CHANGING THE RESOLUTION page 4 56 Special mode settings Touch the Special Modes key to select special modes such as timer transmission and the erase function Auto Auto Auto File Quick File Address Review Direct TX Sub Address Address Book USB Mem Scan Fax Internet Fax PC Scan Special Modes Resolution Exposure Original Scan Scan Send Standard Auto Recepti...

Page 360: ...the BLACK WHITE START key 4 Repeat steps 2 and 3 until all originals have been scanned 5 Touch the Read End key When sending a fax in direct transmission mode Multiple originals cannot be scanned in direct transmission mode Press the BLACK WHITE START key to start transmission When transmission ends image settings and convenient special mode settings are cleared To cancel scanning Press the STOP k...

Page 361: ...RING DESTINATIONS Enter the destination fax number with the numeric keys Take care to enter the correct number If an incorrect number is entered Press the CLEAR key to clear the number and then enter the correct number Touch the Pause key A hyphen is entered when the Pause key is touched once System Settings Administrator Pause Time Setting This is used to set the length of pauses The default sett...

Page 362: ...e fax destinations When destinations of other scan modes are stored in addition to fax destinations an icon indicating the mode appears together with the name of the destination in each one touch key Icon Mode Fax Scan to E mail Internet fax Direct SMTP Scan to FTP Scan to Network Folder Scan to Desktop Group key with multiple destinations System Settings Address Book page 7 16 This is used to sto...

Page 363: ... determines whether or not the Next Address key can be omitted before specifying the next destination Factory default setting The Next Address key can be omitted System Settings Administrator Disable Switching of Display Order This is used to disable switching of the order of display of the one touch keys in the address book screen The currently selected display order will be the order that is use...

Page 364: ...lete A message will appear to confirm the deletion Touch the Yes key Touch the Detail key to check the specified destination type and name 1 2 CCC CCC 10 5 15 To Cc III III GGG GGG EEE EEE AAA AAA JJJ JJJ HHH HHH FFF FFF DDD DDD BBB BBB Global Address Search Address Entry Sub Address Address Review Condition Settings ABCD Freq EFGH IJKL MNOP QRSTU VWXYZ etc Sort Address Preview To 1 2 CCC CCC LLL ...

Page 365: ...d when the destination is stored in the address book If you do not know the search number print the one touch address list using Sending Address List in the system settings When entering search numbers such as 0001 and 0011 0 can be omitted For example to enter 0001 enter 1 and touch the key or the Next Address key If an incorrect search number is entered Press the CLEAR key to clear the number an...

Page 366: ...ch for the destination in the search screen Enter search characters for the destination and touch the Search key The search results will appear after a brief interval For the procedure for entering text see ENTERING TEXT page 1 67 in 1 BEFORE USING THE MACHINE How to search Enter a maximum of 64 characters for the search characters The system will look for names starting with the entered letters A...

Page 367: ...you find that communication errors frequently occur when communicating with that destination you can try changing the settings 3 Select the destination 1 Touch the key of the desired destination If no names are found that match the search letters a message will appear Touch the OK key to close the message and touch the Search Again key to search again 2 Touch the To key This enters the selected de...

Page 368: ...sible A one touch key in which multiple destinations are stored group key Broadcast destinations Destinations transmitted to using a program System Settings Administrator Disable Resend on Fax Image Send Mode This prohibits use of the resend function When this setting is enabled the Resend key cannot be used in the base screen of image send mode Auto Auto Auto USB Mem Scan Fax Internet Fax PC Scan...

Page 369: ...ountry code and or area code are stored separately in one touch keys Example Using chain dialling to dial an international number System Settings Administrator Pause Time Setting This is used to set the length of pauses The default setting is 2 seconds XXX 010 00 XX XXXX XXX 010 Number to access international telephone service Country code Area code Number of other party Using a one touch key Usin...

Page 370: ...reen CHECKING THE STATUS OF FAX JOBS page 4 128 BASIC TRANSMISSION METHODS If memory becomes full while the first original page is being scanned transmission will stop In the following situations the transmission will be automatically reserved memory transmission When the line is busy or a communication error occurs and automatic resending is enabled WHEN THE LINE IS BUSY page 4 30 WHEN A COMMUNIC...

Page 371: ...head of any previously reserved transmissions To send a fax by direct transmission touch the Direct TX key in the base screen USING THE AUTOMATIC DOCUMENT FEEDER TO SEND A FAX IN DIRECT TRANSMISSION MODE page 4 33 USING THE DOCUMENT GLASS TO SEND A FAX IN DIRECT TRANSMISSION MODE page 4 37 When the document glass is being used for a transmission Quick Online transmission will not operate When tran...

Page 372: ...os A4R B5 and A5 8 1 2 x 11 R and 5 1 2 x 8 1 2 size originals are not rotated for transmission System Settings Administrator Rotation Sending Setting The factory default setting is rotate before transmission If this setting is disabled the original will be transmitted in the orientation in which it is placed Transmitted image width Receiving machine s paper width Reduced size Ratio A3 B4 B4 1 0 8...

Page 373: ...1 5 8 height x 39 3 8 width Using the document glass 297 mm height x 432 mm width 11 5 8 height x 17 width Selections Standard sizes detected original sizes Document glass Document feeder tray automatic document feeder AB 1 A3 A4 A4R A5 B4 B5 B5R A3 A4 A4R A5 B4 B5 B5R 8 1 2 x 11 8 1 2 x 14 11 x 17 AB 2 A3 A4 A4R A5 B5 B5R 216 mm x 330 mm 8 1 2 x 13 A3 A4 A4R A5 B4 B5 B5R 8 1 2 x 11 11 x 17 216 mm...

Page 374: ...y after a preset interval This function only operates in memory transmission mode To cancel transmission Cancel the transmission from the job status screen CANCELLING A FAX IN PROGRESS OR A RESERVED FAX page 4 135 System Settings Administrator Recall in Case of Line Busy This is used to set the number of recall attempts and the interval between attempts when the connection cannot be established be...

Page 375: ...ear Touch the OK key and re enter the destination If an incorrect number is entered for confirmation 3 times in a row the screen will revert to the base screen Functions that cannot be used When the fax destination confirmation function is enabled only one destination is allowed and thus the following functions cannot be used Broadcast transmission to multiple destinations including fax destinatio...

Page 376: ...more information see ENTERING DESTINATIONS page 4 17 3 Press the BLACK WHITE START key Scanning begins When scanning is completed the machine sounds a beep When scanning is completed Job stored will be displayed together with a job control number This number can be used to locate the job in the Transaction Report or in the Image Sending Activity Report If a fax is being received when the transmiss...

Page 377: ...uch key a destination can also be specified using a search number You can also directly enter a fax number with the numeric keys or look up a destination in a global address book For more information see ENTERING DESTINATIONS page 4 17 3 Touch the Direct TX key 4 Press the BLACK WHITE START key Transmission begins To cancel transmission While Dialling Press to cancel appears or while the fax is be...

Page 378: ...n is not successful due to a communication error or other reason If a fax transmission is already in progress when the direct transmission operation is performed the direct transmission will wait until the previous transmission is finished When the previous transmission is completed the direct transmission will begin While the direct transmission is waiting the JOB STATUS key can be pressed to dis...

Page 379: ...iginal scan each page in order starting from the first page When sending a multi page fax the automatic document feeder and the document glass cannot both be used to scan the original pages 2 Enter the destination fax number 1 Touch the Address Book key in the base screen 2 Touch the one touch key of the desired destination In addition to specification by one touch key a destination can also be sp...

Page 380: ... confirmation screen appears scanning automatically ends and the transmission is reserved The Configure key can be touched to change the exposure resolution scan size and send size for each original page scanned However when 2in1 or Card Shot is selected in the special modes only the exposure can be changed and this can only be done when scanning each even page number of the original pages To canc...

Page 381: ...n fax number 1 Touch the Address Book key in the base screen 2 Touch the one touch key of the desired destination 3 Touch the Condition Settings key Only one destination can be entered A one touch key in which multiple destinations are stored group key cannot be used In addition to specification by one touch key a destination can also be specified using a search number You can also directly enter ...

Page 382: ... a communication error or other reason If a fax transmission is already in progress when the direct transmission operation is performed the direct transmission will wait until the previous transmission is finished When the previous transmission is completed the direct transmission will begin While the direct transmission is waiting the JOB STATUS key can be pressed to display the job status screen...

Page 383: ... see ENTERING DESTINATIONS page 4 17 After touching the Speaker key you can touch the Speaker Volume key to adjust the volume of the speaker The speaker volume changes each time the Speaker Volume key is touched Adjust the volume to the desired level 3 Wait until the connection is made and then press the BLACK WHITE START key Transmission begins To cancel transmission Touch the Speaker key before ...

Page 384: ...send faxes by broadcast transmission in group keys Group dialling allows you to retrieve multiple fax numbers stored in a one touch key by simply pressing the one touch key To store group keys see Address Control page 7 16 in 7 SYSTEM SETTINGS When a group key is used to dial the number of fax numbers that are dialled is the number of destinations that are stored in the group key When a group key ...

Page 385: ...e Next Address key must be touched before entering the next destination System Settings Administrator Must Input Next Address Key at Broadcast Setting This setting is used to prohibit omission of the Next Address key when entering destinations for broadcast transmissions 3 Touch the Address Review key Pause Next Address CCC CCC 0123456789 1 2 10 5 15 To Cc III III GGG GGG EEE EEE CCC CCC AAA AAA J...

Page 386: ...WHITE START key Repeat until all pages have been scanned and then touch the Read End key A beep will sound to indicate that scanning is finished To cancel scanning Press the STOP key A broadcast transmission takes place by memory transmission only A broadcast transmission can be used in combination with the timer transmission function to transmit at night or any other desired time A broadcast tran...

Page 387: ...mpleted broadcast transmission 2 Touch the Detail key Broadcastxxxx will appear as the destination of the broadcast job key The job control number that appeared in the touch panel when scanning ended appears in xxxx JOB STATUS Fax Job Scan to Print Job Internet Fax Address Broadcast0001 1 2 3 4 5 10 00 04 01 020 003 Connecting 04 01 000 004 Waiting Broadcast BBB BBB AAA AAA 0123456789 10 05 04 01 ...

Page 388: ...on selection screen will appear with the unsuccessful destinations entered Perform the document filing resend procedure There is no need to rescan the original If the job was stored in a confidential folder or was stored as confidential file a password entry screen will appear after you touch the Retry key Enter the password If the All Destinations key is touched in 1 all destinations will be disp...

Page 389: ...puter and then select the Print command in the software application Image data for transmission will be created and sent as a fax For more information on using PC Fax see the Help file for the PC Fax driver To use the PC Fax function the PC Fax driver must be installed For more information see 1 BEFORE USING THE MACHINE This function can only be used on a Windows computer This function can only be...

Page 390: ...Y SCANNING BOTH SIDES OF AN ORIGINAL 2 Sided Original page 4 47 SPECIFYING THE SCAN SIZE AND SEND SIZE Enlarge Reduce page 4 48 2 Exposure key Touch this key to select the exposure for scanning CHANGING THE EXPOSURE page 4 55 3 Resolution key Touch this key to select the scanning resolution CHANGING THE RESOLUTION page 4 56 Auto Auto Auto USB Mem Scan Fax Internet Fax PC Scan Scan Scan Send Standa...

Page 391: ...ded Booklet key and the 2 Sided Tablet key are not displayed 2 Touch the appropriate Image Orientation key If the wrong orientation is selected here the image may not be sent properly 3 Touch the OK key To cancel 2 sided scanning touch the highlighted key so that it is no longer highlighted 2 sided scanning automatically turns off after the transmission operation is completed 2 sided scanning is n...

Page 392: ...fore transmission Only standard original sizes can be automatically detected STANDARD SIZES page 4 29 When the original size is a non standard size or if the size is not detected correctly manually specify the original scan size Specifying the original scan size by paper size page 4 49 Specifying the original scan size by numerical values page 4 51 Auto Auto Auto USB Mem Scan Fax Scan Standard Aut...

Page 393: ...ppropriate original size key When the document cover is installed the Long size key is not displayed 2 Touch the OK key If you are sending a long original touch the Long Size key Use the automatic document feeder to scan a long original The maximum length that can be scanned is 1000 mm 39 3 8 the maximum height is 297 mm 11 5 8 TRANSMITTABLE ORIGINAL SIZES page 4 29 To specify an Inch size for the...

Page 394: ...E Contents 4 Touch the OK key When Long Size is selected the 2 sided scanning setting and send size cannot be changed Auto B5 Scan Size Send Size 100 Fax Original OK 2 Sided Booklet 2 Sided Tablet Image Orientation ...

Page 395: ...Scan Size key 3 Touch the Size Input key 4 Enter the scan size 1 Touch the X width numeric value display key and enter the width 2 Touch the Y height numeric value display key and enter the height 3 Touch the OK key To complete the setting and return to the screen of step 3 touch the OK key next to the Cancel key You can also touch the keys to change the number Auto Auto A4 Scan Size Send Size 100...

Page 396: ...When the automatic document feeder is used an original longer that 432 mm 17 can be scanned maximum width 1000 mm 39 3 8 In this case touch the Long Size key in the screen of step 3 Specifying the original scan size by paper size page 4 49 TRANSMITTABLE ORIGINAL SIZES page 4 29 Auto X420 Y297 Scan Size Send Size Fax Original OK 2 Sided Booklet 2 Sided Tablet Image Orientation ...

Page 397: ...end Size key 3 Specify the send size 1 Touch the desired send size key When the document cover is installed the Long size key is not displayed 2 Touch the OK key Depending on the Scan Size setting it may not be possible to select some sizes for the Send Size Size keys that cannot be specified for the Send Size are greyed out to prevent selection To specify an Inch size for the send size touch the ...

Page 398: ...wrong orientation is selected here the image may not be sent properly when using enlargement reduction 2 Touch the OK key The ratio used for reduction or enlargement of the original will appear between the Scan Size and the Send Size A3 Auto A4 Scan Size Send Size 141 Fax Original OK 2 Sided Booklet 2 Sided Tablet Image Orientation 2 1 ...

Page 399: ...TTINGS page 4 46 2 Select the exposure 1 Touch the Manual key 2 Adjust the exposure with the keys When the exposure is set to Auto the keys cannot be used The exposure darkens when the key is touched and lightens when the key is touched To return to auto exposure adjustment touch the Auto key 3 Touch the OK key When using the document glass to scan multiple original pages the exposure setting can ...

Page 400: ...has gradations of colour such as a colour original This setting will produce a clearer image than Fine Super Fine or Ultra Fine used alone Halftone cannot be selected when Standard is used 1 Touch the Resolution key The current resolution setting appears to the right of the Resolution key IMAGE SETTINGS page 4 46 2 Select the resolution 1 Touch the key of the desired resolution 2 Touch the OK key ...

Page 401: ...ppears while the originals are being scanned and when scanning is finished the preview screen appears on the touch panel Transmission will not take place until you touch the Start Sending key in the preview screen 4 Check the preview image and then touch the Start Sending key Transmission begins For information on the preview screen see PREVIEW CHECK SCREEN page 4 58 System settings administrator ...

Page 402: ... be touched when the entire preview image is displayed in the preview screen 4 Function Rev key Touch to check special mode settings or scan settings for two sided originals 5 Display zoom key Use this to set the zoom ratio of the displayed image Changes from the left in the order Full Page Twice 4 Times 8 Times The setting applies to all pages in the file not just the displayed page 6 Display Rot...

Page 403: ...omatically adjusted when faxes are received When a fax smaller than A4 8 1 2 x 11 size is received the size of the paper used for printing will vary depending on the orientation vertical or horizontal in which the sender placed the original System Settings Receive Setting page 7 105 This is used to change the fax reception mode Auto Reception should normally be used Select Manual Reception when an...

Page 404: ...ed The number of copies of received faxes that are printed and the output tray can be selected When a finisher is installed the number of copies printed the output tray and stapling can be selected If printing of a copy job or print job is in progress when a fax is received the fax will not be printed until the previously reserved job is completed Received faxes will not be printed when the machin...

Page 405: ...le to speak Even when you use an extension phone to answer a call you can touch the Fax Manual Reception key in the touch panel to begin fax reception You can also use the extension phone to begin fax reception RECEIVING A FAX AFTER ANSWERING A CALL ON THE EXTENSION PHONE Remote Reception page 4 127 Auto Auto Auto Speaker Volume USB Mem Scan Fax Special Modes Resolution Exposure Original Scan Stan...

Page 406: ...en Received Data Image Check Setting is enabled in the system settings administrator a password can be entered to display the received data list screen If you wish to check an image before printing it continue from step 2 on the next page The received faxes will be retained in memory regardless of whether they were received automatically or manually If Fax Data Receive Forward is executed in the s...

Page 407: ...ails of the received images touch the Thumbnail key To delete an image that has been selected touch the Delete key To print an image that has been selected touch the Print key 3 Check the received image and then touch the Print key Printing begins For information on the image check screen see IMAGE CHECK SCREEN page 4 66 If the screen of step 1 appears when you are configuring settings in the sett...

Page 408: ... to the base screen of image send mode after checking the image 2 Select the received image 1 Touch the key of the received image that you want to check Multiple received images can be checked 2 Touch the Forward key To show thumbnails of the received images touch the Thumbnail key To check a receieved image touch the Image Check key IMAGE CHECK SCREEN Page 4 66 3 Touch the Forward Destination fro...

Page 409: ...ng the image you will return to the base screen of image send mode regardless of which mode you were in previously System Settings Administrator Received Data Image Check Setting Use this to specify whether or not a received Internet fax can be viewed before it is printed III III GGG GGG EEE EEE CCC CCC AAA AAA JJJ JJJ HHH HHH FFF FFF DDD DDD BBB BBB To Cc 1 2 5 15 10 Address Review ABCD Freq EFGH...

Page 410: ...f pages and the current page number You can touch the current page number key and enter a number with the numeric keys to go to that page number 4 Display Rotation key This rotates the image right or left by 90 degrees The rotation applies to all pages in the file not just the displayed page 5 Print key Touch to start printing 6 Display zoom key Use this to set the zoom ratio of the displayed imag...

Page 411: ...se pages that were not printed will be forwarded A forwarded fax becomes a fax transmission job If transmission does not take place because the transmission was cancelled or an error occurred the fax will be held in memory until it can be printed All faxes received are forwarded Note however that faxes received to an F code confidential memory box cannot be forwarded If a password entry screen app...

Page 412: ...abling the inbound routing function 1 In the Web page menu click Application Settings Inbound Routing Settings and then Administration Settings 2 Select Enable in Inbound Routing and click the Submit button Users without administrator rights can be prohibited from storing editing and deleting forwarding tables in this screen and from specifying which table is used To do so select the checkboxes be...

Page 413: ...t Fax Address or Fax Number as appropriate and click the Add to List button The entered address will be added to the Address to be Entered list Specify whether the address will be directly entered maximum of 1500 characters or selected from a global address book by clicking the Global Address Search button To store multiple addresses repeat this step 3 When you have finished adding addresses click...

Page 414: ...f the desired day of the week To specify a time select the Set Forwarding Time checkbox and specify the time 6 Select the file format The format can be set separately for each forwarding address for each of forwarding addresses 1 2 and 3 in the table 7 Select the forwarding address Forwarding addresses can be selected from the machine s address book Multiple addresses can be selected A maximum of ...

Page 415: ...u 2 Select Always Forward or Forward on Selected Day Time from the forwarding table The forwarding permission settings that appear here are linked to the forwarding conditions set in step 3 If you wish to use different forwarding conditions than those set in step 3 set the forwarding permission settings 3 Click Submit To delete a forwarding table click the checkbox next to the table name so that i...

Page 416: ...OF PAGES Job Build page 4 88 When the document cover is installed this key is not displayed 8 Mixed Size Original key TRANSMITTING ORIGINALS OF DIFFERENT SIZES Mixed Size Original page 4 90 When the document cover is installed this key is not displayed 9 Slow Scan Mode key FAXING THIN ORIGINALS Slow Scan Mode page 4 92 When the document cover is installed this key is not displayed 10 Original Coun...

Page 417: ...ys are used as follows A Enter the selected special mode setting and return to the base screen B Enter the selected special mode setting and return to the special modes menu screen Touch this key when you wish to continue selecting other special mode settings C During selection of special mode settings this key returns you to the special modes menu screen without saving the settings When settings ...

Page 418: ... when selecting the settings so incorrect transmissions may occur When a program is stored settings are selected with ease by simply pressing the program key In addition transmission takes place based on the stored settings so there are no chances for mistakes Programs are stored edited and deleted using Address Control in the system settings See Program page 7 21 in 7 SYSTEM SETTINGS Programs can...

Page 419: ...ot be changed here Functions stored in the program cannot be cancelled here 5 Press the BLACK WHITE START key Scanning begins If you inserted the original pages in the document feeder tray all pages are scanned A beep will sound to indicate that scanning is finished If you are scanning the original on the document glass scan each page one page at a time When scanning finishes place the next origin...

Page 420: ...he shadows Scanning a thick book Erase modes Shadows appear here Not using the erase function Using the erase function Shadows appear in the image No shadows appear 1 Place the original Place the original face up in the document feeder tray or face down on the document glass 2 Enter the destination fax number ENTERING DESTINATIONS page 4 17 3 Select the special modes 1 Touch the Special Modes key ...

Page 421: ...al on the document glass scan each page one page at a time When scanning finishes place the next original and press the BLACK WHITE START key Repeat until all pages have been scanned and then touch the Read End key A beep will sound to indicate that scanning is finished To cancel scanning Press the STOP key When the erase function is used erase takes place at the edges of the original image If you...

Page 422: ...ument The left and right pages are sent as two pages Original scan size Transmitted image A3 11 x 17 x 1 page A4 8 1 2 x 11 x 2 pages When using dual page scan the original must be placed on the document glass The send size cannot be changed 1 Place the original face down on the document glass Align the centre of the original with the appropriate size mark 2 Enter the destination fax number ENTERI...

Page 423: ...d to indicate that scanning is finished To cancel scanning Press the STOP key To erase shadows caused by the binding of a book or other bound document use the erase function Note however that Centre Erase and Edge Centre Erase cannot be used When the scan size of the original is specified by numerical values this function cannot be used To cancel Dual Page Scan Touch the Dual Page Scan key in the ...

Page 424: ...smission It is not possible to leave the document in the auto document feeder or on the document glass and have it scanned at the reserved time of transmission Settings selected for a timer transmission exposure resolution special modes etc are automatically cleared after the transmission is finished However when the document filing function is used the scanned original and settings are stored on ...

Page 425: ...n scanning finishes place the next original and press the BLACK WHITE START key Repeat until all pages have been scanned and then touch the Read End key A beep will sound to indicate that scanning is finished The time can be specified up to a week in advance Up to 94 timer transmissions can be stored at once Only one timer polling operation can be stored at once If you wish to poll multiple machin...

Page 426: ...number of pages sent 1 Place the original When placing the originals orient them as shown below 2 Enter the destination fax number ENTERING DESTINATIONS page 4 17 1 2 1 2 1 2 1 2 Portrait oriented originals Landscape oriented originals Transmission Transmission 1 2 1 2 1 1 1 1 Document feeder tray Place the originals face up Portrait orientation Landscape orientation Document glass Place the origi...

Page 427: ... press the BLACK WHITE START key Repeat until all pages have been scanned and then touch the Read End key A beep will sound to indicate that scanning is finished The Configure key can be touched in the scan end confirmation screen to change the exposure resolution scan size and send size However when scanning each even numbered page of the original only the exposure can be changed To cancel scanni...

Page 428: ...ssion mode or when the speaker is used to dial The 2in1 function cannot be used when the original is other than A4 B5 or A5 8 1 2 x 11 or 5 1 2 x 8 1 2 size When the scan size of the original is specified by numerical values this function cannot be used To cancel 2in1 Touch the 2in1 key in the screen of step 3 so that it is not highlighted ...

Page 429: ...nal must be scanned on the document glass 1 Place the original face down on the document glass 2 Enter the destination fax number ENTERING DESTINATIONS page 4 17 3 Select the special modes 1 Touch the Special Modes key 2 Touch the Card Shot key SPECIAL MODES page 4 72 Transmission Front Back Originals Example of an A4 8 1 2 x 11 size portrait scan transmission Example of an A4 8 1 2 x 11 size land...

Page 430: ...iginal size you entered After selecting Card Shot you can touch the Original key in the base screen to change the original scan size or the send size In this case the screen of step 3 appears when you touch the scan size key For the procedure for setting the send size see Specifying the send size of the original page 4 53 5 Press the BLACK WHITE START key to scan the front of the card To cancel sc...

Page 431: ... resolution scan size and send size The ratio cannot be specified and Rotation Sending Setting cannot be selected This function cannot be used in direct transmission mode or when the speaker is used to dial To cancel Card Shot Touch the Cancel key in the screen of step 4 Place next original Press Start When finished press Read End Pg No x Configure Read End ...

Page 432: ...s can be scanned Note that when the memory is being used for other jobs fewer pages can be scanned 1 Insert the originals face up in the document feeder tray Insert the originals all the way into the document feeder tray Multiple originals can be placed in the document feeder tray The stack of originals must not be higher than the indicator line on the tray 2 Enter the destination fax number ENTER...

Page 433: ...d The Configure key can be touched to change the exposure resolution scan size and send size for each original page scanned However when Job Build is used in combination with 2in1 in the special modes only the exposure can be changed when scanning each even numbered page of the original pages If the memory becomes full during scanning a message will appear and the transmission will be cancelled Th...

Page 434: ...document feeder tray Insert the originals with the corners aligned together in the far left corner of the document feeder tray 2 Enter the destination fax number ENTERING DESTINATIONS page 4 17 3 Select the mixed size original setting 1 Touch the Special Modes key SPECIAL MODES page 4 72 2 Touch the Mixed Size Original key so that it is highlighted 3 Touch the OK key If an original scan size has b...

Page 435: ...e cannot be specified When mixed size originals are set automatic duplex scanning cannot be used When the mixed size original setting is selected rotation sending does not operate To cancel the mixed size original setting Touch the Mixed Size Original key in the screen of step 3 so that it is not highlighted System Settings Administrator Original Feeding Mode The original feeding mode can be set t...

Page 436: ...ument feeder tray Adjust the document guides slowly If the originals are inserted with too much force they may crumple and misfeed 2 Enter the destination fax number ENTERING DESTINATIONS page 4 17 3 Select slow scan mode 1 Touch the Special Modes key SPECIAL MODES page 4 72 2 Touch the Slow Scan Mode key so that it is highlighted 3 Touch the OK key D C B A D C B A Slow Scan Mode Fax Special Modes...

Page 437: ...ancel scanning Press the STOP key When this function is selected automatic 2 sided scanning is not possible To cancel slow scan mode Touch the Slow Scan Mode key in the screen of step 3 so that it is not highlighted System Settings Administrator Original Feeding Mode This is used to have scanning always take place using slow scan mode ...

Page 438: ...n the document feeder tray The stack of originals must not be higher than the indicator line on the tray 2 Enter the destination fax number ENTERING DESTINATIONS page 4 17 3 Select the original count function 1 Touch the Special Modes key SPECIAL MODES page 4 72 2 Touch the Original Count key so that it is highlighted 3 Touch the OK key 4 Press the BLACK WHITE START key Scanning begins To cancel s...

Page 439: ... the image will not be reserved for transmission If the displayed number of original sheets is different from the actual number of sheets Touch the Cancel key and then touch the OK key in the message screen to clear all scanned data Scan settings and destination settings will not be cleared Insert the original sheets in the automatic document feeder again and press the BLACK WHITE START key to re ...

Page 440: ...installed 1 Insert the originals face up in the document feeder tray 2 Enter the destination fax number ENTERING DESTINATIONS page 4 17 3 Select Verif Stamp 1 Touch the Special Modes key SPECIAL MODES page 4 72 2 Touch the keys to switch through the screens 3 Touch the Verif Stamp key so that it is highlighted 4 Touch the OK key 1 1 An O mark is stamped in fluorescent pink Originals are scanned Po...

Page 441: ...nning an original that was not scanned may be stamped When the O mark that is stamped on originals starts to become faint replace the stamp cartridge For the procedure for replacing the stamp cartridge see REPLACING THE STAMP CARTRIDGE page 1 66 in 1 BEFORE USING THE MACHINE To cancel the stamp function Touch the Verif Stamp key in the screen of step 3 so that it is no longer highlighted System Se...

Page 442: ... 2 Enter the destination fax number ENTERING DESTINATIONS page 4 17 3 Select the special modes 1 Touch the Special Modes key 2 Touch the keys to switch through the screens 3 Touch the Transaction Report key SPECIAL MODES page 4 72 4 Select print conditions 1 Select the print conditions 2 Touch the OK key The print conditions for a transaction report are as follows Always Print A transaction report...

Page 443: ...ssion changes to the transaction report print conditions apply to all destinations To cancel the transaction report setting Touch the Cancel key in the screen of step 4 System Settings Administrator Transaction Report Print Select Setting This is used to set the conditions for printing transaction reports The factory default setting is Single Sending Print Out All Report No Printed Report Broadcas...

Page 444: ...lude page numbers in Printing Page Number at Receiver in the system settings administrator Page numbers appear in the format page number total pages Only the page number is printed when manual transmission or quick online transmission is used System Settings Administrator Date Own Number Print Position Setting This is used to set the position where the sender information is printed The sender info...

Page 445: ...3 Touch the Own Name Select key SPECIAL MODES page 4 72 2 Select the sender information 1 Touch the desired sender information key 2 Touch the OK key 3 Touch the OK key System Settings Administrator Registration of Own Name Select This is used to store sender information for Own Name Select Own Name Select Cancel OK 1 2 AAAAA CCCCC EEEEE GGGGG IIIII KKKKK BBBBB DDDDD FFFFF HHHHH JJJJJ LLLLL 1 2 Tr...

Page 446: ...s 3 Touch the Polling key so that it is highlighted 4 Touch the OK key 2 Enter the destination fax number ENTERING DESTINATIONS page 4 17 Multiple fax numbers can be entered Polling will take place in the order that the numbers were entered Polling multiple machines is called Serial Polling Up to 500 fax numbers can be entered In this procedure one touch keys that have a sub address and passcode c...

Page 447: ...poll at any specified time such as at night or when you are not present Only one timer polling reception can be set This function can only be used when the other machine is Super G3 or G3 compatible and has a polling function The receiving machine bears the expense phone charges of the polling reception To cancel polling reception Touch the Polling key in the screen of step 1 so that it is not hig...

Page 448: ...global address book For more information see ENTERING DESTINATIONS page 4 17 After touching the Speaker key you can touch the Speaker Volume key to adjust the volume of the speaker The speaker volume changes each time the Speaker Volume key is touched Adjust the volume to the desired level 2 Receive the fax 1 Touch the Special Modes key SPECIAL MODES page 4 72 2 Touch the keys to switch through th...

Page 449: ...ll your machine you can restrict polling to machines whose programmed sender fax number matches a fax number stored in your machine as a polling passcode number This is called Polling Security To use this function first store polling passcode numbers the sender fax numbers programmed in the other machines in the machine s system settings and then enable polling security Up to 10 fax numbers can be...

Page 450: ... SPECIAL MODES page 4 72 3 Touch the Data Store key 4 Touch the Public Box key 5 Specify the number of polling times 1 Touch the key for the desired number of times Touch the Once key if you want the document cleared from memory after it is transmitted Touch the Unlimited key to allow polling an unlimited number of times 2 Touch the OK key Polling Memory Confidential Reception Data Check Delete Da...

Page 451: ...scan each page one page at a time When scanning finishes place the next original and press the BLACK WHITE START key Repeat until all pages have been scanned and then touch the Read End key To cancel scanning Press the STOP key while the original is being scanned If another document remains in the memory box Public Box the newly scanned document is added to the previous document In this case the n...

Page 452: ... Public Box key will be greyed out 4 Touch the Image Check key The content of the document can be viewed in the image check screen For information on the image check screen see IMAGE CHECK SCREEN page 4 66 The Image Check function requires the hard disk drive To print the document touch the Print key Polling Memory Confidential Reception Data Check Delete Data Data Store Memory Box Data Check Exit...

Page 453: ...t is deleted and you return to the screen of step 3 You can touch the Image Check key to check the image in the touch panel before deleting it For information on the image check screen see IMAGE CHECK SCREEN page 4 66 The Image Check function requires the hard disk drive To cancel the deletion Touch the No key You will return to the screen of step 3 Polling Memory Confidential Reception Data Check...

Page 454: ...ansmitting machine does not match the F code in the receiving machine reception will not take place The products of other manufacturers may use different terms for sub address and passcode If you need to contact the operator of another machine regarding sub addresses and passcodes refer to the terms used by the ITU T in the table below PERFORMING F CODE COMMUNICATION The ITU T is a United Nations ...

Page 455: ...enient to store an F code together with the fax number in a one touch key or group key When the following F code functions are used your machine dials the other machine F code confidential transmission F code polling reception F code relay request transmission When the following F code functions are used the other machine dials your machine F code confidential reception F code polling memory F cod...

Page 456: ... print an F code confidential fax the print passcode must be entered The F code sub address and passcode of the memory box to be used should be verified by the sender and the recipient before the fax is sent System Settings F Code Memory Box page 7 103 This is used to create memory boxes for F code confidential communication confidential reception A memory box name sub address passcode and print p...

Page 457: ... a passcode has been omitted in the memory box of the other machine 5 and 6 are not necessary 3 Press the BLACK WHITE START key Scanning begins If you inserted the original pages in the document feeder tray all pages are scanned A beep will sound to indicate that scanning is finished If you are scanning the original on the document glass scan each page one page at a time When scanning finishes pla...

Page 458: ...h the Special Modes key 2 Touch the keys to switch through the screens 3 Touch the Memory Box key SPECIAL MODES page 4 72 3 Touch the Data Check key 4 Touch the key of the memory box containing the confidential fax appears in the keys of memory boxes that have received faxes The keys of memory boxes that have not received faxes are greyed out and cannot be selected Beep Polling Memory Confidential...

Page 459: ...touch the Print key The confidential fax is automatically given priority in the print job queue The fax is automatically cleared from the memory box after printing If you forget the print passcode There is no way to check a forgotten passcode on the machine Take care not to forget the passcode In the event that you forget the passcode or need to verify the passcode contact your dealer or nearest a...

Page 460: ...rm F code polling reception Do not place an original in the automatic document feeder or on the document glass when using this function The receiving machine bears the phone charges of the transmission 1 Select polling 1 Touch the Special Modes key SPECIAL MODES page 4 72 2 Touch the keys to switch through the screens 3 Touch the Polling key so that it is highlight 4 Touch the OK key Transmission ...

Page 461: ...he memory box of the other machine 5 and 6 are not necessary 3 Press the BLACK WHITE START key Your machine will call the other machine and initiate reception of the fax Polling multiple machines serial polling is not possible F code polling reception can be used in combination with a timer setting Only one polling reception operation with a timer setting can be stored at a time SENDING A FAX AT A...

Page 462: ...nt into a memory box polling memory for F code polling transmission System Settings F Code Memory Box page 7 103 This is used to create memory boxes polling memory for F code polling memory transmission A memory box name sub address and passcode are programmed in each box 1 Place the original Place the original face up in the document feeder tray or face down on the document glass 2 Select the spe...

Page 463: ...nd special modes A program timer setting transaction report polling verif stamp and document filing cannot be selected To return to the screen of step 4 touch the Memory Box List key Polling Memory Confidential Reception Data Check Delete Data Data Store Memory Box Data Check Exit Memory Box Data Store Public Box Back 1 2 Box 1 Box 3 Box 5 Box 7 Box 9 Box 11 Box 2 Box 4 Box 6 Box 8 Box 10 Box 12 U...

Page 464: ...ce the next original and press the BLACK WHITE START key Repeat until all pages have been scanned and then touch the Read End key To cancel scanning Press the STOP key while the original is being scanned If other documents have already been stored in the memory box the document is added to the previously stored documents The factory default setting for the number of polling times is Once after the...

Page 465: ...box where the document you wish to print is stored appears in keys that have documents stored 4 Touch the Image Check key The content of the document can be viewed in the image check screen For information on the image check screen see IMAGE CHECK SCREEN page 4 66 The Image Check function requires the hard disk drive To print the document touch the Print key Polling Memory Confidential Reception D...

Page 466: ... that have documents stored 4 Touch the Yes key The document is deleted and you return to the screen of step 3 Printing will begin You can touch the Image Check key to check the image in the touch panel before deleting it For information on the image check screen see IMAGE CHECK SCREEN page 4 66 The Image Check function requires the hard disk drive To cancel the deletion Touch the No key You will ...

Page 467: ...broadcast transmission or timer transmission An F code relay request transmission can also be stored in a program Your machine the machine that requests a relay broadcast transmission only bears the cost of sending the fax to the relay machine The relay machine bears the cost of sending the fax to each of the end receiving machines When faxes forwarded using this function are printed at the forwar...

Page 468: ...ted the original pages in the document feeder tray all pages are scanned A beep will sound to indicate that scanning is finished If you are scanning the original on the document glass scan each page one page at a time When scanning finishes place the next original and press the BLACK WHITE START key Repeat until all pages have been scanned and then touch the Read End key A beep will sound to indic...

Page 469: ...MUNICATION page 4 111 The end receiving machines do not need to support F code communication The machine that requests a relay broadcast transmission only bears the cost of sending the fax to your machine the relay machine Your machine bears the cost of sending the fax to each of the end receiving machines When faxes forwarded using this function are printed at the forwarding destination the date ...

Page 470: ...so press the BLACK WHITE START key when an original is not placed to receive a fax Connect the extension phone as shown below USING AN EXTENSION PHONE Connect an extension phone that has a modular socket Use standard phone line cable to connect the phone If other than a standard phone line cable is used the connection may not work correctly If the plug on the telephone line cord does not fit into ...

Page 471: ...inging answer the call on the extension phone 2 Signal the machine to start fax reception Press on the keypad of the extension phone 3 Replace the extension phone The machine sounds a beep when reception ends If the extension phone is still lifted when fax transmission ends an alarm signal will sound and a message will appear in the touch panel The alarm and message will stop when the extension ph...

Page 472: ...ING THE STATUS OF FAX JOBS The job status display is in the lower left corner of the touch panel The job status display can be touched to display the job status screen Fax Job Scan to Print Job Internet Fax Address Broadcast0001 10 00 04 01 020 003 Connecting 04 01 000 004 Waiting Broadcast BBB BBB AAA AAA 0123456789 10 05 04 01 000 004 Waiting 10 22 04 01 000 010 Waiting 10 30 04 01 000 010 Waiti...

Page 473: ...tailed information on the results of completed broadcast transmission jobs completed serial polling jobs and completed jobs that used the document filing function Select the key of the desired job in the completed jobs screen 9 and then touch the Detail key From the details screen it is possible to resend the fax to destinations to which transmission was not successful CHECKING COMPLETED JOBS page...

Page 474: ...r serial polling operation Broadcast or Multi Polling appears together with a broadcast control number 4 digits 4 Time reserved Time started In the job queue screen the date and time the job was reserved In the completed jobs screen the date and time the job was started 5 Number of pages Shows the number of pages transmitted total number of original pages 6 Status Shows the job status Job in progr...

Page 475: ...letion of a broadcast transmission serial polling or inbound routing operation If transmission to 3 destinations was successful out of a total of 5 003 005 will appear No response An error occurred because there was no response from the destination Busy An error occurred because the other party was busy Reject Reception A fax was sent from a party that has been blocked by the anti junk fax functio...

Page 476: ...s completed Retry jobs A retry job appears at the bottom of the job queue screen When the set retry interval elapses the job is executed If there are jobs reserved ahead of the retry job the retry job is reserved at the bottom of the job queue and executed when its turn arrives Fax reception jobs when Inbound Routing is enabled When Inbound Routing is enabled in the Web pages fax reception jobs ar...

Page 477: ...ed total number of pages Fax Waiting This shows information on the destinations that are waiting A broadcast control number 3 digits appears in front of each destination Address The name of the other destination Status The status of communication Failed This shows information on destinations for which communication failed A broadcast control number 3 digits appears in front of each destination Add...

Page 478: ...reception that used document filing To retrieve the file and use it touch the Call key The File tab does not appear when the hard disk drive is not installed Failed This shows information on destinations for which communication failed A broadcast control number 3 digits appears in front of each destination Address The name or fax number of each destination Start time Time at which communication be...

Page 479: ...job Touch the NO key Printing of received faxes and forwarding jobs set using Inbound Routing Settings cannot be cancelled FORWARDING RECEIVED FAXES TO A NETWORK ADDRESS Inbound Routing Settings page 4 68 JOB STATUS Fax Job Scan to Print Job Internet Fax Address Broadcast 10 00 04 01 020 003 Connecting 04 01 000 004 Waiting Broadcast BBB BBB AAA AAA 0123456789 10 05 04 01 000 004 Waiting 10 22 04 ...

Page 480: ...b will be executed when the job in progress is completed If the job in progress is a broadcast transmission job or a serial polling job the priority job will be transmitted between destinations of the broadcast transmission or serial polling job However if the priority job is a broadcast transmission job or a serial polling job it will be executed after the current job is completed JOB STATUS Fax ...

Page 481: ...rt You can have the machine print the Image Sending Activity Report each time the number of transactions reaches 201 or at a specified time once a day only The contents of the Image Sending Activity Report are erased when the report is printed and thus it cannot be reprinted System Settings Administrator Activity Report Print Select Setting This is used to set the conditions for printing activity ...

Page 482: ...polled because no data was in memory NO F CODE POLL The other machine refused an F code polling operation or your machine broke the connection when polled because no data was in its F code memory polling box RX POLL NG The connection was broken because the sub address for F code polling memory was not valid F POLL PASS NG The connection was broken because the passcode for F code polling memory was...

Page 483: ...G3 the machine can only send faxes to and receive faxes from machines that support G3 or Super G3 Input document size AB sizes A3 B4 A4 A4R B5 B5R A5 216 mm x 340 mm 216 mm x 343 mm Inch sizes 11 x 17 8 1 2 x 14 8 1 2 x 13 2 5 8 1 2 x 13 8 1 2 x 11 8 1 2 x 11 R 5 1 2 x 8 1 2 Long originals max width 297 mm 11 45 64 x max length 1000 mm 39 23 64 can be transmitted using the automatic document feede...

Page 484: ...K 5 18 RETRIEVING A DESTINATION 5 19 CHECKING AND DELETING THE SELECTED DESTINATIONS 5 20 USING A SEARCH NUMBER TO RETRIEVE A DESTINATION 5 21 ENTERING AN ADDRESS MANUALLY 5 22 SPECIFYING A NETWORK FOLDER 5 23 RETRIEVING A DESTINATION FROM A GLOBAL ADDRESS BOOK 5 25 USING THE RESEND FUNCTION 5 27 TRANSMITTING AN IMAGE SENDING AN IMAGE IN SCAN MODE 5 28 CHANGING THE SUBJECT FILE NAME REPLY TO AND B...

Page 485: ...04 OPERATION WHEN A JOB IN THE JOB QUEUE IS COMPLETED 5 107 CHECKING COMPLETED JOBS 5 108 STOPPING A SCAN JOB BEING TRANSMITTED OR WAITING TO BE TRANSMITTED 5 109 GIVING PRIORITY TO A SCAN TRANSMISSION JOB 5 110 CHECKING THE INTERNET FAX ACTIVITY LOG Image Sending Activity Report 5 111 IMAGE SENDING ACTIVITY REPORT 5 111 INFORMATION APPEARING IN THE RESULT COLUMN 5 111 INTERNET FAX RECEPTION FUNCT...

Page 486: ...is sent to a specified directory of an FTP server When the file is sent it is also possible to send an e mail to a previously stored e mail address to inform the recipient of the location of the file This is called Scan to FTP Hyperlink Scan to Desktop The scanned file is sent to a specified folder on your computer To use Scan to Desktop software must be installed from the Sharpdesk Network Scanne...

Page 487: ...ame network as the machine is used to scan a document or image To use PC Scan the scanner driver must be installed from the Software CD ROM that accompanies the machine Operating systems that can be used are Windows 2000 XP Server 2003 Vista Server 2008 7 The hard disk drive and application integration module are required to use the metadata transmission function METADATA DELIVERY page 5 128 Metad...

Page 488: ...STORING SENDER INFORMATION Be sure to configure this information as it is required for communication Before using Scan to E mail Store a default sender name in Sender Name and a reply e mail address in Reply E mail Address These will be used when a sender is not selected Before using Internet fax Store a sender name in Sender Name and a sender Internet fax address in Own Address When the POWER SAV...

Page 489: ...ed in the address book Store each type of destination as explained below Types of transmission in scanner mode Scan to FTP Click Address Book in the Web page menu and then click the Add button Select FTP in Address Type and store an address Scan to Network Folder Click Address Book in the Web page menu and then click the Add button Select Network Folder in Address Type and store an address Scan to...

Page 490: ...s C will be the name of the one touch key The profile name is determined by the combination of the text entered in Prefix A and the profile The one touch key is assigned to an index tab in the address book screen based on the text entered in Initial B This defines how an image sent to your computer is processed For more information see profile explanation D ADDING DESTINATIONS For the number of co...

Page 491: ...hine does not answer the call within a preset period of time transmission will be re attempted automatically after a preset interval To cancel transmission Cancel the transmission from the job status screen STOPPING A SCAN JOB BEING TRANSMITTED OR WAITING TO BE TRANSMITTED page 5 109 System Settings Administrator Recall in Case of Line Busy This is used to set the number of recall attempts and the...

Page 492: ...DDRESS BOOK page 5 18 5 Address Entry key Touch this key to manually enter an destination address instead of using a one touch key ENTERING AN ADDRESS MANUALLY page 5 22 6 Send Settings key Touch this key to select or enter the subject file name sender name or body text which has been previously stored in the Web page Scan modes CHANGING THE SUBJECT FILE NAME REPLY TO AND BODY TEXT page 5 32 Inter...

Page 493: ...system settings administrator this will appear when an Internet fax is received Only Hold Setting for Received Data Print is enabled Only Received Data Image Check Setting is enabled Both settings are enabled PRINTING A PASSWORD PROTECTED FAX Hold Setting For Received Data Print page 5 114 CHECKING THE IMAGE BEFORE PRINTING page 5 115 17 I Fax Manual Reception key Touch this key to receive an Inte...

Page 494: ...h the OK key Displaying a program key in the base screen will enable you to retrieve the program by simply touching the key STORING SCAN OPERATIONS Programs page 5 73 The functions that can be selected for the customized keys vary depending on the mode System Settings Administrator Customize Key Setting Registration is performed in System Settings Operation Settings Customize Key Setting in the We...

Page 495: ...ssion This function requires the hard disk drive CHECKING THE IMAGE TO BE TRANSMITTED Preview page 5 69 9 To key Touch this key to enter the selected destination one touch key RETRIEVING A DESTINATION page 5 19 10 Cc key When using Scan to E mail touch the Cc key when you wish to send a Carbon copy of the e mail to an additional destination 11 Bcc key When using Scan to E mail touch the Bcc key wh...

Page 496: ...Bcc key appears in the address book screen System Settings Administrator Default Display Settings One of the following screens can be selected for the initial screen that appears when the IMAGE SEND key is touched Base screen of each mode scan Internet fax fax or data entry mode Address book screen Default Display Settings can be set on the displayed screen by touching Image Send Settings Operatio...

Page 497: ... on an index tab can be touched to display keys to further narrow the search range For example when the ABCD tab is touched keys from A to D appear If the B key is touched only destinations starting with the letter B will appear To cancel touch the key again Note that the search letter range cannot be narrowed on the Freq tab the etc tab or on a user index tab System Settings Storing group keys pa...

Page 498: ...ER TO RETRIEVE A DESTINATION page 5 21 Resend key USING THE RESEND FUNCTION page 5 27 Select settings Settings can be selected for scanning the original Original 2 sided original scan size send size Exposure Resolution File Format Colour Mode IMAGE SETTINGS page 5 53 Send Settings File Name Scan mode Data entry mode CHANGING THE SUBJECT FILE NAME REPLY TO AND BODY TEXT page 5 32 USB memory mode EN...

Page 499: ...eat 2 and 3 until all originals have been scanned 5 Touch the Read End key The COLOUR START key cannot be used in Internet fax mode After the original is scanned the settings revert to the default settings To cancel scanning Press the STOP key to cancel the operation System Settings Administrator Default Display Settings The settings can be kept in effect a fixed period of time after scanning is c...

Page 500: ...size Maximum original size Using the automatic document feeder 131 mm height x 140 mm width 5 1 8 height x 5 1 2 width 297 mm height x 1000 mm width 11 5 8 height x 39 3 8 width Using the document glass 297 mm height x 432 mm width 11 5 8 height x 17 width Selections Standard sizes detected original sizes Document glass Document feeder tray automatic document feeder AB 1 A3 A4 A4R A5 B4 B5 B5R A3 ...

Page 501: ...ING DESTINATIONS Icon Mode Fax Scan to E mail Internet fax Direct SMTP Scan to FTP Scan to Network Folder Scan to Desktop Group key with multiple destinations For information on storing addresses in the address book see STORING DESTINATION ADDRESSES FOR EACH SCAN MODE IN THE ADDRESS BOOK page 5 6 For information on storing destinations for Scan to Desktop see STORING A DESTINATION FOR SCAN TO DESK...

Page 502: ...y to send Cc or Bcc copies of the e mail System Settings Administrator Bcc Setting This setting enables or disables Bcc delivery When enabled the Bcc key appears in the address book screen System Settings Administrator Must Input Next Address Key at Broadcast Setting This setting determines whether or not the Next Address key can be omitted before specifying the next destination Factory default se...

Page 503: ...h the one touch key of the destination that you wish to cancel A message will appear to confirm the deletion Touch the Yes key Touch the Detail key to check the specified destination type and name AAA AAA BBB BBB To Cc 1 2 5 15 10 Global Address Search Address Entry Address Review Condition Settings III III GGG GGG EEE EEE CCC CCC JJJ JJJ HHH HHH DDD DDD FFF FFF ABCD Freq EFGH IJKL MNOP QRSTU VWXY...

Page 504: ...estination is stored in the address book If you do not know the search number print the one touch address list using Sending Address List in the system settings When entering search numbers such as 0001 and 0011 0 can be omitted For example to enter 0001 enter 1 and touch the key or the Next Address key If an incorrect search number is entered Press the CLEAR key to clear the number and enter the ...

Page 505: ...en enabled using Bcc Setting in the system settings administrator If you wish the destination to be a Bcc destination touch the Bcc key When Internet fax mode is selected the base screen appears after the destination address is entered However if I Fax Reception Report On Off Setting is enabled in the system settings administrator the reception report request screen will appear If you wish to rece...

Page 506: ...ous page and follow the steps below 1 Touch the Browse key To directly enter a folder touch the Folder Path key A text entry screen will appear If a user name and password are required check with the administrator of the server and enter the user name and password For the procedure for entering text see ENTERING TEXT page 1 67 in 1 BEFORE USING THE MACHINE Cancel OK Browse Folder Path User Name Pa...

Page 507: ...EFORE USING THE MACHINE Up to 100 workgroups 100 servers and 100 network folders can be displayed To move up one level touch the key The Cancel key can be pressed to return to the screen of step 1 To change the sorting order of the displayed keys touch the key that shows or in each screen The order switches between ascending order and descending order each time you touch the key To go to a particu...

Page 508: ...ter your user name and password 2 Touch the OK key 3 Search for the destination in the search screen Enter search characters for the destination and touch the Search key The search results will appear after a brief interval For the procedure for entering text see ENTERING TEXT page 1 67 in 1 BEFORE USING THE MACHINE How to search Enter the search characters maximum of 64 characters The system will...

Page 509: ... to request a reception report when sending an Internet fax 3 Select the destination 1 Touch the key of the desired destination If no names are found that match the search characters a message will appear Touch the OK key to close the message and touch the Search Again key to search again 2 Touch the To key This enters the selected destination If you wish to enter another destination repeat 1 and ...

Page 510: ...re stored group key Scan to FTP Scan to Desktop and Scan to Network Folder addresses Broadcasting destinations Addresses used only for BCC delivery Destinations transmitted to using a program System Settings Administrator Disable Resend on Fax Image Send Mode This prohibits use of the resend function When this setting is enabled the Resend key cannot be used in the base screen of image send mode R...

Page 511: ...ng the automatic document feeder with an object underneath may damage the original size detector plate and prevent correct detection of the document size When placing the originals orient them as shown below To place a large portrait oriented original place it as shown above in Landscape orientation and specify the placement orientation in step 3 Place A5 5 1 2 x 8 1 2 size originals in portrait v...

Page 512: ...book For more information see ENTERING DESTINATIONS page 5 18 System Settings Administrator Bcc Setting This setting enables or disables Bcc delivery When enabled the Bcc key appears in the address book screen 3 Switch to scan mode and display the image settings screen 1 Touch the Scan tab 2 Touch the Original key The current settings for Original Exposure Resolution File Format and Colour Mode ar...

Page 513: ...will take place To scan in full colour press the COLOUR START key To scan in black and white press the BLACK WHITE START key If the colour mode of the COLOUR START key is set to Auto the colour of the original will be detected automatically and scanning in full colour greyscale or Mono2 will take place If Encrypt PDF is selected for the file format PDF is selected in the format settings screen and...

Page 514: ...ge file it may be necessary to reduce the number of scanned pages or reduce the send size Storing a mail signature You can have preset text automatically added at the end of e mail messages as a mail signature This is convenient when you wish to have a corporate policy or other preset text appear at the bottom of e mail messages To store the text for the mail signature click Application Settings N...

Page 515: ...For the procedure for entering text see ENTERING TEXT page 1 67 in 1 BEFORE USING THE MACHINE 1 Touch the Send Settings key in the base screen BASE SCREEN page 5 9 If you are sending to a Scan to FTP Scan to Desktop or Scan to Network Folder destination go to step 4 2 To change the subject touch the Subject key 3 Enter the subject 1 Touch a Pre Set text key 2 Touch the OK key If you wish to direct...

Page 516: ...also touch the Address Entry key to directly enter an e mail address To specify the return address you can touch the key and enter a user number that has been previously stored using User List in the system settings administrator A key can only be selected for the return address if an e mail address has been stored for that user in User List in the system settings administrator Send Settings OK Su...

Page 517: ...ected to send a Cc copy to the sender When storing pre set text for the subject and file name in the Web pages up to 80 characters can be entered System Settings Administrator The Number of File Name Subject Body Keys Displayed Setting The setting for the number of subject keys and file name keys displayed in one screen can be changed to 6 12 or 18 System Settings Administrator Default Sender Set ...

Page 518: ...ath may damage the original size detector plate and prevent correct detection of the document size When placing the originals orient them as shown below To place a large portrait oriented original place it as shown above in Landscape orientation and specify the placement orientation in step 4 Place A5 5 1 2 x 8 1 2 size originals in portrait vertical orientation If placed in landscape horizontal o...

Page 519: ...L IMAGE TYPE page 5 61 CHANGING THE RESOLUTION page 5 63 CHANGING THE FILE FORMAT page 5 64 CHANGING THE COLOUR MODE page 5 68 SPECIAL MODES page 5 71 4 Specify the orientation in which the original is placed To enable the original to be scanned in the correct orientation the orientation in which the top edge of the original appears at the top of the display specify the orientation in which the or...

Page 520: ...ntry key to open the keyboard screen enter a password maximum of 32 characters and touch the OK key The recipient must use the password entered here to open the Encrypt PDF file To cancel Encrypt PDF touch the Cancel key The format settings screen will appear to let you change the file type Select a new file type and press the START key to begin transmission 6 If the original was placed on the doc...

Page 521: ... The scanned data will not be stored However if the file format is set to JPEG and the Specified Pages per File checkbox is selected files for which scanning is completed will be stored in USB memory To cancel scanning Press the STOP key to cancel the operation To cancel scanning to USB memory While scanned data is being stored in the USB memory the message Sending data and the Cancel key appear i...

Page 522: ...folder name and touch the OK key For the procedure for entering text see ENTERING TEXT page 1 67 in 1 BEFORE USING THE MACHINE To move up one level touch the key This key appears when a folder on the second level or lower is selected To change the order of the keys that appear in a screen touch the key that shows or Each time the key is touched the order changes between ascending and descending Sp...

Page 523: ...le name and touch the OK key The entered file name will appear in A If the file name is not entered the settings in the Web page are used For the procedure for entering text see ENTERING TEXT page 1 67 in 1 BEFORE USING THE MACHINE USB Mem Scan Fax Internet Fax PC Scan Scan Auto Auto Scan Send Auto Text 200X200dpi PDF Auto Greyscale Mono2 PDF Special Modes Colour Mode File Format Resolution Exposu...

Page 524: ... degrees and transmitted in A4R B5 or A5 8 1 2 x 11 R or 5 1 2 x 8 1 2 orientation A4R B5 and A5 8 1 2 x 11 R and 5 1 2 x 8 1 2 originals cannot be rotated for transmission Originals cannot be scanned in succession from both the automatic document feeder and the document glass and sent in a single transmission System Settings Administrator Rotation Sending Setting This is used to select whether or...

Page 525: ...ginal is to the left touch the key 2 Touch the OK key You will return to the screen of step 2 The original orientation is initially set to If the original was placed with the top edge up this step is not necessary 5 Press the BLACK WHITE START key Scanning begins If the original is placed on the document glass the Read End key appears in the touch panel If the original is only one page go to step ...

Page 526: ... will stop Storing a mail signature You can have preset text automatically added at the end of e mail messages as a mail signature This is convenient when you wish to have a corporate policy or other preset text appear at the bottom of e mail messages To store the text for the mail signature click Application Settings Network Scanner Settings and then Administration Settings in the Web page menu A...

Page 527: ...ings key in the base screen BASE SCREEN page 5 9 2 To change the subject touch the Subject key 3 Enter the subject 1 Touch a pre set text key 2 Touch the OK key If you wish to directly enter the text touch the Direct Entry key to open the text entry screen Enter the text and touch the OK key The text in a pre set text key can be edited by touching the pre set text key and then the Direct Entry key...

Page 528: ...clear all entered text touch the Clear All key When this key is touched the entire body of the message is erased immediately not just the selected line Each line of the entered text can be selected with the keys To edit the selected line touch the Edit key The text entry screen will appear with the selected text entered Send Settings OK Subject File Name Body Text Sub Schedule coordination meeting...

Page 529: ...em Settings Administrator The Number of File Name Subject Body Keys Displayed Setting The setting for the number of subject keys and file name keys displayed in one screen can be changed to 6 12 or 18 Sub Schedule coordination meeting Material for planning meeting Thank you for your continuous support We have attached sca Send Settings OK Subject File Name Body Text ...

Page 530: ...fax mode destinations in a single operation Up to 500 destinations can be selected in one broadcast operation If you frequently use broadcasting to send images to the same group of destinations it is convenient to store those destinations in a group key 1 Place the original Place the original face up in the document feeder tray or face down on the document glass Originals Transmission ...

Page 531: ...ns in a group key 3 Touch the Address Review key 4 Check the destinations and then touch the OK key If the transmission includes Cc or Bcc destinations touch the Cc tab or the Bcc tab to check those destinations To cancel a specified destination Touch the one touch key of the destination that you wish to cancel A message will appear to confirm the deletion Touch the Yes key CHECKING AND DELETING T...

Page 532: ...ss scan each page one page at a time When scanning of one page finishes replace it with the next page and press the COLOUR START key or the BLACK WHITE START key Repeat until all pages have been scanned and then touch the Read End key A beep will sound to indicate that scanning is finished If Internet fax or fax destinations are included in the broadcast transmission the COLOUR START key cannot be...

Page 533: ...0dpi File compression mode The compression mode will be changed to the compression mode set in Compression Mode at Broadcasting in the system settings administrator Colour scanning Scanning will take place in Mono2 regardless of the colour mode setting Special modes 2in1 This cannot be selected in scan mode however if selected in Internet fax mode it will also be applied to scan destinations Scan ...

Page 534: ...inal and perform the steps of the broadcast transmission Using document filing You will return to the document filing resend screen with the unsuccessful destinations entered Perform the document filing resend procedure There is no need to rescan the original If the All Destinations tab is touched in 1 all destinations will be displayed The Retry key that appears in the screen can be touched to re...

Page 535: ... Image data for transmission will be created and sent as an Internet fax For the procedures for using this function see the PC Fax driver Help To send an Internet fax using the PC I Fax function the PC Fax driver must be installed and then updated using the CD ROM that accompanies the Internet fax expansion kit For more information see the Software Setup Guide This function can only be used on a W...

Page 536: ...lect the exposure for scanning CHANGING THE EXPOSURE AND ORIGINAL IMAGE TYPE page 5 61 3 Resolution key Touch this key to select the resolution for scanning CHANGING THE RESOLUTION page 5 63 4 File Format key Touch this key to change the format file type of the scanned image file CHANGING THE FILE FORMAT page 5 64 5 Colour Mode key Touch this key to select the colour mode for scanning This key doe...

Page 537: ... the 2 Sided Tablet key A book and a tablet are bound as shown below When a document cover is installed the 2 Sided Booklet key and the 2 Sided Tablet key are not displayed 2 Touch the appropriate Image Orientation key If this setting is not correct a suitable image may not be transmitted 3 Touch the OK key To cancel 2 sided scanning touch the highlighted key so that it is no longer highlighted 2 ...

Page 538: ...mission Only standard original sizes can be automatically detected STANDARD SIZES page 5 17 When the original size is a non standard size or if the size is not detected correctly manually specify the original scan size Specifying the original scan size by paper size page 5 56 Specifying the original scan size by numerical values page 5 57 A4 Auto Auto Auto File Quick File Address Review Send Setti...

Page 539: ... OK key If you are sending a long original touch the Long Size key Use the automatic document feeder to scan a long original The maximum width that can be scanned is 1000 mm 39 3 8 the maximum height is 297 mm 11 5 8 TRANSMITTABLE ORIGINAL SIZES page 5 17 To specify an Inch size for the scan size touch the AB Inch key to highlight the Inch side and then specify the scan size 4 Touch the OK key Whe...

Page 540: ...l key IMAGE SETTINGS page 5 53 2 Touch the Scan Size key 3 Touch the Size Input key 4 Enter the scan size original size 1 Touch the X width numeric value display key and enter the width 2 Touch the Y height numeric value display key and enter the height 3 Touch the OK key Touch the OK key next to the Cancel key to complete the setting and return to the screen of step 3 You can also touch the keys ...

Page 541: ...fied When the automatic document feeder is used an original longer than 432 mm 17 can be scanned maximum width 1000 mm 39 3 8 In this case touch the Long Size key in the screen of step 3 Specifying the original scan size by paper size page 5 56 TRANSMITTABLE ORIGINAL SIZES page 5 17 Scan Original OK Auto X420 Y297 Scan Size 2 Sided Tablet 2 Sided Booklet Send Size Image Orientation ...

Page 542: ...and display the image settings screen 1 Touch the tab of the mode that you wish to use 2 Touch the Original key IMAGE SETTINGS page 5 53 2 Touch the Send Size key 3 Specify the send size 1 Touch the desired send size key 2 Touch the OK key Depending on the paper size specified for the Scan Size it may not be possible to select some sizes for the Send Size Size keys that cannot be specified for the...

Page 543: ...his setting is not correct when sending an image with a changed ratio a suitable image may not be transmitted 2 Touch the OK key The ratio used for reduction or enlargement of the original will appear between the Scan Size and the Send Size Scan Original OK A3 Auto A4 Scan Size 2 Sided Tablet 2 Sided Booklet Send Size 141 Image Orientation 1 2 ...

Page 544: ...ext and printed photographs such as a magazine or catalogue Text Photo This mode provides the best balance for scanning an original which contains both text and photographs such as a text document with a photo pasted on Text Use this mode for regular text documents Photo Use this mode to scan photos Printed Photo This mode is best for scanning printed photographs such as photos in a magazine or ca...

Page 545: ...cannot be selected To reduce the occurrence of line patterns moiré effect when scanning printed matter touch the Moiré Reduction checkbox so that a checkmark appears When using the document glass to scan multiple original pages the exposure setting can be changed each time you change pages When using the automatic document feeder the exposure setting cannot be changed once scanning has begun Howev...

Page 546: ...ct the resolution 1 Touch the key of the desired resolution 2 Touch the OK key In Internet fax mode the Half Tone key can be touched to select halftone except when 200X100dpi is selected When the original has many gradations of light and dark such as a photo or colour illustration halftone provides a more attractive image than regular transmission Scan Resolution OK 300X300dpi 200X200dpi 100X100dp...

Page 547: ... can be changed When using the document glass to scan multiple original pages the resolution setting can be changed each time you change pages When using the automatic document feeder the resolution setting cannot be changed once scanning has begun However when Job Build is used in the special modes the resolution can be changed each time a new set of originals is inserted When TIFF S is selected ...

Page 548: ... screen is displayed the setting screen of B W mode initially appears The format setting for B W mode is the file format that is used when the BLACK WHITE START key is pressed with the B W mode set to Mono2 The format setting for Colour Grey mode is the file format that is used when the COLOUR START key is pressed or when the BLACK WHITE START key is pressed with the B W mode set to Greyscale The ...

Page 549: ...ated for multiple pages For this reason the Specified Pages per File checkbox does not appear When the file format is set to Encrypt PDF PDF is selected in the format settings screen and the Encry checkbox is set to a screen prompting you to enter a password will appear when the START key is pressed to start scan send transmission Touch the Entry key in the displayed screen to open the keyboard sc...

Page 550: ... and 200X200dpi If TIFF S is selected after 200X400dpi 400X400dpi or 600X600dpi is selected the resolution automatically changes to 200X200dpi Send size Always A4R 8 1 2 x 11 R If TIFF S is selected after the send size is changed the send size is automatically changed to A4R 8 1 2 x 11 R If a size larger than A4 8 1 2 x 11 is scanned the size will automatically be reduced to A4R 8 1 2 x 11 R When ...

Page 551: ...greyscale 1 Select the mode and display the colour mode settings screen 1 Touch the tab of the mode that you wish to use 2 Touch the Colour Mode key IMAGE SETTINGS page 5 53 2 Select the colour mode 1 Touch the key of the mode to be used when the COLOUR START key is pressed You can select whether black white scanning will take place in Mono2 or greyscale when Auto is selected and a black and white...

Page 552: ...iginals are being read appears while the originals are being scanned and when scanning is finished the preview screen appears on the touch panel Transmission will not take place until you touch the Start Sending key in the preview screen 4 Check the preview image and then touch the Start Sending key Transmission begins For information on the preview screen see PREVIEW CHECK SCREEN page 5 70 System...

Page 553: ...d This key can only be touched when the entire preview image is displayed in the preview screen 4 Function Rev key Touch to check special mode settings or scan settings for two sided originals 5 Display zoom key Use this to set the zoom ratio of the displayed image Changes from the left in the order Full Page Twice 4 Times 8 Times The setting applies to all pages in the file not just the displayed...

Page 554: ...xed Size Original key SCANNING ORIGINALS OF DIFFERENT SIZES Mixed Size Original page 5 88 When the document cover is installed this key is not displayed 9 Slow Scan Mode key SCANNING THIN ORIGINALS Slow Scan Mode page 5 90 When the document cover is installed this key is not displayed 10 Original Count key 1 CHECKING THE NUMBER OF SCANNED ORIGINAL SHEETS BEFORE TRANSMISSION Original Count page 5 9...

Page 555: ...pecial mode menu screen Touch this key when you wish to continue selecting other special mode settings C During selection of special mode settings this key returns you to the special mode menu screen without saving the settings When settings have been completed this cancels the settings and returns you to the special mode menu screen 2in1 Internet Fax Special Modes OK Transaction Report 2 2 Intern...

Page 556: ...ions may occur When a program is used settings are selected with ease by simply pressing the stored key In addition transmission takes place based on the stored settings so there are no chances for mistakes Programs are stored edited and deleted using Address Control in the system settings See Program page 7 21 in 7 SYSTEM SETTINGS Programs can also be stored in the Web pages Click Job Programs an...

Page 557: ...HITE START key Scanning begins If you inserted the original pages in the document feeder tray all pages are scanned A beep will sound to indicate that scanning is finished If you are scanning the original on the document glass scan each page one page at a time When scanning finishes place the next original and press the COLOUR START key or the BLACK WHITE START key Repeat until all pages have been...

Page 558: ...ar Shadows at the edges of the original can also be erased when the automatic document feeder is used When using USB memory mode connect the USB memory device to the machine before performing the procedure below 1 Place the original Place the original face up in the document feeder tray or face down on the document glass 2 Specify the destination ENTERING DESTINATIONS page 5 18 When scanning to US...

Page 559: ... When scanning of one page finishes replace it with the next page and press the COLOUR START key or the BLACK WHITE START key Repeat until all pages have been scanned and then press the Read End key A beep will sound to indicate that scanning is finished If the destination is an Internet fax destination press the BLACK WHITE START key To cancel scanning Press the STOP key to cancel the operation W...

Page 560: ...x 1 page A4 8 1 2 x 11 x 2 pages When using dual page scan the original must be placed on the document glass The send size cannot be changed When using USB memory mode connect the USB memory device to the machine before performing the procedure below 1 Place the original face down on the document glass Align the centre of the original with the appropriate size mark 2 Specify the destination ENTERI...

Page 561: ... that scanning is finished If the destination is an Internet fax destination press the BLACK WHITE START key To cancel scanning Press the STOP key to cancel the operation To erase shadows caused by the binding of a book or other bound document use the erase function Note however that Centre Erase and Edge Centre Erase cannot be used When the scan size of the original is specified by numerical valu...

Page 562: ...ument in the auto document feeder or on the document glass and have it scanned at the specified time of transmission Settings selected for a timer transmission exposure resolution special modes etc are automatically cleared after the transmission is finished However when the document filing function is used the scanned original and settings are stored on the built in hard drive This function canno...

Page 563: ...ginal and press the COLOUR START key or the BLACK WHITE START key Repeat until all pages have been scanned and then touch the Read End key A beep will sound to indicate that scanning is finished If the destination is an Internet fax destination press the BLACK WHITE START key The original is scanned into memory The original cannot be scanned at a specified time To cancel scanning Press the STOP ke...

Page 564: ...ace the original face up in the document feeder tray or face down on the document glass 2 Specify the destination ENTERING DESTINATIONS page 5 18 When scanning to USB memory there is no need to specify the destination Go to step 3 3 Select the special modes 1 Touch the tab of the mode that you wish to use 2 Touch the Special Modes key 3 Touch the Suppress Background key Read the message that appea...

Page 565: ...lass scan each page one page at a time When scanning finishes place the next original and press the COLOUR START key or the BLACK WHITE START key Repeat until all pages have been scanned and then touch the Read End key A beep will sound to indicate that scanning is finished When the colour mode setting of the BLACK WHITE START key is Mono2 the suppress background function will not operate if the B...

Page 566: ...hine before performing the procedure below 1 Place the original face down on the document glass 2 Specify the destination ENTERING DESTINATIONS page 5 18 When scanning to USB memory there is no need to specify the destination Go to step 3 3 Select the special modes 1 Touch the tab of the mode that you wish to use 2 Touch the Special Modes key 3 Touch the Card Shot key SPECIAL MODES page 5 71 Trans...

Page 567: ...ange the original scan size or the send size In this case the screen of this step appears when you touch the scan size key For the procedure for setting the send size see Specifying the send size of the image page 5 59 5 Press the COLOUR START key or the BLACK WHITE START key to scan the front side of the card If the destination is an Internet fax destination press the BLACK WHITE START key To can...

Page 568: ...u can touch the Configure key to change the exposure resolution scan size and send size The ratio cannot be specified and Rotation Sending Setting cannot be selected To cancel Card Shot Touch the Cancel key in the screen of step 4 Read End Configure Place next original Pg No x Press Start When finished press Read End ...

Page 569: ... remaining sets Up to 999 pages can be scanned Note that when the memory is being used for other jobs fewer pages can be scanned When using USB memory mode connect the USB memory device to the machine before performing the procedure below 1 Insert the originals face up in the document feeder tray Insert the originals all the way into the document feeder tray Multiple originals can be placed in the...

Page 570: ...aken for one minute after the confirmation screen appears scanning automatically ends and the transmission is reserved The Configure key can be touched to change the exposure resolution scan size and send size for each original page scanned However when Job Build is used in combination with 2in1 in the special modes only the exposure can be changed when scanning each even numbered page of the orig...

Page 571: ...When using USB memory mode connect the USB memory device to the machine before performing the procedure below 1 Insert the originals face up in the document feeder tray Insert the originals with the corners aligned together in the far left corner of the document feeder tray 2 Specify the destination ENTERING DESTINATIONS page 5 18 When scanning to USB memory there is no need to specify the destina...

Page 572: ...et fax destination press the BLACK WHITE START key To cancel scanning Press the STOP key to cancel the operation Once mixed size originals has been selected an original scan size cannot be specified When mixed size originals are set automatic duplex scanning cannot be used Rotate cannot be used when Mixed Size Original is enabled To cancel the Mixed Size Original setting Touch the Mixed Size Origi...

Page 573: ... USB memory device to the machine before performing the procedure below 1 Insert the originals face up in the document feeder tray Adjust the original guides slowly If the originals are inserted with too much force they may crumple and misfeed 2 Specify the destination ENTERING DESTINATIONS page 5 18 When scanning to USB memory there is no need to specify the destination Go to step 3 3 Select the ...

Page 574: ...ess the STOP key to cancel the operation When this function is selected automatic 2 sided scanning is not possible Rotate cannot be used when Mixed Size Original is enabled To cancel slow scan mode Touch the Slow Scan Mode key in the screen of step 4 so that it is not highlighted System Settings Administrator Original Feeding Mode This is used to have scanning always take place in slow scan mode S...

Page 575: ... originals all the way into the document feeder tray Multiple originals can be placed in the document feeder tray The stack of originals must not be higher than the indicator line on the tray 2 Specify the destination ENTERING DESTINATIONS page 5 18 3 Select the special modes 1 Touch the tab of the mode that you wish to use 2 Touch the Special Modes key SPECIAL MODES page 5 71 4 Select the origina...

Page 576: ...pear Scanning will not be completed automatically and the image will not be reserved for transmission If the displayed number of original sheets is different from the actual number of sheets Touch the Cancel key and then touch the OK key in the message screen to clear all scanned data Scan settings and destination settings will not be cleared Insert the original sheets in the automatic document fe...

Page 577: ...ng USB memory mode connect the USB memory device to the machine before performing the procedure below 1 Insert the originals face up in the document feeder tray 2 Specify the destination ENTERING DESTINATIONS page 5 18 When scanning to USB memory there is no need to specify the destination Go to step 3 3 Select the special modes 1 Touch the tab of the mode that you wish to use 2 Touch the Special ...

Page 578: ...each original is stamped twice If an error occurs during scanning an original that was not scanned may be stamped When the O mark that is stamped on originals starts to become faint replace the stamp cartridge For the procedure for replacing the stamp cartridge see REPLACING THE STAMP CARTRIDGE page 1 66 in 1 BEFORE USING THE MACHINE To cancel the stamp function Touch the Verif Stamp key in the sc...

Page 579: ...are blank may not be detected as blank and thus sent When using USB memory mode connect the USB memory device to the machine before performing the procedure below 1 Insert the originals face up in the document feeder tray This function cannot be used when the document glass is used for scan send 2 Specify the destination ENTERING DESTINATIONS page 5 18 When scanning to USB memory there is no need ...

Page 580: ... that include two blank pages are scanned by duplex scanning A will show 5 B will show 10 and C will show 8 If this step is not performed for one minute while the above confirmation screen appears the scanned image and settings will be cleared and the base screen will reappear Scanning will not be completed automatically and the image will not be reserved for transmission When Default Preview is e...

Page 581: ...ory mode or data entry mode 1 Place the original When placing the originals orient them as shown below 2 Specify the destination ENTERING DESTINATIONS page 5 18 1 2 1 2 1 2 1 2 Portrait oriented originals Landscape oriented originals Transmission Transmission 1 2 1 2 1 1 1 1 Document feeder tray Place the originals face up Portrait orientation Landscape orientation Document glass Place the origina...

Page 582: ...ing is not correct a suitable image may not be transmitted 2 Touch the OK key 1 2 2in1 Internet Fax Special Modes Card Shot OK Dual Page Scan Slow Scan Mode Quick File Mixed Size Original Erase Job Build File Program Timer Original Count 2 1 Auto Auto Auto File Quick File I Fax Manual Reception Address Review Send Settings Address Entry Address Book USB Mem Scan Fax Internet Fax PC Scan Special Mo...

Page 583: ...nd to indicate that scanning is finished The Configure key can be touched in the scan end confirmation screen to change the exposure resolution scan size and send size However when scanning each even numbered page of the original only the exposure can be changed To cancel scanning Press the STOP key to cancel the operation Transmission is not possible at a size smaller than the original size The 2...

Page 584: ...ata entry mode 1 Place the original Place the original face up in the document feeder tray or face down on the document glass 2 Specify the destination ENTERING DESTINATIONS page 5 18 3 Select the special modes 1 Touch the Internet Fax tab 2 Touch the Special Modes key 3 Touch the keys to switch through the screens 4 Touch the Transaction Report key SPECIAL MODES page 5 71 4 Select print condition...

Page 585: ...ncel the operation For a broadcast transmission changes to the transaction report print conditions apply to all destinations To cancel the transaction report setting Touch the Cancel key in the screen of step 4 System Settings Administrator Transaction Report Print Select Setting This is used to set the conditions for printing transaction reports The factory default setting is Single Sending Print...

Page 586: ...HECKING THE STATUS OF TRANSMISSION RECEPTION JOBS The job status display is in the lower left corner of the touch panel The job status display can be touched to display the job status screen Print Job Fax Job Internet Fax Scan to Address Set Time Pages Status Broadcast0001 1 2 3 4 10 00 04 01 020 003 Connecting AAA AAA BBB BBB CCC CCC 10 05 04 01 000 001 Waiting 10 22 04 01 000 004 Waiting 10 30 0...

Page 587: ...s screen Detail key This shows detailed information on the results of completed broadcast transmissions and jobs that used the document filing function Select the key of the desired job in the completed jobs screen 9 and then touch the Detail key This key does not appear if the had disk drive is not installed CHECKING COMPLETED JOBS page 5 108 8 Call key Touch this key to call up and use a transmi...

Page 588: ...ast appears together with a broadcast control number 4 digits 4 Time reserved Time started In the job queue screen the date and time the job was reserved In the completed jobs screen the date and time the job was started 5 Number of pages Shows the number of pages transmitted total number of original pages 6 Status Shows the job status Job in progress Job waiting to be executed 3 AAA AAA 10 22 04 ...

Page 589: ...ponse from the destination OK Report A receive report was requested for a transmission the transmission was completed normally and the receive report was received from the destination NG Report A receive report was requested for a transmission however the transmission did not take place correctly and a transmission failed report was received No Report An e mail was received without an attached fil...

Page 590: ...ssion job excluding Direct SMTP transmission jobs that requests a receive report the job is placed on standby at the bottom of the job queue screen Report Wait appears in the status column When the receive report is received from the destination or if the report is not received within the timeout time the job moves to the completed jobs screen Reception jobs when Inbound Routing Settings are enabl...

Page 591: ...ransmission that includes a Scan to FTP address Scan to Network Folder address or Scan to Desktop address Tab name Information displayed File Shows information on a transmission reception that used document filing function To call up the file and use it touch the Call key Failed Shows information on addresses for which communication failed Address Address name or number Start time Time at which co...

Page 592: ... of the job to be stopped 3 Touch the Stop Delete key 3 Touch the Yes key If you do not want to stop the selected job Touch the No key Printing of a received Internet fax cannot be stopped JOB STATUS Broadcast 1 2 4 10 00 04 01 020 003 Connecting AAA AAA CCC CCC 10 05 04 01 000 001 Waiting 10 30 04 01 000 010 Waiting Priority 3 BBB BBB 10 22 04 01 000 004 Waiting Print Job Fax Job Internet Fax Sca...

Page 593: ...y 1 Touch the mode tab of the job to be given priority 2 Touch the key of the job to be given priority 3 Touch the Priority key The selected job moves up to the position immediately following the job in progress The job will be executed when the job in progress is completed JOB STATUS Broadcast 1 2 4 10 00 04 01 020 003 Connecting AAA AAA CCC CCC 10 05 04 01 000 001 Waiting 10 30 04 01 000 010 Wai...

Page 594: ...orts The factory default setting is not to print The Image Sending Activity Report can be set to print each time the number of transactions reaches 201 or at a specified time once a day only Message Explanation OK The transaction was completed normally OK REPORT A receive report was requested for a transmission the transmission was completed normally and the receive report was received from the de...

Page 595: ...orward page 7 22 When printing is not possible because the machine has run out of paper or toner received Internet faxes can be forwarded to and printed by another previously stored Internet fax machine System Settings Administrator I Fax Default Settings These settings are used to select how received faxes are handled when the POWER key is off the main power switch is on the volume of the beep th...

Page 596: ...t selection System Settings Fax Data Receive Forward page 7 22 This setting is used to hide the I Fax Manual Reception key that appears in the base screen of Internet Fax mode When the I Fax Manual Reception key is hidden manual reception is initiated by touching the Reception Start key in the screen that appears when Fax Data Receive Forward I Fax Settings is selected Auto Auto Auto File Quick Fi...

Page 597: ... Received Data Image Check Setting is enabled in the system settings administrator a password can be entered to display the received data list screen If you wish to check an image before printing it continue from step 2 on the next page The received faxes will be retained in memory regardless of whether they were received automatically or manually If Fax Data Receive Forward is enabled in the syst...

Page 598: ...umbnails of the received images touch the Thumbnail key To delete an image that has been selected touch the Delete key To print an image that has been selected touch the Print key 3 Check the received image and then touch the Print key Printing begins For information on the image check screen see IMAGE CHECK SCREEN page 5 118 If the screen of step 1 appears when you are configuring settings in the...

Page 599: ...r checking the image 2 Select the received image 1 Touch the key of the received image that you want to check Multiple received images can be checked 2 Touch the Forward key To show thumbnails of the received images touch the Thumbnail key The receieved image can be checked by touching the Image Check key This function requires the hard disk drive IMAGE CHECK SCREEN Page 5 118 3 Touch the Forward ...

Page 600: ... viewing the image you will return to the base screen of image send mode regardless of which mode you were in previously System Settings Administrator Received Data Image Check Setting Use this to specify whether or not a received Internet fax can be viewed before it is printed III III GGG GGG EEE EEE CCC CCC AAA AAA JJJ JJJ HHH HHH FFF FFF DDD DDD BBB BBB To Cc 1 2 5 15 10 Address Review ABCD Fre...

Page 601: ...umber of pages and the current page number You can touch the current page number key and enter a number with the numeric keys to go to that page number 4 Display Rotation key This rotates the image right or left by 90 degrees The rotation applies to all pages in the file not just the displayed page 5 Print key Touch to start printing 6 Display zoom key Use this to set the zoom ratio of the display...

Page 602: ...ng the inbound routing function 1 In the Web page menu click Application Settings Inbound Routing Settings and then Administration Settings 2 Select Enable in Inbound Routing and click the Submit button Users without administrator rights can be prohibited from storing editing and deleting forwarding tables in this screen and from specifying which table is used To do so select the checkboxes below ...

Page 603: ...nternet Fax Address or Fax Number as appropriate and click the Add to List button The entered address will be added to the Address to be Entered list Specify whether the address will be directly entered maximum of 1500 characters or selected from a global address book by clicking the Global Address Search button To store multiple addresses repeat this step 3 When you have finished adding addresses...

Page 604: ...ox of the desired day of the week To specify a time select the Set Forwarding Time checkbox and specify the time 6 Select the file format The format can be set separately for each forwarding address for each of forwarding addresses 1 2 and 3 in the table 7 Select the forwarding address Forwarding addresses can be selected from the machine s address book Multiple addresses can be selected A maximum...

Page 605: ...ge menu 2 Select Always Forward or Forward on Selected Day Time from the forwarding table The forwarding permission settings that appear here are linked to the forwarding conditions set in step 3 If you wish to use different forwarding conditions than those set in step 3 set the forwarding permission settings 3 Click Submit To delete a forwarding table click the checkbox next to the table name so ...

Page 606: ... from the Software CD ROM using the integrated installer For the procedures for installing the scanner driver and configuring settings see the Software Setup Guide This function cannot be used when it has been disabled using Disable Scan Function in the system settings administrator The procedures for selecting the scanner driver and starting scanning vary depending on the TWAIN compliant applicat...

Page 607: ... the TWAIN compliant application on your computer and select Select Scanner from the File menu 4 Select the scanner driver of the machine 1 Select SHARP MFP TWAIN K 2 Click the Select button 5 Select Acquire Image from the File menu The scanner driver opens 1 2 ...

Page 608: ... other advanced settings change to the Professional screen Image Area menu Select the scan area If Auto is selected the original size detected by the machine will be scanned You can also set the scanning area in the preview window with your mouse 3 Click the Preview button The preview image will appear in the scanner driver If you are not satisfied with the preview image repeat 2 and 3 If the Zoom...

Page 609: ...numbers will change the area relative to the top left corner of the specified area button When a preview image is displayed and a scanning area is not specified you can click the button to automatically set the scanning area to the entire preview image For further information on the scan settings click the button to open scanner driver Help If the originals are placed in the document feeder tray o...

Page 610: ...tents At the machine 9 Touch the Exit key in the touch panel 10 Touch the Yes key Exit This machine is in the PC scan mode Do not remove the original Scanner IP address 250 160 102 106 Yes No PC scan in progress Finish PC scan mode ...

Page 611: ...itted as a separate file The metadata file is created in XML format By linking the metadata with applications such as document management software a workflow application or an encryption server a sophisticated document solution environment can be built Using the application integration module kit information on a generated image file can be entered at the touch panel and transmitted along with the...

Page 612: ...e by including a unique extension the date etc in the generated file name If the file name setting is left blank the machine will automatically generate a file name that is unique Addresses specified in Address Type Allowing Metadata Entry when a metadata set is stored can be selected as transmission destinations at the time of transmission using one touch keys manual entry and or a global address...

Page 613: ...he item that you want to enter If you accidentally selected the wrong metadata set or wish to use a different metadata set when a default metadata set has been set touch the Metadata Set key Touch the OK key in the message screen that appears You will return to the screen of step 1 Metadata items entered to that point will be cancelled Auto Auto Auto File Quick File Send Settings Address Entry Add...

Page 614: ...sion without sending metadata switch to a different mode by touching the tab of that mode and then perform transmission Before configuring metadata settings you can specify addresses in all modes to be used After metadata settings have been configured only addresses in modes that are allowed in the selected metadata set can be specified When metadata settings have been configured or an address is ...

Page 615: ...priate information in the related items of the send settings Name entered in metadata field Description Where entered fromName Name of the user who sent the job If the name is not entered as metadata the sender name determined by the usual rules for determining the sender name will be applied as metadata Reply To Sender name of selected sender replyTo E mail address to which the transmission resul...

Page 616: ...tocols TCP IP IPv4 File formats Colour including greyscale File types TIFF JPEG PDF Encrypted PDF XPS Compression ratio High Medium Low Black and white File types TIFF PDF Encrypted PDF XPS Compression modes None Medium G3 High G4 Internet Fax black and white only File types TIFF FX TIFF F TIFF S Compression modes Medium G3 High G4 Remarks Number of one touch keys for storing destinations 2 Maximu...

Page 617: ... WHEN USING DOCUMENT FILING 6 7 USING DOCUMENT FILING IN EACH MODE 6 8 BASE SCREEN OF DOCUMENT FILING MODE 6 10 SAVING FILES WITH DOCUMENT FILING SAVING A FILE WITH Quick File 6 11 SAVING A FILE WITH File 6 13 FILE INFORMATION 6 15 SAVING A DOCUMENT FILE ONLY Scan to HDD 6 18 Scan to HDD SCREEN 6 18 PERFORMING Scan to HDD 6 23 USING STORED FILES SEQUENCE FOR USING A STORED FILE 6 24 FOLDER AND FIL...

Page 618: ... other information The stored file can also be used by other people Do not use this method to save files that you do not want others to use such as files containing sensitive or confidential information File As a copy scan send or other job is performed this function saves the document data to the hard drive Unlike Quick File various types of information can be appended to the file when the file i...

Page 619: ...d above to obtain another set of output the settings must be selected all over again If you don t remember the settings much effort may be expended to get the same output result as the previous time By retrieving a job stored using document filing there is no need to reselect copy settings or rescan the original The job can be retrieved and printed using the same settings quickly and easily Ratio ...

Page 620: ... are not needed when storing a job using Quick File A maximum of 1000 custom folders can be created on the hard drive User Name This is necessary if you will be assigning a user name to stored files User names are stored in User List in the system settings administrator A user name is also used as a search condition when searching for a file Custom Folder The Main folder is initially available as ...

Page 621: ...en stored in the Quick File folder it may not be possible to perform a large copy job using sort mode Delete unneeded files The original types above are examples to make the explanation easier to understand The actual number of pages and number of files that can be stored will vary depending on the contents of the original images and the settings when the files are stored Examples of original type...

Page 622: ...check information on the deletion cycle Print the Administrator Settings List in the system settings administrator To check information on the folders selected for file deletion Print the Document Filing Folder List in the system settings When Automatic Deletion of File Settings is enabled in the system settings administrator all files in the specified folders will be deleted when the set time arr...

Page 623: ...others to use When saving a file with File use the Confidential property A password can be set for a Confidential file to prevent the file from being used by other people Take care to keep the password of a stored Confidential file secret The property of a stored Confidential file can be changed to Sharing by Property Change when the file is used Do not store sensitive documents or documents that ...

Page 624: ...d transmitted 1 Touch the COPY key 2 Touch the File key or the Quick File key 1 Touch the IMAGE SEND key 2 Touch the Scan tab 3 Touch the File key or the Quick File key Plain A3 3 1 2 A4R B4 4 A4 A4 Ready to scan for copy Colour Mode Special Modes 2 Sided Copy Output File Quick File Original Paper Select Auto A4 Plain Auto A4 Full Colour Exposure Auto Copy Ratio 100 IMAGE SEND DOCUMENT FILING COPY...

Page 625: ...nt filing in print mode To use document filing in print mode select document filing in the printer driver For more information on using document filing in print mode see CONVENIENT PRINTER FUNCTIONS page 3 58 in 3 PRINTER Using document filing in PC Fax PC I Fax mode To use document filing in PC Fax or PC I Fax mode select document filing settings in the PC Fax driver For more information see Help...

Page 626: ...on are performed The file will be stored in the Main folder or a custom folder SAVING A DOCUMENT FILE ONLY Scan to HDD page 6 18 4 HDD Status tab Touch this key to check how much of the machine s hard drive is being used The amount used is shown as a percentage 5 External Data Access tab This can be selected when an FTP server is stored or a USB memory device is connected to the machine DIRECTLY P...

Page 627: ... a document in the Quick File folder while copying is explained below SAVING FILES WITH DOCUMENT FILING 1 Place the original Place the original face up in the document feeder tray or face down on the document glass 2 Touch the Quick File key 3 Touch the OK key You will return to the base screen of copy mode and the Quick File key will be highlighted To cancel Quick File Touch the Quick File key in...

Page 628: ...START key that you pressed initially Repeat until all pages have been scanned and then press the Read End key To cancel scanning Press the STOP key When a file is stored using Quick File the following user name and file name are automatically assigned to the file User Name User Unknown File Name Mode_Day Month Year_Hour Minute Second Example Copy_04042010_112030 Stored to Quick File Folder When us...

Page 629: ... information settings To select the user name file name folder and confidential setting see FILE INFORMATION page 6 15 Specifying a user name page 6 15 Assigning a file name page 6 16 Specifying the folder page 6 16 Storing a file as a confidential file page 6 17 After configuring the above settings you will return to this screen Go to the next step If you do not wish to assign a user name or othe...

Page 630: ...E WITH Quick File page 6 11 To cancel scanning Press the STOP key When a file is stored using File without appending file information the following user name and file name are automatically assigned to the file User Name User Unknown File Name Mode_Day Month Year_Hour Minute Second Example Copy_04042010_112030 Stored to Main Folder When user authentication is used the user name that was used for l...

Page 631: ...ed user name in the list of user names that is displayed 1 Select the user name There are two ways to select the user name A Touch the key of the user name The touched user name is highlighted If you accidentally select the wrong user name touch the key of the correct name B Touch the key An area for entering the Registration No appears in the message display Enter the Registration No set during u...

Page 632: ... file 1 Touch the key of the folder where you want to store the file If a password has been set for the folder a password entry screen appears Enter the password of the touched folder with the numeric keys 5 to 8 digits and touch the OK key 2 Touch the OK key File Information OK Cancel Confidential User Name User Unknown Copy_04042010_112030 Main Folder File Name Stored to Password File Informatio...

Page 633: ...rty 1 Select the Confidential checkbox so that a checkmark appears Confidential mode is enabled and a password can be entered 2 Touch the Password key 2 Enter a password 5 to 8 digits with the numeric keys and touch the OK key As each digit is entered changes to File Information OK Cancel Confidential User Name Password Name 1 file 01 User 1 File Name Stored to 1 2 Password Enter password via the ...

Page 634: ... Original key Touch this key to set the scanning size storing size and orientation of the original and select 2 sided scanning settings Original key page 6 19 5 Exposure key Touch this key to select the exposure for scanning 6 Resolution key Use this to select the resolution that will be used when the file is transmitted When Long Size is specified only resolution settings of 300 X 300 dpi and und...

Page 635: ...e settings are stored and you return to the Scan to HDD screen Exposure key To adjust the exposure touch the Exposure key Select an appropriate exposure mode for the original and touch the or key to adjust the exposure level When finished touch the OK key 1 Select the appropriate original type for the original to be scanned 2 Select Auto or Manual If you selected Manual touch the or key to adjust ...

Page 636: ...lack and white it is scanned as a full colour original Auto The machine detects whether the original is colour or black and white and automatically selects full colour or black and white greyscale scanning 2 Colour Only the red areas of the original are changed to the selected colour colours other than red are scanned in black Red green blue cyan magenta or yellow can be selected BLACK WHITE START...

Page 637: ...ere are more original pages than can be placed at once in the auto document feeder 5 Original Count key When using the automatic document feeder to scan an original you can check whether or not the correct number of pages were scanned before storing the document 6 Mixed Size Original key This feature lets you scan originals of different sizes at the same time for example B4 8 1 2 x 14 size origina...

Page 638: ... a number with the numeric keys to go to that page number 3 Display Rotation key This rotates the image right or left by 90 degrees The rotation applies to all pages in the file not just the displayed page 4 Start Storing key This starts Scan to HDD 5 Display zoom key Use this to set the zoom ratio of the displayed image Changes from the left in the order Full Page Twice 4 Times 8 Times The settin...

Page 639: ...TE START key Scanning begins For the procedure for placing the original see step 4 of SAVING A FILE WITH Quick File page 6 11 When Preview is enabled the preview screen appears Checking the image before storing it Preview page 6 22 A beep will sound to indicate that Scan to HDD is completed To cancel scanning Press the STOP key When Scan to HDD is performed without appending file information the f...

Page 640: ...user authentication and storing user names see User Control page 7 47 in 7 SYSTEM SETTINGS USING STORED FILES Files stored by document filing can also be retrieved and used from the Web pages Click Document Operation and then Document Filing in the Web page menu and select the folder that contains the file you wish to use You can also show a preview of a stored file in the web pages Change the mod...

Page 641: ...ired operation and configure settings JOB SETTINGS SCREEN page 6 30 PRINTING A STORED FILE page 6 31 SENDING A STORED FILE page 6 37 PROPERTIES OF STORED FILES page 6 39 MOVING A STORED FILE page 6 41 DELETING A STORED FILE page 6 43 CHECKING AN IMAGE OF A STORED FILE page 6 44 Main Folder File Name file 01 Name 1 04 04 2010 file 02 Name 2 04 04 2010 file 03 tiff Name 3 04 04 2010 file 04 Name 4 0...

Page 642: ...touched The password must be entered 3 Quick File Folder key Touch this key to retrieve a file from the Quick File folder The files in the Quick File folder will appear SAVING A FILE WITH Quick File page 6 11 4 Index tabs All folders appear on the All Folders tab Touch a tab to display the custom folders whose initials set in Document Filing Control in the system settings match the letters on the ...

Page 643: ...creen appears Enter the desired page number 3 digits with the numeric keys For example to display page 3 enter 003 5 Switch Display key The displayed file keys can be changed by job type and can be displayed as thumbnail images The currently selected job type appears to the right of the Switch Display key All Files is initially selected When the Switch Display key is touched the following screen a...

Page 644: ...PRINTING page 6 33 7 Sort Order Display Items This can be used in the thumbnail screen The order of display of the file thumbnails can be changed in Sort Order Select Date Date File Name File Name User Name or User Name The number of displayed file thumbnails can be changed in Display Items Select 2 thumbnails or 8 thumbnails ...

Page 645: ...the Switch Display key to display the keys of a particular mode such as copy or scanner mode or to display thumbnail images of the files The Switch Display key allows you to quickly find a file You can touch the File Name key the User Name key or the Date key to change the order of display of the files The Multi File Print key can be touched to select multiple files in a folder for printing MULTI ...

Page 646: ...ERTIES OF STORED FILES page 6 39 8 Image Check key An image of the stored file appears CHECKING AN IMAGE OF A STORED FILE page 6 44 9 Detail key Touch this key to show detailed information on the selected file When this key is touched the following screen appears If you wish to change the file name touch the File Name key in this screen A text entry screen will appear Enter the desired file name T...

Page 647: ...umber of copies and other settings can be selected For more information see PRINT SETTINGS SCREEN page 6 32 A file saved in black and white or greyscale cannot be printed in colour When a long size document is stored from Scan to HDD or scan mode the file cannot be printed A file stored from scan mode that included fax mode or Internet fax mode destinations in a broadcast transmission can be print...

Page 648: ...select Margin Shift Pamphlet Style 2in1 4in1 Tandem Print or Stamp This key does not appear if the file was saved from print mode 5 key Use these keys to set the number of copies The number of copies can also be selected by directly touching the numeric display and changing the number with the numeric keys 6 Print and Delete the Data key Printing begins when this key is touched When printing is fi...

Page 649: ...with the Switch Display key or the screen is changed with the Back key while a file is selected the selection of the file will be cancelled When the Select All key is touched it will change into the Cancel All key To cancel the selection of all files that was made with the Select All key touch the Cancel All key If all files are selected without using the Select All key the key will not change int...

Page 650: ...the keys You can also directly touch the numeric display and change the number with the numeric keys 3 Touch the Print and Delete the Data key or the Print and Save the Data key If the Print and Delete the Data key is touched the files will be automatically deleted after printing If the Print and Save the Data key is touched the files will be saved after printing Number of Selected Files 5 Job Set...

Page 651: ...he Registration No set during user registration This will allow you to select the user name D Touch the Direct Entry key A text entry screen appears Directly enter the user name After selecting the user name touch the OK key When Selection of All Users is not allowed checkbox and Selection of User Unknown is not allowed checkbox are disabled in the system settings administrator the All Users key a...

Page 652: ... Data key If the Print and Delete the Data key is touched the files will be automatically deleted after printing If the Print and Save the Data key is touched the files will be saved after printing If there are no files that match the search conditions you will return to the file list screen All files that match the current search conditions can be deleted by touching the Delete the Data key User ...

Page 653: ...ire installation of the corresponding options If any of the following special modes were included in the saved file the file cannot be transmitted Pamphlet Copy Covers Inserts Photo Repeat Multi Page Enlargement Multi Shot for copying If any of the following special modes were included in the saved file the file can be transmitted but the special modes will not be executed Margin Shift Transparenc...

Page 654: ...file to multiple destinations 7 Cancel key This returns you to the job settings screen 8 File name User name display This shows the icon of the file to be sent the file name the user name and the colour mode colour black white 9 Any of these keys can be touched to change the corresponding settings of the file to be sent The settings that can be selected vary by mode Scan mode Resolution key Use th...

Page 655: ...can be changed to Protect or Confidential using Property Change in the Job Settings Protect Protect prevents a file from being moved or deleted A password cannot be established The icon appears with the mode icon in the file key of a protected file Confidential To protect a Confidential file a password is set The password must be entered to retrieve the file The icon appears with the mode icon in ...

Page 656: ...hanged to Protect A file that is set to Protect can be changed to Sharing or Confidential However a Protect file that is saved in the Quick File folder can only be changed to Sharing A file that is saved in the Quick File folder cannot be changed to Confidential If the file is moved to the Main folder or a custom folder the property can be changed to Confidential Two properties cannot be selected ...

Page 657: ... the file name touch the File Name key 3 The above screen shows the custom folders as an example Select the destination folder 1 Touch the key of the folder to which you want to move the file If a password is set for the selected folder a password entry screen will appear Enter the password with the numeric keys 5 to 8 digits and touch the OK key 2 Touch the OK key Job Settings Cancel file 01 Name...

Page 658: ...y A file whose property is Protect cannot be moved To move a protected file change its property to Sharing or Confidential User 2 Move Job Settings Move Cancel file 01 Name 1 F Colour File Name Move to Select the folder the file is moved to file 01 A4 ...

Page 659: ...CTING A FILE page 6 29 1 Touch the Delete key 2 Check the file and then touch the Yes key A file whose property is Protect cannot be deleted To delete a protected file change its property to Sharing or Confidential Job Settings Cancel file 01 Name 1 A4 F Colour Print Send Image Check Property Change Move Delete Detail Select the job Yes No Delete the file data Name 1 file 01 ...

Page 660: ... size of the image part of the image may be clipped off in the image check screen on the touch panel 1 Touch the Image Check key 2 Check the image of the file For information on each of the items see IMAGE CHECK SCREEN page 6 45 Job Settings Cancel file 01 Name 1 A4 F Colour Print Send Image Check Property Change Move Delete Detail Select the job 0001 0010 file 01 Name 1 F Colour A4 Image Check De...

Page 661: ...ent page number key and enter a number with the numeric keys to go to that page number 4 Display Rotation key This rotates the image right or left by 90 degrees The rotation applies to all pages in the file not just the displayed page 5 Detail key This shows the detailed information screen FILE SELECTION SCREEN page 6 27 6 Display zoom key Use this to set the zoom ratio of the displayed image Chan...

Page 662: ...elect the file and then touch the Detail key If user authentication is enabled and the Call key is touched when no users are logged in the user authentication screen will appear to let you log in When Display only the Files of Logged in Users is enabled under System Settings Administrator Authority Group List Document Filing it is not possible to reuse a file if its user name does not match the us...

Page 663: ... know the file name touch the File or Folder Name key and go to Using the file name or folder name to search in step 3 When Display only the Files of Logged in Users is enabled under System Settings Administrator Authority Group List Document Filing the user name of the currently logged in user is selected and other user names cannot be selected When you search using Meeting All folders and files ...

Page 664: ...text entry screen appears Directly enter the user name Searching is possible even if you only enter the first several letters of the user name After selecting the user name touch the OK key After the user name is selected the Password key can be touched To search for files of the selected user name that have a certain password touch the Password key and enter the password It is not possible to sea...

Page 665: ...search screen touch the Search Again key When you search using File or Folder Name custom folders that match the search characters will also appear in the list When a folder key is touched a list of the files in the folder appears Touch the desired file in the list You can also use the Web pages to search for a file Click Document Operations Document Filing and then Search in the Web page menu Sta...

Page 666: ...older Name key and go to Using the file name or folder name to search in step 4 When Display only the Files of Logged in Users is enabled under System Settings Administrator Authority Group List Document Filing the user name of the currently logged in user is selected and other user names cannot be selected File Retrieve Scan to HDD HDD Status Ex Data Access Main Folder User 1 User 3 User 5 User 7...

Page 667: ... key A text entry screen appears Directly enter the user name Searching is possible even if you only enter the first several letters of the user name After selecting the user name touch the OK key After the user name is selected the Password key can be touched To search for files of the selected user name that have a certain password touch the Password key and enter the password It is not possible...

Page 668: ...ill appear in a screen similar to the following screen A list of the files that match your search criteria will appear Select the desired file from the list The job settings screen will appear To return to the base screen of document filing mode touch the Cancel key To return to the file search screen touch the Search Again key Start Search Password file 01 Name 1 Search within Current Folder Sear...

Page 669: ...ypass 7 15 Address Control 7 16 Address Book 7 16 Custom Index 7 20 Program 7 21 Fax Data Receive Forward 7 22 I Fax Settings 7 22 Printer Condition Settings 7 23 Printer Default Settings 7 23 PCL Settings 7 24 PostScript Setting 7 25 Document Filing Control 7 26 USB Device Check 7 27 User Control 7 27 Amend User Information 7 27 SYSTEM SETTINGS ADMINISTRATOR Accessing the System Settings Administ...

Page 670: ...e Settings 7 90 List Print Administrator 7 91 Security Settings 7 92 Enable Disable Settings 7 93 Change Administrator Password 7 96 Product Key 7 96 Data Backup 7 97 Storing Calling of System Settings 7 98 Sharp OSA Settings 7 99 SYSTEM SETTINGS FOR FAX System Settings for Fax General List 7 100 Address Control 7 101 Address Book 7 101 F Code Memory Box 7 103 Fax Data Receive Forward 7 105 Fax Se...

Page 671: ...lowing settings can be configured Storing users of the machine Energy save settings Settings related to the operation panel Settings for peripheral devices installed on the machine Settings related to the copy function Network connection settings Transmission reception settings for faxes and scanned images Advanced settings for the document filing function For more information see SYSTEM SETTINGS ...

Page 672: ...u make a mistake press the CLEAR key to clear the incorrect number 7 Text box Touch this box to open a text entry screen When you have finished entering text in the screen the text will appear in the text box 8 Checkbox This switches between and each time you touch it To enable the corresponding setting touch the checkbox so that a checkmark appears To disable the setting clear the checkmark Radio...

Page 673: ...nfigure For detailed explanations of each of the settings see the following pages of this chapter SYSTEM SETTINGS GENERAL HOME IMAGE SEND JOB STATUS PRINT READY DATA DATA LINE SYSTEM SETTINGS LOGOUT System Settings Exit Admin Password Total Count Default Settings Address Control USB Device Check List Print User Fax Data Receive Forward Paper Tray Settings Printer Condition Settings Document Filing...

Page 674: ...ng Page Total Count 7 10 Job Count 7 10 Device Count 7 10 Item Factory default setting Page Default Settings 7 11 Clock Adjust 7 11 X Clock Adjust Specify Time Zone Date Time Settings Synchronize with Internet Time Server Disable X Daylight Saving Time Setting Varies depending on country and region Select Setting Type Varies depending on country and region Start Time Varies depending on country an...

Page 675: ...ilar Sizes for Auto Detection Auto AB 216 mm x 330 mm 8 1 2 x 13 Auto Inch 8 1 2 x 14 Paper Type Registration 7 15 Auto Tray Switching Enabled 7 15 Custom Size Registration Bypass Custom 1 X 432 mm 17 Y 297 mm 11 Custom 2 X 432 mm 17 Y 297 mm 11 Custom 3 X 432 mm 17 Y 297 mm 11 7 15 Item Factory default setting Page Address Control 7 16 Address Book 7 16 Storing group keys User 1 7 18 Program 7 21...

Page 676: ...he machine configuration X Default Paper Type Plain Paper X Initial Resolution Setting 600dpi High Quality X Disable Blank Page Print Disabled X Line Thickness 5 X 2 Sided Print 1 Sided X Colour Mode Auto X N Up Print 1 Up X Fit To Page Enabled X Output Varies depending on the machine configuration Print per Unit Enabled X Quick File Disabled PCL Settings 7 24 X PCL Symbol Set Setting PC 8 X PCL F...

Page 677: ...ication is enabled and the logged in user does not have the authority to configure the system settings administrator excluding factory default users Item Factory default setting Page Document Filing Control 7 26 Item Factory default setting Page USB Device Check 7 27 Item Factory default setting Page User Control 7 27 Amend User Information 7 27 ...

Page 678: ...x 17 paper is counted as four pages An entered paper size of 384 mm 15 1 8 or larger is counted as two pages Pages printed directly from the machine such as list prints are included in the Other Prints count The items displayed or printed will vary depending on the machine specifications and peripheral devices installed Document feeder Each sheet is counted as two pages when two sided scanning is ...

Page 679: ...ting Select whether or not the Daylight Saving Time Setting is enabled If disabled the following settings will not be possible Select Setting Type Specify whether the starting and ending day of daylight saving time are to be set using the day of the week or the date Start Time Set the starting time of daylight saving time Set the starting month If you selected Day of the Week in Select Setting Typ...

Page 680: ...y 00 00 to 24 00 If Disabling of Clock Adjustment page 7 63 has been enabled in the system settings administrator the date and time cannot be set English US English UK Japanese French German Swedish Norwegian Finnish Danish Russian Greek Turkish List name Description All Custom Setting List This list shows the hardware status software status printer condition settings paper tray settings and total...

Page 681: ... page 7 14 If the desired size does not appear in the list select Custom Size and directly enter the size only for the bypass tray For more information see Tray Settings page 7 14 Feeding Approved Job Select the modes that can be used If there is a function that you do not wish to be used with the selected tray disable the function When the Type is other than plain paper recycled paper coloured pa...

Page 682: ...4 x 10 1 2 R 5 1 2 x 8 1 2 R 8K 16K 16KR Tray 2 When a paper drawer is installed Auto AB A3 A4 A4R B4 B5 B5R 216 mm x 330 mm 8 1 2 x 13 Auto Inch 11 x 17 8 1 2 x 14 8 1 2 x 11 8 1 2 x 11 R 7 1 4 x 10 1 2 R 8 1 2 x 13 2 5 216 mm x 340 mm 216 mm x 343 mm 8 1 2 x 13 1 2 5 1 2 x 8 1 2 R A5R 8K 16K 16KR Tray 3 When a paper drawer is installed Tray 4 When a paper drawer is installed Bypass In addition t...

Page 683: ...Y dimensions of the paper Size Input AB The X dimension can be set to a value from 140 mm when a finisher is installed 148 mm to 432 mm The factory default setting is 420 mm The Y dimension can be set to a value from 90 mm to 297 mm The factory default setting is 297 mm Size Input Inch The X dimension can be set to a value from 5 1 2 when a finisher is installed 5 7 8 to 17 The factory default set...

Page 684: ... Disable Registering Destination from Operation Panel page 7 79 is enabled in the system settings administrator for a function addresses cannot be stored for that function To store addresses for Scan to FTP Scan to Network Folder and Scan to Desktop Store Scan to FTP and Scan to Network addresses in the Web pages Store Scan to Desktop addresses using Network Scanner Tool A combined maximum of 200 ...

Page 685: ...me that you wish to appear in the address book this is different from the address name Custom Index Select the custom index in which the address will appear Register this Address to be added to the Frequent Use index Frequently used addresses can be stored in the Frequent Use index Items appearing when an e mail address is stored E mail Address Enter an e mail address max 64 characters File Format...

Page 686: ...ss of the receiving machine is user sample_domain com and the host name is HOST Enter user HOST in the Direct SMTP Address text box 3 When the receiving machine is set to only receive e mail from specific addresses Enter the specified specific e mail address in the Direct SMTP Address text box Select the Add Hostname or IP Address Too checkbox and enter the host name or IPv4 address of the receivi...

Page 687: ...et the Group Name Initial and Key Name settings Other settings can be adjusted as necessary 6 Use the scroll bar to display the lower part of the screen and touch the Address Book key Touch the Direct Entry key to store an address that is not stored in a one touch key AAA AAA CCC CCC EEE EEE BBB BBB DDD DDD FFF FFF 1 1000 1 1000 ...

Page 688: ...om indexes are User 1 to User 6 7 Touch the one touch keys that you want to add to the group Three keys are added in this example 8 Touch the OK key 9 Touch the OK key 10 Touch the OK key on the dialog box that appears 11 The group key registration screen appears If you want to finish touch Cancel key to return to the previous screen AAA AAA CCC CCC EEE EEE GGG GGG BBB BBB DDD DDD FFF FFF AAA AAA ...

Page 689: ...ystem Settings Back Program 1 Program 3 Program 5 Program 7 Program 9 Program 11 Program 2 Program 4 Program 6 Program 8 Program 10 Program 12 Add New A timer setting cannot be included in a program At least one one touch key must be specified in a program or the program cannot be stored Item Description Program Number Set the number to be assigned to the program The lowest available number is aut...

Page 690: ...e fax function see SYSTEM SETTINGS FOR FAX page 7 100 To use this function POP3 server settings must be configured Configure these settings in the screen that appears when Application Settings Internet Fax Settings is selected in the Web page menu To store a forwarding address see Set Address for Data Forwarding page 7 86 in the system settings administrator If forwarding was not successful becaus...

Page 691: ...nter driver the printer driver settings take precedence over the printer condition settings Item Selections Copies 1 999 sets Orientation Portrait Horizontal Default Paper Size A3 B4 A4 B5 A5 11 x 17 8 1 2 x 14 8 1 2 x 13 8 1 2 x 11 7 1 4 x 10 1 2 5 1 2 x 8 1 2 8k 16k Default Output Tray Centre Tray Offset Tray 1 Right Tray Default Paper Type Plain Paper Letter Head Pre Printed Pre Punched Recycle...

Page 692: ...s and line feed code used in a PCL environment Settings Quick File Disabled Enabled Item Description Selections PCL Symbol Set Setting Specify the symbol set used for printing Select from 35 items PCL Font Setting Use this to select the font used for printing Internal Font Extended Font List of internal fonts when extended fonts are not installed PCL Line Feed Code This setting is used to select h...

Page 693: ... PostScript data is received in binary format Settings Item Description Selections Print PS Error When a PS PostScript error occurs during PostScript printing this setting determines whether or not an error notice is printed Enabled Disabled Binary Processing Receive PostScript data in binary format Enabled Disabled This setting can be configured when the PS3 expansion kit is installed ...

Page 694: ...creen to open an edit delete screen for the folder For more information see Settings page 7 26 Delete a folder with the Delete key Settings Folder List Back User 1 User 3 User 5 User 7 User 9 User 2 User 4 User 6 User 8 User 10 Add New Sort Up All Folders EFGHI ABCD JKLMN OPQRST UVWXYZ 1 2 If the folder has a password the correct password must be entered before a file can be deleted A folder that ...

Page 695: ...ent filing user name and the sender name The user name must be unique Initial Edit the initials maximum of 10 characters The initials determine where the user name will appear in the user name list Index Select the desired custom index The custom index names are the same as those in the address book Login Name This cannot be edited Password Enter the password used for user authentication by login ...

Page 696: ...or password 2 Touch the OK key This completes the administrator login procedure The system settings administrator can be used User authentication is initially disabled factory default setting To logout Touch the Logout key in the top right corner of the screen You can also touch the Exit key to quit the system settings If Auto Clear activates logout will automatically take place System Settings Ex...

Page 697: ...sword key Enter the administrator password in the administrator password entry screen 2 Touch the OK key If login name password e mail address is selected for the authentication method the E mail Address key will appear below the User Name For the factory default administrator password see TO THE ADMINISTRATOR OF THE MACHINE in the Start Guide This completes the administrator login procedure The s...

Page 698: ... the system settings administrator can also be accessed when login is performed by selecting a user with administrator rights from the user list or by entering a user number with administrator rights For more information on login procedures when user authentication is enabled see USER AUTHENTICATION page 1 17 in 1 BEFORE USING THE MACHINE To logout Press the LOGOUT key Except when entering a fax n...

Page 699: ...tication Disabled 7 47 X Authentication Method Setting Authenticate a User by Login Name and Password 7 47 X Device Account Mode Setting Disabled 7 47 Other Settings 7 48 X Actions when the Limit of Pages for Output Jobs Job is Completed even when the Limit of Pages is Reached 7 48 X The Number of User Name Displayed Setting 12 7 48 X A Warning when Login Fails Disabled 7 48 X Disabling of Printin...

Page 700: ...r Setting 60 sec 7 62 Cancel Auto Clear Timer Disabled X Message Time Setting 6 sec 7 62 X Display Language Setting Varies depending on country and region 7 62 X Default Display Settings Off 7 62 X Disabling of Job Priority Operation Disabled 7 62 X Disabling of Bypass Printing Disabled 7 62 X Key Operation Setting 0 0 sec 7 62 Disable Auto Key Repeat Disabled X Disabling of Clock Adjustment Disab...

Page 701: ...review All disabled X Default Preview Display Copy Full Page Image Send Scan Send Full Page Internet Fax Send Full Page Fax Send Full Page Data Entry Full Page USB Memory Full Page Reception Data Twice Memory Box Twice Doc Filing Image Check Twice Scan to HDD Full Page X Received Data Image Check Setting Disabled X Default List Thumbnail Display List Remote Operation Settings 7 66 X Remote Softwar...

Page 702: ...Device Control 7 67 Other Settings 7 67 X Original Feeding Mode All Disabled 7 67 X Auto Paper Selection Setting Plain Paper 7 67 X Tandem Connection Setting 7 67 IP Address of Slave Machine 0 0 0 0 Port Number 50001 Disabling of Master Machine Mode Disabled Disabling of Slave Machine Mode Disabled X Detect Standard in Auto Colour Mode 3 7 67 X Registration Adjustment 7 67 X Optimization of a Hard...

Page 703: ...tting Page Copy Function Settings 7 70 Initial Status Settings 7 70 X Colour Mode Full Colour X Paper Tray Varies depending on the machine configuration X Exposure Type Auto X Copy Ratio 100 X 2 Sided Copy 1 Side to 1 Side X Output Other Settings 7 71 X Copy Exposure Adjustment 7 71 Colour 5 Black White 5 X Rotation Copy Setting Enabled 7 71 X Add or Change Extra Preset Ratios 7 71 X Setting a Max...

Page 704: ...600dpi x 600dpi Scanning Mode for Document Feeder Disabled 7 72 X B W Quick Scan from Document Glass Enabled 7 72 X Auto Clear Before Copy Job Execution Disabled 7 72 Colour Adjustments 7 73 X Initial Colour Balance Setting Factory default state 7 73 X Auto Colour Calibration 7 73 Item Factory default setting Page Network Settings 7 74 IPv4 Settings DHCP 7 74 IPv6 Settings Disabled 7 74 Enable TCP...

Page 705: ...ss Tray from Auto Paper Select Disabled 7 75 X Job Spool Queuing Enabled 7 75 X Disabling of USB Memory Direct Print Disabled 7 75 X Disabling of Network Folder Direct Print Disabled 7 75 Interface Settings 7 76 X Hexadecimal Dump Mode Disabled 7 76 X I O Timeout 60 sec 7 76 X Enable USB Port Enabled 7 76 X USB Port Emulation Switching Auto 7 76 X Enable Network Port Enabled 7 76 X Network Port Em...

Page 706: ...abled 7 79 Default Verification Stamp Disabled 7 79 Erase Width Adjustment 7 79 Edge Clearance Width 10 mm 1 2 Centre Clearance Width 10 mm 1 2 X Settings to Disable Registration 7 79 Disable Registering Destination from Operation Panel All disabled 7 79 Disable Registering Destination on Web Page 3 All disabled 7 79 Disable Registration of Program All disabled 7 80 Disable Registration of Memory ...

Page 707: ...m Specified Pages per File Disabled Number of Pages Disabled Compression Mode at Broadcasting 7 82 Black White MH G3 Colour Greyscale Medium Maximum Size of E mail Attachments E mail Unlimited 7 83 Maximum Size of Data Attachments FTP Desktop Network Folder Unlimited 7 83 Bcc Setting 7 83 Enable Bcc Disabled Display Bcc Address on the Job Status Screen Disabled Disable Scan Function 7 83 USB Memor...

Page 708: ...eport On Off Setting Disabled 7 85 I Fax Reception Report Request Timeout Setting 1 hour 7 85 Number of Resend Times at Reception Error 2 7 85 Maximum Size of E mail Attachments Unlimited 7 85 Rotation Sending Setting All Enabled 7 86 Printing Page Number at Receiver Enabled 7 86 Recall in Case of Line Busy Times 2 Interval 3 min 7 86 Recall in Case of Communication Error Times 2 Interval 3 min 7 ...

Page 709: ...k White Mono 2 X Default Exposure Settings Auto 7 88 Original Image Type Text Moiré Reduction Disabled X Initial Resolution Settings 600 x 600 dpi 7 88 X Colour Data Compression Ratio Setting Medium 7 89 X Scan Complete Sound Setting Middle 7 89 X Default Output Tray 1 Varies depending on the machine configuration 7 89 X Disable Stamp for Reprinting Disabled 7 89 X Batch Print Settings 7 89 Select...

Page 710: ...ncl PC Fax 3 Disabled Scan to HDD Enabled X Scan Send Copy Disabled Scan Send Enabled Internet Fax Send Incl PC I Fax 2 Disabled Fax Send Incl PC Fax 3 Disabled Scan to HDD Enabled X Internet Fax Send 2 Copy Disabled Scan Send Disabled Internet Fax Send Incl PC I Fax Enabled Fax Send Incl PC Fax Disabled Scan to HDD Disabled X Fax Send 3 Copy Disabled Scan Send Disabled Internet Fax Send Incl PC I...

Page 711: ...91 Image Sending Activity Report 7 91 Data Receive Forward List 7 91 Web Settings List 1 7 91 Metadata Set List 2 7 91 Item Factory default setting Page Security Settings 7 92 SSL Settings 7 92 X Server Port HTTPS Enabled IPP SSL Disabled Redirect HTTP to HTTPS in Device Web Page Access Disabled X Client Port HTTPS Enabled FTPS Enabled SMTP SSL Enabled POP3 SSL Enabled LDAP SSL Enabled Level of En...

Page 712: ... of Duplex Disabled 7 93 X Disabling of Optional Paper Drawer 2 Disabled 7 93 X Disabling of Tray Setting Disabled 7 93 X Disabling of Finisher 3 Disabled 7 93 X Disabling of Offset Disabled 7 93 X Disabling of Stapler 3 Disabled 7 93 X Disabling of Punch 4 Disabled 7 93 X Disabling of Colour Mode 5 Disabled 7 94 X Disabling of Master Machine Mode Disabled 7 94 X Disabling of Slave Machine Mode Di...

Page 713: ...l disabled 7 94 Disable Registering Destination on Web Page 7 All disabled 7 95 Disable Registration of Program All disabled 7 95 Disable Registration of Memory Box All disabled 7 95 Disable Destination Registration Using Global Address Search 7 All disabled 7 95 Disable Registration Using Network Scanner Tools 7 Disabled 7 95 X Settings to Disable Transmission 7 95 Disable Resend on Image Send Mo...

Page 714: ...tegration Module 7 96 Application Communication Module 7 96 External Account Module 7 96 XPS Expansion Kit 7 96 Item Factory default setting Page Data Backup 7 97 Storage Backup 7 97 Device Cloning 7 97 Item Factory default setting Page Storing Calling of System Settings 7 98 Restore Factory Defaults 7 98 Store Current Configuration 7 98 Restore Configuration 7 98 Item Factory default setting Page...

Page 715: ...on method also requires the entry of an e mail address Authenticate a User by User Number Only This can be used as a simple authentication method when network authentication is not used Device Account Mode Setting A specific user can be stored as an auto login user When this setting is enabled login can be performed automatically This function eliminates the bother of logging in but still allows t...

Page 716: ...gin This function requires the hard disk drive When retention is enabled in the printer driver and print data has been spooled to the machine you can have the spooled print data automatically print out when the user who enabled retention logs in Default Network Authentication Server Setting Use this to set the default network authentication server When a user logs in from the Web page or sends a p...

Page 717: ... user is actually granted To use this function to ensure that users are granted the same authority and settings on any machine the same Pages Limit Group Authority Group and Favourite Operation Group information must be stored in each machine using the same registration numbers For My Folder the same folder name must be stored in Custom Folder in each machine The directory information of the LDAP ...

Page 718: ...the page counts of a user appear when the user logs in User Information Print The following lists can be printed User List List of Number of Pages Used Page Limit Group List Authority Group List Favourite Operation Group List All User Information Print Touch the key of the desired list to begin printing Cannot be printed when no groups are stored E mail Address Information is acquired from the LDA...

Page 719: ...t delete screen for the user For more information see Settings page 7 52 Delete a user with the Delete key Factory stored users The following users are stored in the machine at the factory Administrator Factory stored account for the administrator of the machine User This is used when network authentication is used and a login name not stored in the machine is directly entered This cannot be selec...

Page 720: ...ame password is enabled maximum of 255 characters The login name must be unique Password 1 3 Enter the password used when authentication by login name password is enabled 1 to 32 characters The password can be omitted E mail Address Enter the e mail address used in the sender list and for LDAP authentication maximum of 64 characters My Folder A folder My Folder can be specified as the folder used ...

Page 721: ...on on the settings see Settings To return a group to the factory default state set Select the Group Name to be the Registration Model to Unlimited in the editing screen Settings Page Limit Group List System Settings Back Group 2 Group 1 Group 3 Group 4 Group 5 Group 6 Group 7 Group 8 Group 9 Group 10 Group 11 Group 12 Add New Item Description Group Name Store the name of the group max 32 character...

Page 722: ... screen to open a registration screen Up to 20 groups can be stored For information on the settings see List of settings and factory default settings of template groups page 7 55 Editing an authority group A group can be selected from the list in the above screen to open an edit delete screen for the group For information on the settings see List of settings and factory default settings of templat...

Page 723: ...owed Allowed Only Black White Allowed FTP Pull Print Allowed Allowed Prohibited USB Memory Direct Print Allowed Allowed Prohibited Network Folder Pull Print Allowed Allowed Prohibited Image Send Approval Settings for Each Mode E mail FTP Desktop Network Folder USB Memory PC Scan Internet Fax Send PC I Fax Send Fax Send PC Fax Send All allowed All allowed All allowed Colour Scan Allowed Allowed Pro...

Page 724: ...ll allowed All prohibited MFP Settings System Settings Operational Authority System Settings 1 Allowed 2 Only user authority settings are allowed All settings prohibited Web Settings Operational Authority Display of Device Network Status Allowed Allowed Prohibited Power Reset Prohibited Machine Identification Prohibited Network Settings Prohibited Application Settings Excluding Registration of Pre...

Page 725: ... and number Document Filing Scan to HDD Initial Status Settings Select settings for Colour Mode Resolution Exposure Original Image Type and Compression Ratio Prints Document Filing Set the default output tray for document filing print System Settings Original Size Detector Setting Select whether AB sizes or inch sizes are detected or disable detection on the document glass Display Language Setting...

Page 726: ...he title name Display User Name Show the currently logged in user name on the My Menu Display Date Show the date and time on the My Menu Background Image Select the image that appears in the background of the My Menu Select Template A template for the design of the My Menu can be selected from the list A sample of the selected template can be viewed Key Layout of the Screen The layout of the keys ...

Page 727: ...ear User Count Back Administrator Other User User Name 1 Name 2 Name 3 Name 4 Name 5 Name 6 Name 7 Select All Users Show Delete ABCD EFGH IJKL MNOP QRSTU VWXYZ etc ABC Search Number Index Switch Sorting Order All 1 2 Item Settings Next This shows the next user in the order of the registration numbers Previous This shows the previous user in the order of the registration numbers Show Counts The cou...

Page 728: ...g the product ID and vender ID of the connected HID card reader are displayed To store the HID card reader touch the Read key For settings that enable an HID card to be used consult your service technician Item Description Next This shows the next user in the order of the registration numbers Previous This shows the previous user in the order of the registration numbers Show Counts The counts and ...

Page 729: ...he remote job is finished enter Auto power shut off mode is enabled Auto Power Shut Off happens in a short while after the print job or fax reception is complete In case of settings that depend on the usage conditions select Change transition time by time of day As per the default settings the time zone is set automatically depending on the application conditions of the machine When it is to be se...

Page 730: ...communication module is installed Disabling of Job Priority Operation This disables the job priority function and hides the Priority key in the job status screen Disabling of Bypass Printing This is used to disable bypass printing printing other jobs ahead of a job that has been stopped because the paper required for the job is not in any of the trays This does not include cases where the paper ra...

Page 731: ...ng is used to prohibit the use of the covers and inserts function Set Keyboard Priority When an external keyboard is connected you can select whether the soft keyboard or the external keyboard is used Initial Original Count Setting This specifies whether or not Original Count in the special functions is enabled for each function Copy Copy Image Send Scan Internet Fax Fax Job Data Entry Document Fi...

Page 732: ...ey The functions that can be selected vary by mode Return to the Defaults This returns all customized keys to their factory default state This setting can only be configured in the Web pages It cannot be configured in the touch panel of the machine Item Description Mode Keys Key Name When Custom is selected any key name maximum of 16 characters can be entered Image When Use Custom Image is selecte...

Page 733: ...mage Select the image that appears in the background of the My Menu Select Template A template for the design of the My Menu can be selected from the list A sample of the selected template can be viewed Key Layout of the Screen The layout of the keys in the My Menu is displayed Key Number Select the number of the key that you want to configure referring to Key Layout of the Screen Key Name The nam...

Page 734: ...when remote software is used to operate the machine remotely View Password Entry Screen When remote software is used to operate the machine remotely you can have a password entry screen appear on the machine on the computer or both Operation from Specified PC Operational Authority This is used to allow remote operation of the machine using a specified computer Hostname or IP Address of PC Enter th...

Page 735: ... of 5 levels To make it easier to detect a black and white original adjust the setting toward Black White To make it easier to detect a colour original adjust the setting toward Colour Registration Adjustment If the colours are out of place on the printed surface when colour printing is performed the print positions of the colours can be adjusted To perform this adjustment touch the Auto Adjustmen...

Page 736: ...R A5 B4 B5 B5R 11 x 17 8 1 2 x 11 216 mm x 330 mm 8 1 2 x 13 AB 3 A4 A4R A5 B4 8K 16K 16KR A3 A4 A4R A5 B4 11 x 17 8 1 2 x 11 216 mm x 330 mm 8 1 2 x 13 8K 16K 16KR AB 4 A3 A4 A4R A5 B5 B5R 216 mm x 340 mm 8 1 2 x 13 2 5 A3 A4 A4R A5 B4 B5 B5R 11 x 17 8 1 2 x 11 216 mm x 340 mm 8 1 2 x 13 2 5 AB 5 A3 A4 A4R A5 B5 B5R 216 mm x 343 mm 8 1 2 x 13 1 2 A3 A4 A4R A5 B4 B5 B5R 11 x 17 8 1 2 x 11 216 mm x...

Page 737: ...ions Disabling of Punch When a punch module is installed This setting is used to prohibit punching such as whenthe punch module of the finisher malfunctions Disabling of Colour Mode When a colour related problem has occurred When a colour related problem has occurred and printing is not possible the use of colour mode can be temporarily prohibited Black white printing will still be allowed Fusing ...

Page 738: ...ttings can be changed Item Description Colour Mode Configure default colour mode settings Paper Tray Specify the paper tray that is selected by default Exposure Type Configure exposure mode settings Copy Ratio Specify the copy ratio that is selected by default 2 Sided Copy Configure the 2 sided mode settings that are selected by default If this setting is used to change the default setting for the...

Page 739: ...nitial Margin Shift Setting This is used to set the default margin shift amount Specify a value from 0 mm 0 to 20 mm 1 in increments of 1 mm 1 8 for both the front and reverse sides Erase Width Adjustment This is used to set the default erase width for erase copy Specify a value from 0 mm 0 to 20 mm 1 in increments of 1 mm 1 8 for both edge erase and centre erase Card Shot Settings This is used to...

Page 740: ...resolution for copying in black and white using the automatic document feeder can be changed from 600 x 400 dpi to 600 x 600 dpi high quality mode When high quality mode is used fine print and thin lines are reproduced with greater clarity however the scanning speed is slower B W Quick Scan from Document Glass The resolution for copying in black and white using the document glass can be changed fr...

Page 741: ...ibration This is used to perform automatic colour correction when the colour in colour copies is off The machine prints a test patch the test patch is scanned and the colour is automatically corrected After the Execute key is touched and a test patch is printed a message appears prompting you to begin automatic calibration Place the test patch on the document glass as shown below so that the thin ...

Page 742: ...able TCP IP To use the machine on a TCP IP network this setting must be enabled Enable NetWare To use the machine on a NetWare network this setting must be enabled Enable EtherTalk To use the machine on an EtherTalk network this setting must be enabled Enable NetBEUI To use the machine on a NetBEUI network this setting must be enabled Reset the NIC This returns all Network Settings to the factory ...

Page 743: ... prohibit printing when the paper type specified for a print job is different from the paper type inserted in the bypass tray Exclude Bypass Tray from Auto Paper Select When auto is selected for paper type selection the bypass tray can be excluded from the trays that can be selected This is recommended when special media is often placed in the bypass tray Job Spool Queuing When the hard disk drive...

Page 744: ... connected using the USB port select the emulated printer language The settings are shown below Auto PostScript PCL When the PS3 expansion kit is installed Enable Network Port This is used to enable printing from the network port Network Port Emulation Switching When the printer expansion kit is installed This setting is used to select the emulated printer language when the machine is connected by...

Page 745: ...the document glass as shown below so that the thin line at the edge of the page is to the left Lay copy paper about five sheets that is the same size as the test patch on top of the placed test patch gently close the automatic document feeder and touch the Execute key Before executing Auto Colour Calibration check to see if the registration adjustment is correct If the registration adjustment is n...

Page 746: ...esolutions of scan Internet fax and fax mode Scan 100X100 dpi 200X200 dpi 300X300 dpi 400X400 dpi 600X600 dpi Internet fax 200X100 dpi 200X200 dpi 200X400 dpi 400X400 dpi 600X600 dpi Fax Standard Fine Super Fine Ultra Fine Apply the Resolution Set when Stored When an image stored by document filing is used this applies the resolution setting that was stored with the image Default Exposure Settings...

Page 747: ... Internet faxes in memory without printing them The faxes can be printed by entering a password factory default setting 0000 with the numeric keys Password When Hold Setting for Received Data Print is enabled enter the password 4 digit number Default Verification Stamp When a stamp unit is installed When the automatic document feeder is used this setting can be enabled to have each original page s...

Page 748: ...e Registration Using Network Scanner Tool When network connection is enabled This disables address control from the Network Scanner Tool These settings are used to disable the following transmission operations Disable Resend on Image Send Mode This setting disables the Resend key in the base screen of image send mode Disable Selection From Address Book This disables the selection of destinations f...

Page 749: ...he sender fax number To insert a pause between digits of the number touch the key To insert a space between digits of the number touch the Space key I Fax Own Address Enter a default sender address maximum of 56 characters Registration of Own Name Select Store sender names used in Own Name Select in the special modes Up to 18 sender names can be stored Add New Store a sender name A maximum of 20 c...

Page 750: ...s is entered manually by touching the Address Entry key File Format PDF TIFF JPEG Encrypt PDF XPS When Black White is selected the format is TIFF Black White Compression Mode None MH G3 MMR G4 Colour Greyscale Compression Ratio Low Medium High Specified Pages per File When multiple pages are scanned this is used to generate a separate file for each scanned page or specified number of pages When th...

Page 751: ...memory scan When these modes are disabled they are greyed out when the mode is changed in the base screen Pre Setting Mail Signature A signature can be automatically appended to the end of the body text of e mail This is convenient when it is a corporate policy to append a specific signature at the end of e mail The mail signature to be appended is configured in the Web pages This setting simply e...

Page 752: ...When a transaction report is printed this is used to print part of the first page of the transmitted original on the transaction report Select one of the settings below Print Out All Report Print Out Error Report Only No Printed Report This setting will not be effective if Transaction Report Print Select Setting below is set to No Printed Report Transaction Report Print Select Setting This is used...

Page 753: ...ation of time that the machine will wait for a reception report from the destination machine can be set by any number from 1 hour to 240 hours in increments of 1 minute Number of Resend Times at Reception Error The number of resend attempts when an error message is received from an I Fax recipient can be set to any number from 0 to 15 Maximum Size of E mail Attachments To prevent the transmission ...

Page 754: ...lected Interval to Wait Between Recall Attempts min in Case of Error The interval between recall attempts can be set Any number of minutes from 1 to 15 can be selected I Fax Receive Settings are described below Auto Receive Reduce Setting When a fax is received that includes printed information such as the sender s name and address the received image is slightly larger than the standard size This ...

Page 755: ...ending the machine configuration This setting is used to allow or refuse reception from specified addresses domains When this setting is enabled A4R size faxes are also reduced Outside the Received Image cannot be selected for the reception date and time print setting when Auto Receive Reduce Setting page 7 86 is not enabled When this setting is enabled ledger 11 x 17 size faxes are also reduced T...

Page 756: ... the Quick File Folder Delete Now Touch this key to start deletion of all files immediately Delete Quick Files at Power Up This is used to automatically delete all files in the Quick File Folder with the exception of protected files when the POWER key is turned on Default Colour Mode Settings This sets the default settings for black white and colour when Scan to HDD is used The settings are shown ...

Page 757: ...it will not be possible to change the stamp setting This function can be used to prevent inconsistencies in the printed information such as that of the original date in the file and the date the file is retrieved and printed Batch Print Settings When printing files by batch printing this setting is used to prohibit the selection of the All Users key and the User Unknown key in the user selection s...

Page 758: ...hat have been added to the machine Item Description Print For each mode select whether or not printing of stored files is allowed Scan Send For each mode select whether or not scan send of stored files is allowed Internet Fax Send Incl PC I Fax For each mode select whether or not I Fax transmission of stored files is allowed Fax Send Incl PC Fax For each mode select whether or not fax transmission...

Page 759: ...he following Image Sending Activity Reports can each be separately printed Image Sending Activity Report Scan Image Sending Activity Report Internet Fax Image Sending Activity Report Fax Data Receive Forward List The following lists showing reception settings and forwarding settings can be printed Anti Junk Fax Number List Anti Junk Mail Domain Name List Inbound Routing List Document Admin List We...

Page 760: ...ed to configure settings for IP packet encryption in a Web browser or other higher level application This setting is only used to enable or disable IPsec detailed IPsec settings are configured in the Web pages Note the following points when enabling IPsec A certain amount of time may be needed for the setting to be updated During this time it will not be possible to connect to the machine If the s...

Page 761: ... of the date and time Disabling of Covers Inserts Mode This function requires the automatic document feeder This setting is used to prohibit the use of the covers and inserts function Device Control Disabling of Document Feeder This function requires the automatic document feeder Use this setting to prohibit the use of the automatic document feeder such as when the feeder malfunctions When the set...

Page 762: ...ages Exclude Bypass Tray from Auto Paper Select When Auto is selected for paper type selection the bypass tray can be excluded from the trays that can be selected This is recommended when special paper is often placed in the bypass tray Disabling of USB Memory Direct Print This function requires the hard disk drive and printer expansion kit are installed This setting is used to disable printing of...

Page 763: ...ollowing transmission operations Disable Resend on Image Send Mode This setting disables the Resend key in the base screen of image send mode Disable Selection from Address Book This disables the selection of destinations from the address book Configure the setting for each of the following items E mail FTP Desktop Network Folder Internet Fax Including Direct SMTP Fax Select All Select all items C...

Page 764: ...in the product key Font Kit for Barcode Enter the product key of the barcode font kit PS3 Expansion Kit Enter the product key of the PS3 expansion kit Internet Fax Expansion Kit Enter the product key of the Internet fax expansion kit E mail Alert and Status Enter the product key of e mail alert and status Application Integration Module Enter the product key of the application integration module Ap...

Page 765: ...xport This exports data to USB memory Import Use Export to import data written to USB memory back into the machine This function can be enabled when a USB memory device is installed This function cannot be used while the system settings are in use while a job is being executed or when there is a reserved job For machines for which data can be imported contact your SHARP dealer or nearest authorise...

Page 766: ...m settings administrator Store Current Configuration This is used to store the currently configured system settings The stored settings will be retained even if the POWER key is turned off To retrieve the stored settings use Restore Configuration below Items not stored Network Settings These are not stored as unexpected settings may cause damage to the network Product Keys Product Keys are not sto...

Page 767: ...e external driver Select from none AES 128 or AES 256 Job Priority Preference Set the playing speed of the animation in the Sharp OSA application The following settings can be configured Printing Balanced LCD Animation Playback These settings can be used when the hard disk drive and external account module or application communication module is available When settings are changed the changes will ...

Page 768: ...sed with administrator rights see System Settings for Fax Administrator List page 7 106 Address Control Fax Data Receive Forward When a finisher is installed SYSTEM SETTINGS FOR FAX Depending on the machine specifications and peripheral devices installed it may not be possible to use some settings Item Factory default setting Page Address Control 7 101 Address Book 7 101 F Code Memory Box 7 103 It...

Page 769: ...FF HHH HHH JJJ JJJ Freq ABCD EFGH IJKL MNOP QRSTU VWXYZ etc 1 2 When Disable Registering Destination from Operation Panel page 7 79 is enabled in the system settings administrator for a function addresses cannot be stored for that function If you cannot edit or delete a one touch individual or group key Individual keys and group keys cannot be edited or deleted in the following situations The key ...

Page 770: ...ace where you wish to enter a pause To enter an F code sub address and passcode 1 Enter the destination fax number 2 Touch the key 3 Enter the sub address maximum of 20 digits 4 Touch the key 5 Enter the passcode maximum of 20 digits A passcode is not necessary if the destination machine does not use a passcode The destination fax number can be a maximum of 64 digits including all numbers and char...

Page 771: ...mory box Touch the Add New key in the above screen to open a registration screen A total of 100 F code memory boxes for all functions polling memory confidential and relay broadcast can be stored For information on the settings see Settings page 7 104 Editing and deleting a memory box A memory box can be selected from the list in the above screen to open an edit delete screen for the box For infor...

Page 772: ... a fax Memory Box Name Enter a name maximum of 18 characters for the memory box Sub Address Passcode Enter a sub address and passcode A maximum of 20 digits can be entered for each Separate a sub address and passcode by a slash Items displayed when storing a confidential memory box Print PIN Set a Print PIN for confidential reception Enter a 4 digit number Items displayed when storing a relay broa...

Page 773: ...ettings page 7 113 Forward Received Data When the machine cannot print because it is out of paper or out of toner received faxes can be forwarded to another previously stored fax machine If some pages of a fax that is being forwarded were successfully printed only those pages that were not printed will be forwarded A forwarded fax becomes a fax transmission job If transmission does not take place ...

Page 774: ...ng Page Image Send Settings 7 108 Fax Settings 7 108 X Fax Default Settings 7 108 Dial Mode Setting Tone 7 108 Auto Wake Up Print Enabled 7 108 Pause Time Setting Varies depending on country and region 7 108 Fax Dest Confirmation Mode Disabled 7 108 Speaker Settings 7 108 Speaker Volume 5 Ringer Volume Volume 5 Line Monitor Volume 5 Fax Receive Complete Signal Volume 5 Tone Pattern 3 Transmission ...

Page 775: ...ceiver Enabled 7 110 Date Own Number Print Position Setting Outside the Original Image 7 110 Recall in Case of Line Busy See Country Differentiation Table page 7 111 7 111 Recall in Case of Communication Error See Country Differentiation Table page 7 111 7 111 X Fax Receive Settings 7 112 Number of Calls in Auto Reception 2 7 112 Switching from Manual to Automatic Reception Disabled 7 112 Duplex R...

Page 776: ...ed when dialling or storing a fax number a pause of 2 seconds is inserted The pause can be changed to any number of seconds from 1 to 15 Note that in South Africa the machine is normally set to 4 seconds Fax Dest Confirmation Mode This setting specifies whether or not a destination verification message is displayed when sending a fax in order to prevent accidental transmission to the wrong destina...

Page 777: ...n Mode is turned on pages that are distorted are automatically re transmitted Distinctive Ring Detection This Setting can only be activated in Canada Australia New Zealand and Hong Kong If multiple telephone numbers have been assigned to your telephone line the number called can be identified by its ringing pattern By using one number for voice calls and another number for faxes you can tell which...

Page 778: ...e first page is scanned Transmission takes place at the same time as the remaining pages are being scanned If you disable this setting transmission will not begin until all pages have been scanned Note that this setting does not apply to manual transmission Printing Page Number at Receiver This setting is used to add the page number to the top of each fax page printed by the receiving machine Date...

Page 779: ...ch country are shown in the following table Country Differentiation Table The number of recall attempts The interval between attempts United Kingdom France Germany Sweden Italy Spain Netherlands Saudi Arabia South Africa Hungary Czech Republic Slovakia Poland Greece Russia 1 to 10 default 2 any number of minutes from 1 to 15 default 3 Canada 1 to 14 default 2 Australia New Zealand Singapore Thaila...

Page 780: ...d in memory and will not be printed until a suitable size of paper is loaded However if the received fax is longer than A3 11 x 17 size it will be automatically divided onto multiple sheets of paper Print Actual Size Cut off Enabled Each received image is printed at full size If necessary the image is divided onto multiple sheets of paper Auto Size Select Each received image is printed at full siz...

Page 781: ...ether reception from a stored number is to be allowed or rejected Reject hidden Number Reception from a number whose settings are not notified can be rejected irrespective of the contents of the specific number reception settings When this setting is enabled A4R size faxes are also reduced Outside the Received Image cannot be selected for the reception date and time print setting when Auto Receive...

Page 782: ...ed in your machine Add New When the Polling Security Setting is enabled use this setting to store or delete the fax numbers of the machines that are allowed to poll your machine The stored fax numbers are called passcode numbers Up to 10 passcode numbers can be stored maximum of 20 digits each Passcode Number Key List This shows a list of the stored passcode numbers A number can be selected to del...

Page 783: ...utput Jobs The Number of User Name Displayed Setting A Warning when Login Fails Disabling of Printing by Invalid User Keys Touch Sound Auto Clear Setting Message Time Setting Display Language Setting Original Feeding Mode Auto Paper Selection Setting Tandem Connection Setting Detect Standard in Auto Colour Mode Registration Adjustment Optimization of a Hard Disk Clear All Job Log Data Disabling of...

Page 784: ...arding Letter Size RX Reduce Print Receiving Date Time Print Disable Stamp for Reprinting Batch Print Settings Erase Width Adjustment Card Shot Settings Default Mode Settings Sort Method Setting Administrator Authority Setting Delete All Quick Files Default Colour Mode Settings Default Exposure Settings Initial Resolution Settings Colour Data Compression Ratio Setting Scan Complete Sound Setting D...

Page 785: ... 8 6 Adjusting the volume of the ringer 8 7 The machine starts printing when I try to forward data 8 7 Checking the machine s communication record 8 7 REMOVING MISFEEDS REMOVING MISFEEDS 8 8 PAPER MISFEED ILLUSTRATIONS 8 9 REMOVING STAPLE JAMS FINISHER 8 11 COPYING PROBLEMS RELATED TO COPYING OPERATION 8 13 PROBLEMS RELATED TO COPY RESULTS 8 15 PRINTING PROBLEMS RELATED TO PRINTING OPERATION 8 16 ...

Page 786: ...he machine Turn the power off and then on again Turning the power off and on may solve the problem in some cases so try doing so before attributing the problem to a malfunction Press the POWER key to turn off the power and switch the main power switch to the off position Wait at least 10 seconds and then switch the main power switch and the POWER key back on in that order When turning off the main...

Page 787: ... document glass For a thin original use Slow Scan Mode 1 Place the originals 2 Enter the original size Paper Select Cancel Plain Pre Punched Heavy Paper 1 Pre Printed Colour Heavy Paper 2 Glossy Paper Recycled Thin Paper Transparency Letter Head Labels Tab Paper Envelope Heavy Paper 1 106 209 g m2 28 lbs bond 110 lbs index Bypass Tray Type Size Setting Select the paper type 1 2 Heavy Paper 2 210 2...

Page 788: ...me Check that the machine is selected in the Print dialog box and select the machine if it is not If your machine is not listed the printer driver is not installed Install the printer driver and try again SHARP MX XXXX SHARP MX XXXX Do your port settings look like this Your port settings should look like this Checking port settings in the printer driver Display the printer driver s Properties dial...

Page 789: ... Job Disable Staple Disable Punch Envelope DL Tray Settings Copy Print Fax I Fax Doc Filing 5 5 Change Back 1 Place paper in the bypass tray 2 Tray Settings Type Envelope Size Select the envelope size Print on the name and address side 1 2 3 4 5 3 Select settings in the printer driver 1 Click the Paper tab 2 Select the size of the envelope in Paper Size 3 Select Bypass Tray from Paper Source in Pa...

Page 790: ...pty Colour B W B W Output Paper A5 Plain Special Modes Paper Select 1 Check details on the job Press the JOB STATUS key on the operation panel to display the job status screen Select the job whose status is Paper Empty and touch the Detail key To delete the job you can press the Stop Delete key Check the paper size specified for the job in the detail screen and touch the Paper Select key Paper Sel...

Page 791: ...ng received fax data to a shared folder check that destination computer is turned on If the computer is not turned on the machine prints the received fax data If data is being forwarded to several computers received data is printed if even one of the computers is turned off Checking the machine s communication record To check the machine s record of communication using the image send function foll...

Page 792: ... hot Take care not to burn yourself when removing a misfeed When removing misfed paper do not touch or damage the transfer belt Carefully pull the paper out without tearing it A misfeed may have occurred inside the machine Check carefully and remove the misfeed If the paper tears be sure to remove all pieces from the machine While the message appears printing and scanning cannot be resumed If the ...

Page 793: ...tray and remove the misfed paper Open the automatic document feeder Rotate the transfer roller in the direction of the arrow and remove the original 2 Paper misfeed in the output area Remove the misfed paper 3 Paper misfeed in the fusing unit Rotate knob and remove the misfed paper If the misfed paper is inside the fusing area press down on the green part to tilt the fusing unit down toward you 1 ...

Page 794: ...e direction of the arrow to remove the misfed paper 9 Paper misfeed in tray 1 to tray 4 in the tray Before pulling the tray out open the right cover and check if there is a paper misfeed If you pull the tray out without checking you may tear misfed paper and make it more difficult to remove the pieces that remain in the machine Paper misfeed in tray 1 to tray 4 side 10 Paper misfeed in the finishe...

Page 795: ...r to the left until it stops Gently slide the finisher until it stops 3 Lower the staple case release lever and remove the staple case Pull the staple case out to the right 4 Raise the lever at the front end of the staple case and remove the jammed staple Remove the leading staple if it is bent If bent staples remain a staple jam will occur again Take care that a bent staple does not hurt you ...

Page 796: ...the front end of the staple case 6 Replace the staple case Push the staple case in until it clicks into place 7 Slide the finisher back to the right Gently slide the finisher back to the right until it locks into its original position 8 Close the cover ...

Page 797: ...tor is lit or blinking do not switch off the main power switch or unplug the power plug This may damage the hard drive or cause the data being stored or received to be lost Problem Point to check Solution Copying does not take place Have functions been disabled by the administrator When user authentication is enabled the functions that you can use may be restricted in your user settings Check with...

Page 798: ...ed two sided copying using that tray will not be possible Change the paper type setting to a type that can be used for two sided printing System Settings Paper Tray Settings Tray Settings Change Are you using a special size or type of paper For the paper types and sizes that can be used for two sided copying see SPECIFICATIONS in the Start Guide Are you copying using settings that do not allow two...

Page 799: ...o copy photos Map This mode is best for copying the light colour shading and fine text found on most maps Light original Use this mode for originals with light pencil writing Colours are off Did you perform Registration Adjustment Ask your administrator to perform Registration Adjustment System Settings Administrator Device Control Other Settings Registration Adjustment If the colour tones are off...

Page 800: ...unable to solve a problem using the solutions in this manual switch off the POWER key and the main power switch Wait at least 10 seconds and then switch on the main power switch and the POWER key in that order When the LINE indicator is lit or the DATA indicator is lit or blinking do not switch off the main power switch or unplug the power plug This may damage the hard drive or cause the data bein...

Page 801: ...pen AppleTalk from the Control Panels and make sure that Ethernet is selected in the Connect via menu Printing is not possible if Ethernet is not selected Is your computer in an unstable state Restart your computer Printing is sometimes not possible when you run multiple applications at once or there is insufficient memory or hard drive space Is the machine specified correctly in the software appl...

Page 802: ...lack and White Print can also be selected on the Main tab of the printer driver If you wish to print in colour make sure that the Black and White Print checkbox on the Main tab is not selected Have functions been disabled by the administrator Check with your administrator When user authentication is enabled the functions that you can use may be restricted in your user settings Two sided printing d...

Page 803: ...ct the resolution in the Advanced menu of the print window In Mac OS v10 5 select the resolution on the Color menu in the print window The image is too light or too dark Does the image particularly a photo need correction Windows Check the settings of the printer driver Brightness and contrast can be corrected by performing Color Adjustment on the Color tab of the printer driver These settings can...

Page 804: ... upside down Are you using a type of paper tab paper punch paper etc that can only be loaded in a fixed orientation Rotate the image 180 degrees before printing When the image size and paper size are the same but the orientations are different the orientation of the image is automatically rotated to match the paper However when the paper can only be loaded in a fixed orientation this may result in...

Page 805: ...rinter list select the job that you wish to delete and delete it In Mac OS 9 0 to 9 2 2 double click the printer icon on the desktop select the print job that you wish to delete and delete it At the machine Press the JOB STATUS key on the operation panel touch the Print Job tab to change the screen touch the key of the print job that you wish to delete and touch the Stop Delete key A message appea...

Page 806: ...LATED TO AUDIBLE SIGNALS The volume is too low 8 26 No sound is heard 8 26 PROBLEMS RELATED TO ONE TOUCH INDIVIDUAL KEYS GROUP KEYS A one touch individual key or group key cannot be stored 8 27 A one touch individual key or group key cannot be edited or deleted 8 27 If you cannot find the item that you are looking for in the above table of contents see GENERAL PROBLEMS page 8 37 If you are unable ...

Page 807: ...ou wish to cancel and then touch the Stop Delete key Did a communication error occur If an error occurs that prevents transmission the transmission is temporarily cancelled and then automatically re attempted after a brief interval Factory default setting 3 min intervals System Settings Administrator Image Send Settings Fax Settings Fax Send Settings Recall in Case of Communication Error To cancel...

Page 808: ...ed during scanning Are the sub address and passcode correct When using F code communication Check with the operator of the other machine to make sure that the sub address and passcode are correct Have functions been disabled by the administrator Check with your administrator When user authentication is enabled the functions that you can use may be restricted in your user settings The transmitted f...

Page 809: ...ceived fax If Print Actual Size Cut off Disabled is enabled in Print Style Setting in the system settings administrator and a fax is received that is larger than any paper that is loaded the fax will be received to memory without being printed However when a fax longer than A3 11 x 17 size is received it will be printed using multiple sheets of paper Is forwarding Inbound Routing function selected...

Page 810: ...not talk to the other party Did you dial using the speaker Use the extension phone When you dial using the speaker you will be able to hear the voice of the other party but he or she will not hear your voice When the extension phone is not installed you cannot talk to the other party Problem Point to check Solution The volume is too low Speaker Ringer Volume Line Monitor Fax Receive Complete Signa...

Page 811: ...ncel the transmission and then edit or delete the key Is the key included in a program key Remove the key from the program and then edit or delete the key If the key is included in multiple programs it must be removed from all programs System Settings Address Control Program If multiple program keys have been stored print the Program List in Sending Address List in the system settings The list wil...

Page 812: ...e stored 8 32 A one touch individual key or group key cannot be edited or deleted 8 32 If you cannot find the item that you are looking for in the above table of contents see GENERAL PROBLEMS page 8 37 If you are unable to solve a problem using the solutions in this manual switch off the POWER key and the main power switch Wait at least 10 seconds and then switch on the main power switch and the P...

Page 813: ...ce a long size original on the document glass when it is scanned Place originals in the document feeder tray of the automatic document feeder A long size original cannot be scanned from the document glass Did you place an original that is folded Following the instructions in the display unfold the original place it in the automatic document feeder again and rescan If a folded original is placed in...

Page 814: ...priority to the quality of the photo image Exercise caution in this case as a larger file will be created than when the default setting is used A destination is pre selected Is Default Address Setting enabled in the system settings administrator If you wish to send to a destination other than the default destination touch the Cancel key If you are the administrator and wish to change or disable th...

Page 815: ...mission is performed that includes both scan mode destinations and Internet fax destinations that have TIFF S selected for the format the resolution will remain fixed at 200X200dpi even if a different resolution setting is selected The scanned image is blank Is the original placed face up or face down correctly Reload the thermal paper correctly and send the fax again When using the document glass...

Page 816: ... scanned image Problem Point to check Solution A one touch individual key or group key cannot be stored Has the maximum number of keys been stored Adjust the number of stored keys Delete one touch keys or group keys that are not being used Have functions been disabled by the administrator Check with your administrator Some functions may have been disabled in the system settings administrator A one...

Page 817: ...s List in the system settings The list will show where individual and group keys are stored System Settings List Print User Sending Address List Program List Have functions been disabled by the administrator Check with your administrator Some functions may have been disabled in the system settings administrator Has your administrator enabled a function that prevents editing deleting Check with you...

Page 818: ... indicator is lit or blinking do not switch off the main power switch or unplug the power plug This may damage the hard drive or cause the data being stored or received to be lost Problem Point to check Solution Document filing does not take place Did you select document filing settings in the printer driver Enable document filing settings In print mode enable document filing on the Job Handling t...

Page 819: ...system settings administrator the files in the specified folders are periodically deleted Even when the file property is Confidential or Protect the file may be deleted A file cannot be deleted Is the property of the file set to Protect Change the property to Sharing and then delete the file A file cannot be deleted when its property is set to Protect The property of a file cannot be set to Confid...

Page 820: ...he name was stored in the advanced transmission settings before Quick File or File settings were configured that name will be used for the stored file If the number of characters in the name exceeds the maximum number of characters allowed for a Quick File name 30 characters the characters after the 30th character will be discarded Problem Point to check Solution ...

Page 821: ... feeder does not operate 8 42 PROBLEMS RELATED TO QUALITY PRINT RESULTS Lines appear in the scanned image 8 43 Smudges appear on printed output 8 43 Toner does not adhere well or creases appear in the paper 8 43 Print quality is poor 8 43 Part of the image is cut off 8 44 Printing takes place on the wrong side of the paper 8 44 A cover or insert is not printed on the specified paper 8 44 PROBLEMS ...

Page 822: ...rd 8 47 If you are unable to solve a problem using the solutions in this manual switch off the POWER key and the main power switch Wait at least 10 seconds and then switch on the main power switch and the POWER key in that order When the LINE indicator is lit or the DATA indicator is lit or blinking do not switch off the main power switch or unplug the power plug This may damage the hard drive or ...

Page 823: ...orrect user information When A Warning when Login Fails is enabled in the system settings administrator and login fails 3 times in a row a warning will be displayed and operation will lock for 5 minutes After operation unlocks log in using the correct user information If you do not know your user information contact your administrator Does a message appear indicating that Auto Login failed Contact...

Page 824: ...net fax and document filing Check the Paper Tray Settings and see if checkmarks appear in the checkboxes of each mode Feeding Approved Job Functions without a checkmark cannot be used for printing using that tray System Settings Paper Tray Settings Tray Settings Change Each mode The original size is not automatically selected or the wrong size is selected Is the original curled or folded Straighte...

Page 825: ...ure all paper is removed REMOVING MISFEEDS page 8 8 Is too much paper loaded in the tray Make sure that the stack of paper in the tray is not higher than the indicator line Are multiple sheets feeding at once Fan the paper well before loading it Are you using paper that is not within the specifications Use SHARP recommended paper Using paper that is not supported may result in misfeeds creases or ...

Page 826: ...f the system settings are restrictions placed on the trays that can be used in each mode copy print fax Internet fax and document filing Check the Paper Tray Settings and see if checkmarks appear in the checkboxes of each mode Feeding Approved Job Functions without a checkmark cannot be used for printing using that tray System Settings Paper Tray Settings Tray Settings Change Each mode The image o...

Page 827: ...er or nearest authorised service representative as soon as possible Toner does not adhere well or creases appear in the paper Are you using paper that is not within the specifications Use SHARP recommended paper Using paper that is for other models or special paper that is not supported may result in misfeeds creases or smudges SUPPLIES in the Start Guide Did you set the correct paper type Set the...

Page 828: ...rect direction Check that the paper is loaded so that printing takes place on the correct side Trays 1 to 4 Load the paper with the front side facing up Bypass tray and tray 5 Load the paper with the front side facing up When the paper type is Pre Printed or Letter Head load the paper in the opposite way Except when Disabling of Duplex is enabled in the system settings administrator For the curren...

Page 829: ...r trouble Letters and numbers appear in xx xx Check the plug of the connecting cable of the finisher Plug and unplug the cable and after ensuring that it has been properly plugged restart the power supply to the machine Have functions been disabled by the administrator Check with your administrator Some functions may have been disabled in the system settings administrator Stapling does not take pl...

Page 830: ... in the print job For the paper sizes that can be punched see SPECIFICATIONS in the Start Guide Is the tray selected in the printer driver set to a paper type that cannot be punched Check the paper type settings in the machine and select a tray that has paper that can be used for punching Click the Tray Status button in Paper Selection on the Paper tab of the printer properties window and check th...

Page 831: ... Auto Clear activate Log in again When user authentication is used the currently logged in user will be automatically logged out if Auto Clear activates Except when in PC scan mode If you are the administrator you can change the time setting of Auto Clear or disable Auto Clear in Auto Clear Setting System Settings Administrator Operation Settings Other Settings Auto Clear Setting You forgot the ad...

Page 832: ...MX2010 EX ZZ Operation Guide MX 2010U MX 2310U MODEL ...

Reviews: