background image

Summary of Contents for FO-1450

Page 1: ...TION 2 INITIAL SETTINGS 3 BASIC OPERATIONS 4 ANSWERING MACHINE CONNECTION 5 SPECIAL FUNCTIONS 6 OPTIONAL SE lNGS 7 PRINTING OUT REPORTS AND LISTS 8 MAINTENANCE 9 TROUBLESHOOTING SPECIFICATIONS QUICK REFERENCEGUIDE INDEX ...

Page 2: ...quipment does cause interference to radio or television reception which can be determined by turning the equipment off and on the user is encouraged to try to correct the interference by one or more of the following measures Reorient or relocate the receiving antenna Increase the separation between the equipment and the receiver Connect the equipment into an outlet on a circuit different from that...

Page 3: ...ed for use on a line which has call waiting call forwarding and certain special services offered by your telephonecompany If you attempt to use the fax machine in conjunction with any of these services you may experience errors during transmissionand reception of facsimile messages This fax machine is not compatible with digital telephonesystems No other fax machines may be connected to the same l...

Page 4: ...electricalstem There may be a remote risk of electric shock from lightning Do not use a telephone in the vicini of a gas leak Do not install or use the machine near water or when you are wet Take care not to spill any liquids on the machine Your fax machine and the telephone system The Australian Austel Registration Number and Ringer Equivalence Number REN and the N Z Telecom Registration and Ring...

Page 5: ... Time 2 7 Selecting the Reception Mode 2 8 Distinctive Ring 2 9 Storing Numbers for Automatic Dialling 2 10 Volume Adjustment 2 14 3 BASIC OPERATIONS Sending Documents 3 1 Receiving Documents 3 11 Making Copies 3 15 Making Telephone Calls 3 18 4 ANSWERING MACHINE CONNECTION Preparations 4 1 Using the Connection 4 2 Optional A M Connection Settings 4 5 5 SPECIAL FUNCTIONS Anti Junk Fax 5 1 Memory 5...

Page 6: ...NTENTS 6 OPTIONAL SEITINGS 7 PRINTING OUT REPORTS AND LISTS 8 MAINTENANCE 9 TROUBLESHOOTING Problems and Solutions 9 1 Messages and Signals 9 4 Clearing Paper Jams 9 6 SPECIFICATIONS QUICK REFERENCE GUIDE INDEX iv ...

Page 7: ...p the fax away from air conditioners heaters direct sunlight and dust 4 If the fax is moved from a cold to a warm place it is possible that condensation may form on the reading glass preventing proper scanning of documents for transmission To remove the condensation turn on the power and wait approximately two hours before using the fax If your area experiences a high incidence of lightning or pow...

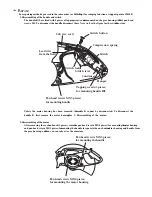
Page 8: ...cover and pull up to open the cover 2 Push back the green levers on each side of the printing compartment and rotate the printing head frame up and to the rear Caution The printing head the strip of metal on the underside of the frame applies heat to the printing film It may be hot if a document has just been printed 3 If you are replacingthe imaging film take the old film out of the printing com ...

Page 9: ... is on the left and lower the spools into the front of the print ing compartment The gears in the ends of the spool with film should fit into the slots on each side of the printing com partment 1slot tL 2 slots 2 tabs Cut the band which holds the spools to gether with scissors and remove it In sert the remaining gear into the right end of the empty spool and the flange into the left end of the emp...

Page 10: ... of the compartment so that the gear and the flange fit into the slots on the sides of the compartment Make sure that the gear engages with the gear below it 9 Wind the film slightly rotate the gear on the right side of the empty spool so that there is no slack in the film Make sure that both edges of the film wind onto the spool evenly 1 4 INSTALLATION ...

Page 11: ...ing position for printing If this is not done the first pages you print will come out blank Note that initialisation will not be possi ble if the paper tray is not in the fax When to replace the imaging film The sample roll of imaging film provided with your fax is capable of printing approximately 90 pages of A4 size paper When it is used up FILM END will appear in the display Replace it with the...

Page 12: ...stall the fax machine near an easily ac cessible power point 230 240 V 50Hz Plug the power lead into a 230 240 V 50 Hz grounded 3 prong AC outlet The fax does not have a power onloff switch so the power is turned on and off by simply plugging or unplugging the power lead Caution When disconnecting the fax unplugthe telephone line cord before unpluggingthe power lead Attach the received document tr...

Page 13: ...et on the wall Be sure to DIUQ the line cord into the TEL LINE so ket on the fax Do not plug it into the TEL SET socket For New Zealand Moving your fax and reconnecting Should it be necessa to move your fax to a new location first disconnect the telephone line cord before disconnectingthe power lead When reconnecting it is necessary to connect the power lead before connecting the telephone line co...

Page 14: ...s in Chapter 3 insert one end of the answering ma chine or extension phone line either into the socket on the back side of the adap tor if available or into the socket marked TEL S on the fax first re move the seal from the socket Important In New Zealand not all standardtelephones and answering machineswill respondto incoming ringing when connected to the extension socket of the equipment Importa...

Page 15: ...he cover Grasp the end of the pa per tray lift it slightly and pull it out of the fax machine Important You must remove the paper tray from the fax machine to add paper 2 Push the pressure plate down until it locks into position 3 Fan the papei and then place it in the pa per tray print side up Make sure the cor ners of the paper go under the holders and then shake the tray gently to straighten th...

Page 16: ...hes the documents 6 STOP o Your fax has been set at the factory to print on regular paper If you have loaded Sharp FO 16NC paper you must change this setting to HIGH QUALITY To change the setting press the FUNC TION key the 6 key the key two times and then press 1 to select regu lar or 2 to select Sharp high quality pa per When finished press the STOP key Be sure to change this setting again if yo...

Page 17: ...e from your telephone company this is a service which signals voice calls and faxes by different ring patterns you will need to set your fax for distinctive ring operation See Distinctive Ring in this chapter Answering machine connection If you have connected an answering machine to your fax you must set Option Setting 10 to YES as described in Chapter 6 Optional Settings For more information on p...

Page 18: ...utomatically redial dial a 2 digit Speed the last number Dial number dialled c Number keys Use these keys to dial numbers and enter numbers and letters during numberlname storing procedures HOLD SEARCH key Press this key to search for an automatic dialling number or during a SPEAKER key phone conversation press Pressthis key to dial a it to put the other party on number without picking hold up the...

Page 19: ...LL u o I transmitting it VOLUME kevs Pressthese keys to adjust the volume of the speaker when the SPEAKER key has been pressed or the volume of the ringer at all other times STOP key Press this key to stop operations before they are completed COPY HELP kev When a docume ntis in the feeder press this key to make a copy At any other time press this key to print out the Help List a quick reference gu...

Page 20: ...e keys shown at left ENTRY MODE will appear in the display 2 am Press the key 2 times OWN NUM BER SET will appear in the display 3 START n Press the START key 4 Enter your fax number max of 20 dig its by pressing the number keys To in sert a space between digits press the key To insefl a press the Example key 5 START m Press the START key 6 D Enter your name by pressingthe appro mam priate number ...

Page 21: ... shown above the key I Delete 0 Symbols I Press either key repeatedly until the desired symbol appears see the symbol list on the following page Press this key to delete the SPEED DIAL letter highlighted by the cursor 0 if the cursor is to the right of the last letter entered it will REDIAL backspaceand delete the last o tt HO LO SEARCH Press this key once to change case press ii again to chan e b...

Page 22: ... a symbol from the list below press the key or the key repeatedly until the desired symbol appears s 90 A I The following is an example of entering the name ABC Co l The cursor in the display is indicated below by a rectangle I 2 6 INITIAL SETTINGS ...

Page 23: ...at left ENTRY MODE will appear in the display 2 am Press the keys shown at left DATE TIME SET will appear in the display 3 START F Press the START key Example the 5th Enter a 2 digit number for the day 01 to 31 5 mm Enter a 2 digit number for the month 01 for January 02 for February 12 Example January for December etc 6 m m Enter the last 2 digits of the year Example 1996 7 m Enter a 2 digit numbe...

Page 24: ...y answer all calls and receive incoming faxes Tel Fax Auto Changeover a special function for receiving both faxes and voice calls also operates in this mode Setting the reception mode RECEPTION Set the mode of reception with the MODE FUNCTION RESOLUTION RECEPTION MODE key on the panel n 00 h To select FAX press the key until o FAX appears in the display To select TEL press the key until TEL appear...

Page 25: ...ory setting is 2 rings You can also use distinctive ring in TEL reception mode if you set Option Setting 3 to YES In this case fax reception will begin after 4 rings Important The distinctive ring function can only be used if you subscribe to a distinctive ring service from your telephone company Do not turn on distinctive ring if you are on a normal line as the fax machine will not operate propet...

Page 26: ...s attach each strip of Rapid Key labels above the appropriate row of Rapid Keys The arrangementof the keys is shown in Operation Panel at the beginning of this chapter Each time you store a number for Rapid Key Dialling write the name of the party above the appropriate key Comments Youmay need to add a pause between certain digits in the number to allow time for connection For example if you are o...

Page 27: ... the START key n 6 Enter the name of the location or party 5 by pressing number keys as described in Entering Letters for Names in this chapter max of 20 characters If you Example don t want to enter a name skip this step 7 Press the START key 8 Return to Step 3 to store another num STOP Step 3 or o ber or press STOP to exit If the num ber will be used for Rapid Key Dialling you can write the name...

Page 28: ... num Step 3 or o ber or press STOP to exit To make changes in a number previously stored repeatthe storing procedure Select the code number for which you want to make changes in Step 3 and then change the number and or name when they appear in the display Steps 4 and 6 respectively Numbers and letters are changed as described in Entering letters for names in this chapter A lithium battery keeps au...

Page 29: ...roup Key cannot be cleared if it is being used in a programmed Broadcasting operation First clear the programmedoperation as described in Entering and Using Programs in Chapter 5 then clear the key If you need to check which program the key is used in print out the Program and Group List as described in Chapter 7 1 FUNCTION Press the keys shown at left GROUP Q ma ENTRY MODE will appear in the dis ...

Page 30: ... key until the desired level appea in the display make sure the SPEAKER has not been pressed and the handset is not lifted The fax will ring at the new volume level each time you change the level If you select OFF press the START key to confirm your selection Silent ring fax detection system You can also set your fax machine to receivefaxes silently but ring to alert you to a voice call To do so s...

Page 31: ...cument size Thescanning width is 210 m m and the scanning length is the length of the document minus 4 mm Other restrictions Documents written in yellow greenish yellow or light blue ink cannot be transmitted as the scanner does not recognisethese colours Ink glue and correcting fluid on documents must be dry before they pass through the document feeder All clips staples and pins must be removedfr...

Page 32: ...ment guides to the width of your document 2 Placethe document face down and push it gently into the document feeder The top edge of the document should enter the fax first The feeder will draw the leading edge of the document into the fax READY TO SEND will appear in the display 3 You can now either make resolution and or contrast settings as described in the following section or dial the other pa...

Page 33: ...Use HALF TONE for photographs and illustrations The original will be reproduced in 64 shades of grey Note In order to transmit in FINE or SUPER FINE resolution the receiving fax machine must also have that resolution If it doesn t your fax will automatically step down to the next best available setting Contrast The contrast is normally set to AUTO which means that the fax automatically controls th...

Page 34: ...16 to YES as described in Chapter 6 Optional Settings Note that once Option Setting 16 is set to YES cover sheets will be automatically included with every transmission until you change the setting to NO When the cover sheet function is turned on you can also select a messagewhich will appear as a header at the top of the cover sheet To do so follow the steps below Note that the message selection ...

Page 35: ...e total number of pages Your fax will adjust the numberto include the cover sheet automatically If you need to cancel a batch number entry remove the document from the feeder or press the STOP key If the number of pages actually transmitted does not coincide with the batch number entered the alam will sound and PAGE COUNT ERROR will appear in the display PAGE E will also appear in the NOTE column ...

Page 36: ...ers your call by picking up the handset and speaking and then pressestheir Stari key to begin fax reception you can talk with them before sending the fax 1 Pick up the handset or press the SPEAKER n SPEAKER key Listen for the dial tone or h 2 qqm Dial the number of the receiving ma a m chine by pressingthe numeric keys Boa h 3 9 n 3 Beep L v Wait for the connection Dependingon the setting of the r...

Page 37: ...iing is a form of automatic dialling so if you need to insert a pause between any digits of the number press the REDIAL key For more information on pauses see Storing Numbersfor Automatic Dialling in Chapter 2 1 ABC DEF Omm Enter the number of the receiving ma chine by pressing the numeric keys GHI JKL MNO aam h 2 START m Check the display If the number of the o I receiving machine shown is correc...

Page 38: ...If no name was stored the fax number will appear If the name or number is incorrect press the STOP key The document will be automatically transmitted once the connection is made Speed Dialling Speed Dialling can be used to dial any number which has been stored for automatic dialling see Storing Numbers for Automatic Dialling in Chapter 2 1 Pressthe SPEED DIAL key and then enter the two digits of t...

Page 39: ...quired letter one or more times until the letter appears in the display if the name begins with a special character or num ber press 1 If you don t rememberthe first letter go to Step 3 youwill scroll through the list from the beginning If a name wasn t stored for the num ber press O This will cause num bers not names to appear when you scroll 3 m or o Press the key or the key to scroll through th...

Page 40: ...x will automatically redial the number Up to 2 redialling attempts will be made at intervals of 5 minutes To stop automatic redialling press the STOP key Using the REDIAL key You can press the REDIAL key to redial the last number dialled To send a document proceed from Step 3 of Normal Dialling Note that the speaker will be automatically activated so you do not need to pick up the handset immediat...

Page 41: ...x set to answer on 4 rings you can receive both voice calls and fax messages in FAX mode by answering before the fourth ring but still have the fax answer calls automatically at times when you are unable to respond personally When the reception mode is set to TEL press the RECEPTION MODE key until TEL appears in the display you must answer all calls including fax transmissions using the fax s hand...

Page 42: ... signal to begin reception 5 and ifa document is loaded in its feeder Comments The code used to activate fax reception from a tone dial extensionphone 5 and can be changed if desired See Option Setting 4 Tel Fax Remote Number in Chapter6 Optional Settings If you do not intend to use the code for activating fa reception you can turn detection of the code off by resetting Option Setting 5 This will ...

Page 43: ...is set to FAX Note If Option Setting2 is set to a high number of rings yourf may not be able to receive documents sent by automatic dialling If you have difficulty receiv ing documents change the setting of Option Setting 2 to a lower number How the function operates When a call comes in your fax will answer it after the number of rings set with Option Setting 2 After answering the fax monitors th...

Page 44: ...to fit the size of the printing paper This ensures that data on the edges of the document are not cut off If desired you can turn this function off and have received documents printed at full size Note Note If a document is too long to fit on the printing paper the remainder will be printed on a second page In this case the cut off point may occur in the middle of a line Automatic reduction may no...

Page 45: ...e ordered in each case when 3 copies each of 3 originals are made mOriginals Sofled so co y f Be OtSOrt d M LTICOPY 1 Loadthe document s face down R R If desired adjust the resolution and i contrast with the RESOLUTION and 8 A CONTRAST keys w 2 Press the COPY HELP key COPY HELP m If you are only making one copy of the original or of each original and don t want to make a reduction or enlargementse...

Page 46: ...ing a number from 1 to m 5 as shown below Copying will begin 1 AUTO automatic size adjustmentto match the size of the printing paper Example 2 50 3 100 no reductionor enlargement 4 1250 5 135 o Note If you place a large number oforig nals in the feeder the memory may be come full before all of them can be scanned MEMORY IS FULL will appear in the display If this happens press the START key to copy...

Page 47: ...nt your fax to always print the remaining part of the documenton a second page follow the steps below 1 Press the keys shown at left COPY m CUT OFF will appear in the display 2 Press 1 to turn copy cut off on the re or maining part of the document will not be printed or 2 to turn it off the remain ing parl will be printed on a second page 3 STOP Press the STOP key m BASIC OPERATIONS 3 17 ...

Page 48: ... fax reception 5 and immediately after you answer 1 Pick up the handset or press the SPEAKER key Listen for the dial tone O p 2 m GHI a o P RS 7 ABC DEF am JKL ma Qa WXY o 9 h Dial the number using one of the follow ing methods Normal Dialling Enter the full tele phone number with the numeric keys Rapid Key Dialling Press the appro priate Rapid Key Speed Dialling Pressthe SPEED DIAL key and enter ...

Page 49: ...last number called can be redialled by pressingthe REDIAL key it is not necessary to pick up the handset or press the SPEAKER key When the other party answers pick up the handset to talk Hold You can put the other party on hold during a conversation by pressing the HOLD SEARCH key When this is done they cannot hear you You can put the handset back in the cradle without breakingthe connection When ...

Page 50: ...MAKING TELEPHONE CALLS Notes 3 20 BASIC OPERATIONS ...

Page 51: ...ng message OGM of your answering machine should be changed to inform callers who want to send a fax to press their Start key For example your message might go as follows Hello You ve reached the ABC company No one is available to take your call right now Pleaseleave a messageafter the beepor press your facsimile Start key to send a fax Thank you for calling Comments It is advisable to keep the len...

Page 52: ...tes While you are out all of your incoming calls will be answered by your answering machine and its outgoing messagewill play During this time your fax will quietly monitor the line If your fax detects a fax transmission it will take over the line and begin reception If the connection is not good or there is noise on the line the answering machine and or fax machine may not respond properly The ca...

Page 53: ...er than the specified duration the fax will interrupt It is best to shorten or eliminate such pauses but if necessaryyou can also t lengthening the Quiet Detect Time setting This procedure is described in Optional A M Connection Settings at the end of this chapter Are callers who want to send a fax manually having trouble doing so after your answering machine s outgoing message plays If so the ans...

Page 54: ...achine does not send a calling tone Instead the person faxing normally waits until they hear a reception tone and then presses their Start key In the case of an answering machine connection they will hear your outgoing message instead of a reception tone and then press their Start key However this does not signal a fax transmission to your fax Instead your fax must use a function called Quiet Dete...

Page 55: ...e unusuallyfast disconnecttimes equal to or very slightly less than 4 seconds which meansthat the answering machine may disconnect the line before fax receptioncan begin In this case try a Quiet Detect Time setting of about 3 seconds If the fax machine is interrupting callers before thev can leave a message try a longer Quiet Detect Time settin If your outgoing message includes a period of silence...

Page 56: ...No one is available to take your call right now After the beep please leave a message or if you want to send a fax andare calling on a touch tone line press five once asterisk twice andthen your facsimile Start key When this function is turned on your fax will answer the call after 5 rings if the answering machine for some reasonfails to answer before that time This ensures that you will receive f...

Page 57: ...fies it If you have forgotten this number print out the Anti Junk Number List as described in Chapter 7 1 Press the keys shown at left STORE m JUNK FAX will appear in the display 2 0 Press 1 to store a number in the Anti Junk Number List or 2 to clear a num ber from the list 3 Storing Enter a l digit number from l a to 5 This number identifies the fax voice number you will store in the Example nex...

Page 58: ...iving machine is made This is convenient when transmitting to places where the line is often busy as it saves you from waiting to pickup the original document and frees the feeder for other operations After transmission the document will be cleared from memory Only one memory transmission can be set at a time The amount of memory currently occupied appears as a percentage in the display while the ...

Page 59: ...ction which is automatically activated if your fax runs out of paper the printing ribbon needs replacement or the paperjams When you have received a document in memofy FAX RX IN MEMORY will appear in the display alternating with OUT OF PAPER FILM END or PAPER JAM When you add paper replace the imaging film or clear the jam the stored documents will automatically print out If you received documents...

Page 60: ...tion You can only use Rapid Keys or Speed Dial numbers to dial the numbers of the receiving machines 1 Load the document s 2 Press the MEMORY key and then 2 MEMORY o m 3 mm Dial the receiving machines maximum of 20 using one or both of the following methods m Example Enter one or more Speed Dial num bers by pressing the numeric keys Press one or more Rapid Keys 4 START m Press the START key Set th...

Page 61: ...n error code If so send the docu ment to those locations again Broadcasting using a Group Key If the fax machines to which you want to broadcast have ail been programmed into one Group Key you can perform the broadcastingoperation using the following simplified procedure 1 Load the document s Make any desired transmission set tings resolution contrast etc 2 Pressthe appropriate Group Key Trans IT ...

Page 62: ...ing15 as described in Chapter 6 Optional Settings Note that when Rapid Key 20 POLL is set as a polling key it cannot be used for Rapid Key Dialling 1 Dial the fax machineyou want to poll us ing one of the following methods Pick up the handset or press the s ol SPEAKER key and dial the full num ber Wait for the fax answerback tone Press the SPEED key and enter a 2 Example digit Speed Dial number En...

Page 63: ...s turned on polling will only take place when the fax number of the polling fax machine has been entered in your fax s list of permitted fax numbers called passcode numbers The number of the polling fax must also be correctly programmed into itself for identification Turning Polling Security on and off 1 FUNCTION Press the keys shown at left ENTRY o MODE will appear in the display Press the key 3 ...

Page 64: ...lay 3 0 0 Press 1 to store a number or 2 to clear a number 4 Storiw Enter a 2 digit number from ma 01 to 1 O This number identifies the fax number you will store in the next step Example Clearing Enter the number which iden tifies the fax number you want to clear and go to Step 6 5 mmammm Enter the fax number max of 20 digits Example 6 START CJ Press the START key 7 STOP Returnto Step 4 to enter o...

Page 65: ...ff peak telephone rates without having to be there when the operation is performed Note Only a Speed Dial number can be used to dial the receiving machine Setting a timer operation 1 FUNCTION Press the keys shown at left TIMER o m MODE will appear in the display 2 m r Press to set a transmission operation SEND MODE or to set a polling operation POLLING MODE 3 Press 1 to select SET a 4 Enter the ti...

Page 66: ...n the STOP key If this is a transmission op eration load the document in the feeder sometime before the specified time of transmission To cancel an operation If you need to cancel an operation after it has been set follow the steps below 1 FUNCTION m Press the keys shown at left TIMER o MODE will appear in the display Press to cancel a transmission opera 2 m r m tion or to cancel a polling operati...

Page 67: ...ered If the program is for a regular transmission or polling operation a timer setting can be included to have the operation performed automatically at a selected time To clear a mistake press the STOPkey To program an operation first perform the following basic procedure After you have completed it refer to the procedurefor the specific operationyou want to program 1 Pressthe keys shown at left P...

Page 68: ...ing pages Continuedfrom Initial procedure Press 1 if you want the document to be scanned into memory and then transmit ted or 2 if you want the document to be transmitted directly from the feeder Note If you select 2 you can include a timer setting in the program If you pressed 1 go to Step 11 If you pressed 2 and don t want to make a timer setting go to Step 10 9 Enter the time at which you want ...

Page 69: ...key otherwise skip this step 4m a Pressthe START key and then the STOP key Continued from initial procedure 8 Enter the time at which you want the op eration to take place 2 digits for the hour and 2 digits for the minute Example 9 25 If you don t want to make a timer setting go to Step 9 9 START m Press the START key 0 Enter the Speed Dial number of the re Example ceiving fax machine m I t TmTkey...

Page 70: ...nd or con 0 trast by pressingthe RESOLUTION key otherwise skip this step 11 1 s l Press the START key and then the STOP key To clear a Program key follow these steps 1 Press the keys shown at left PRG EN Fu oN TRY MODE will appear in the display 2 Press 2 to select CLEAR 3 161P1 Press the Program Key you want to cl Example clear m Press the START key and then the STOP key 5 14 SPECIAL FUNCTIONS ...

Page 71: ...ns can be set atany one time including both timer operations set by pressing a Program Key and operations set as de scribed in Timer Operations in this chapter If a Program Key has been pressed for a timer operation and you need to cancel the operation before it is performed follow these steps 1 161P1 Press the Program Key Example 2 Press the START key m SPECIAL FUNCTIONS 5 15 ...

Page 72: ...ENTERING AND USING PROGRAMS Notes 5 16 SPECIAL FUNCTIONS ...

Page 73: ...ar in the order listed below 3 When the desired setting appears in the m display make a selection as described below Example 4 STOP o Press the STOP key Setting 1 FINE RESOLUTION PRIORIV This sets the default resolution the resolution used if a Sefling is not madewith the RESOLUTION key for transmitting documents Press 1 YES to set it to FINE or 2 NO to set it to STANDARD Factory setting 2 Setting...

Page 74: ...N REPORT PRINT SELECT This sets the condition for printing out a Transaction Report Enter a number from l to 4 as follows l ALWAYS PRINT A report will be printed after each transmission reception or error 2 ERR TIMER MEM A report will be printed after an error timer operation or memory operation 3 SEND ONLY A report will be printed only after a transmission 4 NEVER PRINT A report will never be pri...

Page 75: ...l take over the line and begin reception when an answering machine is connected Enter a number from 01 to 1O or enter 00 to turn off the function See Chapter 4 for more details Factory setting 04 Setting 12 FAX RX A M FAILS Press 1 YES to have the fax answer a call if an answering machine connected to the fax does not answer within 5 rings Press 2 NO to turn the function off This setting is descri...

Page 76: ...he last page of each transmission Press 2 NO to turn the function off Factory setting 2 Setting 17 ACTIVITYREPORT AUTOPRINTOUT Press 1 to have your fax automatically print out an Activity Reporl once every 30 operations The list can still be printed out on demand when desired Press 2 to turn automatic print out off Factory setting 2 Setting 18 ERROR CORRECTION MODE ECM Press 1 YES to have any dist...

Page 77: ...appear The report is divided into two parts the TRANSMISSIONS ACTIVITY REPORT which shows information on transmissions and the RECEPTIONSACTIVITY REPORT which shows information on receptions If Option Setting 17 is set to 1 a report will be automatically printed out whenever information on 30 operations has accumulated A report can still be printed on demand at any time All information is erased a...

Page 78: ... numbersaregiveninthe following tables however these are primarily for use by service engineers In general you will want to simply try the transaction again If necessary check with the other party to make sure their machine is functioning properly Transmission errors E O Ableto recognise handshake signal butit haserrors E 1 Cannotrecognise the handshake signal from the receiver side E 2 Line disco...

Page 79: ... reception of all pages E 9 Error occurred when mode was changed or transmission reception switching was performed E 10 Error occurred during parlial page or physical page reception E n Erroroccurred afterorduringinquiryfromtheremote transmitting machine asto whetherreception waspossible or not E 12 Erroroccurred duringorjustafterfallback E 13 Erroroccurred afterretransmission endcommand wasreceiv...

Page 80: ...o 201 555 1234 L SPEED NO NOME TEL EpHONE no Passcode List This list shows settings made for polling security your name and fatitelephone number as entered in the machine and a sample of the header printed at the top of every page you transmit HEADER PRINT 0 0 s 8 2 6 Options Setting List This list shows the current status of the optional settings NO o o o 0 7 4 PRINTING OUT REPORTS AND LISTS ...

Page 81: ... 3353333533 4 4444444444 5 555555555 s Program and Group List The top part of this list shows the programs which have been entered The bottom part shows the fax numbers which have been stored in each Group Key pF OGi A M GR OU P L I S T FOR 22 P A i 96 1 3 37 J o hn Do C o r F 201 555 1234 P ROGRA 1 1 N ME 9BC Co r R E S E R E D T I ME 17 o TYPE T I ME R P OL L I N C RE MOT E S T 9 T I ON I D so1 ...

Page 82: ...ort This reporl is printed out automatically after an operation is completed to allow you to check the result Your fax is set at the factory to print out the report only when an error occurs or after a timer or memory operation If desired you can change the setting to have it printed out under a variety of other conditions This is done by changing Option Setting 6 as described in Chapter 6 The sam...

Page 83: ...lers with a soft cloth or cotton swab Make sure that all dirt and stains such as correcting fluid are removed as these will cause vertical lines on transmitted images and copies Adhesive cellophanetape is useful for removal of debris from the rollers Document I White backplate rollers Reading glass Wipe the external parts and surface of the machinewith a dry cloth Caution Do not use benzene or thi...

Page 84: ...hold on the right side of the cover and pull up and remove the imaging film Wipe the print head frame and roller with a soft cloth dampened with dena tured alcohol Frame Caution Do not use benzene or thinner Avoid touching the pn nthead with hard objects Theprint head maybe hot if your fax machine hasjust receiveda large number of documents If this is the case allow the print head to cool prior to...

Page 85: ... both the TEL LINE socket and the wall socket Make sure that the fax is set to the correct dialling mode for your telephone line See Option Setting 7 in Chapter 6 Nothing is printed at the receiving Make sure that the document for end transmission is placed face down in the feeder Make sure that the printing paper is properly loaded in the receiving machine A distorted image is received at the s N...

Page 86: ...er is on but no reception Make sure that the telephone line cord is takes place plugged into the TEL LINE socket and not the TEL SET socket The printing paper does not come The printing paper may be jammed See Clearing Jammed Printing Paper in this out chapter Make sure that the printing paper is properly loaded in your machine Make sure the power is on Make sure that the document is loaded The pr...

Page 87: ...copy is also distorted your fax may have a problem If the problem persists call for service The operation of this equipment on the same line as the telephone or other equipment with audible warning devices or automatic ring detectors will give rise to bell tinkle or noise and may cause false tripping of the ring detector Should such a problem occur contact your authorised Sharp Service Centre for ...

Page 88: ...was not successful LINE ERROR Press STOP to clear the message and then try again An extension phone connected to the fax is being used Do not lift the fax s handset or LINE IS IN USE attempt transmission at this time as this will interrupt the conversation on the extension phone MEMORY IS FULL I Thernemorv isfull See Memow in ChaDter5 MEMORY PRINTING IThe fax is preparing or printing out a documen...

Page 89: ...nsmission reception or copying Intermittent tone 5 seconds Indicates incomplete 3 bleeps 1 second on transmission reception or 1 second off copying 35 seconds Rapid intermittent tone 0 7 seconds on Indicates that the handset is off 0 3 seconds off hook TROUBLESHOOTING 9 5 ...

Page 90: ...he finger hold on the right side of the printing compartmentcover and pull up to open the cover 2 Push back the green levers on each side of the printing compartment and rotate the printing head frame up and to the rear Caution The printing head the strip of metal on the undersideof the frame applies heat to the printing film It may be hot if a document has just been printed 3 2 Removethe imagingf...

Page 91: ...t on _J the left side of the printing compartment jj 4 Also make sure that the right rear gear J 3 engages with the gear below it u y 7 Wind the film slightly rotate the gear on the right side of the rear spool so that L there is no slack in the film Make sure that both edges of the film wind onto the ii spool evenly TROUBLESHOOTING 9 7 ...

Page 92: ...ng Width 148 to 216 mm Length 128 to 1000 mm 210 mm max Automatic document feeder 20 sheets max Halftone gray scale 64 levels Contrast control Automatic Dark selectable Copy function Single Multi copy Sort copy 99 copies page Telephone function Standard cannot be used if power fails Power requirements 230 to 240 V AC 50 Hz Operating environment 5 to 35 C 20 tO 800 0RH Power consumption Stand by 6 ...

Page 93: ...SPECIFICATIONS Notes SPECIFICATIONS Spec 2 ...

Page 94: ...g Load s 0 EnterSpeed Dial document 0 PEO AL y Redialing f RESOL REDIAL Load O O wait for START document n reception tone 0 J Making voice calls Normal Dialilng Lifthandset or Dial press Lifthandsetif you pressSPEAKER numenc keys pressed SPEAKER Rapid Key Lifthandset Dialling Press Rapid Lifthandset if you Key press LEAKER pressed SPEAKER Speed Dialling Lifthandset SPEED DIAL or pressSPEAKER 0 Ent...

Page 95: ...sting Mode Entry Mode Activity Report Faflel Numbers 7 1 for Auto Dialing Timer List 2 lo 7 3 Own Number and Name Set Telephone Number 2 4 List 7 4 Polling Security Passcode List Select 7 4 5 7 Option Setting List Passcode Numbers 7 4 for Polling 5 8 Anti Junk Fax Number List Date and Time Set 7 5 2 7 Program and Store Junk Fax Group List Number 7 5 5 1 Print Setup List 7 6 Optional settings Fine ...

Page 96: ...Time 3 4 6 3 Fax RX A M Fails 6 3 Distinctive Ring 6 3 Junk Number Check 6 4 Polling 6 4 Auto Cover Sheet 6 4 Activity Report 6 4 ECM 6 4 Initialize Film Program Entry l 5 Mode Reception Ratio 5 11 3 14 Group Entry 2 in 1 Print Mode 3 14 2 13 Paper Type Set l lo copy cut off 3 17 Quick iii QUICK REFERENCE GUIDE ...

Page 97: ...y 2 2 2 5 3 10 3 19 Redialling 3 10 3 19 Remote Reception Select 6 2 Resolution 3 3 Resolution key 2 3 3 3 Ringing volume 2 14 Rollers cleaning 8 1 8 2 s Search Dialling 3 9 3 19 Sender s name and number entering 2 4 Speaker key 2 2 3 6 3 18 Speakervolume 2 14 Speed Dial key 2 2 3 7 3 18 Speed Dialling 3 8 3 18 Starl key 2 3 Stop key 2 3 Storing numbers for automatic dialling 2 10 2 13 T TEL recep...

Page 98: ... 3 7 Normal 3 6 3 18 Rapid Key 3 8 3 18 Search 3 9 3 19 Speed 3 8 3 18 Dial mode 6 2 Direct Keypad Dialling 3 7 Display 2 2 Display messages 9 4 Distinctive Ring 2 9 Documentfeeder 3 2 Document guide 3 2 Document restrictions 3 1 Document rollers 8 1 Documentsizes 3 1 Document maximumscanning size 3 1 E Electrical outlet 1 6 Error Correction Mode 6 4 Extensiontelephone using 3 12 F FAX reception m...

Page 99: ...A PTY LTD A C N 003039405 1 Huntingwood Drive Huntingwood Blacktown N S W 2148 SHARP CORPORATION OF NEW ZEALAND LIMITED Cnr Mahunga Drive Hastie Ave Mangere Bridge Auckland New Zealand SHARP CORPORATION PRINTED IN THAILAND TINSE3619XHZZ ...

Reviews: