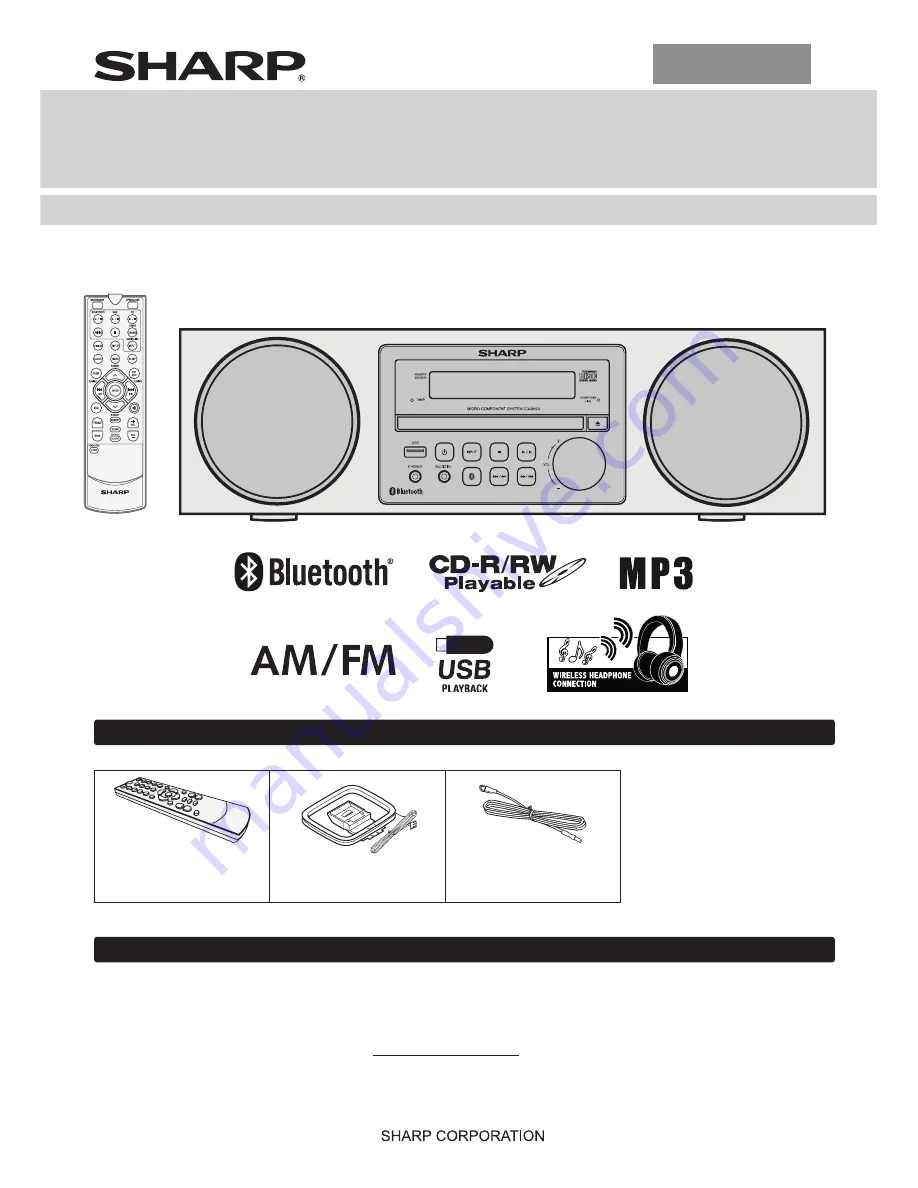
background image

ENGLISH

MODEL

CD-BH20

MICRO COMPONENT SYSTEM

OPERATION MANUAL

Accessories

Please confirm that only the following accessories are included.

Special Note

Supply of this product does not convey a license nor imply any right to distribute content created with this product in 

revenue-generating broadcast systems (terrestrial, satellite, cable and/or other distribution channels), revenue generating 

streaming  applications  (via  Internet,  intranets  and/or  other  networks),  other  revenue-generating  content  distribution 

systems (pay-audio or audio-on-demand applications and the like) or on revenue-generating physical media (compact 

discs, digital versatile discs, semiconductor chips, hard drives, memory cards and the like). An independent license for 

such use is required. For details, please visit http://mp3licensing.com
MPEG Layer-3 audio coding technology licensed from Fraunhofer IIS and Thomson.

Remote control x 1

(RRMCGA415AWSA )

AM loop antenna x 1

(QANTLA016AW01)

FM antenna x 1

(92LFANT1535A)

18C R KI 

1

Printed in Malaysia

TINSEA527AWZZ

Barcodesoft

http://www.barcodesoft.com

 Barcode  Symbology: 

 Code  93

 ;     Font Facename: 

 Code93M

 Data To Encode: 

 TINSEA527AWZZ

 Point Size 8 :    

 *TINSEA527AWZZAX*|

 Point Size 10 :    

 *TINSEA527AWZZAX*|

 Point Size 12 :    

 *TINSEA527AWZZAX*|

 Point Size 14 :    

 *TINSEA527AWZZAX*|

Thank you for purchasing this SHARP product. To obtain the best performance from this product, please read this manual 

carefully. It will guide you in operating your SHARP product.

Summary of Contents for CD-BH20

Page 1: ...ke or on revenue generating physical media compact discs digital versatile discs semiconductor chips hard drives memory cards and the like An independent license for such use is required For details please visit http mp3licensing com MPEG Layer 3 audio coding technology licensed from Fraunhofer IIS and Thomson Remote control x 1 RRMCGA415AWSA AM loop antenna x 1 QANTLA016AW01 FM antenna x 1 92LFAN...

Page 2: ...e that may cause undesired operation This equipment should be installed and operated with a mini mum distance of 20 cm between the radiator and person s body IC Radiation Exposure Statement For Users In Canada This Class B digital apparatus complies with the Canadian ICES 003 Class B specifications This device complies with Industry Canada license exempt RSS standard s Operation is subject to the ...

Page 3: ...d substitutions may result in fire electric shock or other hazards 20 Safety Check Upon completion of any service or repairs to this product ask the service technician to perform safety checks to determine that the product is in proper operating condition 21 Wall or ceiling mounting When mounting the product on a wall or ceiling be sure to install the product according to the method recommended by...

Page 4: ... MIZARI to the purchaser with respect to the Product and shall constitute full satisfaction of all claims whether based on contract negligence strict liability or otherwise In no event shall MIZARI be liable or in any way responsible for any damages or defects in the Product which were caused by repairs or attempted repairs performed by anyone other than an authorized servicer Nor shall MIZARI be ...

Page 5: ...3 Tuner Preset Down Auto Tuning Down CD USB Bluetooth Skip Down Button 14 Disc USB Bluetooth Play or Pause Button 15 Tuner Preset Up Auto Tuning Up CD USB Bluetooth Skip Up Button 16 Volume Control 17 Disc Tray Open Close Button 18 Right Speaker 1 10 12 14 2 3 4 7 6 16 17 5 18 11 13 15 9 8 Controls and indicators 1 2 3 4 3 Rear panel Front panel 1 FM 75 Ohms Antenna Jack 2 AM Loop Antenna Terminal...

Page 6: ...27 Tuning Up Skip Up Fast Forward Time Up Button 28 Enter Button 29 Mute Button 30 Clear Button 31 Volume Up Button 32 Volume Down Button Display 1 USB Indicator 2 CD Indicator 3 MP3 Indicator 4 RDM Random Indicator 5 MEM Memory Indicator 6 Repeat Indicator 7 Play Pause Indicator 8 Tuning FM Bluetooth status Indicator 9 FM Stereo Mode Indicator 10 Stereo Station Indicator 11 Muting Indicator 12 Ti...

Page 7: ... Bluetooth standby mode The first time the unit is plugged in it will enter the Bluetooth standby mode Bluetooth Stby appears on the display To cancel the Bluetooth standby mode press the ECO button remote control during power standby mode The unit will enter the low power consumption mode To return to the Bluetooth standby mode press the ECO button again AC power connection After all connections ...

Page 8: ... will protect the memorized function mode for a few hours should there be a power failure or the AC power cord becomes disconnected Remote control Battery installation Use 2 AAA size batteries UM SUM 4 R3 HP 16 or similar Batteries are not included 1 Open the battery cover 2 Insert the batteries according to the terminal indicated in the battery compartment When inserting or removing the batteries...

Page 9: ... the or button once to advance the time by 1 hour Hold it down to advance continuously 6 To adjust the minutes press the or but ton and then press the ENTER button Press the or button once to advance the time by 1 minute Hold it down to advance the time by 5 minutes interval To confirm the time display Press the CLOCK button The time display will appear for about 10 seconds Note When power supply ...

Page 10: ...t 1 meter of each other when pairing Some source devices are unable to display lists of de tected devices To pair this unit with the source device refer to the source device operating manual for details 4 Select CD BH20 SHARP from the source list If Pass code is required enter 0000 Passcode may be called PIN Code Passkey PIN num ber or Password 5 Connected appears on the display once the unit is s...

Page 11: ... headphones to this unit Before making the connection check that The Bluetooth headphone to be connected is in pairing mode and within range 1 Select a desired function to listen to except for Blue tooth function 2 Press and hold the HEADPHONE LINK button on the remote control until Headphone Link appears on the display 3 Press ENTER button Searching appears on the dis play 4 After finish searchin...

Page 12: ...ped 1 While a disc is playing press the button once 2 To resume play press the CD button Playback resumes from the track you stopped To cancel the resume playback Press the button twice Various disc functions Function Main unit Remote control Operation Play Press in the stop mode Pause Press in the playback mode Press the button to resume play back from the paused point Stop Press in the playback ...

Page 13: ...red tracks 3 Press the MEMORY button to save the folder and track number 4 Repeat steps 2 3 for other folder tracks Up to 32 tracks can be programmed 5 Press the CD button to start playback To cancel the programmed play mode During programmed stop mode press the button The display will show Memory Clear and all the programmed contents will be cleared Adding tracks to the program If a program has b...

Page 14: ...y device Use of the USB cable will affect the performance of this audio system This USB memory cannot be operated via USB hub The USB terminal in this unit is not intended for a PC connection External HDD storage cannot be played back via USB terminal If the data inside the USB memory is large it may take longer time for the data to be read This product can play MP3 files It will automatically det...

Page 15: ...2 Press the MEMORY button 3 Within 30 seconds press the PRESET or button to select the preset channel number Store the stations in memory in order starting with preset channel 1 4 Within 30 seconds press the MEMORY button to store that station in memory If the MEM and preset num ber indicators disappear before the station is memo rized repeat the operation from step 2 5 Repeat steps 1 4 to set oth...

Page 16: ...as in steps 7 and 8 above 10 To adjust the volume press the or but ton and then press the ENTER button 11 Press the ON STANDBY button to enter the power standby mode TIMER indicator lights up 12 When the preset time is reached playback will start The volume will increase gradually until it reaches the preset volume The timer indicator will blink during timer playback 13 When the timer end time is ...

Page 17: ... 1 While SLEEP is indicated press the SLEEP button To cancel the sleep operation Press the ON STANDBY button while SLEEP is indi cated To cancel the sleep operation without setting the unit to the standby mode proceed as follows 1 While SLEEP is indicated press the SLEEP button 2 Within 5 seconds press the SLEEP button repeatedly until Sleep Off appears To use timer and sleep operation together Sl...

Page 18: ...f something is wrong with this product check the following be fore calling your authorized SHARP dealer or service center General Symptom Possible cause The clock is not set to the correct time A power failure occurred Reset the clock Refer page 8 When a button is pressed the unit does not respond Set the unit to the power standby mode and then turn it back on If the unit still malfunc tions reset...

Page 19: ...2 If the unit is not restored in the previous operation unplug and plug in the unit again and then turn the power on Note If neither operation above restores the unit clear all the memory by resetting it Factory reset clearing all memory 1 Press the ON STANDBY button to turn the power on 2 Press INPUT button main unit repeatedly to enterAudio In mode 3 Press button main unit once 4 Press and hold ...

Page 20: ...als Headphones 16 50 Ω recommended 32 Ω Input terminals Audio In audio signal 500 mV 47 k ohms Line in Analogue input 500 mV 47 k ohms CD player Type Single disc multi play compact disc player Signal readout Non contact 3 beam semiconductor laser pickup D A converter Multi bit D A converter Frequency response 20 20 000 Hz Dynamic range 90 dB 1 kHz USB MP3 USB host interface Complies with USB 1 1 F...

Reviews: