May 2019, 1st Edition
Sold by: KDDI CORPORATION,
OKINAWA CELLULAR TELEPHONE COMPANY
Manufactured by: SHARP CORPORATION
Setting Guide
SHV44
When using the product
●
The battery is built into the product, and cannot be removed by the customer.
●
To force the power off, hold
f
down for 8 or more seconds (Release your finger after the product
vibrates to turn the power off).
Initial Settings
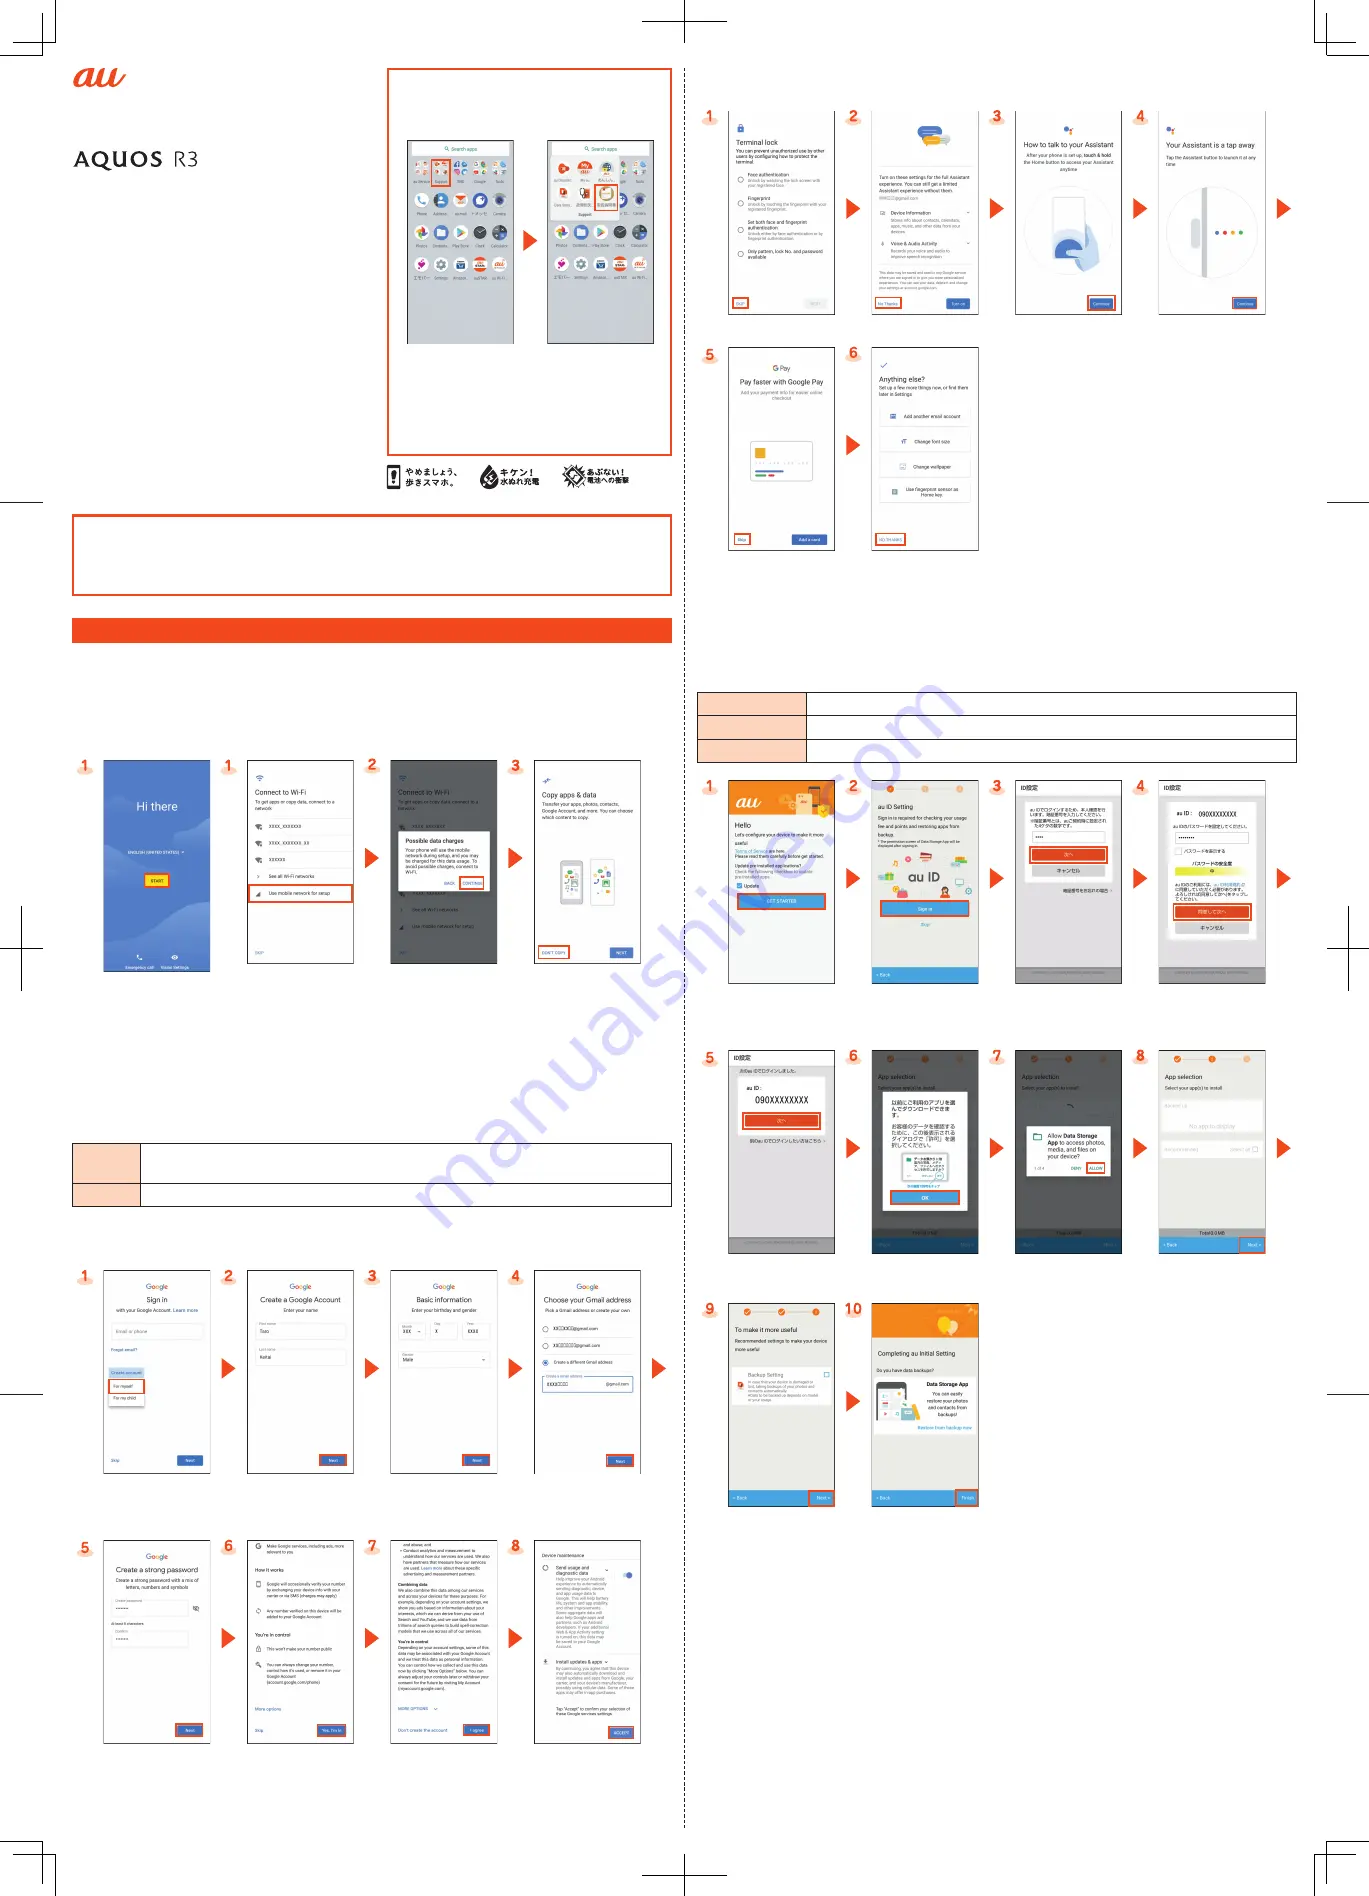
The Google™ initial settings screen is displayed automatically when you turn the power on for the first
time. Follow the on-screen instructions to set each function.
■
STEP1: Language
Setting
■
STEP2: Wi-Fi
®
Connection/Data Transfer Settings
You may skip the steps here for making Wi-Fi
®
Connection/transferring data
from another device settings. By using “Copy apps & data”, you can transfer
data from an old device etc.
Select the language
→
[START].
[Use mobile network for
setup].
Confirm the contents
and [CONTINUE].
[DON'T COPY].*
* To transfer data from another device, select “NEXT” and follow the on-screen instructions.
■
STEP3: Google Account Settings
You can use applications provided by Google Inc. such as “Play Store” and “Calendar” by setting up a
Google account. You can use the product without a Google account set, but in such case some
applications are not available.
The main setting items are as follows.
Username
Register your Google account (user ID) and any characters which you want to use as a mail
address. You can register any user name but you cannot set the same user name as another user's.
Password Register the password for using your Google account.
●
The Google account setup screen is displayed when you also activate an application for which
a Google account is required for the first time.
●
Depending on how you operate, screens other than those below may be displayed.
[Create account]
*
→
[For myself].
*
Enter your “First name”
and “Last name”
→
[Next].
Enter basic information
→
[Next].
[Create a different Gmail
address]
→
Enter your
“Username”
→
[Next].
Enter the password
→
[Next].
Confirm the contents
→
[Yes, I'm in].
Confirm the contents
→
[I agree].
[Next]
→
Confirm the
contents
→
[ACCEPT].
* If you already have a Google account, enter the e-mail address or your phone number. The above shows you the
steps to create your own account.
■
STEP4: Google service Settings etc.
Set other items such as Google service, screen unlock.
[SKIP].*
[No Thanks].*
[Continue].
[Continue].
[Skip].*
Tap "NO THANKS" to
complete the settings.*
* To use each items, select it and follow the on-screen instructions.
■
STEP5: au
初期設定
(au Initial Setting)
You can use various services provided by au such as au Smart Pass and “au Simple Payment Service” in
which you can purchase applications displayed on Google Play™ by setting an au ID.
au ID
Register your au phone number as an au ID.
au ID password
Register the password for using your au ID.
Security code
The four-digit security code you wrote on the application form.
[GET STARTED].
*1
[Sign in].
Enter the security code
→
[
次へ
] (Next).
*2
Enter the password
→
[
同意して次へ
]
(Agree).
*2
[
次へ
] (Next).
[OK].
[ALLOW].
*3
Mark the applications
to install
→
[Next]
Confirm the contents
and mark the item to
set up
→
[Next].
*4
[Finish]
*5
.
*1 When updating apps in the product, mark “Update”.
*2 The input screen is displayed only when registering au ID for the first time.
*3 The confirmation screen for app permissions is displayed several times. Operate in the same way.
*4 To use the “Data Storage App” application and automatically store photos and address book entries to the au
server, mark “Backup Setting”.
*5 If there are any data stored by “Data Storage App” application, you can restore them from it. Tap “Restore from
backup now” and follow the on-screen instructions.
• Alternatively, on the home screen, swipe up the screen to display the App list screen
→
[Settings]
→
[au Settings]
→
[au Settings Menu]
→
[au Initial Setting].
Using “Online Manual” (Japanese)
You can check “Online Manual” (Japanese) that
describes detailed of various functions by
operating the product as follows.
On the home screen,
swipe up the screen to
display the App list
screen
→
[Support].
[
取扱説明書
] (Online
Manual) (Japanese).
Also, you can check “Online Manual” (Japanese)
on the au homepage.
https://www.au.com/online-manual/shv44/
Thank you for buying the “AQUOS R3 SHV44”
(simply called the “product” from here on).
This manual describes settings for using the product.
* For illustrations and descriptions in this manual, refer to
“Basic Manual” available on the au homepage.
* Descriptions in this manual are based on Android™ version 9
Pie.
* The company names and product names appearing in this
manual are trademarks or registered trademarks of their
respective holders.
* Phone illustrations and screen shots are for descriptive
purposes only, and may differ from the actual product.


