background image


Using the 

ēno


Interactive Whiteboard


Part A: Equipment 

Please come to Teaching and Learning in room A2508 to 

s

ign out


the ēno Stylus kit and to get 

the ēno


Application installed on your laptop.
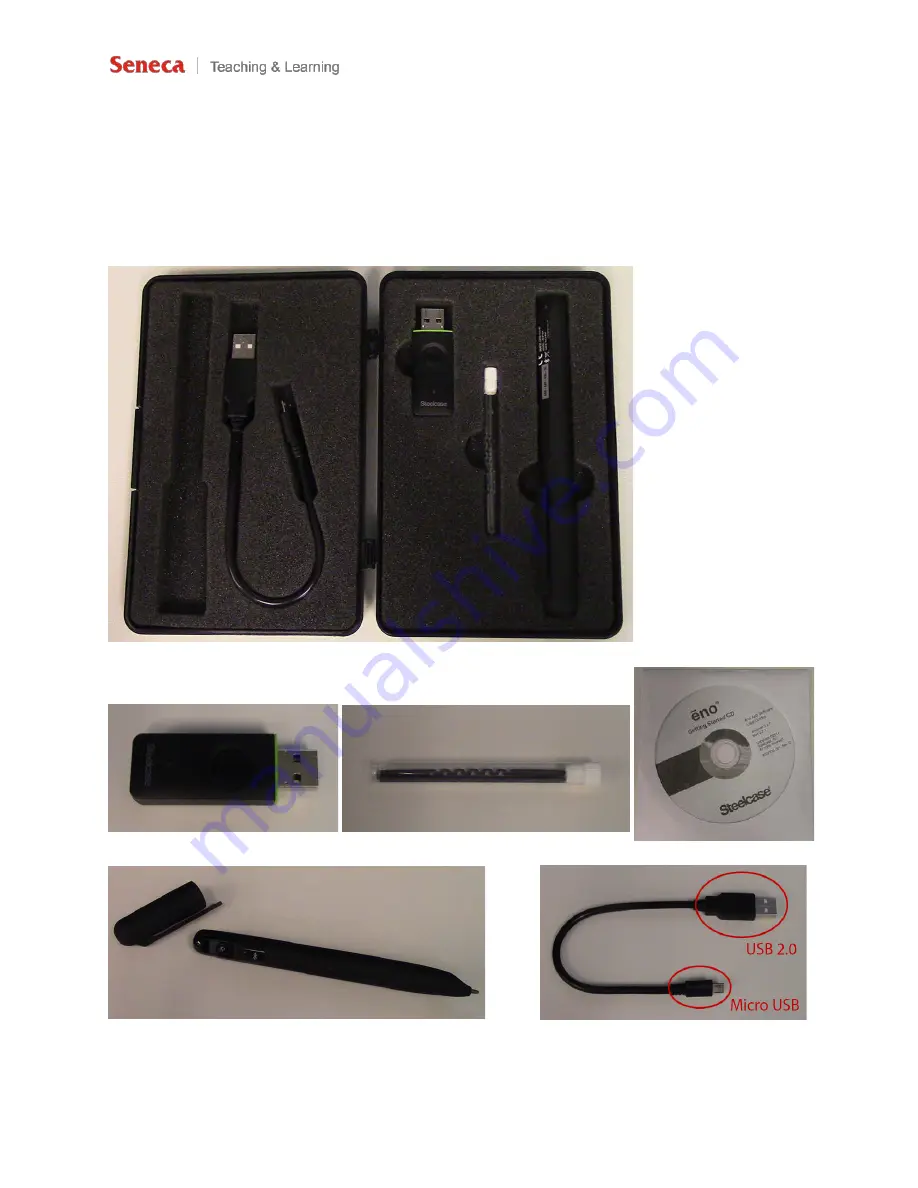


ēno Stylus K

it 


ēno Bluetooth Receiver 


Stylus 

Tip 

Replacements


Installation CD


Rechargable ēno Stylus


USB Charging


Cable


Summary of Contents for eno

Page 1: ...ease come to Teaching and Learning in room A2508 to sign out the ēno Stylus kit and to get the ēno Application installed on your laptop ēno Stylus Kit ēno Bluetooth Receiver Stylus Tip Replacements Installation CD Rechargable ēno Stylus USB Charging Cable 1 ...

Page 2: ...getting started CD When you insert a CD into a Windows computer AutoPlay will run Click Install ēno Application If AutoPlay does not run open My Computer to see your CD DVD drive right click the DVD RW Drive ēno App 3 2 1 and click Install ēno Application 2 ...

Page 3: ...ng for permission to install the software onto your computer Click Yes The User Account Control will also ask for permission for the installer to make changes to your computer click Yes 3 Please wait while the installer is initializing 4 The Steelcase ēno Application installer will appear Click Continue 3 ...

Page 4: ...the box to accept the terms in the license agreement and click Continue 6 By default ēno should be selected if not check the ēno option box Click Install 7 Please wait while the ēno application is installing 4 ...

Page 5: ...8 When you receive the prompt plug the ēno Receiver into a USB port on your computer Click OK to close the prompt 9 Once the installation is complete click on Reboot to reboot your system 5 ...

Page 6: ...is finished loading you will see the screen shown below If the ēno Receiver is not plugged into your computer at this point plug it into a USB port 3 Pair the stylus to your computer There are two ways you can begin the pairing process a Click on Pair Stylus to begin the pairing process When you see the prompt to turn off and on the ēno Stylus as shown below click OK and proceed to step 4 6 ...

Page 7: ...b Click on the button on the ēno Receiver and proceed to step 4 4 Power off and on the ēno Stylus There are two ways to do this a Press the power button b Replace and remove the stylus cap 7 ...

Page 8: ... a blinking green light while it s attempting to connect When the ēno Stylus is paired successfully click OK When successfully paired the light on the ēno Stylus will have a solid green light and the ēno Receiver will have a solid blue light If the automatic pairing fails a Make sure the ēno Receiver is plugged into your computer 8 ...

Page 9: ...ylus and plug the USB end into your computer s USB port c Power the ēno Stylus off and on by pressing the power button or replace and remove the stylus cap d Make sure the ēno Stylus is within range 10m of the ēno Receiver Click Retry to attempt to pair the ēno Stylus again or click Cancel and return to step 3 9 ...

Page 10: ...6 You will see that the ēno Stylus is Connected and the ēno Receiver is Active 10 ...

Page 11: ...ard 1 Connect the HDMI cable to your computer If the ēno Receiver is not plugged into your computer at this point please plug it into a USB port 2 Turn on the ēno Interactive Whiteboard by touching the Crestron screen Click Send Front Plate to all 11 ...

Page 12: ... computer s desktop will now be projected onto the whiteboard Mediascape 1 and Mediascape 2 You will see on your computer with the Steelecase ēno Application opened that the ēno whiteboard is now active 12 ...

Page 13: ... you need to calibrate the whiteboard with your computer Using the ēno Stylus tap the Calibrate icon on the ēno App strip once 4 Follow the instructions that is projected onto the whiteboard You will be asked to tap the X with the ēno Stylus multiple times on the screen 13 ...

Page 14: ...5 Once you finish calibrating the whiteboard with your computer go to User Settings in the Steelcase ēno Application Turn ON Fixed Projector and Search COM Ports on 14 ...

Page 15: ...Part E Using the ēno App Icon Strip You can use the ēno Stylus to tap on these icons on the ēno App icon strip 15 ...

Page 16: ...When connected to the ēno Interactive Whiteboard click the Slide Show button to begin your PowerPoint presentation 2 Sometimes what you see on your computer screen is different from what is displayed on the whiteboard as shown below 16 ...

Page 17: ...de Show to duplicate your screens 4 Now both your computer screen and the whiteboard will display the same thing For more detailed information ēno Interactive Whiteboard User Guide Self Help Documents and How To Videos from Bring Learning to Life 17 ...

Reviews: