background image

Use these instructions in conjunction with the complete installation manual for

this product. Follow all warnings and directions specified within and/or on the
equipment.

You


must


complete


steps


1–4


before


powering


up


the


panel

.

Your SmartTech Dealer Portal:

cloud.secure.direct/smarttech/

Sign in using the dealer credentials provided by SecureNet Technologies.

You will now create a new “Customer/End-User” account. These steps can be used as
a checklist. Steps 1–4 are applicable for all panel types.

Create an Account

by expanding the “Accounts” section in the left side bar.

Select “Search Accounts” to access all accounts.

Select “Add Account” in the top right corner of the main “Accounts” list panel.

From the “Add Account“ screen, assign an Account ID and enter the basic account
information. To assign an account, choose one of two options:

Auto Assign - assigns the next available Account ID within your dedicated account
range. Manually Enter ID - enter the preferred account number in the “Account ID” field.

Set the Panel Type to “iotega”

All fields marked with an asterisk (*) are required. All details should be of the property
and master account contact. Site Phone may be set as a mobile.

Assign a Service Plan

that corresponds with the panel gateway type you are

installing (GSM, LTE, IP or WIFI).

Note: If more than one gateway is installed on the panel, select the service plan based
on cellular communication (GSM or LTE).

Otherwise, select the service plan based on the services provided:

l

Managed Alarm Transport (includes alarm signal forwarding only)

l

Interactive/Direct Alarm Transport (includes alarm signal forwarding, remote
arm/disarm, notifications, zone status, event history, panel offline
supervision)

l

Complete Interactive (includes all direct alarm transport features, plus Z-
Wave device support, scenes, event schedules, system sabotage
protection)

l

Direct Alarm Tra Video

l

Complete Inter Video

l

Stand Alone Video (Up to 4 cameras, 250 event storage & notifications)

l

Stand Alone Video Plus (Up to 8 cameras, 500 event storage & notifications)

Once the service plan is chosen, select “Next”.

If all required fields are complete, a “Complete” confirmation message is displayed.
Press “Finish” to add the account.

On the “Account Summary” page, select “Go Live!” to start services. This activates the
service functionality and starts billing.

Note: If you are creating the account in advance or wish to start services at a later
date, do not select “Go Live“ at this point. You can select “Go Live” at any time to begin
services.

Add a Gateway

by selecting “System” in the left side bar. On the “System” page,

select “Add Gateway” to bring up the “Add Gateway” panel.

Set the Panel Type to “iotega”

Enter the 10-digit ID number found on the bottom of the panel.

Press “Done” to add the gateway.

Create a Master Contact

by selecting “Contacts” in the left side bar. From the

“Contacts” page, select “Add Contact” and complete the form. All fields marked with an
asterisk (*) are required.

Assign a unique username and passcode for the customer to access both the end-user
website and mobile application.

The username must be between 3–32 characters long and can include alpha, numeric
or the ‘@’ (at), ‘_’ (underscore), ‘.’(period) characters.

The passcode must be between 6–16 characters and can contain only alpha or numeric
characters.

In the “Alarm User” section, set “User ID” to “Master” and enter the panel master code.

If you are installing a new panel, the default master panel access code

is “1234”.

Select “Done” to create the master contact. Following the initial system activation, the
contact information and panel codes can be edited from the “Contacts” page in both the
dealer portal and end-user customer web portals.

Note that only the master contact is created from the dealer portal. Additional user
contacts are created by the master account in the user portal.

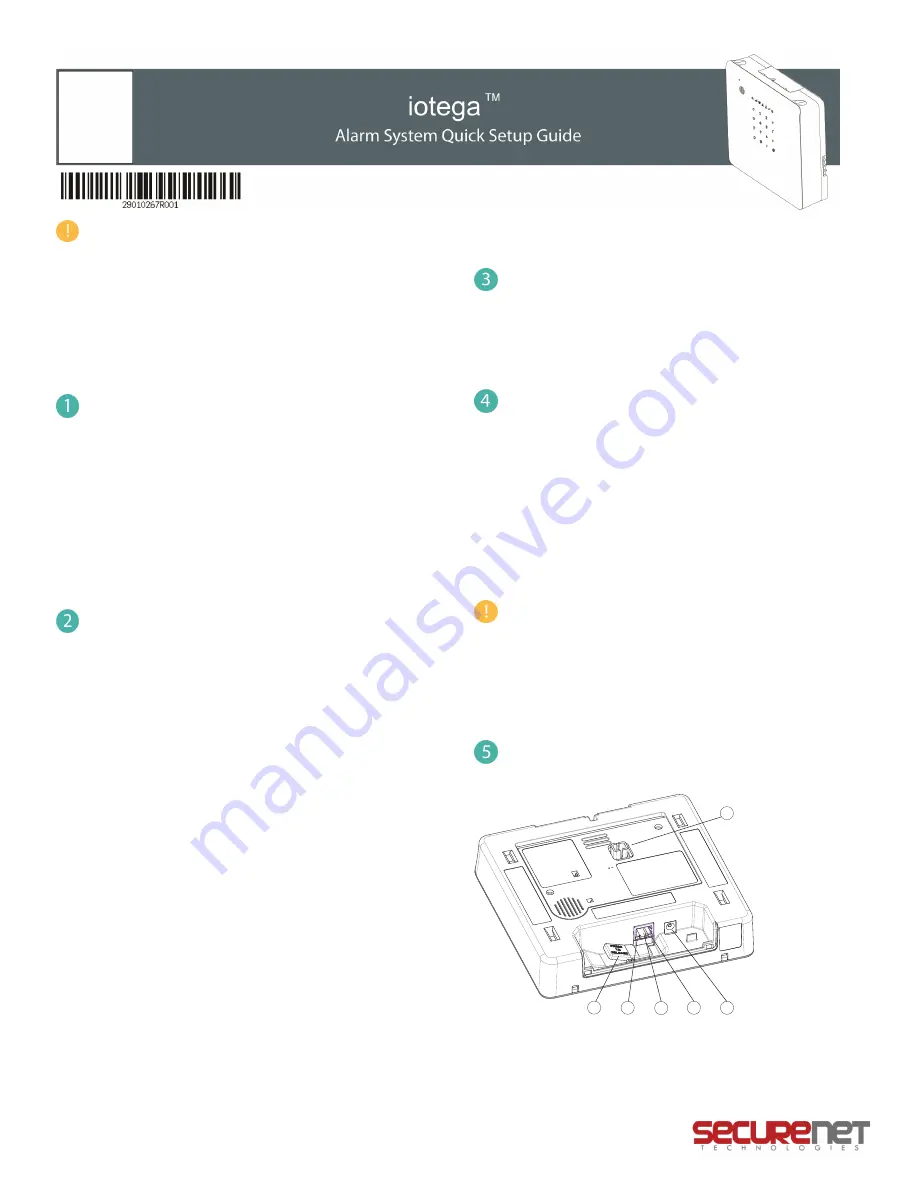
To Install the iotega

, locate the panel near the WiFi router during initial setup,

as direct connection via Ethernet cable is required.

5

4

3

2

1

6

1. Ethernet Cable Release

4. Ethernet Link Speed LED

2. Ethernet Link Activity LED

5. Power Connector

3. Ethernet Port

6. Case Tamper

Connect the Ethernet cable to the port on the back of the panel.

290010267R001

1

Summary of Contents for IOTEGA

Page 1: ... Alone Video Plus Up to 8 cameras 500 event storage notifications Once the service plan is chosen select Next If all required fields are complete a Complete confirmation message is displayed Press Finish to add the account On the Account Summary page select Go Live to start services This activates the service functionality and starts billing Note If you are creating the account in advance or wish ...

Page 2: ...n Status On steady green when Link to remote server is active On flashing red when link to remote server is active but has failed to communicate Off when link to remote server is not active Verify the Online Status of the Panel from the SmartTech dealer portal In the left side bar navigate to the System page ensuring the panel is connected and powered up The System page displays the current Online...

Page 3: ...ample A tamper trouble on zone 5 is shown as follows After pressing 2 the number 2 lights up indicating a zone trouble see Table 1 1 below Pressing 2 displays the second trouble layer The number 3 lights up signifying a tamper trouble Pressing 3 displays the third layer where the number 5 is lit This indicates that the sensor on zone 5 has a tamper condition Table 1 1 Trouble Indications 1st Layer...

Page 4: ...Software withoutthe written permission ofan officer ofDSC You may notremove any proprietary notices marks or labels fromthe Software Product You shall institute reasonable measures to ensure compliance with the terms and conditions ofthis EULA b Separation ofComponents The SOFTWARE PRODUCTis licensed as a single product Its componentparts may notbe separated for use on more than one HARDWARE unit ...

Page 5: ...e 250 événements et notifications l Vidéo autonome Plus jusqu à 8 caméras stockage de 500 événements et notifications Après avoir sélectionné le plan de service sélectionnez Suivant Si tous les champs obligatoires sont remplis un message de confirmation Complet s affiche Appuyez sur Terminer pour ajouter le compte Sur la page Synthèse du compte sélectionnez Lancer pour démarrer les services Cela a...

Page 6: ...tant est active Rouge clignotant lorsque la liaison au serveur distant est active mais ne parvient pas à communiquer Éteint lorsque la liaison au serveur distant n est pas active Consultez l état en ligne de la centrale à partir du portail des revendeurs SmartTech Dans la barre latérale gauche accédez à la page Système en vérifiant que la centrale est connectée et alimentée La page Système affiche...

Page 7: ...onible pour le problème Appuyez sur la touche pour revenir au niveau précédent ou pour quitter le menu Problèmes Exemple Un problème de sabotage sur la zone 5 est indiqué comme suit Après avoir appuyé 2 fois sur la touche la touche numérotée 2 s allume indiquant ainsi un problème de zone voir le Tableau 1 1 ci dessous Appuyer sur la touche 2 permet d afficher le deuxième niveau du problème La touc...

Page 8: ...désosser décompiler ou désassembler le PRODUITLOGICIEL saufetseulementdans la mesure dans laquelle une telle activité estexplicitementpermise par la loi en vigueur sans égards à ces limites Vous n avez pas le droitde faire des changements ou des modifications quels qu ils soient sans la permission écrite d un dirigeantde DSC Vous n avez pas le droitde retirer les notices les marques ou les étiquet...

Page 9: ...0 eventos almacenamiento y avisos Una vez que haya elegido el plan de servicios seleccione Siguiente Si todos los campos obligatorios están completos aparecerá el siguiente mensaje de confirmación Completo Pulse Finalizar para agregar la cuenta En la página Resumen de cuenta seleccione Poner en funcionamiento para iniciar los servicios Esta opción activará la funcionalidad de servicios e iniciará ...

Page 10: ...de de color verde fijo cuando el enlace al servidor remoto está activo Parpadea de color rojo cuando el enlace al servidor remoto está activo pero no se pudo realizar la comunicación Se apaga cuando el enlace al servidor remoto no está activo Verificar el estado en línea del panel desde el portal del distribuidor de SmartTech En la barra lateral izquierda navegue hasta la página Sistema y asegúres...

Page 11: ...3 se ilumina indicando que hay un problema de sabotaje Al pulsar 3 se muestra el siguiente nivel y se ilumina el número 5 Esto indica que el sensor de la zona 5 tiene una condición de sabotaje Table 1 1 Indicaciones de problemas 1er Nivel 2do Nivel 3er Nivel 01 Problema del sistema 01 CA 02 Problema de batería 03 Sabotaje 04 Fallo de hardware 05 Pérdida de tiempo 06 Interferencia de RF 02 Zona 01 ...

Page 12: ...ones de este EULA b Separación de los Componentes El PRODUCTO DE SOFTWARE se licencia como un producto único Sus partes componentes no pueden ser separadas para el uso en más de una unidad de HARDWARE c PRODUCTO ÚNICO INTEGRADO Si usted adquirió este SOFTWARE con HARDWARE entonces el PRODUCTO DE SOFTWARE está licenciado con el HARDWARE como un producto único integrado En este caso el PRODUCTO DE S...

Page 13: ...ções de eventos Depois que o plano de serviços for escolhido selecione Avançar Se todos os campos obrigatórios estiverem preenchidos uma mensagem de confirmação Concluído será exibida Pressione Terminar para adicionar a conta Na página Resumo da conta selecione Entre agora para iniciar os serviços Isso ativa a funcionalidade do serviço e inicia a cobrança Nota se você estiver criando a conta antec...

Page 14: ...elho quando o link para o servidor remoto estiver ativo mas com falha na comunicação Desligado quando o link para o servidor remoto não estiver ativo Verifique o Status on line do painel no portal do revendedor da SmartTech Na barra lateral esquerda navegue até a página Sistema assegurando que o painel esteja conectado e ligado A página Sistema exibe o status on line off line atual do painel Regis...

Page 15: ... tem uma condição de sabotagem Table 1 1 Indicação de problema 1a camada 2a camada 3a camada 01 Problema no Sistema 01 CA 02 Problema Bateria 03 Sabotagem 04 Falha Hardware 05 Perda da hora 06 Bloqueio de RF 02 Zona 01 Uso Futuro 02 Problema Bateria 1 128 03 Sabotagem 1 128 04 Falha Supervisão 1 128 05 Não em rede 1 128 06 Problema de Incêndio CO 1 128 07 Transgressão de RF 1 128 03 Sirene 01 Uso ...

Page 16: ... irá instituir medidas razoáveis para garantir a conformidade comos termos e condições deste EULA b Separação de Componentes O PROGRAMA é licenciado como umproduto único As partes que o constituemnão podemser separadas para utilização emmais do que uma unidade de HARDWARE c PRODUTO ÚNICO INTEGRADO Se o Usuário adquiriu este SOFTWARE como HARDWARE então o PRODUTO DE SOFTWARE é licenciado como HARDW...

Page 17: ...è visualizzato un messaggio di conferma Completo Premere Termina per aggiungere l account Nella pagina Riepilogo account selezionare Go Live per avviare i servizi Questa operazione attiva la funzionalità di assistenza e avvia la fatturazione Nota se state creando l account in anticipo o desiderate avviare i servizi in una data successiva non selezionare Go Live in questa fase È possibile seleziona...

Page 18: ...ndo Aggiungi dispositivo I dispositivi possono essere registrati in due modi attraverso Registrazione automatica o inserendo il numero di serie del dispositivo nel modulo Aggiungi dispositivo per numero seriale Per aggiungere mediante numero seriale selezionare lo strumento Aggiungi dispositivo e immettere il numero seriale del dispositivo nel campo del numero seriale Una volta inserito un numero ...

Page 19: ...tenere assistenza in garanzia riportare l articolo i in questione dove lo si è acquistato Tutti i distributori e i venditori autorizzati hanno un programma di garanzia Chiunque restituisca merci alla Digital Security Controls deve prima ottenere un numero di autorizzazione La Digital Security Controls non accetterà alcuna spedizione per la quale non sia stata ottenuta una previa autorizzazione Con...

Page 20: ...ivo proprietario dei contenuti e possono essere protetti da copyrightapplicabile e da altre leggi e trattati sulla proprietà intellettuale Il presente Contratto di Licenza non concede all Utente i diritti per l utilizzo di tali contenuti Tutti i diritti non espressamente concessi dal presente Contratto di Licenza sono riservati alla DSC e ai suoi fornitori 4 LIMITAZIONIDIESPORTAZIONE L Utente acce...

Page 21: ...llt erscheint die Bestätigungsmeldung Vollständig Drücken Sie Fertig stellen um das Konto hinzuzufügen Wählen Sie auf der Seite Kontoübersicht die Option Go Live um die Dienste zu starten Dadurch wird die Dienstfunktionalität aktiviert und die Abrechnung gestartet Hinweis Wenn Sie das Konto im Voraus erstellen oder die Dienste zu einem späteren Zeitpunkt starten möchten wählen Sie an dieser Stelle...

Page 22: ...ie Kommunikation fehlgeschlagen ist Erloschen wenn die Verbindung zum Remote Server nicht aktiv ist Überprüfen Sie den Online Status der Zentrale über das SmartTech Händlerportal Navigieren Sie in der linken Menüleiste zur Seite System und vergewissern Sie sich dass die Zentrale angeschlossen und eingeschaltet ist Die Seite System zeigt den aktuellen Online Offline Status der Zentrale an Registrie...

Page 23: ...ie zweite Störungsebene angezeigt Die Ziffer 3 leuchtet was auf Sabotage hindeutet Durch Drücken von 3 wird die dritte Ebene angezeigt in der die Ziffer 5 leuchtet Das zeigt an dass der Melder in Linie 5 einen Sabotagezustand hat Tabelle 1 111 Störungsanzeigen 1 Ebene 2 Ebene 3 Ebene 01 Anlagen Störung 01 AC 02 Batteriestörung 03 Sabotage 04 Hardwarefehler 05 Zeitverlust 06 HF Blockierung 02 Linie...

Page 24: ...sen aufangemessene Weise dafür sorgen dass die Bedingungen dieser Endverbraucher Lizenzvereinbarung eingehalten werden b Trennung von Komponenten Das SOFTWAREPRODUKTistals Einzelproduktlizenziert Seine Komponenten dürfen nichtzur Nutzung aufmehr als einemHARDWARE Gerätgetrenntwerden c Einzelnes INTEGRIERTES PRODUKT Haben Sie diese SOFTWARE gemeinsammitHARDWARE erworben dann istdas SOFTWAREPRODUKTg...

Reviews: