Sealite TRIDENT-2600Q, Installation & Service Manual
The Sealite TRIDENT-2600Q is a state-of-the-art navigational aid designed for maritime applications. Ensure a seamless installation and optimal performance with our comprehensive Installation & Service Manual. Download the manual for free at manualshive.com and unlock the full potential of this exceptional product.
Share
Download


Reviews:
No comments
Related manuals for TRIDENT-2600Q

Precision2 HP2 Series
Brand: B-K lighting Pages: 6

Altair
Brand: B-K lighting Pages: 3

TKR-750
Brand: Kenwood Pages: 2

Soffio
Brand: FOSCARINI Pages: 16

DSKL10-18WCC-S
Brand: Spitzer LIGHTING Pages: 2

CLMFXBAR
Brand: Cameo Pages: 56

IB520081ML
Brand: Cooper Pages: 10

ACM-41A
Brand: Champlain Pages: 4

LED PAR27
Brand: Karma Pages: 12

Hydro 880
Brand: p-light Pages: 28

HB-10521-HS
Brand: HAMPTON BAY Pages: 20

EclPanel TWCJR4X1
Brand: ProLights Pages: 56

iAquaLink 3.0
Brand: Jandy Pages: 2

BR-S36 RGB
Brand: Bresser Pages: 16

AIS-CTRX
Brand: True Heading Pages: 43

Torrent Wash IP
Brand: Gamma Pages: 16

GUS- 2FT
Brand: RAB Pages: 4
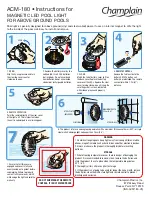
ACM-180
Brand: Champlain Pages: 2


