KEY LOCK FLOOR SAFE
MODEL NO:
SKFSO1
Thank you for purchasing a Sealey product. Manufactured to a high standard, this product will, if used according to these instructions,
and properly maintained, give you years of trouble free performance.
IMPORTANT:
PLEASE READ THESE INSTRUCTIONS CAREFULLY. NOTE THE SAFE OPERATIONAL REQUIREMENTS, WARNINGS & CAUTIONS. USE
THE PRODUCT CORRECTLY AND WITH CARE FOR THE PURPOSE FOR WHICH IT IS INTENDED. FAILURE TO DO SO MAY CAUSE DAMAGE AND/OR
PERSONAL INJURY AND WILL INVALIDATE THE WARRANTY. KEEP THESE INSTRUCTIONS SAFE FOR FUTURE USE.
1. SAFETY
WARNING!
This safe is heavy and care should be exercised in transit and handling to ensure that no one is injured.
9
For maximum security, this safe must be securely fixed within a sound floor.
8
DO NOT
install in areas where there is excessive damp and condensation present.
8
DO NOT
install in floor areas that are constantly walked on or where there is any wheeled traffic e.g. trolleys, pallet trucks.
WARNING!
The warnings, cautions and instructions referred to in this instruction manual cannot cover possible conditions and situations
that may occur. It must be understood that common sense and caution are factors which cannot be built into this product, but must be
applied by the operator.
2.
i
INTRODUCTION
Heavy-duty steel construction with triple locking bolts. Powder coated finish to help prevent corrosion. Compact design, pre-drilled holes
and security fixings allow safe to be fixed into the floor and be hidden away discreetly. Supplied with two keys.
3.
i
SPECIFICATION
Model No.: ................................................................
SKFS01
External dims. (WxDxH rounded): ...........
260 x 400 x 140mm
Internal dims. (WxDxH rounded): ..............
225 x 315 x 90mm
N
ett weight:
....................................................................
12kg
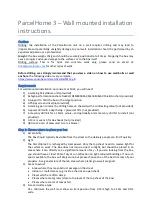
4. INSTALLATION
4.1.
Careful consideration should be given to the sighting of the floor safe to ensure that it is discreetly placed and not easily found by any
intruders.
4.2.
It is intended that the safe flanges will rest at floor level with carpet overlaying the safe.
4.3.
Each safe is supplied with four heavy duty screws primarily intended to fix into wooden joists. Where the distance between joist
centres (2” thick)is greater or less than 16”(406mm) it will be necessary to create additional woodwork to bridge or constrict unsuitable
spaces.
4.4.
If the safe is intended for a solid concrete floor, any recess created must be sound and fully dried out.
4.5.
Remove the door of the safe as shown in fig.2. Unlock the safe by turning the key clockwise (1). Using the recessed handle (2), lift up
the loose end of the door by 20mm (3) and then pull the door sideways (4) to unhook it from the other end of the opening. Lift the door up
and away from the safe.
4.6.
Lower the safe into the previously prepared aperture and drill 4mm pilot holes into the joists using the pre-drilled holes in the
ends of the safe as a guide.
4.7.
Screw the four heavy duty screws provided, sideways into the joists as shown in fig.4.
SKFS01 Issue 2 15/03/19
Original Language Version
© Jack Sealey Limited
Refer to
instruction
manual
fig.1
fig.2
fig.3