ON
P2
RV1
P3
Important
: Before starting the programming stage please check the following:
A)
All wiring connections.
B)
That the power is turned on.
C) That the correct indicator leds are lit.
D) The operator(s) are securely fitted.
Programming Work and Pause Times
Put the gates into the closed position.
Press Programming Button P2 until led DL1 lights (approx 3 secs) and the
gate(s) start to open at reduced speed – The board is now in Programming Mode
During this phase adjust trimmer RV1 to obtain the desired motor slowdown
speed.
When the gate is fully open – Press P2 again and wait for led DL1 to stop
flashing & light continuously.
Continue giving 1 second presses to button P2 to set the following logic
parameters (a total of 6 more presses to set the logic).
Press 1 - Starts Motor 1 closing
Press 2 – Starts Motor 2 closing and sets the leaf delay in closing
Press 3 – Starts Motor 1 slowdown point
Press 4 – Starts Motor 2 slowdown point
Press 5 – When Motor 1 reaches the closed position
Press 6 – When Motor 2 reaches the closed position – Programming ends.
Setting the Open Pause Time
Press button P3 until led DL1 is lit – When the required Open Pause time is
reached – Press P3 again and the time is set.
All cabling, wiring and connections must be carried out by fully trained personal and
adhere to all the current electrical regulations in force.
The manufacturer or supplier of this equipment cannot be held responsible for any
damage or injury caused by improper or incorrect use of this product.
24V Transformer
Connections
5
4
3
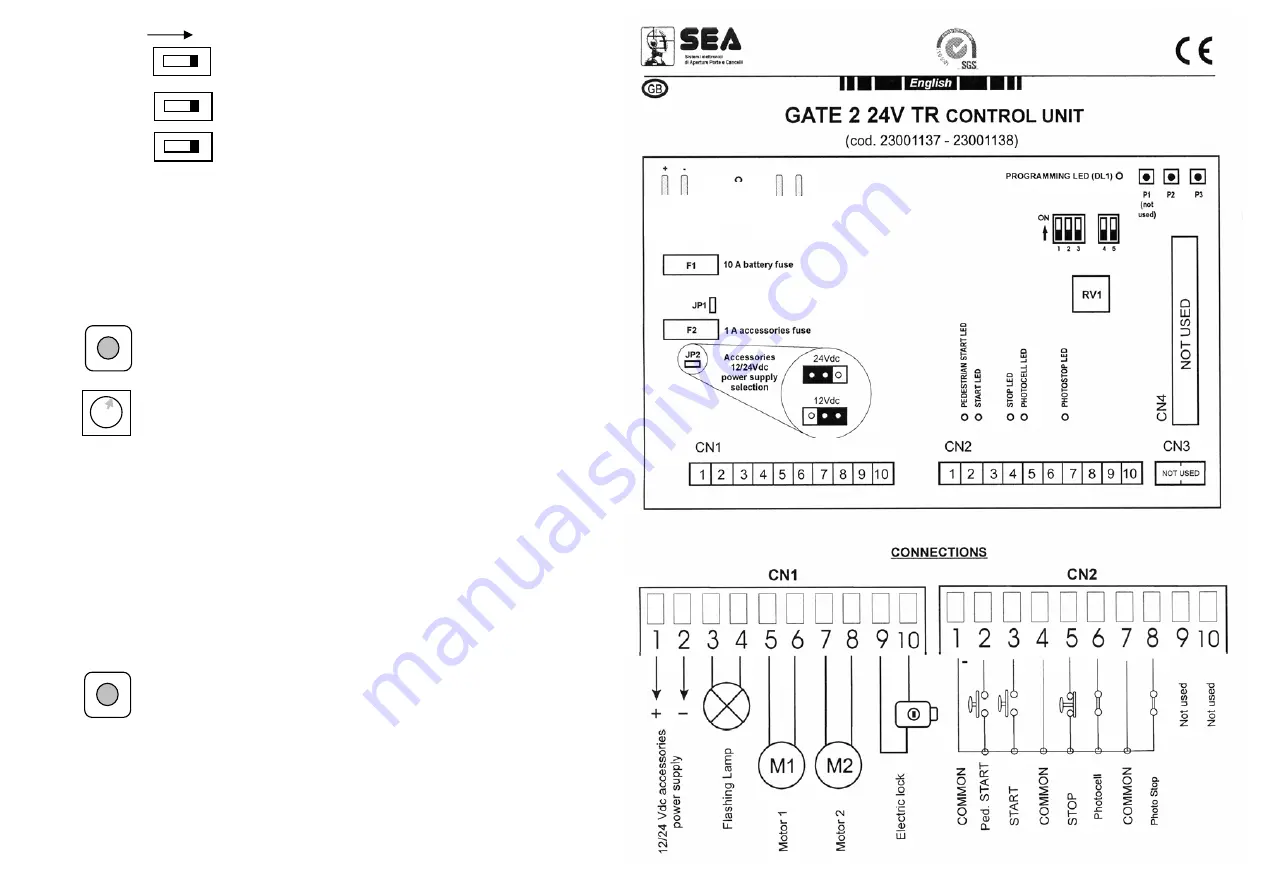
SINGLE LEAF LOGIC – Put dip switch 3 ON to select
REVERSING STROKE LOGIC – Put dip switch 4 ON to select
CANCELL LEAF DELAY – Put dip switch 5 ON to select
When selected, both motors start at the same time
Battery
Connections
24Vac led
Used if batteries fitted


