SR-i1100
Motorcycle GPS Security System
INSTALLATION MANUAL
AND USER’S GUIDE
rLiNK includes a state of the art security system to deter theft as well as the ability to track
and recover your vehicle if it is stolen. The GSM/GPRS technology keeps you connected
from anywhere, allowing you to control alarm, tracking and reporting functions with the
free iPhone application or any web enabled smartphone or browser. In addition, rLiNK
allows you to share maps of your favorite rides, get ride stats, weather updates, progress
reports and more.
Once the installation is complete, go to my.rlink.com to create your account, purchase
the data plan and activate the unit
Table of Contents
Installation
•
Component List ----------------------------------------------------------------
Page 3
•
Planning The Installation ----------------------------------------------------
Page 3
•
Mounting The Components -----------------------------------------------
Page 4
•
Color Codes ---------------------------------------------------------------------
Page 5
•
Connections ---------------------------------------------------------------------
Page 5
•
Using the T-tap ------------------------------------------------------------------
Page 6
User’s Guide
•
Encoding a Transceiver -----------------------------------------------------
Page 1
•
Standard Features ------------------------------------------------------------
Page 2
•
Transceiver Battery ------------------------------------------------------------
Page 3
•
Violation Display ---------------------------------------------------------------
Page 6
•
Operating the transceiver --------------------------------------------------
Page 7
•
Adjusting G Sensor ------------------------------------------------------------
Page 7
•
Selecting Arming Modes ----------------------------------------------------
Page 6
•
Alarm Triggers -------------------------------------------------------------------
Page 8
•
Manual Override Code -----------------------------------------------------
Page 8
•
Account Setup -------------------------------------------------------------------
Page 10
•
MCM Lights -------------------------------------------------------------------
Page 11
•
Theft Tracking -------------------------------------------------------------------
Page 11
•
Mobile Phone Support -------------------------------------------------------
Page 12
•
Troubleshooting Guide -----------------------------------------------------
Page 14
Accessories
•
Accessories -------------------------------------------------------------------
Page 1
•
Perimeter Sensor (SN-5) ------------------------------------------------------
Page 9
•
Starter Disable --------------------------------------------------------------- Page 12
Warranty and FCC Information
•
Limited Warranty -------------------------------------------------------------
Page 15
•
FCC Notice ----------------------------------------------------------------------
Page 15
•
Contact information ----------------------------------------------------------
Page 15
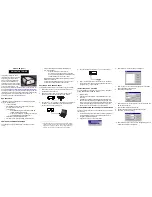
Encoding a Transceiver
1.
Disarm the alarm. Unplug HAR-1 from the MCM and plug it back in, the siren will
chirp 2 times and the lights will flash 2 times. (if equipped with optional siren)
2.
Within
6 seconds
of the lights flashing, turn ignition switch “ON” and “OFF” 3
times.
3.
If step 2 is done correctly and within the time allowed , the siren will chirp 2 times
and the lights will flash an additional 2 times to confirm that the system is in
“Learn Mode”.
4.
Press and hold the remote button until the system chirps 2 times and the lights
flash 2 times to indicate that the MCM has learned the code.
5.
Turn ignition “ON” and “OFF” to exit “Learn Mode”.
**It is not recommended to clip the remote to your ignition key. Attaching the
remote to your key may damage the remote and/or scratch your bike**
1
Note: The transceivers are programmed from the factory. Encoding is only necessary should
the transceiver lose its code and will not arm or disarm the security system or if a
replacement remote is obtained.