background image


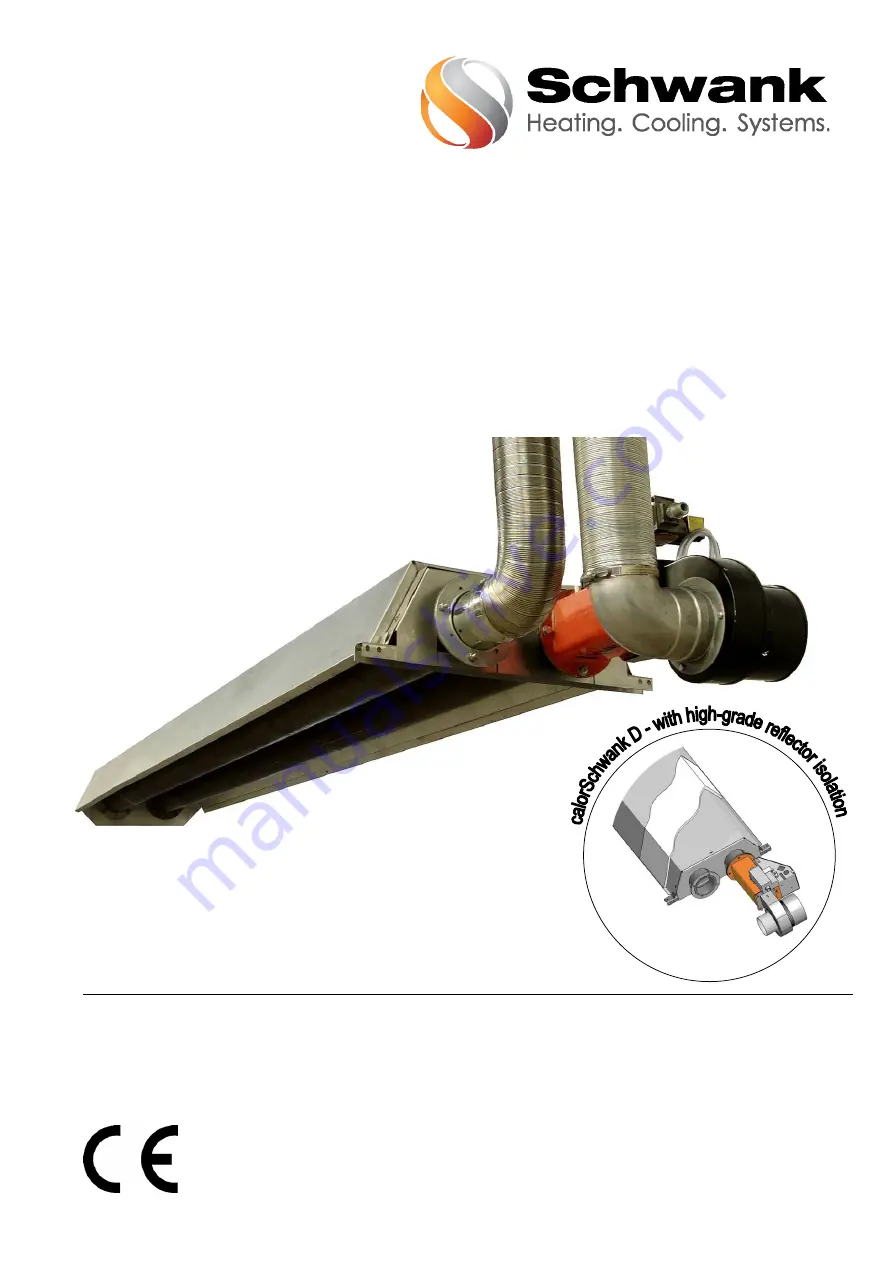
infraSchwank D / calorSchwank D 

Radiant Tube Heater 


15 U / 20 U / 30 U / 40 U / 50 U / 60 U 

1-stage / modulating lambdaPlus 

single heater and flue gas collection system [herringbone] type F 


Technical Manual 

Technical Instructions 

Operating Instructions 

Legal Requirements 

Assembly Instructions 

Installation Instructions 

Commissioning 

Service Guide 

0085BO0037 

Version

 021
  infr
a D U-Form


16

/19
 

Techni

sche

Ä

nd

eru
ngen

vorbeha

lten

Summary of Contents for calorSchwank D 15 U

Page 1: ...aPlus single heater and flue gas collection system herringbone type F Technical Manual Technical Instructions Operating Instructions Legal Requirements Assembly Instructions Installation Instructions Commissioning Service Guide 0085BO0037 Version 021 infra D U Form 16 19 Technische Änderungen vorbehalten ...

Page 2: ...ogne Germany Tel 49 0 221 7176 0 Fax 49 0 221 7176 288 Internet www schwank de Schwank companies in Austria Belgium Canada China Czech Republic France Germany Great Britain Hungary Netherlands Poland Romania Russia Slovakia Ukraine USA Distribution in more than 40 countries worldwide ...

Page 3: ...ration with MODBUS control 36 Electrical connection exhaust gas collecting system herringbone system 36 11 Commissioning instructions 42 Before commissioning 42 Parameter IC 4000 1 and setting 43 Assignment MODBUS address 44 External identification MODBUS address 44 Adjusting nominal thermal load at single stage operation 45 Adjusting thermal loads for modulating operation lambdaPlus 45 Commission...

Page 4: ...ind additional instructions about the application handling of the heater Notes for your safety This appliance is designed according to the requirements of the existing standards Nevertheless it is possible that dangers for you and others result from the installation and or operating errors To avoid this please read and follow the instructions carefully General Notes Only use the radiant tube if it...

Page 5: ...ant tubes with turnaround box flange packing Corrosion resistant and radiant optimized reflector end cap and brackets for hanging calorSchwank D isolated reflectors Accessories Central control unit SchwankControl Touch with temperatures and operating schedules MODBUS control Central control SRT 1 with temperatures and operating schedules Gas cock gas connection with thermal shut off device Gas hos...

Page 6: ...e incoming side not shown 4 Fan 5 Air baffle plate only 15 20 30 40U 6 Gas combination valve 1 stage modulating 7 Test nipple connection pressure 8 Test nipple nozzle pressure 9 Adjustment screw nozzle pressure 10 Adjustment screw start step valve 11 Inspection glass 12 Burner cup 13 Burner nozzle 14 Ignition and ionisation electrode 15 Ignition cable 16 Ionisation cable 17 3 pin power supply sock...

Page 7: ... d cm Tab 2 Safe distances Key a Minimum radial safety distance inside radiation area b Minimum upper safety distance when hanging horizontally c Minimum upper safety distance when hanging angled d Minimum lateral distance to supply pipes outside radiation area Distances to flammable materials in the radiant area Radiant tubes must be positioned so that the surface temperature of components with f...

Page 8: ...operation expands several centimetres because of thermal expansion Avoid therefore inflexible suspension Do not use fixing elements like open hooks etc Hang the heater in balance We recommend the use of turnbuckles or adjustable steel cable grips for ease of adjustment and balance Fixing points for chains or steel cables on the heater are shown in Fig 15 and 16 on pages 20 and 21 Attention If you ...

Page 9: ...room Type A3 without exhaust system combustion air from inside the room 2 Flued with individual exhaust system combustion air from inside the room Type B23 3 Flued with individual exhaust system combustion air from outside the room Type C 4 Flued with flue collecting system and central flue fan combustion air either from inside or from outside according to EN 777 Type F 1 Indirect flue into the ro...

Page 10: ...nstallation must not exceed 10 radiant tubes The exhaust air of each tube is collected via a central collecting tube system by a central flue fan and led to the chimney Planning construction and layout of such installations must be carried out by Schwank employees as well as commissioning The strict observance of the Schwank layout drawings and calculation figures are the precondition of the manuf...

Page 11: ...f tapping screws The wall terminal is mounted with a small gradient to outside to prevent intrusion of driving rain The 90 elbow at the sucking fan side is to mount with the opening on the top infraSchwank D calorSchwank D type 50 60 U cannot be operated using a wall terminal Please note the safety distance to flammable materials single wall exhaust pipe 40 mm double wall exhaust pipe wall termina...

Page 12: ...s of self tapping screws All socket connections on the exhaust and air line must be locked by means of self tapping screws The 90 elbow at the sucking fan side is to mount with the opening on the top System certification tube heater infraSchwank D calorSchwank D with exhaust line system CE 0432 CPD 217915 System 0 2 0 5 Muelink Grol Please note the safety distance to flammable materials single wal...

Page 13: ...e to prevent intrusion of driving rain The wall terminal is fastened to the building wall with screws by means of the integrated flange plate The flange plate supports and secures the wall terminal Please note the safety distance to flammable materials single wall exhaust pipe 80 mm double wall exhaust pipe wall terminal 0 mm System certification tube heater infraSchwank D calorSchwank D with exha...

Page 14: ...fety distance to flammable materials single wall exhaust pipe 80 mm double wall exhaust pipe roof terminal 0 mm System certification tube heater infraSchwank D calorSchwank D with exhaust line system Future ew CE 0432 CPR 00055 209 Future ew flex CE 0036 CPR 00055 207 Future dw CE 0432 CPR 00055 301 Schräder The roof terminal is fastened with screws by means of the integrated flange plate on the b...

Page 15: ...ust pipe roof terminal 0 mm System certification tube heater infraSchwank D calorSchwank D with exhaust line system Future ew CE 0432 CPR 00055 209 The roof terminal is fastened with screws by means of the integrated flange plate on the building ceiling The flange plate supports and secures the roof terminal Fig 12 Installation tetraSchwank in room air operation with roof terminal stainless steel ...

Page 16: ...pipe collecting system consist of following main components Tube heater infraSchwank D calorSchwank D Spiral duct and connection elements for exhaust collecting system different dimensions Central low pressure fan Fan monitoring kit Article no 700 0012 0 Planning and calculation of the complete system including collecting pipes fans and chimneys must only be done by Schwank Planning details have t...

Page 17: ...endments in force at the time of installation is a requirement of our warranty In Germany the following rules standards and regulations must be observed EnEV Verordnung über energiesparenden Wärmeschutz und energiesparende Anlagentechnik bei Gebäuden DIN EN 12831 Heizungsanlagen in Gebäuden Verfahren zur Berechnung der Norm Heizlast DIN EN 13384 Abgasanlagen DIN V 18599 Energetische Bewertung von ...

Page 18: ...d on and off automatically Fault If no flame is reported during the pre purge period and the safety time approx 30 sec the heater repeats the ignition process If there is no flame after the second ignition process the heater switches off automatically and is locked Investigation and repair must be carried out by authorized personnel After clearance of the fault the heater can be reset The cause of...

Page 19: ...section 3x 1 5 mm2 Ölflex or silicone cable To set the bluTek burner kit free of voltage it is only necessary to remove the plug of the power supply Regulation The heating system is controlled via the central control unit SchwankControl Touch The corresponding heating commands for the heater are sent via MODBUS communication Connection MODBUS control from SchwankControl Touch to IC 4000 1 Use for ...

Page 20: ... 19 _INT Technical specification subject to change Fig 16 Measurements infraSchwank D calorSchwank D 30U 40U 50U and 60U view from below infraSchwank D calorSchwank D 50U infraSchwank D calorSchwank D 30U infraSchwank D calorSchwank D 40U infraSchwank D calorSchwank D 60U ...

Page 21: ... 30 0 49 0 38 0 60 0 48 0 Gas consumption m3 h 1 75 2 22 3 38 4 55 5 72 7 00 Propan Nominal heat load kW 15 0 19 0 29 0 39 0 49 0 60 0 G 31 3 modulating min max kW 15 0 11 2 19 0 14 3 29 0 22 0 39 0 30 0 49 0 38 0 60 0 48 0 Gas consumption m3 h 1 17 1 48 2 25 3 03 3 81 4 66 Weight infra calor kg 54 68 75 95 92 119 130 171 166 221 185 245 of air exhaust flue mm Electrical consumption W Electrical p...

Page 22: ...tor plate D 15 D 20 D 30 D 40 D 50 ELW D 60 ELW Air baffle plate D 15 D 20 D 30 spin D 40 U Burner baffle plate Ø 50 Ø 50 Ø 65 Nozzle pressure hPa 1 stage 15 2 15 2 15 2 15 2 15 2 21 4 modulating max min 15 2 10 15 2 10 15 2 10 15 2 10 15 2 10 21 4 14 min fan voltage VACTrue RMS 180 180 18 190 160 160 min fan voltage VACaverage RMS 165 165 165 180 130 130 Parameter PP03 phase angle control 13 13 1...

Page 23: ...ulating operation Start and ignition of the heater has always to be in full load After a time of minimal 1 minute the heater can be switched to small step Fault If no flame is reported during the pre purge period including 1 repetition of ignition process the burner control unit IC 4000 1 will switch off the radiant tube error will give fan runs in post purge time for 30 seconds and then heater wi...

Page 24: ...on bracket First the reflector will be fixed on the U bend connection by screws self locking nuts lock washers 3D washers M5 For insulated reflectors calorSchwank D the reflector end with notch on sides shows to the turnaround box The other reflector ending will be shoved under the clip of the suspension brackets Reflector and front plate have to be fixed by screws self locking nuts lock washers 3...

Page 25: ...round box connection by screws self locking nuts lock washers 3D washers M5 For insulated reflectors calorSchwank D the reflector end with notch on sides shows to the turnaround box The other reflector endings will be shoved under the clips of the suspension brackets The short reflector L 1500mm is mounted at the front of the heater Reflectors will be jointly fixed by 3x M 5 screws and self lockin...

Page 26: ...o be fixed by nuts 3D washers lock washers M8 on the suspension brackets Start the reflector mounting at the turnaround box connection Reflector will be fixed on the turnaround box connection by by screws self locking nuts lock washers 3D washers M5 For insulated reflectors calorSchwank D the reflector end with notch on sides shows to the turnaround box The other reflector endings will be shoved u...

Page 27: ...ed on the turnaround box connection by screws self locking nuts lock washers 3D washers M5 For insulated reflectors calorSchwank D the reflector end with notch on sides shows to the turnaround box The other reflector endings will be shoved under the clips of the suspension brackets Reflectors will be jointly fixed by 3x M 5 screws and self locking nuts Reflector and front plate have to be fixed by...

Page 28: ...ackets Start the reflector mounting at the turnaround box connection Reflector will be fixed on the turnaround box connection by screws self locking nuts lock washers 3D washers M5 For insulated reflectors calorSchwank D the reflector end with notch on sides shows to the turnaround box The other reflector endings lie on top to each other on the bracket bars Reflectors will be jointly fixed by 3x M...

Page 29: ...r endings lie on top to each other on the bracket bars The short reflector L 1500 mm is mounted in the middle of the heater Note the distance measure of suspension brackets The intermediate reflectors have to be fixed with the both front reflectors each reflector with 2 middle reflectors At the end of the main reflector sheet the middle reflector is riveted by 2 stainless steel rivets this reflect...

Page 30: ...right Fig 25 and 26 Remove the measuring pipe differential pressure contact between venturi fan and APS Now fit two new measuring pipes between venturi fan 2 2 way valve APS contact Making sure that the measuring pipe with damping nozzle 0 6mm is mounted on the right side Attention Do not cover the bore of the connecting bushing Fig 26 Place additional cable gland on right housing wall IC 4000 1 C...

Page 31: ...fraSchwank D calorSchwank D shape U 31 Version 021 infra D Form_U 16 19 _INT Technical specification subject to change Fig 27 View burner kit after conversion Fig 28 Assembly connection parts exhaust gas ...

Page 32: ... of the individual devices is available at the nominal thermal load of the entire system according to table 6 Please consider the pressure drop of the upstream mounted gas connection and gas filter For the detailed pressure drop value of the Schwank gas pipe systems see table 7 Minimum connection pressures in front of valve type min connec tion pressure start step pressure hPa single stage hPa mod...

Page 33: ... installation of the heater Reconnection after pressure control and expansion Please observe the national standards Connect the heater with an approved flexible hose Use the following hose length for infraSchwank D calorSchwank D shape U Mount a flexible hose only with 90 bend or with 2 x 90 elbow fittings in a 180 bend according to Fig 30 31 and 32 Keep the specified installation dimensions Incor...

Page 34: ...per have to be mounted at the end of the tube heater The adapter must be fixed with a gasket at the flange of the last radiant tube The spiral tubes for the flue collecting system with different lengths and dimensions must be mounted according to Schwank planning When assembling the tube elements any burrs or residue of oil and grease must be eliminated All connecting tubes and collecting tubes mu...

Page 35: ...ly burner kit is included in delivery of the kit Modulating operation lambdaPlus In the standard case 230 VAC error signal is given via contact 3 at 4 pin plug For modulating operation without MODBUS communication the modulation signal must now be connected to contact 3 of 4 pin plug Fig 34 The wiring between the plug socket and board is already factory made For modulating operation without MODBUS...

Page 36: ...tween junction box MODBUS and connection burner control unit IC 4000 1 may be 0 5m At the of each MODBUS communication circuit a terminal resistance 120 must be set on the relevant burner control unit IC 4000 1 Resistor is already loosely plugged into each socket KN 8 of the burner control unit IC 4000 1 This socket must then be closed with the resistor The necessary MODBUS address assignment is e...

Page 37: ... D calorSchwank D shape U 37 Version 021 infra D Form_U 16 19 _INT Technical specification subject to change Fig 35 Wiring scheme burner kit infraSchwank D calorSchwank D with MODBUS control to SchwankControl Touch ...

Page 38: ...nk D shape U 38 Version 021 infra D Form_U 16 19 _INT Technical specification subject to change Fig 36 Wiring scheme burner kit infraSchwank D calorSchwank D 1 stage via relay control SchwankControl Touch without MODBUS control ...

Page 39: ... D shape U 39 Version 021 infra D Form_U 16 19 _INT Technical specification subject to change Fig 37 Wiring scheme burner kit infraSchwank D calorSchwank D modulating via relay control SchwankControl Touch without MODBUS control ...

Page 40: ...e U 40 Version 021 infra D Form_U 16 19 _INT Technical specification subject to change Fig 38 Wiring scheme burner kit infraSchwank D calorSchwank D exhaust gas collecting system with SchwankControl Touch extension kit Fan Control SAV1 ...

Page 41: ...ical specification subject to change Fig 39 Wiring scheme burner kit infraSchwank D calorSchwank D 1 stage with alternative control unit SRT 1 Fig 40 Wiring diagram burner kit 1 stage infaSchwank D calorSchwank D Fig 41 Wiring diagram burner kit modulating infraSchwank D calorSchwank D ...

Page 42: ...not included in this service The heaters are only pre set by the manufacturer and must be adjusted for proper operation according to gas quality site on site For this information contact your local gas company Check the function of the following equipment Exhaust flue Combustion air supply Control unit Safety equipment Safety of electrical circuit Pay attention when commissioning Vaporization of r...

Page 43: ...successive numbers 3 burner control software 1 Parameter Parameter name and parameter value definitions Factory setting Set range PP01 Setting Communication 0 No MODBUS control e g ThermoControl M 1 MODBUS contol by SchwankControl Touch 1 0 1 PP02 Drive Fan 0 Phase angle control driven 1 PWM driven 1 0 1 PP03 Note 1 Value phase angle control fan 0 80 power supply 230V value 0 153 V value 80 230 V ...

Page 44: ...econds Parameter menu is closed and DISP1 is blank again Parameter settings menu has 10 minutes timeout If you don t press any button for 10 minutes control exits from parameters menu automatically without saving the settings Assignment MODBUS address For every heater burner control unit it is mandatory to assign an MODBUS address if it controlled by SchwankControl Touch All heaters are assigned w...

Page 45: ... jet pressure until the point is reached at which a decrease or increase in the nozzle pressure is noticeable on the measuring instrument 2 Close test nipple after the measurement 3 Remove the measuring instrument and check if the test nipple is gas tight Adjusting thermal loads for modulating operation lambdaPlus It is necessary in addition to the mechanical factory setting of the modulating gas ...

Page 46: ...um value 19 To store the new parameter setting press SW2 and SW3 buttons together for 3 seconds and leave the setting level 20 Adjustment of the mechanical pressure range of modulating regulator Be left in chimney sweep mode and disconnect the power supply modulating regulator 21 Turn the large outer adjusting screw B on the regulator slowly in the or direction while continuously watching the pres...

Page 47: ...ank D shape U 47 Version 021 infra D Form_U 16 19 _INT Technical specification subject to change Fig 46 Board IC4000 1 with 7 segment display and push buttons SW 2 SW 3 Dia 1 Fan voltage phase angle control drive vs value PP03 ...

Page 48: ... at the end of the tubes completely open The minimum negative pressure under these conditions must be 1hPa In case the negative pressure level is lower please check again the tightness of the complete system Also check that the damper in front of the central exhaust fan is open Commissioning The safe evacuation of the exhaust gases of all heaters is ensured by correct adjusting of negative pressur...

Page 49: ...echnical specification subject to change Determination of nozzle pressure Example for the determination of the nozzle pressure Diagram 2 Wobbe Index profile Natural gas infraSchwank D calorSchwank D 15 50U Diagram 3 Wobbe Index profile Natural gas infraSchwank D calorSchwank D 60U ...

Page 50: ...rmediate reflectors Check tightness of gas carrying parts and connections Check the flexible gas hose for correct installation and tightness Check electrical connection to the burner kit Check the air flue system Check firm mounting and tightness of fan burner kit Visual check impeller fan for damage traces and balanced run Check condensation pipes Check the safety functions of the ignition and io...

Page 51: ... flame is not detected for the 2 ignition attempts after a flame loss 3 APS open error APS air pressure switch Error Is given if phase angle control type is selected PP02 0 Error is given if APS contact opens during start or operation 4 APS closed error Error Is given if phase angle control type is selected PP02 0 Error is given if APS contact already closed during start 5 Encoder signal missing e...

Page 52: ...or code 2 poor low ionization current 0 7 A DC too low connection pressure Error code 5 PWM fan don t run e g impeller broken motor broken PWM cable broken Error code 7 8 internal error IC 4000 1 Error code 9 Wrong setting fan speed parameters PP04 PP05 PP06 Damaged fan e g bearing failure Error code 10 interruption MODBUS connection 3 minutes wrong wiring between IC4000 1 and SchwankControl Touch...

Page 53: ...r baffle only 15 20 30 40U Burner cup Burner nozzle Air baffle plate only 15 20 30 40U Fan air restrictor Instruction to change the gas family 1 Change the burner nozzle 2 Change the burner ceramic tile or the whole burner cup only for 50 60U 3 Adjust the new nozzle pressure see Tab 5 page 23 4 Adjust the new start step pressure see Tab 5 page 23 5 Stick on the new rating label ...

Page 54: ...Fig 48 2 Fix end bracket at inner side of turnaround box open and close again 4 nuts M8 Fig 50 3 Fix two angle brackets at each tube hanger screws M8 x 60 nuts Fig 51 Screw on angled brackets at the inner holes of suspension bracket NOTE 50 60kW Screws to fixing suspension bracket bars must be inserted from below 4 Holding bracket put loose on the first reflector view from burner unit and screw to...

Page 55: ... on the left side in view from behind Fix burner protection grid burner top with supplied cable straps or similar at bottom protection grid 11 Protection grid burner top has to be cut holes depends on installation on site for flue system and may be gas line Connect flue system pipes and gas line NOTE Select the cutouts large enough to compensate the thermal length expansion of the heater 12 Insert...

Page 56: ... 51 Fixed angle bracket on suspension bracket Fig 52 Holding bracket infra D and calor D Fig 53 Loose mounted clamp Fig 54 Cut out on fan side for mounting and compensation thermal length expansion only 50 60kW Fig 55 Fixing front protection cover burner on protection grid burner top Cut out on fan side Holding bracket calor D shape U Holding bracket infra D shape U ...

Page 57: ... chapter 9 page 25 30 2 Mount bolts with spacer sleeves and mounting brackets A at required positions Fig 56 3 If required fasten mounting bracket B to turn around box by losing 4 lower hex nuts M8 placing mounting bracket on tube flanges and fastening hex Nuts Fig 58 4 Place reflector elongation C on mounting brackets A and bolt them together with reinforcement plates D self securing nut M8 Fig 5...

Page 58: ... angled bracket 5 Further assembling as described in chapter 9 page 24 27 Fig 59 60 Assembling order reflector elongation Gas filter groups To avoid technical problems with the gas combination valves which are caused by pollution of dust or rust coming out of the gas pipe have to be mounted a gas filter group gas filter premounted double nipple for each tube heater 50 60U For tube heaters 15 30U a...

Page 59: ...om burner unit 4 Pass other half gas inlet connection through PG gland and connect with burner unit Union fitting first tighten by hand Access to the burner kit for assembling is given via the inspection opening on the top of the cover 5 Stick gasket on protection box with silicon Mount complete protection box with burner kit inside at radiant tube flange with gasket between tube flange and protec...

Page 60: ...l screws Ventilator must be hang separate Note the suction direction of the ventilator Note the outflow direction downwards of the ventilator tetraSchwank heat exhanger should be mounted with slight slope 3 mm 1m to the T piece An extension of the flue gas installation is permitted only in exceptional cases tetraSchwank must be suspended by two premounted fastening clamps Chains or steel cables ha...

Page 61: ...L 5950 mm stainless steel with welded flanges not in Fig 66 126 7220 0 8 Gasket between tubes and burner infra D calor D 126 7048 0 9 Turnaround box 126 7015 0 10 Reflector infra D shape U L 3000mm 126 7011 0 11 Reflector calor D shape U L 3000mm 126 7062 0 12 Reflector short infra D 20U and 60U L 1500 mm 126 7221 0 13 Reflector short calor D 20U and 60U L 1500 mm 126 7234 0 14 Intermediate reflec...

Page 62: ...e and 2 stage coil in cardboard 126 7536 1 7 Spare part gas valve cpl premounted replacement HONEYWELL for SIT 2 stage Propane infra D calor D 15 60U with cable for valve and 2 stage coil in cardboard 126 7536 2 8 Spare part HONEYWELL for HONEYWELL 1 stage modulating VK 4105N 5016 192 0761 3 9 Spare part gas valve HONEYWELL for HONEYWELL 2 stage Natural gas VK 4115Q 2004 192 0766 0 10 Spare part g...

Page 63: ...infraSchwank D calorSchwank D shape U 63 Version 021 infra D Form_U 16 19 _INT Technical specification subject to change 16 EC type examination certificate ...

Page 64: ...infraSchwank D calorSchwank D shape U 64 Version 021 infra D Form_U 16 19 _INT Technical specification subject to change ...

Page 65: ...infraSchwank D calorSchwank D shape U 65 Version 021 infra D Form_U 16 19 _INT Technical specification subject to change 17 EC declaration of conformity ...

Page 66: ...2 122 0 10 0 10 0 09 Values 122 122 122 77 0 79 5 80 5 81 1 79 5 81 9 79 0 81 3 79 9 82 1 79 3 81 1 Tab 14 Characteristic values energy performance infraSchwank D shape U fuel Natural gas Propane 15 1 U 15 M U 20 1 U 20 M U 30 1 U 30 M U 40 1 U 40 M U 50 1 U 50 M U 60 1 U 60 M U Nominal heat input kW NCV 15 0 15 0 19 0 19 0 29 0 29 0 39 0 39 0 49 0 49 0 60 0 60 0 Minimum heat input kW NCV 11 2 14 ...

Reviews: