background image

SMART Board Interactive Whiteboard Basics

This

Quick Reference Guide

provides an overview of the information you need to begin using a SMART Board™ interactive

whiteboard. Before you begin, make sure the appropriate SMART Board software has been loaded on your computer.

Starting the SMART Board Interactive Whiteboard

1

Ensure the interactive whiteboard and projector are connected to the computer.

2

Turn on the projector, then the computer. The interactive whiteboard draws power from the computer and will be

activated automatically. The Ready Light, indicating the status of your interactive whiteboard, will be red while the

SMART Board and the computer are establishing communication.
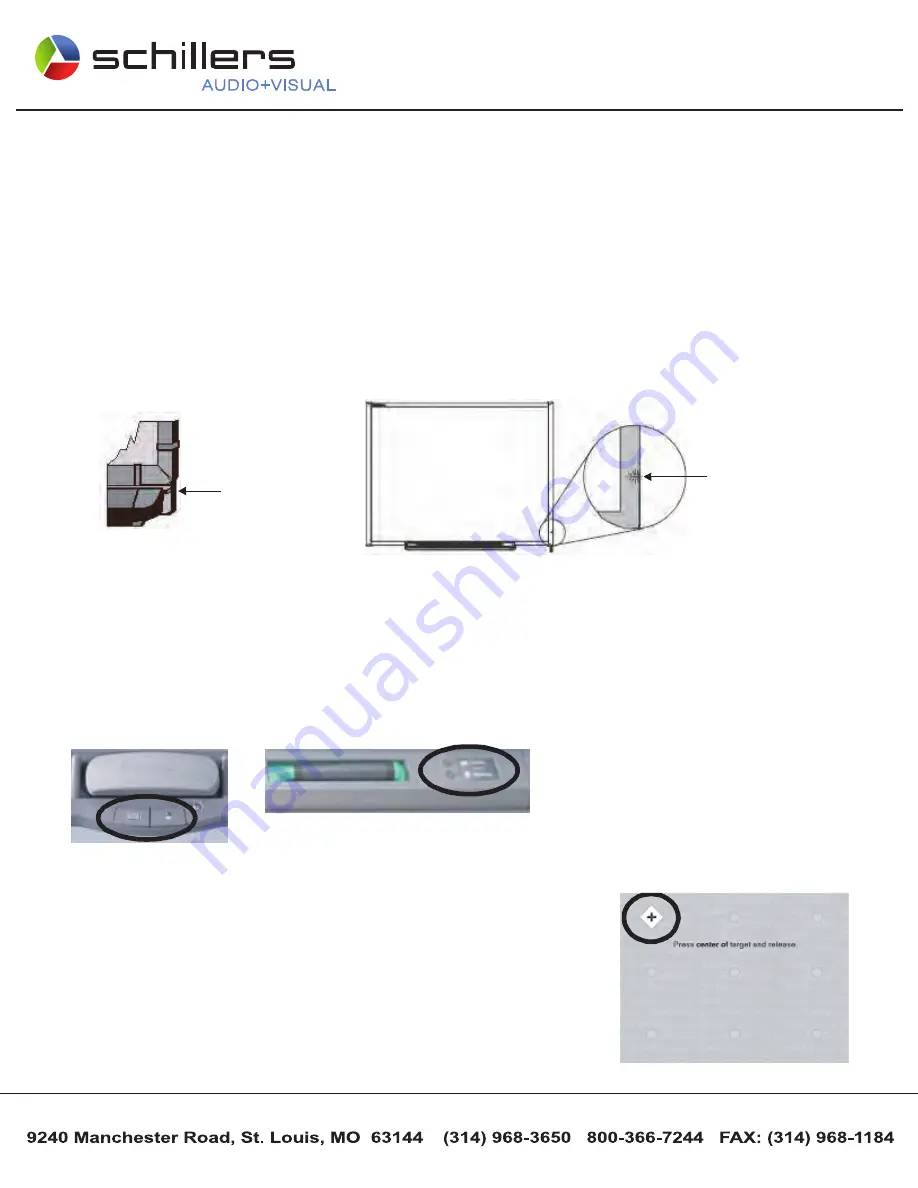
NOTE

:

Depending on the model of the SMART Board interactive whiteboard you are using, the Ready Light is either

located on the right side of the SMART Pen Tray or the lower-right of the frame bezel.

3

Log on, if required, using the computer keyboard. When the Ready Light on the pen tray turns green, the computer

and the interactive whiteboard have established communication. The SMART Board is now touch sensitive, and you

can open any application available on the connected computer.

Orienting the SMART Board Interactive Whiteboard

You should orient your interactive whiteboard when setting it up, or if either the projector or interactive whiteboard has been

moved since you last used it.

1

Press and hold the

Keyboard

and the

Right Mouse

button simultaneously until the Orientation screen appears.

2

Begin the orientation process at the upper left corner of the Orientation screen.

Press your finger or pen firmly on the center of each cross in the order

indicated by the white, diamond-shaped graphic.

Ready Light on lower-

right of frame bezel

Ready Light on right

side of pen tray

Pen-tray buttons

Pen-tray buttons

Orientation screen

SMART BOARD 
Quick Reference Guide

TM

Technical Assistance Available from SMART:

1-888-42-SMART (76278)

www.smarttech.com or call Schiller's at:

(314) 968-3650 or 800-366-7244

www.schillersAV.com

[email protected]

Schiller's Audio-Visual

Schiller's Audio-Visual

Summary of Contents for Smart Board

Page 1: ...n the Ready Light on the pen tray turns green the computer and the interactive whiteboard have established communication The SMART Board is now touch sensitive and you can open any application available on the connected computer Orienting the SMART Board Interactive Whiteboard You should orient your interactive whiteboard when setting it up or if either the projector or interactive whiteboard has ...

Page 2: ...f the border An image of the screen including your writing will be saved in a new Notebook file NOTE If the Digital Ink Layer border does not appear when you pick up a pen you may be working in an Ink Aware application e g Microsoft Word If the application is Ink Aware buttons will be available in the application s own toolbar for capturing writing 2 If you wish to capture a specific area of your ...

Page 3: ...ges Search for objects stored in the Gallery such as images video and Macromedia Flash content Export your Notebook file to HTML PDF PowerPoint PPT and image types such as JPEG GIF PNG and BMP Recorder Record all actions that take place on your interactive whiteboard such as training or workflow processes Add audio with a microphone control recording quality and video format and share your recordi...

Page 4: ... Excel spreadsheet to make them easier to see Two windows will appear the smaller window is used to select the area you would like to magnify and the larger window displays the magnified view Other SMART Tools Pointer Use the Pointer to direct audience attention to an important piece of information on the screen Other SMART Tools Screen Capture Toolbar Enhance your lesson activity by capturing a s...

Page 5: ...area of the screen with translucent ink for emphasis Undo your previous action This tool toggles between two states Undo and Redo Redo an action you cleared in error This is the second of the two states mentioned above Erase digital ink Make your next press on the interactive whiteboard a right click Open the drop down menu to personalize toolbar functions Cursor Pen Tool Highlighter Eraser Right ...

Page 6: ...V com av schillers com Schiller s Audio Visual SMART BOARD Quick Reference Guide TM Technical Assistance Available from SMART 1 888 42 SMART 76278 www smarttech com or call Schiller s at 314 968 3650 or 800 366 7244 ...

Page 7: ...V com av schillers com Schiller s Audio Visual SMART BOARD Quick Reference Guide TM Technical Assistance Available from SMART 1 888 42 SMART 76278 www smarttech com or call Schiller s at 314 968 3650 or 800 366 7244 ...

Page 8: ... to type the keyword triangle into the search field to save time To look for Gallery items using the search field 1 Press once inside the search field 2 Type a keyword related to the type of object s you are looking for 3 Press the Search button to display your results TIP Press the icon to the left of the search field to use the On Screen Keyboard to type your keyword Select a folder to display i...

Page 9: ...to help supplement learning activities Double press a folder thumbnail to view its contents The thumbnails displayed in Pictures and Backgrounds include clip art and photographs Drag an item to the work area to use as part of a lesson or to modify its properties Interactive and Multimedia contains three types of content Flash files video files and objects with attached sounds Items from this secti...

Page 10: ...Navigate to the screen you want to capture such as a Web page The Capture toolbar will remain open over any active application or Web browser There are four ways to capture content 4 The captured image will appear on a page in your Notebook file Using the Insert Menu You have accumulated numerous pieces of content over the last several years of teaching Now it s time to incorporate some of this ma...

Page 11: ...ur current Notebook file for future reference or to share the file with others using Notebook software 1 Select File Save from the Notebook menu or Select File Save As to save revisions as a new Notebook file Your original Notebook file will not be changed 2 The Save As dialog box will appear 3 Browse to the location where you want to save your Notebook file 4 Type a name of your file in the File ...

Reviews: