background image


SH206+


User Manual 

V2.3.X iOS System


Smart Home System 

Se Power Saving Solution 


Product Introduction:


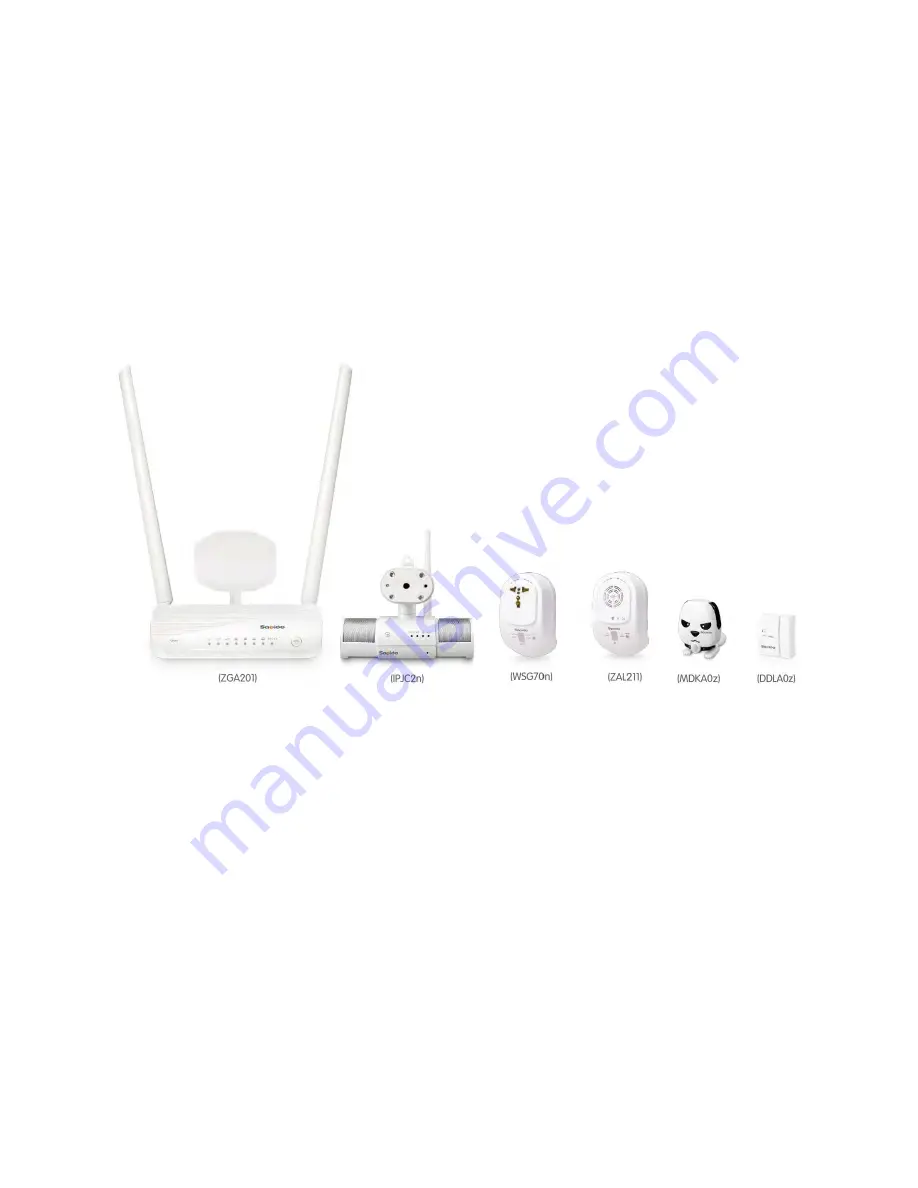
SH206+ is a Security plus Power Saving Solution with Sapido APP. There are five different 
scenarios to make your system more ease to use. Use your iPhone/iPad to long-end control your 
home wherever you are. Better secure with IP Camera and Security Alarm. Manage your electronic 
appliances and do the power saving. Let Sapido do more for you, make your life easier and smarter. 


Summary of Contents for SH206 Plus

Page 1: ... Saving Solution with Sapido APP There are five different scenarios to make your system more ease to use Use your iPhone iPad to long end control your home wherever you are Better secure with IP Camera and Security Alarm Manage your electronic appliances and do the power saving Let Sapido do more for you make your life easier and smarter ...

Page 2: ...he system 52 1 Advice When the family user s handheld device is around the same place 52 2 When the family user s handheld device is not around the same place 54 9 3Instruction of Scenario Settings 56 9 3 1Activation Delay Setting of Scenario s Smart Switch 56 9 3 2Activation Delay Action Time of Scenario s Security 57 9 3 3Activation Delay Working Time of Scenario s Camera 59 9 3 4Activation Dela...

Page 3: ...iles of mobile device iPhone iPad 101 1 Document Browse 102 2 Rename 106 3 File Edit 107 4 Offline Browse 110 9 8 3IOT Network To review SH206 and USB device status 111 9 8 4IOT Device Managent How to manage security device in system 115 1 Update the firmware version 116 2 Hide the Device in IOT Device Management 117 3 Delete Device While Off Line 118 4 The Function of GUI 119 9 9Q A 120 10 Add Mo...

Page 4: ...tatus Orange 2 4G Wi Fi signal normal Blue 5G Wi Fi signal normal WAN Green 10 100Mbps Wireless network is connected properly Orange 10 100 1000Mbps Wireless network is connected properly LAN Green Wireless network is connected properly Orange 10 100 1000Mbps Wireless network is connected properly WPS Status Green Router Connected Properly Green Wi Fi signal extending Router Resetting ...

Page 5: ...uide light Light Color Status Instruction Power Green Alarm in properly Alarm Red Alarm is triggered Status Red Zigbee off line Orange Resetting ZigBee LED Green Steady Security system working properly Flashing Zigbee connecting ...

Page 6: ... DDLA0z Product Guide light Light Color Status Instruction DDLA0z ZigBee Red Connecting with ZAL211 Green Connected with ZAL211 successfully Orange Low Battery MDKA0z ZigBee Red Connecting with ZAL211 Green Connected with ZAL211 successfully Orange Low Battery ...

Page 7: ...t Color Status Instruction Power Green Camera is working properly WAN Green Wireless network is connected properly LAN Green Wireless network is connected properly Wireless Status Green Wi Fi signal normal WPS Status Orange Wi Fi signal extending Green Wi Fi signal extended successfully ...

Page 8: ...AN Orange Power on is being applied on the device After 30 seconds the LED light will be green Green Wireless network is connected properly Manual Button Green Power ON No Light Power OFF Wireless Status Green Wi Fi signal normal WPS Status Orange Wi Fi signal extending Green Wi Fi signal extended successfully ...

Page 9: ...LAN Connecting to on line equipment such as personal PC web cam printer server etc If more LAN ports are needed please apply Switch Hub for extension Power ON OFF Power ON OFF USB USB Port Power Transformer Connected In Package RESET REBOOT Press over 10 seconds to factory default settings like your Wi Fi password Press about 3 seconds the device will be rebooted ...

Page 10: ...on and Port Function Description Mute Alarm Button ZigBee Button ZigBee signal extending Reset Reboot Button Press over 10 seconds to factory default settings like your Wi Fi password Press about 3 seconds the device will be rebooted ...

Page 11: ...loud Door Window Sensor DDLA0z Product Button and Port Function Description DDLA0z Power Button ON Power On OFF Power Off ZigBee LED ZigBee signal connecting MDKA0z Power Button ON Power On OFF Power Off ZigBee LED ZigBee signal connecting ...

Page 12: ...Connecting to on line equipment such as personal PC web cam printer server etc If more LAN ports are needed please apply Switch Hub for extension USB Connectable Micro USB Power Port Please connect with Sapido adapter Volume Adjust the volume of speaker RESET REBOOT Press over 10 seconds to factory default settings like your Wi Fi password Press about 3 seconds the device will be rebooted ...

Page 13: ...iption WAN LAN Connect to xDSL Fiber Static IP Dynamic IP PPTP L2TP Wi Fi ISPAP WiFi AP Power Outlet Power supply 100V 240V Manual Button Switch power ON OFF RESET REBOOT Press over 10 seconds to factory default settings like your Wi Fi password Press about 3 seconds the device will be rebooted ...

Page 14: ...ou have to download Sapido APP first Please follow the steps below Step 1 Install both Antenna on Home Gateway ZGA201 Step 2 Connect the Ethernet cable to ZGA201 WAN port Step 3 Press the white button to start up Step 4 Wait for 30 seconds and both turn on means start up successfully Home Gateway ZGA201 is the main router of your SH206 which with two different Antennas one is supported 9dbi the ot...

Page 15: ...15 Step 5 Install Antenna on IP Cam IPJC2n Step 6 Power on turns red and blink to boot Step 7 Wait for 30 seconds and all will turn green means start up was successfully ...

Page 16: ...less WPS light turns to green which means the start up was successful Step 9 Plug in with the non electronic control type of household appliances like below One Switch for one electric appliance only No extension cord recommend in order to avoid heavy electric tension ...

Page 17: ...After ZigBee LED and Power LED lighting green which means start up successful Security Alarm ZAL211 will be triggered if someone open the window door giving the notice for your safety Step 11 Please open the lid of the Cloud Door Window Sensor DDLA0z and insert 2 x AAA batteries ...

Page 18: ...igBee light is blinking which means the DDLA0z is mapping with Home Gateway ZGA201 Once the Window is opened the alarm will start to have the alert sound Step 13 Please open the lid of the Cloud Motion Sensor MDKA0z and insert 2 x AAA batteries Before close the lid switch the power to ON Step 14 After fastening the MDKA0z on the hallway or gate it will trigger the Alarm ZAL211 if someone approache...

Page 19: ...click and search by the key word Sapido Click Free Install Step 3 After installing Sapido APP it will create a shortcut automatically on the main page of your iPhone Step 4 Please open the Settings function on your iPhone Step 5 Please turn on and search for WiFi network from ZGA201 Step 6 Click Cancel to continue ...

Page 20: ...fault password admin in blank In order to protect your network domain security please click Change Password and enter the new password IOT name You can give your IOT Name in the blank Device Name The Device name will show up automatically doesn t need to change User name of Domain The account will show up automatically doesn t need to change Password of Domain Need to enter the default password ad...

Page 21: ...ase enter your password for your network domain WiFi Password Please enter your WiFi Password Press New to complete setting network domain security Step 12 Connecting Step 13 After setting it will enter to the log in page automatically ...

Page 22: ...22 Step 14 Turn on Setting Wi Fi and find ZGA201 WiFi signal to connect Step 15 Enter the WiFi Password you have set on step 11 and press Join Step 16 Re enter Sapido APP ...

Page 23: ...age see the instruction below Symbol Function Status Instruction Security Status Armed Panic Disarmed No security devices Events Notification No new event New event click for detail Scenario Off Mode Custom Mode Home Mode Away Mode Sleep Mode ...

Page 24: ... environment and view data with related devices Real Time View View Camera Internet Setting Internet setting while Gateway doesn t connect with Internet Digital TV Watch the digital TV with Sapido NAS TV WD091n This function won t show If you don t have Sapido NAS TV Log Out Log out the system Advanced To use more advanced function please change to the Advanced page ...

Page 25: ...are two ways of Internet setting to set up as below 1 No need to do additional setting if your Internet is from original router and the ZGA201 is connecting with your Ethernet cable already 2 Follow the steps below if your Internet is from PPPoE Step 1 Log in APP and click Internet Settings Step 2 Click PPPoE based on your Internet type Step 3 Please enter your ISP account and password and click A...

Page 26: ...ls on Step 6 Step 6 The instruction of the symbols from the main page Guide light Light Statue Instruction 1 The lights of device of the domain Green Domain and network is connected Gray Domain and network is disconnected Red Event alert 2 The light sym bols of the Cloud Security Green Security System Arm Gray Security System Disarm Red Alarm is triggered Empty No Installed or Security System offl...

Page 27: ...Smart Switch WSG70n and press the All Link Button on Home Gateway ZGA201 the system will make an automatically connection Set up the system with Sapido APP Step 1 Press the All Link Button on Home Gateway ZGA201 3 seconds Wait for 2 minutes the system will make an automatically connection ...

Page 28: ...s built up as below Home Gateway IP Cam Security Alarm Motion Sensor Door Window Sensor Smart Switch Battery Status Step 4 In IOT Setting page you can rename the device Select Home Gateway ZGA201 and click Rename Step 5 After typing in the new name click Apply to confirm Step 6 Gateway ZGA201 has been shown with new device name ...

Page 29: ...e click Apply to confirm Step 9 IP Camera has been shown with new device name Step 10 Please select the Security Alarm ZAL211 then click Rename Step 11 After entering the new name please click Apply then it will show the new name Step 12 The Alarm ZAL211 had been changed to the new name ...

Page 30: ...ill show the new name Step 15 The Cloud Motion Sensor MDKA0z_xxx had been changed to the new name Step 16 Choose the Cloud Door Window Sensor DDLA0z_xxx in IOT Setting first then click Rename Step 17 After entering the new name please click Apply then it will show the new name Step 18 The Cloud Door Window Sensor DDLA0z_xxx had been changed to the new name ...

Page 31: ...T Setting first then click Rename Step 20 After entering the new name please click Apply then it will show the new name Step 21 The Smart Switch WSG70n_xxx had been changed to the new name Step 22 After renaming select any device and click to access GUI ...

Page 32: ...larm Create your own scenario in Custom Mode brings more convenience in your life 4 1 Home Mode Step 1 Log in to the Basic Function home page and click Scenario Step 2 Off Mode has already selected this scenario means there is no scenario now in this system Please select Home Mode for further settings Step 3 Home Mode setting suggestion below Turn on the lamp Turn off the motion sensor in living r...

Page 33: ...urn on the motion sensor in living room Turn on the 2F window sensor Click Back for complete settings 4 3 Sleep Mode Step 1 Click in Sleep Mode for settings Step 2 Sleep Mode setting suggestion below Turn on the lamp Turn on the motion sensor in living room Turn on the 2F window sensor Click Back for complete settings ...

Page 34: ...X My Favorite and click Apply Step 3 Click in My Favorite Mode for settings Step 4 My Favorite Mode setting suggestion below Turn on the lamp Turn off the motion sensor in living room without alarm speaker Turn on the 2F window sensor without alarm speaker Click Back for complete settings Create Custom Mode 2 with the same steps ...

Page 35: ...y Step 2 Make sure you would like to change to Away Mode please click Yes Step 3 Please wait Step 4 Mode change successfully please click Back return to the Basic Function home page Step 5 Back to the home page you can see the Scenario symbol like means the system is in Away Mode Based on the Away Mode setting your rule will be under working Instruction of Scenario Symbols Off Mode Custom Mode Hom...

Page 36: ...s well Click in Event Notification to view the detail Step 3 The detail of event notifications will show and sort by date and time Click into a specific event Step 4 Click the alarm speaker symbol to mute the alarm To view the recording just click the Video Recording Step 5 30 seconds recording playing Click Exit return to the page Step 6 You will see the security status turn green means the syste...

Page 37: ...gered Step 2 If the security system be triggered the Panic symbol will show up Click the Panic sign and it will turn back to the Arm symbol means the system is back in status and under working Step 3 Click Real Time View to check the camera Step 4 Click Arm once you find the intruder in the camera screen Volume adjustor ...

Page 38: ...3 Click View Picture to review the screenshot image Step 4 The images will be sorted by date please direct select the date you want to view Step 5 Image checklist will be listed in order by time sequence See left side to directly preview the image and click the image for full screen review Step 6 Click below Play icon to review all images in turn when browsing full screen image ...

Page 39: ... the recording starts you can find the red pot on the top left corner Step 4 Video will be automatically stored in the USB drive of IP camera please go View Videos for video browse Step 5 Videos will be sorted by date and time please directly choose the video you want to view Step 6 Select the video for immediate play ...

Page 40: ...browse Step 8 Click Download if you want to back up the files to your smartphone or other devices Step 9 Video Downloading Step 10 Once download successfully and then you can play it Step 11 Downloaded files will be directly stored in Camera of Download List Step 12 Please Click Stop to stop recording ...

Page 41: ...41 Step 13 Click Apply Step 14 Please wait Step 15 Once the red pot is disappeared the recording has been stopped ...

Page 42: ...as below Step 1 Click Schedule Step 2 Click New to add new schedule Step 3 Please first select Record Schedule and set up the start time at 22 00 and end time at 23 59 Step 4 Choose Everyday for Day and finally click Done for confirmation Step 5 You can find the schedule you just added Please again click New to make the 2nd schedule Step 6 Choose Record Schedule and select start time at 00 00 end ...

Page 43: ...he 2nd schedule added To modify the schedule please click To delete the schedule please click Step 9 Click Confirm to finish setting Step 10 Please await for setting Do not turn off or return Step 11 Once the setup is done the screen will automatically go back to log in page Please again log in ...

Page 44: ... you can operate the appliances in your house along with the set schedules of Smart Insight Switch through cycling time setting and schedule function to surely accompany with daily routine and fully saving the energy and cost 6 1 Power On Off Step 1 Click Control on the home page of Basic Function Step 2 Click one specific electric appliance s power button at the right next to device name button i...

Page 45: ...wer on Off Power Off Repeat Power on off in cycle Step 4 If you want to select power mode in Repeat Mode just select it Step 5 Set up the rule for appliance schedule ON 1 Hour and 10 minutes OFF 30 minutes Day Friday Start 10 00 End 14 00 Click Done to complete setting Step 6 You can see your schedule is under the page To delete or edit the schedule click delete or edit button to do so ...

Page 46: ...46 Step 7 Click Confirm after setting Step 8 Please await for setting Do not turn off or return Step 9 Once the setup is done the screen will automatically go back to log in page Please again log in ...

Page 47: ...ance s total Day Week Month and Year power consumption like the picture below Step 3 For example click Week to view the detail of electricity statistics this week Step 4 You can also view the detail of this appliance like when is the power on time or working time Step 5 To delete all the data before click Reset on the top right corner After deleting the device will show up the time of reset If you...

Page 48: ... Step 7 Waiting for reset Step 8 You will see the reset data after deleting Click power ON OFF to start measuring your specific electric appliance s total daily weekly monthly and annual power consumption ...

Page 49: ...er if you want to do more settings please switch to the Advanced Function page Follow the steps below Step 1 Click Advanced on the top right hand side of the Basic function home page Step 2 You can see many sections on the Advanced function home page for users to do more settings See instructor below ...

Page 50: ...e right for children to change mode and control appliances only Just follow the steps below Step 1 Click IOT Account Management Step 2 Click User 1 Step 3 Select Enable first then giving the account and password for user 1 EX Mommy Step 4 Continually set up the limitation for User 1 For example Mommy can use Scenario Message Music Camera Switch and Internet Security only Click Apply after setting ...

Page 51: ...51 Step 6 Click User2 Step 7 Continually set up the limitation for User 2 For example Son can use Scenario Camera and Switch only Click Apply after setting ...

Page 52: ... device is around the same place Step 1 Go to Settings Step 2 Switch on Wi Fi Step 3 Select Main Home Gateway ZGA201 WiFi signal to connect Step 4 Type in the Security Password set by network creator and click Join Step 5 Please click and search by the key word Sapido Click Free Install ...

Page 53: ...lease type in the password provided by network family administrator in column and click New IOT to log in Step 9 There are two function pages can do the setting and use see the picture below Users will enter the Basic Function first automatically Basic Function Advanced Function Step 10 Click Back and return to home page ...

Page 54: ...arch by the key word Sapido Click Free Install Step 2 Click downloaded Sapido APP Step 3 Click New IOT Step 4 APP will NOT automatically shown information please create device name default user name admin and IOT password provided by network family administrator in column and click New IOT to log in ...

Page 55: ...5 There are two function pages can do the setting and use see the picture below Users will enter the Basic Function first automatically Basic Function Advanced Function Step 6 Click Back and return to home page ...

Page 56: ...1 Enter to the Advanced Function Page and click in Scenario you would like to do more settings EX Away Mode Step 2 Click Switch Step 3 Select the Smart Switch and click in to do the settings Step 4 Giving an example if you would like to make an activation delay of automatically turn off the appliance after 20 minutes in Away Mode to save power Please click Activation Delay and setting 20 Min worki...

Page 57: ...ity Step 2 Select the sensors you would like to set up Step 3 Click in the Motion Sensor to do the settings Step 4 You will set up the Activation Delay and Action Time of Motion Sensor Also you can select the devices to act after Motion Sensor be triggered such as Alarm Switch Speaker and Camera Select Notification Message means you will receive push notification if Motion Sensor be triggered Step...

Page 58: ...after make the rule for triggering Step 8 Back to the page for set up the Activation Delay If you want to let the motion sensor action delay 10 minutes after triggered just click Activation Delay and set up the time Action Time for Always then press Done to complete settings Your Motion Sensor will follow the rule you just make if it is triggered ...

Page 59: ... Mode below Step 1 Click in Scenario you would like to do more settings and click Camera Step 2 Select the specific Camera you would like to set up Step 3 Click in the Camera Step 4 If you want to let the Camera action delay 30 minutes after triggered just click Activation Delay and set up the time Working Time for Always then press Done to complete settings Your Camera will follow the rule you ju...

Page 60: ...ode below Step 1 Click in Scenario you would like to do more settings and click Online Streaming Step 2 Select the specific Camera you would like to play music Step 3 Click in the Camera Step 4 If you want to let the Camera action delay 1 hour after triggered just click Activation Delay and set up the time Working Time for Always then press Done to complete settings Your Camera will follow the rul...

Page 61: ...ose the music you would like to play and click Done Upload music to the USB first please see the detail on section 12 3 1 Step 6 You can see the Music List shows 3 which means you have select three songs to play with the rule you made ...

Page 62: ...ow the instruction below 9 4 1 Door Window Sensor Step 1 Click Security Step 2 Click the clock sign next to the Door Window Sensor Step 3 Click New Step 4 Giving an example make the schedule from 8AM to 5 30PM every day See the picture below Click Done after settings Step 5 You will see the schedule you just made has shown already ...

Page 63: ...off or return Step 8 Once the setup is done the screen will automatically go back to log in page Please again log in Step 9 You will see the clock sign turn dark grey which means it is under schedule working Step 10 To turn off all the functions of your Door Window Sensor just slide to OFF ...

Page 64: ...Motion Sensor Step 2 Click New Step 3 Giving an example make the schedule from 8AM to 5 30PM every day See the picture below Step 4 Click Done after settings Step 5 You will see the schedule you just made has shown already Step 6 Click Confirm to use this schedule ...

Page 65: ...Once the setup is done the screen will automatically go back to log in page Please again log in Step 9 You will see the clock sign turn dark grey which means it is under schedule working Step 10 To turn off all the functions of your Door Window Sensor just slide to OFF ...

Page 66: ...e able to store your favorite music in USB drive of IP Camera via Upload and bring you more options Step 1 Plug in the USB drive into your PC Step 2 Save your favorite music into USB drive Step 3 Plug USB drive back to the top of IP Camera IPJC2n Step 4 Select Camera Step 5 Select Play Step 6 Click Change to choose path ...

Page 67: ... Step 8 If you want to play music for 2 hours and then stop please first select Schedule Mode and set up the time click Done to complete Step 9 First select the music you want to play or whole folder and click Play on the top right corner Step 10 In music play mode you can adjust the volume via Step 11 Click Stop to stop music Step 12 Music play is stopped ...

Page 68: ... automatic music play at every 12 00 pm to 13 00 pm please first select Music Schedule mode Step 4 Set the start time at 12 00 pm and end time at 13 00 pm and choose Everyday for Day Step 5 Click Music to choose the music you would like to play Step 6 First select the music or whole folder and then Play ...

Page 69: ...chedule you just added in the checklist To modify please click To delete please click Step 9 Click Confirm to finish setting Step 10 Please await for setting Do not turn off or return Step 11 Once the setup is done the screen will automatically go back to log in page Please again log in ...

Page 70: ...side Step 2 Tap to start recording your voice Step 3 The microphone will turn orange while recording press the sign once again to stop recording Step 4 Stop recording Wait for the system uploading the alarm Step 5 After recording your own alarm it will automatically up load to the USB of IP Cam Create a name for your alarm EX for wake up or system will give the name with date Click Apply after nam...

Page 71: ...ess Back to the front page Step 8 Click Schedule in below Step 9 Click New Step 10 For example to set up the morning alarm at every 6 00 am please first select the mode as Siren Schedule and set the start time at 6 00 am end time at 6 05 am and select Everyday for Day ...

Page 72: ... you just added in the checklist To modify please click To delete please click Step 13 Click Confirm Step 14 Please await for setting Do not turn off or return Step 15 Once the setup is done the screen will automatically go back to log in page Please again log in ...

Page 73: ...se follow the steps below Step 1 Click the sign on the top right hand side of the page of Camera Step 2 Click Dropbox Status Step 3 Choose Connected then back to the front page Step 4 Dropbox Status shows Connected Press Apply for saving settings Step 5 Sign in your Dropbox account and click Sign In and Link Your 30 second video recording will automatically upload to your Dropbox from now on ...

Page 74: ...on measurement power switch set up schedule making and start up timing with the specific electric appliance for historical electric information reference Also it provides the function of over heating protection Giving you a lifestyle with smart protection power saving and energy conservation You can turn on off the power directly click the power button on the Smart Switch WSG70n if you are home Tu...

Page 75: ...on at the right next to device name button is grey means OFF Step 3 Power button turns to red means ON Step 4 Select one specific electric appliance Step 5 You can view different functions such as Power on Reason power consumption Uptime Since time of startup Step 6 If you want to change the Switch Mode to Repeat click Switch Mode ...

Page 76: ...matically and your electric appliance will follow the schedule you have set up Step 10 Back to the front page you will see the repeat sign at the right next to the device name that means your setup was successful Now turn the repeat sign to red represents turn on the repeat mode Step 11 After ten minutes in a period the sign will turn to grey Step 12 If you want to stop the repeat mode click the s...

Page 77: ...f 30 minutes every Friday from 10AM within 5 hours period Step 1 Select Schedule setting Step 2 Click New on the top right corner to add your new schedule Step 3 Select Repeat of Switch Mode Step 4 Set up the schedule like this ON 1 Hour and 10 minutes OFF 30 minutes Day Friday Start 10 00 End 14 00 Then click Done to complete setting Step 5 You can see your schedule is under the page To delete or...

Page 78: ...78 Step 7 Please await for setting Do not turn off or return Step 8 Once the setup is done the screen will automatically go back to log in page Please again log in ...

Page 79: ...story Step 4 History record of your electric appliances power on off Cloud Switch Schedule Use schedule set up to turn on off power Mobile APP Switch Use mobile APP to turn on off power Button Press Button on the Smart Switch to turn on off power Step 5 To delete all the data click Reset Step 6 All history record were deleted ...

Page 80: ...load photos videos and files etc in your mobile device to USB drive for expanding your storage spaces and share to you family members at the same time Step 1 Click Upload Step 2 Click Camera Roll Step 3 Tick the files you want to upload ex photos and click Change to select the path Step 4 Select your device name nickname Step 5 Click New Folder Step 6 Rename the folder such as Photo and click Appl...

Page 81: ...ep 9 Uploading the files Step 10 Please click Upload more files after upload succeeded Step 11 Click Back to select other files ex video Step 12 APP will memorize the path of last upload click Upload without changing path or click Change to choose other path ...

Page 82: ...pload paths as the shortcut Step 14 If you want to upload to other path please select the device name nickname Step 15 Click Upload Step 16 Uploading Step 17 All file upload succeeded click Upload more files to upload other files or click Home to leave ...

Page 83: ...nload Step 2 Select your IP Cam device name nickname Step 3 Select the files you want to download ex video and click Download Step 4 Downloading Step 5 File download succeeded Step 6 You can select the files and click Play on the top right corner to browse the file ...

Page 84: ... Step 8 Return to download succeeded page and click Download more files Step 9 Click right next to folder to set as Favorites Step 10 Click Back to return to the device selected page and you will see Favorites has been shown in download shortcut Click the folder to directly access the folder ...

Page 85: ...Step 12 Downloading Step 13 File download succeeded You can see contracted photos select the files and click Play at top right corner to browse Step 14 During file play rotate the smartphone and tablet to enlarge the photo Click Exit to end the browse and return to download succeeded page ...

Page 86: ...P4 and AVI are supported Step 1 Enter Sapido APP and click Online Streaming Step 2 Click IP Cam Nick Name Step 3 Choose the file path you want to browse Video format of MP4 and AVI are supported Step 4 Rotate the smartphone or tablet to enlarge the screen During video play click Exit to stop and return to the previous page The video function will auto play next video after the original one finish ...

Page 87: ... Step 5 Please again select the file your want to browse Step 6 During file browse touch the screen to hide the functional key bar for full screen browse Click Exit to top and return to the previous page ...

Page 88: ...heck and see internet attack status 1 Client List Step 1 Click Network Security Step 2 Click Client List Step 3 is to set up the internet block time and make it block during a period Step 4 Select the start and end time of block in 24 hour time system and then select weekday and click Apply to save Step 5 Setting please await Step 6 After setting APP will automatically log out and return to the ho...

Page 89: ...lick Client List Step 9 right next to block device is shown as light gray with ON block setting is succeeded Step 10 If you want to cancel the setup just directly push the device switch to OFF Step 11 Click Sure to confirm Step 12 Please await ...

Page 90: ...k Security Step 15 Click Client List Step 16 The clock symbol of block device has become dark gray with ON block setting is succeeded Step 17 If you want to unlock the block to a specific device please directly push the device switch to OFF Step 18 Click Apply to unlock and the device can be on line again ...

Page 91: ...l automatically log out after finishing setting please again log in Step 21 Click Network Security Step 22 Click Client List Step 23 When the block switch of device shows as gray and clock symbol shows as light gray the device can be on line ...

Page 92: ...ule Step 2 Enter into checklist and click New on top right corner Step 3 Select online start and end time in 24 hour time system Step 4 Setting please await Step 5 After the setting APP will automatically log out please again log in Step 6 Click Network Security ...

Page 93: ...u can review the list of wireless schedule and click edit or delete 3 5G Wireless Schedule Step 1 Click 5G Wireless Schedule Step 2 Enter into checklist and click New on top right corner Step 3 Select online start and end time in 24 hour time system ...

Page 94: ...e await Step 5 After the setting APP will automatically log out please again log in Step 6 Click Network Security Step 7 Click 5G Wireless Schedule Step 8 You can review the list of wireless schedule and click edit or delete ...

Page 95: ...ord you want to block such as Yahoo and click New to confirm Step 3 Please await Step 4 APP will automatically log out after setting please again log in Step 5 Click Network Security Keyword Blocked Step 6 You can review the block list and new added keyword has been added ...

Page 96: ...ock and click Unlock on top right corner Step 8 Please await Step 9 APP will automatically log out after setting please again log in Step 10 Click Network Security Step 11 Click Keyword Blocked Step 12 To review the block list and you can find the unlock keyword has been removed from list ...

Page 97: ...device you want to review Step 3 To review all visit website checklist of device and you can select any of website and click Preview Step 4 You can first preview the visited website and decide if blocking the website or not Click Back to end Step 5 Again return to website checklist and select the website you want to block click Block in below to confirm Step 6 Setting please await ...

Page 98: ...tep 8 Click Network Security Step 9 Click Website History Step 10 You will find added block website is appeared in below block list Step 11 To unlock the website please first select the website you want to unlock and click Unlock on top right corner Step 12 Setting please await ...

Page 99: ...matically log out after setting please again log in Step 14 Click Network Security Step 15 Click Website History Step 16 You will see the website which is just unlocked has been removed from the block list Unlock is succeeded ...

Page 100: ...lick DDoS Step 3 When your network is attacked you can review the attack type situation and time If there s no event the list will be blank 7 Login History Step 1 Log in IOT and click Network Security Step 2 Click Login History Step 3 You can review all device IP and log in date and time here ...

Page 101: ...connect status Step 1 Click Download List to show all files Step 2 The files downloaded via Sapido APP will be automatically sorted by file format JPG MP3 AVI EXE and stored in first 5 folder ex JPG will be automatically stored in Picture folder If you never download any file via Sapido APP and no file would be showed those 5 folders Step 3 Photos and videos in Camera Roll are all from your mobile...

Page 102: ...e supported Step 1 Click Camera Roll Step 2 Select the photos you want to browse Step 3 During photo browse click Back to stop and return to the previous page Step 4 Rotating the smartphone or tablet to enlarge the screen click Exit to stop and return to previous page If the functional key are hidden after rotating just slightly touch the screen to show ...

Page 103: ...g video play click Exit to stop and return to the previous page Step 8 Rotate the smartphone or tablet to enlarge the screen click Back to stop and return to the previous page If functional key is hidden after rotating it will be again appeared after rotate it back Step 9 Return to Download List page and click Music ...

Page 104: ...a device name nickname Step 13 When is showed as blue the music will be played through IP Camera IPJC2n Step 14 You can find the functions such as pause play back forward repeat one and all etc in below functional bar Click Exit to stop and return to the previous page Step 15 Return to Download List page and click Document ...

Page 105: ...105 Step 16 Directly select the document you want to browse Step 17 During document browse slightly touch the screen to hide the functional bar Click Exit to stop and return to the previous page ...

Page 106: ...ight corner Step 2 You can find the functional keys of Rename and Edit in right hand side and in the bottom Step 3 Click the function key in the right hand side to rename the file Step 4 Enter new name and click Apply to confirm Step 5 Rename succeeded new name has been shown in checklist ...

Page 107: ...f Rename and Edit will appear in the right hand side and in the bottom cut copy paste folder and delete Step 3 You can do the file and data edit here please select the files you want to sort and click Cut Step 4 Click Folder Step 5 Enter the name of new folder and click Apply to confirm Step 6 Select the new added folder ...

Page 108: ...e to end the edit or click Back to continue other file edit Step 9 Return to the previous page and continue other edit Please select the file you want to copy and click below Copy Step 10 Copy the selected file to any folder of Download List or click Folder to add new folder Step 11 Enter the name of new folder and click Apply to confirm Step 12 Select the new added folder ...

Page 109: ...end the edit or click Back to continue other file edit Step 15 Return to the previous page to continue other file edit Select the files you want to delete and click Delete in below function key Step 16 Again confirm whether to delete the file or not click Apply to confirm the delete Step 17 File delete succeeded To end the edit click Done on the top right corner Step 18 Edit mode is end ...

Page 110: ...or will become gray Please select the network Step 2 Connecting please await Step 3 Please click Offline Browse Step 4 After access the download list you can browse the video and music etc or click Edit on the top right corner to edit files Step 5 Edit function key cut copy paste folder and delete will appear in bottom side of page Refer to 11 2 3 File Edit for detail operating method ...

Page 111: ...atus of IP camera USB drive and speaker Step 1 Click IOT Network Step 2 Internet connection type and USB device connection status will be showed in this page Click PPPoE Step 3 To review the IP information of Home Gateway click Back to the previous page Step 4 Click Step 5 Click LAN Information Step 6 You can see IP address MAC address and SSID and Encryption mode here ...

Page 112: ...e Step 8 Please refer to 9 8 Network Security for detail function Click Back and return to IOT Network Step 9 Click IP Cam IPJC2n Step 10 You can see IP address MAC address SSID and Encryption mode here Step 11 Click to rename the IP Cam IPJC2n and click Apply to confirm Click Back and return to the Network Security page ...

Page 113: ...you want to play and click Change to select the speaker device Step 14 Select IP Camera nickname Step 15 During music play click Exit to stop and return to network maps Step 16 Click USB driver to upload or download files Step 17 Click to upload see 9 7 1 Upload Click to download see 9 7 2 Download ...

Page 114: ...114 Step 16 Click Camera to go Camera Step 17 For the application of Camera please refer to 7 Application of IP Camera for details ...

Page 115: ...ur security system Please operate in the IOT Device Management page The IOT Device Management page offers several functions like rename and the symbols of Graphic User Interface GUI and security sensor update You can view the detail of all the wireless devices and ZigBee s SH206 number name and battery ...

Page 116: ...e of the sensors click it and complete the updating Step 2 Click Sure before double check Step 3 Under connecting Do not turn off or log out Step 4 Enter Sapido APP then log in your security network Sapido APP then log in your security network The latest firmware version is successfully upgraded ...

Page 117: ...age just select the IP Cam and click Device Setting Step 2 Click Hide Step 3 You will see the device hiding Click Back to the front page Step 4 You can t see all the Camera Functions on the Advanced Function Page Upload Download Camera Music Step 5 To return the functions click IOT Device Management once again Step 6 Select the IP Cam and click Device Setting again ...

Page 118: ...mera Functions on the Advanced Function Page again Upload Download Camera Music 3 Delete Device While Off Line Device name will turn red while it is off line or disconnected You can delete the device on system via APP Step 1 Select the device which is disconnected Click Device Setting Step 2 Click Delete Step 3 Delete successfully ...

Page 119: ...ion today s date time time of power on and network status Also it can setup VPN SSID and so on Step 1 Select one of the sensors then click GUI on the top right corner Step 2 Enter the page of GUI You will see the page as same as when you viewing from computer Step 3 You can arrange the screen for easier watching ...

Reviews: