


STANDBY
z
/ ON
FM MODE
MEMORY
FUNCTION
F U L L L O G I C C O N T R O L / A U T O R E V E R S E
q
EJECT
M U LT I F U N C T I O N D I S P L AY
VOLUME
–
+
q
OPEN/CLOSE
m
/
k
n
SOUND PRESET
BASS
XPANDER
i
CLOCK/TIMER
TUNING -
TUNER/BAND
PHONES
PRESET –
INSTRUCTION MANUAL
DC-BM300
Micro Component System
W
: For listening to both sides of the tape in succession.
-
If playback has been started from the reverse side, only the
reverse side will be played back.
:For listening repeatedly to both sides of the tape.
LISTENING TO TAPES
LISTENING TO THE RADIO
-7-
If a cassette is loaded, you can turn the unit on and begin play
immediately by pressing the
a
or
b
button.
1.
Press the FUNCTION button to select
“TAPE”.
2.
Press the cassette holder (
q
EJECT
portion) to open it.
3.
Load the cassette.
After loading the cassette, push the
cassette holder (
q
EJECT portion)
back into position.
4.
Press the
button to select the
reverse mode as desired.
S
: For listening to one side of the
tape only.
5.
Press the
a
or
b
button to begin playback. “
a
” or “
b
” appears.
a
: For forward play
b
: For reverse play.
6.
Press the
n
button to stop playback at any time.
When the end of the tape has been reached, automatic stop or
reverse will be activated.
Note:
-
Use the normal tape (TYPE 1).
-
Endless tapes cannot be used.
-
Do not use C-100 (or longer) tapes. They may jam in the mechanism.
Fast forward and rewind
Press the
g
or
h
button. “
a
” or “
b
” blinks. When the
desired location has been reached, press the
n
button.
Before use
When the unit is shipped from the factory, its AM frequency band is set
as “522 - 1710 kHz (in 9 kHz steps)”.
If your local AM broadcast system is organized in 10 kHz steps, change
the frequency band to “520 - 1710 kHz (in 10 kHz steps)” as follows.
1.
Press the TUNER/BAND button to select “AM”.
2.
While pressing the MEMORY button on the front panel, press the
TUNER/BAND button on the front panel.
To return the original setting, repeat steps above.
To turn the unit on and listen to the last received station, press the
TUNER/BAND button.
Automatic/Manual tuning
1.
Press the TUNER/BAND button to select AM or FM.
-
“TUNER” is selected automatically. “TUNER” appears on the
display, then “TUNER” is replaced by the tuner mode display.
2.
Automatic tuning
Press the TUNING – or button for at least 1 second to tune
in a station. The unit will scan up or down the band and receive the
next receivable station. Press the button again to continue.
Manual tuning
Press the TUNING – or button briefly until the desired
frequency is displayed.
To preset stations
Up to 24 stations for FM band, 12 stations for AM band can be preset.
Automatic presetting (APT)
1.
Press the TUNER/BAND button to select AM or FM.
2.
Press the MEMORY button for at least 3 seconds. “PROG.” blinks.
The automatic tuning mode is set and automatic presetting begins
from the low end of the band.
When 24 stations for FM, 12 stations for AM have been preset or the
high end of the band is reached, automatic presetting stops. “PROG.
” disappears and the previous received station is heard.
3.
To preset stations on the other band, follow steps above.
Note:
If APT is activated, all previously programmed stations of the band will
be cleared and new stations will be programmed.
Manual presetting
1.
Tune in the station to be preset as described in “Automatic/Manual
tuning”.
2.
Press the MEMORY button.
3.
Press the PRESET – or button on the front panel (or
PRESET button on the remote control) to select the channel number
to be preset.
4.
Press the MEMORY button.
-
In this example, “103.25 MHz” FM station is preset on FM
channel 9.
-
The number buttons on the remote control can be used to preset
the station directly. In this example, press 0, then 9 after the step
2 above.
Note:
If the next step is not taken within 10 seconds while performing steps
2 - 4, “PROG.” disappears and the preset operation is cancelled.
Press the MEMORY button to continue.
5.
Repeat steps above to add more preset stations.
-
When presetting a new station, the previous preset station is
cleared.
Listening to preset stations
1.
Press the TUNER/BAND button to select AM or FM.
2.
Press the PRESET – or button on the front panel (or
PRESET button on the remote control) to select the desired channel
number. The selected channel number appears briefly.
-
The number buttons on the remote control can also be used.
Press two number buttons within 2 seconds.
Preset scan tuning
1.
Press the TUNER/BAND button to select AM or FM.
2.
Press the PRESET – or button (or the PRESET button
on the remote control) for at least 1 second.
-
The channel number blinks.
-
The preset stations are selected in sequence for approximately 5
second each.
3.
Press the PRESET – or button (or the PRESET button
on the remote control) when the desired station has been selected.
Preset scanning will stop.
RECORDING
Recording copyright material without permission of the copyright
owners is usually an infringement. If you wish to re-record copy-
right material, permission from the copyright owner is necessary.
SANYO does not approve of, and cannot be held responsible for,
any unlawful use of this machine.
When beat interference is heard
A high-pitched noise called “beat” is sometimes heard during the
recording of radio broadcasts. If this occurs.
1.
Press the MEMORY button.
2.
While “PROG.” is blinking, press the
button to select “bc-1” or
“bc-2”. Select the setting that gives the best results.
Automatic record muting (Remote control only)
Undesirable parts of a programme can be omitted while recording.
Press the
r
button once while recording. “REC” blinks and a 5-second
unrecorded blank space is created, then the deck enters the recording
pause mode. “REC” remains lit and “
a
” or “
b
” blinks on the display.
-
To add another 5-second blank space, press the
r
button again.
-
To resume recording, press the
a
or
b
button (to match the blinking
“
a
” or “
b
”).
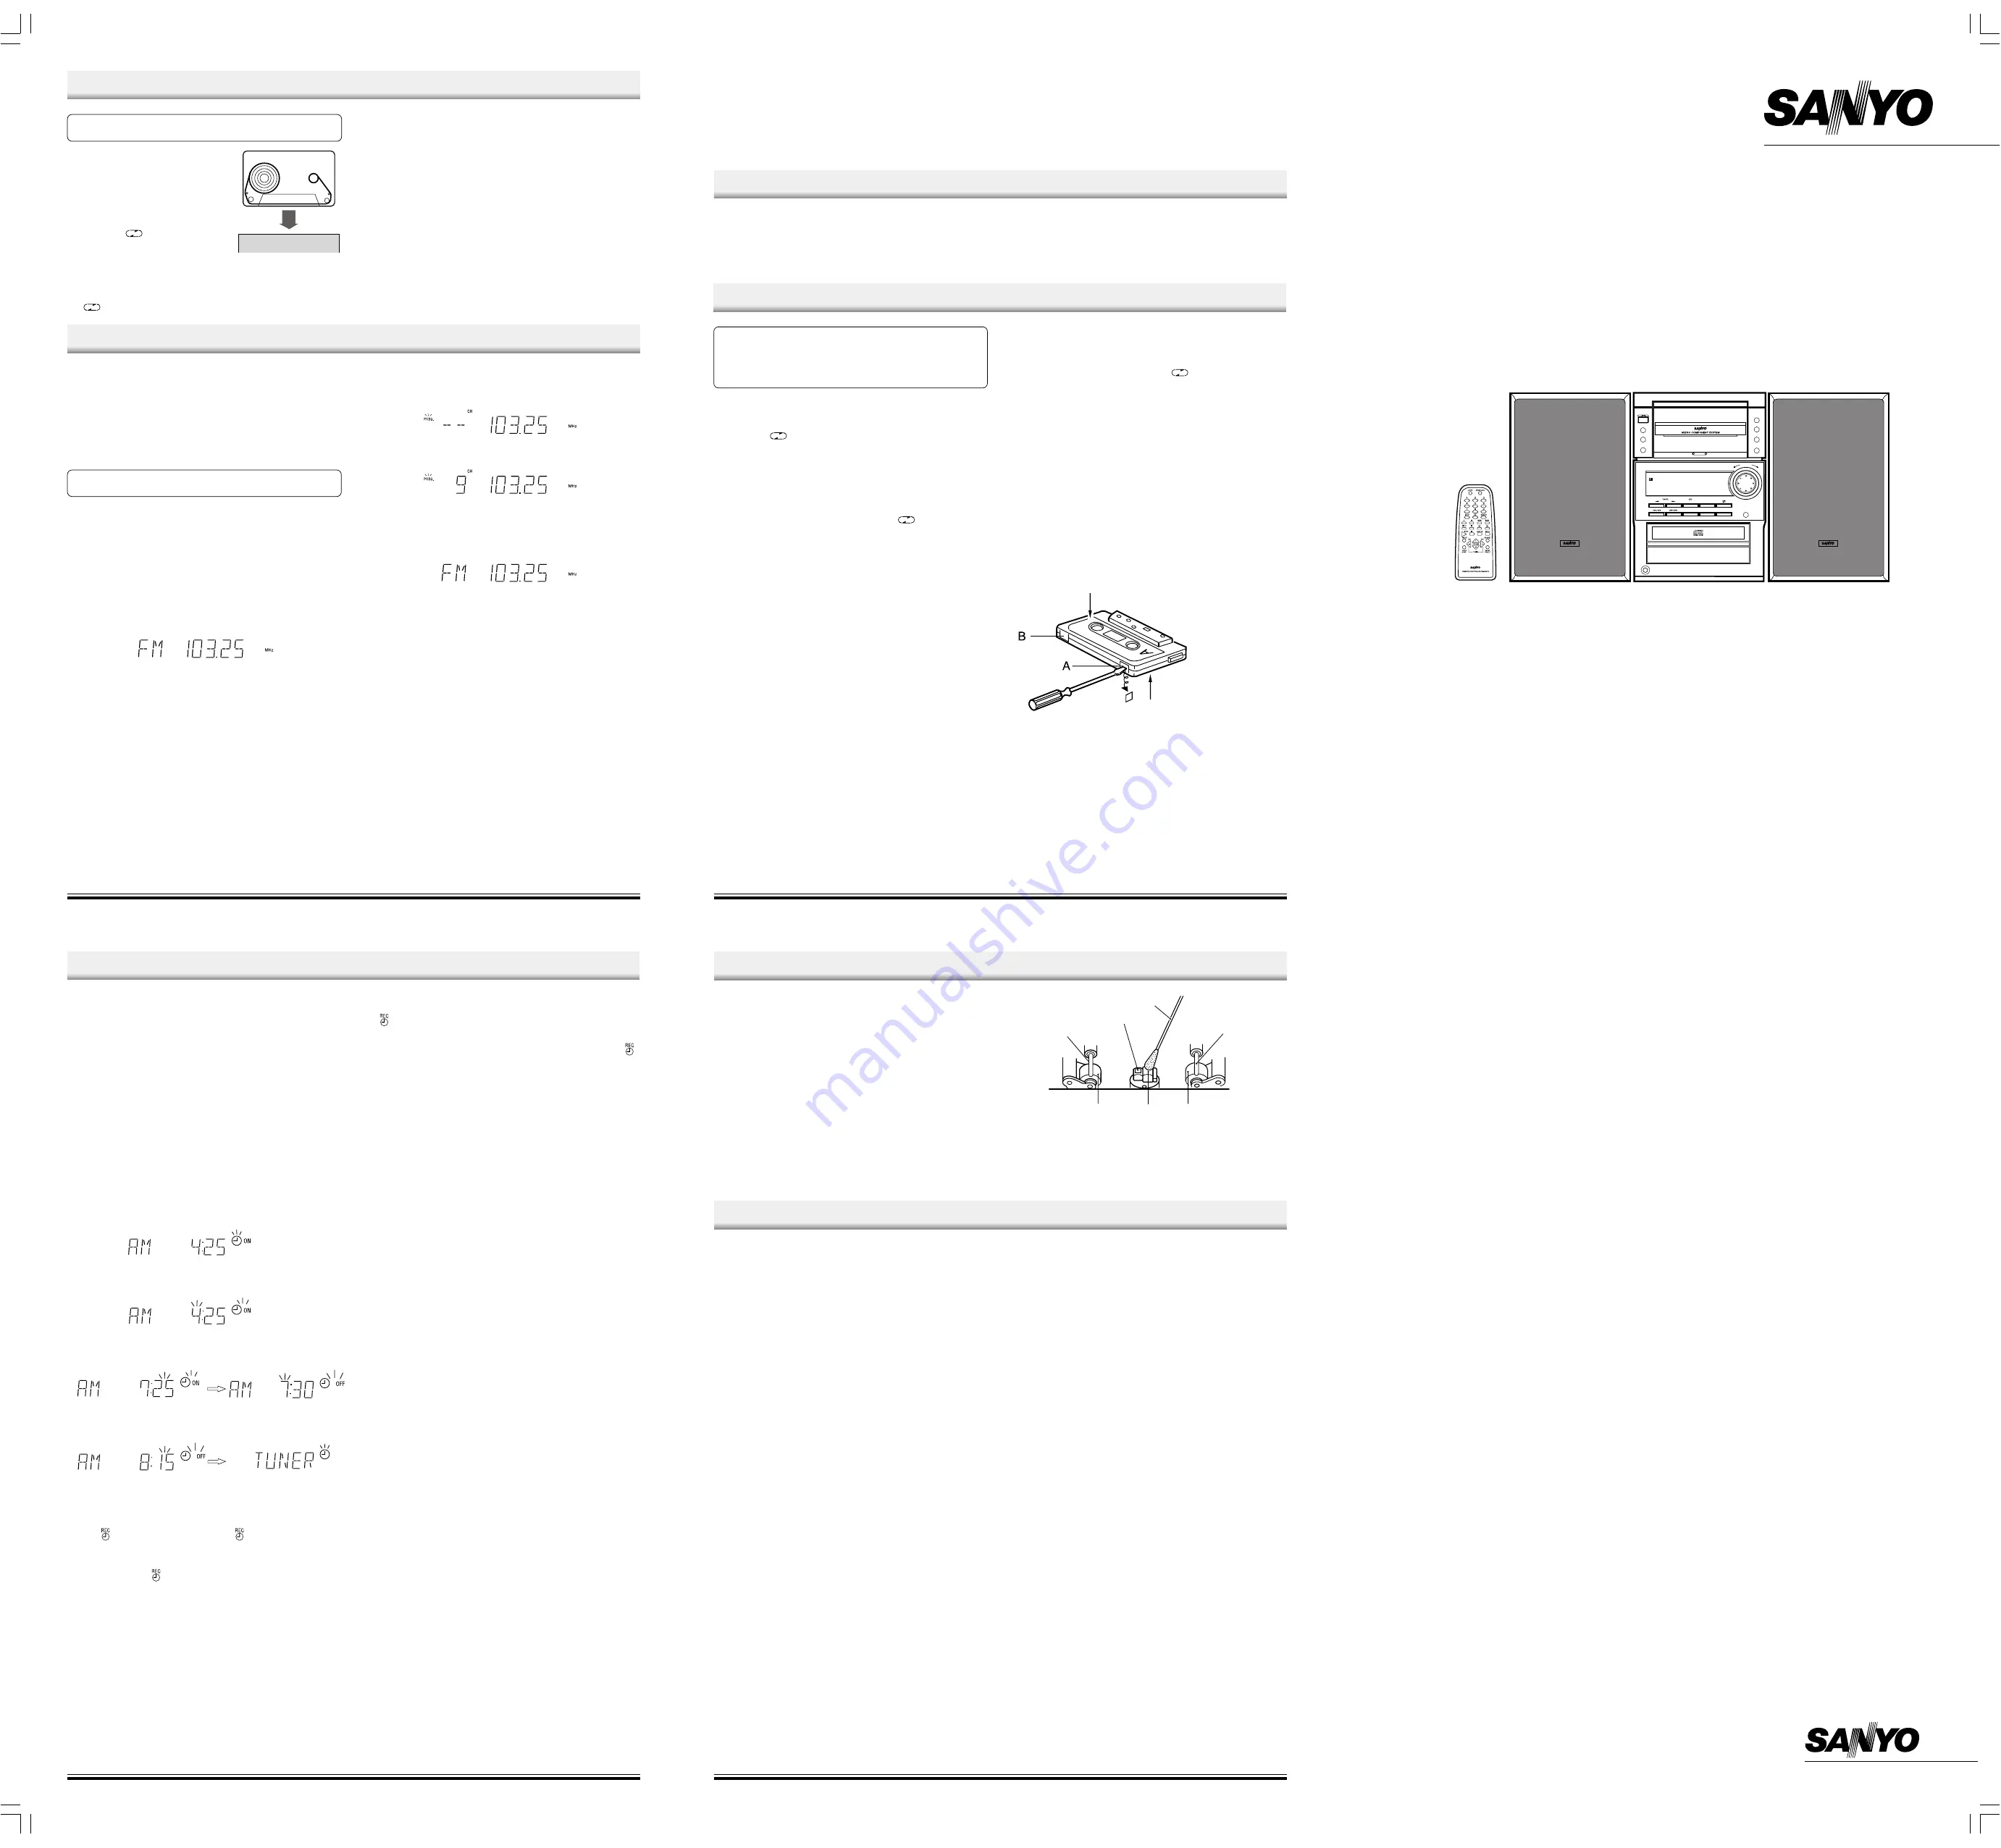
Safeguards against accidental erasure
Accidental erasure can be prevented by breaking out the tabs on the end
of the cassette tape (where the tape is not exposed) using a screwdriver
or similar implement.
If a tab is broken out in error and you wish to re-record the tape, simply
block the tab hole using adhesive tape and the tape can be used for
recording again.
Break out tab A for side A.
Break out tab B for side B.
Preparation
1.
Press the FUNCTION button to select “TAPE”.
2.
Load a blank cassette.
3.
Press the
button to select the reverse mode.
S
: For recording one side only.
W
: For recording both sides in succession.
-
If recording has been started from the reverse side, only the
reverse side will be recorded.
-
If a tape with one of its tabs already broken out is used for
recording, the tape will not be reversed automatically, and it will
stop.
-
If the reverse mode has been set to “
”, “
W
” appears
automatically when the recording mode is established.
Recording compact discs (Synchronous recording)
1.
Select “CD” function.
2.
Load the disc to be recorded.
-
For programmed recording, programme the material in advance
(as described under “PROGRAMMED PLAY”).
3.
Select the track number to be recorded if required.
-
For programmed recording, this step is unnecessary.
4.
Press the
j
button (or the
m
button on the remote control). The
deck enters the recording pause mode and “REC” appears. “
b a
”
blinks.
5.
Press the
a
or
b
button. Recording starts.
6.
Press the
n
button to stop recording. Also the CD player stops
automatically.
Recording from the tuner or other sources
1.
Tune in the radio station to be recorded or play other sources.
2.
Press the
j
button.
3.
Press the
a
or
b
button. Recording starts.
4.
Press the
n
button to stop recording.
Side A
Side B
LISTENING TO OTHER SOURCES
1.
Press the FUNCTION button to select “VIDEO”.
2.
Follow the instructions supplied with the video equipment.
-8-
To receive FM stereo broadcasts
“ST” appears when an FM stereo broadcast is received in the stereo
mode.
-
If the signal from an FM stereo station is weak and reception is poor,
press the FM MODE button to change to the mono mode. The
reception may be improved, but the sound will be monaural.
When beat interference is heard
A high-pitched noise called “beat” is sometimes heard during reception
of radio broadcasts. If this occurs.
1.
Press the MEMORY button.
2.
When “PROG.” is blinking, press the FM MODE button to select “bc-
A” or “bc-B”. Select the setting that gives the best results.
TIMER OPERATION
Using the timer
(Main unit only)
Set the on and off times, and function to be used. Operation will start with
the selected function at the on time. The sound will be gradually
increased from a no-sound level to the current volume setting (fade-in).
The power will be switched off at the off time.
The timer will function every day unless it is released.
Preparation
Note:
Make absolutely sure that the clock is set to the correct time before
setting the timer.
-
Prepare the sources to be used.
-
If the function selected is tuner, tune in to the desired band and
station.
-
For cassette deck: Tape playback will start in the forward direction.
-
Adjust the volume level as desired.
Operation
1.
Press the FUNCTION button to select the function and set the
desired volume level for timer operation.
2.
Press the CLOCK/TIMER button for at least 2 seconds.
The previous timer on time setting appears.
3.
Press the MEMORY button within 10 seconds.
4.
Set the timer on time by turning the VOLUME control, then press the
MEMORY button (as described under “ADJUSTING THE CLOCK”).
The timer off time setting appears.
5.
Set the timer off time as described in step 4.
The previous timer mode/function setting appears.
-
“
0
” blinks only for tuner function, “
0
” remains lit for other function.
6.
Select the timer mode by turning the VOLUME control (Tuner function
only).
-
“
” and “
0
” blink alternately. Select “
” for unattention recording.
7.
Press the MEMORY button (Tuner function only).
The original display returns, then the timer operation standby mode is
activated. “
0
” or “
” remains lit.
8.
Press the
z
/ON button to switch off the power.
-
To switch off the power during a timer controlled operation, press
the
z
/ON button. The timer will be set in the standby mode.
To release the timer
After turning the power on, press the CLOCK/TIMER button twice. “
0
”
or “
” disappears.
To set the timer again with the same settings
1.
Press the CLOCK/TIMER button repeatedly to display “
0
” or “
”.
2.
Press the
z
/ON button to switch off the power.
Note:
The timer operation is released if a power failure occurs.
Using the sleep timer
(Remote control only)
The sleep timer automatically switches off the power after a preset time
has elapsed. The volume will gradually be reduced (fade-out) during the
1-minute period before the unit turns off. There are 12 time periods
available: 120, 110, 100, 90, 80, 70, 60, 50, 40, 30, 20, and 10 minutes.
Press the SLEEP button repeatedly to select the desired sleep time.
“SLEEP” blinks and the selected time appears on the display. After a few
seconds, the original display returns. “SLEEP” remains blinking.
To check the remaining sleep time
Press the SLEEP button once. After a few seconds, the original display
returns.
To release the sleep timer while in operation
Press the SLEEP button repeatedly until “SLEEP” disappears. The
timer is also released if the power is switched off.
-9-
MAINTENANCE
Cleaning the tape heads
To ensure continued high performance, use cotton swab to clean the
heads, pinch rollers and capstan of the deck after about every 10 hours
of use. If the dirt persists, soak the swab in a little methylated spirit or
head cleaning fluid and then clean.
Cleaning the unit
Clean the outside of the unit with a clean soft cloth, moistened with
lukewarm water. Do not use benzene, thinner or alcohol since they will
mar the finish of the surfaces.
-10-
1.
Cotton swab
3, 7.
Capstan
4, 6.
Pinch roller
2, 5.
Head
Tuner
Reception frequency:
FM: 87.5 - 108 MHz
AM: 522 -1710 kHz (in 9 kHz steps)
520 - 1710 kHz (in 10 kHz steps)
CD player
Channels:
2-channel stereo
Sampling frequency:
44.1 kHz
Pick-up:
Optical 3-beam semiconductor laser
Laser output:
0.6 mW (Continuous wave max.)
Wave length:
790 nm
Wow/flutter:
Below measurable limits
Cassette deck
Track system:
4-track, 2-channel stereo
Frequency response:
60 Hz to 13.5 kHz
Signal-to-noise ratio:
50 dB
Wow/flutter:
0.12% (WRMS)
Fast forward/rewind time:
Approx. 110 sec. (C-60)
General
Output power:
12.5 W x 2 (at 4 ohms, 10% distortion)
Input:
VIDEO IN: 500 mV/50k ohms
Outputs:
SPEAKERS: 4 ohms
PHONES: 8 - 32 ohms
Power requirements:
AC 230V ~ 240V, 50 Hz
Power consumption:
35 W
Dimensions:
200(W) x 281(H) x 278(D) mm
Weight:
4.0 kg
Speaker systems
Type:
Full range bass reflex
Unit used:
10 cm cone type
Maximum power-handling capacity:
25 W (peak)
Nominal impedance:
4 ohms
Dimensions:
181(W) x 280(H) x 205(D) mm
Weight:
2.6 kg (per speaker)
Specifications subject to change without notice.
SPECIFICATIONS
3
2
1
7
4
5
6
(AU) 1AD6P1P1698-C
SANYO Electric Co., Ltd.
Printed in China
DC-BM300/AU-sheet
10/07/2002, 11:41
1


