background image

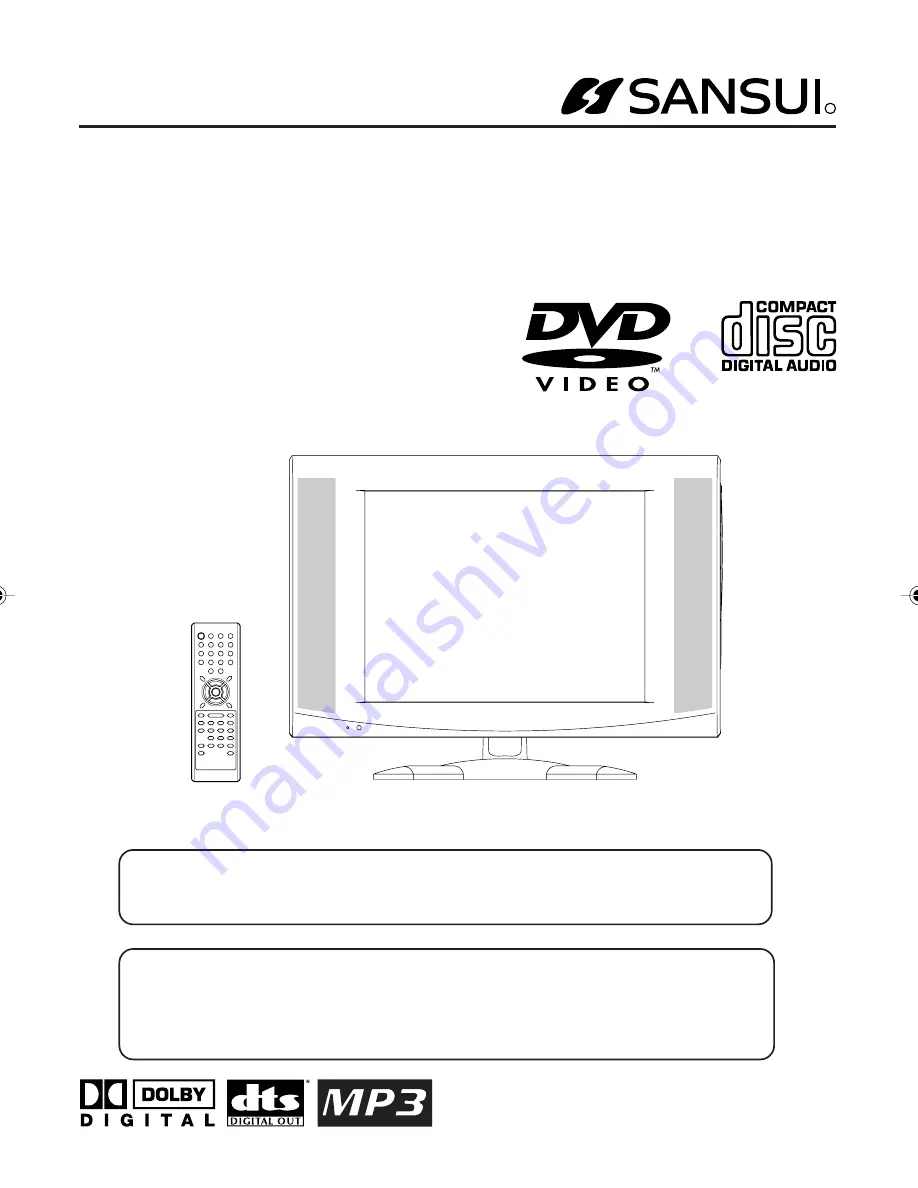
15” TFT LCD TV with DVD PLAYER

LCDVD150

ORION WEBSITE

FOR INFORMATION ON OUR OTHER PRODUCTS,

PLEASE VISIT OUR WEBSITE AT

www.orionsalesinc.com

R

OWNER’S MANUAL

TV/CATV MODE SELECTION

When shipped from the factory, the TV/CATV menu option is set to the "CATV" (Cable Television)
mode. If not using CATV, set this menu option to the "TV" position.

Before operating the unit, please read this manual thoroughly.

 5G30101A E Cover

7/7/04, 14:10

1

Summary of Contents for LCDVD150

Page 1: ...VISIT OUR WEBSITE AT www orionsalesinc com R OWNER S MANUAL TV CATV MODE SELECTION When shipped from the factory the TV CATV menu option is set to the CATV Cable Television mode If not using CATV set...

Page 2: ...EABLE PARTS INSIDE REFER SERVICING TO QUALIFIED SERVICE PERSONNEL WARNING TO PREVENT FIRE OR SHOCK HAZARD DO NOT EXPOSE THIS APPLIANCE TO RAIN OR MOISTURE WARNING This equipment has been tested and fo...

Page 3: ...ot be blocked or covered The openings should never be blocked by placing the unit on a bed sofa rug or other similar surface This unit should never be placed near or over a radiator or heat source Thi...

Page 4: ...f as opening or removing covers may expose you to dangerous voltage or other hazards Refer all servicing to qualified service personnel 19 DAMAGE REQUIRING SERVICE Unplug this unit from the wall outle...

Page 5: ...0 of the NEC that provides guidelines for proper grounding and in particular specifies that the cable ground shall be con nected to the grounding system of the building as close to the point of cable...

Page 6: ...P3 CD You can play back tracks in programmed sequences Zoom DVD only You can zoom in the selected subject on the screen during playback Note Make sure that discs are suitable for the following functio...

Page 7: ...program SAP 26 Sound control adjustment 27 TV operation Zooming Locating desired scene 32 Repeat Random Program playback and Repeat A B 33 Marking desired scenes 34 Changing soundtrack language Subti...

Page 8: ...divided into two or more sections Each section is called a TITLE Chapter The titles can be subdivided into many sections Each section is called a CHAPTER Track An Audio CD can contain several items Th...

Page 9: ...hones jack AUDIO L R VIDEO IN LINE 2 IN jacks PLAY button STOP button 5 EJECT button SKIP buttons Left Side Right Side DISC slot POWER indicator Remote sensor Front POWER button VOLUME UP DOWN buttons...

Page 10: ...15 Approx 5 0 Variable TV screen angle You can adjust the angle of the TV screen for 5 forward or for 15 backward from vertical angle AUDIO L R VIDEO IN LINE 1 IN jacks DC input jack COAXIAL DIGITAL A...

Page 11: ...e menu 16 22 24 30 31 34 36 38 43 48 CANCEL Reset information in the menu 22 24 25 27 32 34 41 48 49 TOP MENU Select title 36 SEARCH Fast Forward Review playback 30 PLAY Playback 29 31 33 36 43 SKIP S...

Page 12: ...them to leak or burst Read the battery warnings and use the batteries properly Do not mix old and new batteries Remove batteries if the remote control will not be operated for an extended period of t...

Page 13: ...FIRE ELECTRICAL SHOCK OR DAMAGE DO NOT USE WITH A VOLTAGE OTHER THAN THE POWER VOLTAGE DISPLAYED THIS COULD CAUSE FIRE ELECTRICAL SHOCK OR DAMAGE CAUTION DO NOT USE THE AC ADAPTOR IF IT IS COVERED BY...

Page 14: ...k Connect the 75 ohm cable from the combination VHF UHF antenna to the antenna jack If your combination VHF UHF antenna has a 300 ohm twin lead wire the use of the 300 75 ohm matching transformer may...

Page 15: ...RIBERS TO UNSCRAMBLED BASIC CABLE TV SERVICE WITH SCRAMBLED PREMIUM CHANNELS Splitter B A Incoming 75 ohm CATV Cable A B Switch 75 ohm Cable to TV DVD Incoming 75 ohm CATV Cable 75 ohm Cable to TV DVD...

Page 16: ...ons Press TV MENU in the TV mode The TV menu screen will appear Press TV MENU until the MENU screen is cleared Press or to select the LANGUAGE option then press or 1 2 3 Press or until the OPTION menu...

Page 17: ...nnel Selection When the TV CATV menu option is in the CATV position channels can be selected as follows TO SELECT CATV CHANNELS 1 9 Press 0 twice then 1 9 as needed Example to select channel 2 press 0...

Page 18: ...the remaining time will be displayed for a few seconds To cancel the sleep timer press SLEEP repeatedly until the display turns to 0 FREEZE This function allows you to make a freeze frame of a pictur...

Page 19: ...adcasting with Closed Captions look in your TV guide for the Closed Captions symbol CC When selecting Closed Captions the captioning will be delayed for approximately 10 seconds If no caption signal i...

Page 20: ...they must be programmed into the TV DVD s memory In addition to normal VHF and UHF channels this TV DVD can receive up to 113 Cable TV channels To use this TV DVD with an antenna set the TV CATV menu...

Page 21: ...he TV menu screen will appear Press or until SET UP menu appears AUTOMATIC MEMORY TUNING Press or to select the AUTO CH MEMORY then press or The TV will begin memorizing all the channels available in...

Page 22: ...enu will appear on the display NOTES TO REGISTER PASSWORD This TV DVD is equipped with a V Chip Controller which provides you with channel viewing access controls and restrictions This function is to...

Page 23: ...T THE V CHIP Press or to display the desired setting In the V CHIP SET menu press or to select the TV RATING When you select TV Y7 TV PG TV 14 or TV MA press DISPLAY CALL to show the contained rating...

Page 24: ...CHANGE PASSWORD Press TV MENU in the TV mode The TV menu screen will appear Press or until OPTION menu appears Press or to select the V CHIP SET then press or Press or to select CHANGE PASSWORD then...

Page 25: ...he factory preset levels NOTES The CONTRAST default setting is set to maximum at the factory The TV section has its own picture control menu and also DVD section and PC section have their own picture...

Page 26: ...broadcasting is received no indication is displayed If the broadcast signal is not strong enough or clear stereo sound is not available press AUDIO to change to mono sound The noise should be eliminat...

Page 27: ...e dynamic presence and sound created offers a thoroughly enjoyable listening experience OFF Normal sound 4 After your desired setting press TV MENU until the MENU screen is cleared 5 Sound controls ar...

Page 28: ...larized AC outlet If the AC cord plug is plugged in for the first time wait for about 5 seconds before pressing POWER NOTE When connecting to other equipment unplug the unit from the AC outlet Press P...

Page 29: ...ain or unload the disc appears on the screen the unit will clear the stopped point 7 Press 5 5 5 5 5 EJECT Remove the disc and then press POWER The unit turns off NOTES If a non compatible disc is loa...

Page 30: ...rmal playback press PLAY To resume the still playback press PAUSE STILL Press SLOW Reverse or SLOW Forward during normal playback or still playback Each press of SLOW will change the speed of the slow...

Page 31: ...usic files recorded by Hierarchical File System HFS cannot be played A MP3 menu screen will appear on the TV screen Press or or Number buttons 0 9 to select the desired track then press ENTER Track is...

Page 32: ...Use the title chapter and time recorded on the disc to locate the desired point to play back Press Number buttons 0 9 to input the number If you input a wrong number press CANCEL Refer to the package...

Page 33: ...On screen Operation display Title Repeats the current title Chapter Repeats the current chapter Off Resumes normal playback During stop mode PLAY MODE key is not effective Audio CD MP3 CD On screen O...

Page 34: ...the Marker 1 3 3 Press ENTER Playback starts from the marked scene 1 Press MARKER 2 Press or to select the Marker 1 3 3 Press CANCEL To Cancel the Mark NOTES The marking is canceled when you eject the...

Page 35: ...t recorded on the disc Changing soundtrack language is can celled when you eject the disc The initial default language or available lan guage will be heard if the disc is played back again Changing su...

Page 36: ...e selection Some DVDs allow you to select the disc contents using the menu When you play back these DVDs you can select the sub title language and soundtrack language etc using the DVD menu 1 Press DV...

Page 37: ...red setting press SETUP DVD sound menu will disappear CANCEL Pressing CANCEL while making picture or sound adjust ments will return all adjustments to the factory preset levels Picture and sound contr...

Page 38: ...r language enter the language code see the Language code list on page 44 Off subtitle Subtitles do not appear 5 Press SETUP to remove the Menu screen Enter Setup Return OSD Language Francais Espanol E...

Page 39: ...ght edges automatically cut off If you want to return to the previous menu press or RETURN 4 Press SETUP to remove the Menu screen NOTE If the DVD disc is not formatted in the pan scan style it displa...

Page 40: ...remove the Menu screen Enter Setup Return Sound DRC On Dynamic Range Control DRC Dynamic Range Control ena bles you to control the dynamic range so as to achieve a suitable sound for your equipment NO...

Page 41: ...hen press or ENTER 3 Press or to select a level from Off or 1 8 Press or ENTER to set the se lected level Level Off The parental control setting does not func tion Level 8 Almost all DVD software can...

Page 42: ...1 8 and then press or ENTER 7 Press or to select Password and then press or ENTER 8 Press number buttons 0 9 to enter a 4 digit pass word Note You can enter a new password 9 Press ENTER The parental...

Page 43: ...ssword has not been set playback will commence If you don t know or have forgotten the password select STOP The setting screen will disappear Press 5 5 5 5 5 EJECT to re move the disc To quit entering...

Page 44: ...6 Hindi 1819 Norwegian 2425 Thai 3018 Bihari 1218 Hungarian 1831 Oriya 2528 Tibetan 1225 Breton 1228 Icelandic 1929 Panjabi 2611 Tigrinya 3019 Bulgarian 1217 Indonesian 1924 Pashto Pushto 2629 Tonga 3...

Page 45: ...ts NOTES When you make the connection above on the AV Amplifier do not set DOLBY DIGITAL to DOLBY DIGITAL or MPEG to MPEG ON If you do a loud noise will emit from the speakers possibly causing damage...

Page 46: ...S VIDEO IN jack on the rear lower left of the TV DVD you must also connect the audio cables to the AUDIO IN jacks on the rear lower left of the TV DVD LINE1 IN The S VIDEO cable only carries the vide...

Page 47: ...you wish to change the on screen language follow the steps 1 6 on page 16 If no buttons are pressed for more than approx 60 seconds the PC Monitor Menu screen will return to normal Monitor screen aut...

Page 48: ...ition of the image on the PC Monitor screen Each video standard will require a different value for this setting VER POSITION To adjusts the vertical position of the image on the PC Monitor screen Each...

Page 49: ...s TV MENU The TV menu screen will appear Press TV MENU until the MENU screen is cleared Press or to select the PC AUDIO option 1 2 Press or until the OPTION menu appears 5 Press or to select ON or OFF...

Page 50: ...sure channels are set into memory CATV company is scrambling signal Check antenna orientation No CATV reception Check all CATV connections Set TV CATV menu option to the CATV mode Station or CATV sys...

Page 51: ...etup does not match your TV No on screen display Select Display On No surround sound The setup does not match your stereo system The remote control does not function Aim at the remote control at the r...

Page 52: ...drills or hair dryers SNOW If the TV DVD is located far from the TV station in a fringe reception area where the signal is weak small dots may appear in the picture If the signal is extremely weak th...

Page 53: ...15 380 mm diagonal Transmission TFT color LCD panel 1 024 H x 768 V Left Right 75 75 degree Up Down 50 75 degree Quartz PLL Frequency Synthesized VHF 2 13 UHF 14 69 CATV 14 36 A W 37 59 AA WW 60 85 AA...

Page 54: ...Damaged because it is improperly connected to the equipment of other manufacturers This warranty does not cover a Damage to video disc b Damage to equipment not properly connected to the product c Cos...

Page 55: ...Memo...

Page 56: ...03 08 Z ppPRINTED IN THAILAND...

Reviews: