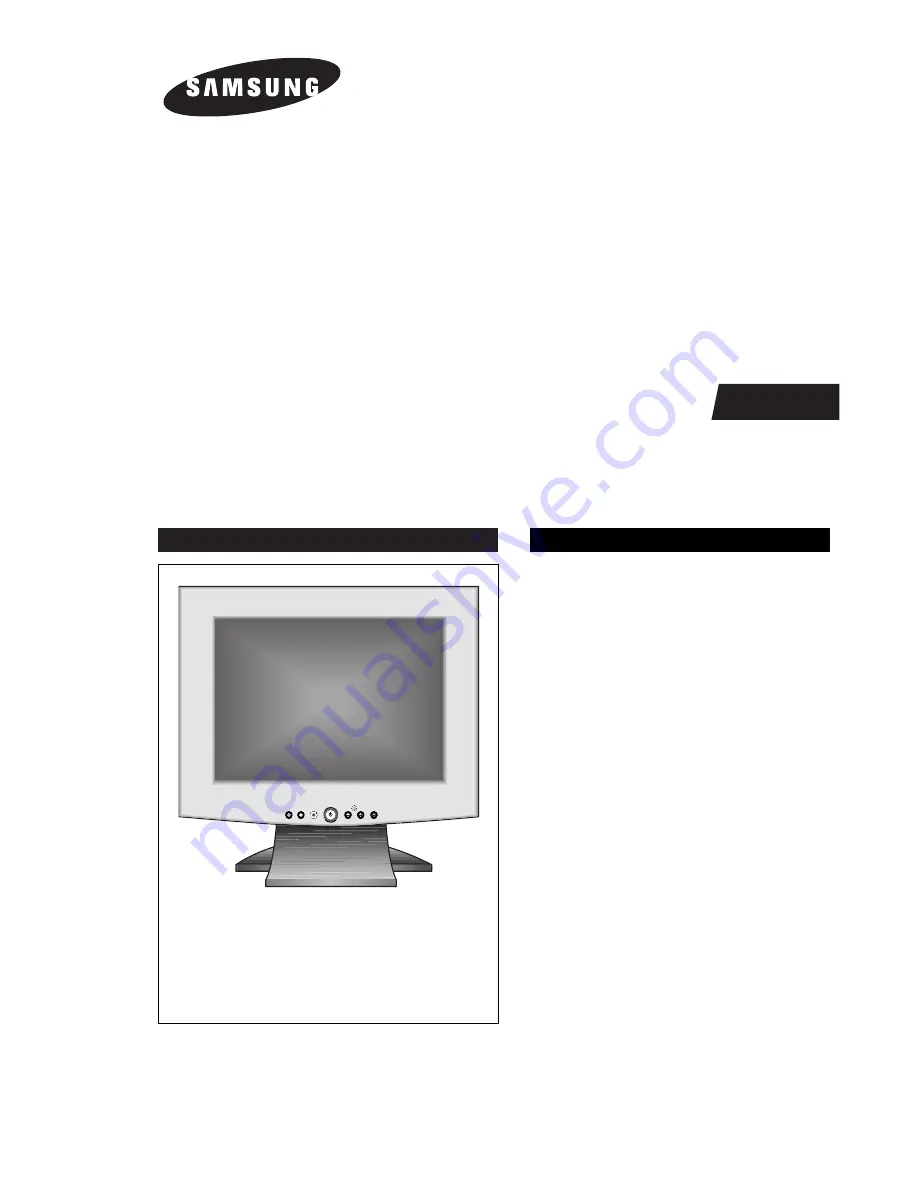
background image

COLOR MONITOR

SyncMaster 570BTFT
SyncMaster 580BTFT
(RN15MSS / RN15MST

RN15MOS / RN15MOT)

Manual

SERVICE

COLOR MONITOR

CONTENTS

EXIT

MENU

AUTO

EXIT

MENU

AUTO

1. Precautions

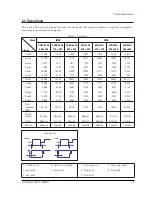
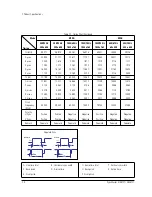
2. Product Specifications

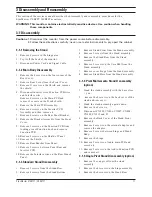
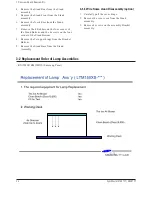
3. Disassembly & Reassembly
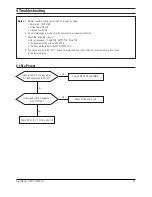
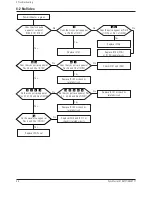
4. Troubleshooting

5. Exploded View & Parts List

6. Electrical Parts List

7. Block Diagram

8. Wiring Diagram

9. Schematic Diagrams

Содержание SyncMaster 570B TFT

Страница 1: ...RN15MOS RN15MOT Manual SERVICE COLOR MONITOR CONTENTS EXIT MENU AUTO EXIT MENU AUTO 1 Precautions 2 Product Specifications 3 Disassembly Reassembly 4 Troubleshooting 5 Exploded View Parts List 6 Electrical Parts List 7 Block Diagram 8 Wiring Diagram 9 Schematic Diagrams ...

Страница 2: ...ces and Underwriters Laboratories UL Publication UL1410 59 7 Figure 1 1 Leakage Current Test Circuit 4 With the unit completely reassembled plug the AC line cord directly into a 120V AC outlet With the unit s AC switch first in the ON position and then OFF measure the current between a known earth ground metal water pipe conduit etc and all exposed metal parts including metal cabinets screwheads a...

Страница 3: ...ch ON Connect an insulation resistance meter 500 V to the blades of the AC plug The insulation resistance between each blade of the AC plug and accessible conductive parts see above should be greater than 1 megohm 6 Always connect a test instrument s ground lead to the instrument chassis ground before connecting the positive lead always remove the instrument s ground lead last 6 Do not remove a re...

Страница 4: ...3 Hz Power Consumption 25 W max Dimensions Unit W x D x H 15 9x7 7x16 5 Inches 404 x 196 x 419 mm Carton W x D x H 18 7 x 11 1 x 20 1 Inches 475 x 282 x 510 mm Weight Net Gross 7 4 kg 9 4kg Environmental Considerations Operating Temperature 50 F to 104 F 10 C to 40 C Humidity 10 to 80 Storage Temperature 13 F to 113 F 25 C to 45 C Humidity 5 to 95 Audio Characteristics Audio Characteristics option...

Страница 5: ...ata H V Sync Not Used DDC Clock Red Green H V Sync Blue GND GND DDC Return GND R GND G GND B Not Used GND Sync Self Test GND DDC Data Not Used Not Used DDC Clock Sync Type Pin No 26 Pin Signal Cable Connector Separate Composite 1 2 3 4 5 6 7 8 9 10 11 12 13 14 15 Red Green Blue GND GND DDC Return GND R GND G GND B No Connection GND Sync Self Test GND DDC Data H Sync V Sync DDC Clock Red Green Blue...

Страница 6: ...Q Back porch R Active time E Front porch S Front porch VGA3 60 Hz 640 x 480 640 72 Hz 640 x 480 640 75 Hz 640 x 480 800 56 Hz 800 x 600 800 60 Hz 800 x 600 VGA1 70 Hz 640 x 350 VGA2 70 Hz 720 x 400 Table 2 1 Timing Chart 31 469 31 777 3 813 1 589 26 058 0 318 70 087 14 268 0 064 0 858 13 155 0 191 28 322 Negative Positive Separate 31 469 31 778 3 813 1 589 26 058 0 318 59 940 16 683 0 064 0 794 15...

Страница 7: ...9 60 004 16 666 0 124 0 600 15 880 0 062 65 000 Negative Negative Separate 56 476 17 707 1 813 1 920 13 653 0 320 70 069 14 272 0 106 0 513 13 599 0 053 75 000 Negative Negative Separate 60 023 16 660 1 219 2 235 13 003 0 203 75 029 13 328 0 050 0 466 12 795 0 017 78 750 Positive Positive Separate 35 000 28 571 2 116 3 175 21 164 2 116 66 667 15 000 0 086 1 114 13 714 0 086 30 240 Negative Negativ...

Страница 8: ... assembly 6 Remove 5 screws on the Vesa Brkt from the Stand assembly 7 Remove cover hinge from the Stand assembly 8 Remove Stand Base from the Stand assembly 3 1 4 Pivot Multi media Stand Disassembly option 1 Stand the stand assembly with the base close to you 2 Remove the 4 screws on the back cover of the stand and remove it 3 Stand the stand assembly upside down 4 Remove the 4 screws 5 Disconnec...

Страница 9: ...r corner of the Stand Bottom 8 Remove the 5 stopper hings from the Bracket Bottom 9 Remove the Stand Base from the Stand Assembly 3 1 6 Wire frame stand Disassembly option 1 Carefully pull the cover hinge 2 Remove the cover vesa from the Stand assembly 3 Remove 4 screws on the assembly Bracket assembly 3 Disassembly and Reassembly 3 2 SyncMaster 570BTFT 580BTFT 3 2 Replacement Order of Lamp Assemb...

Страница 10: ...3 Disassembly and Reassembly SyncMaster 570BTFT 580BTFT 3 3 ...

Страница 11: ...the stopper and slide the lamp unit 3 Please take out the lamp units from the LCD module 3 3 Replacement Order of Lamp Assemblies RN15MST RM15SOT Toshiba Panel 1 After confirm there is nothing on the desk Turn the LCD module over and put it on a flat desk set to the ground ...

Страница 12: ...4 Please fix the new lamp units on the LCD module opposite process 2 and 3 Replacement of lamp unit should be done at the power off state and rcommended clean bench condition 3 4 Reassembly Reassembly procedures are in the reverse order of Disassembly procedures ...

Страница 13: ...Memo 3 Disassembly and Reassembly 3 6 SyncMaster 570BTFT 580BTFT ...

Страница 14: ...ing circuits No raster appears Audio PCB SMPS PCB Main PCB 12V develop but no screen Main PCB 12V does not develop Audio PCB SMPS PCB 4 If you push and hold the EXIT button for more than 5 seconds the monitor automatically turns back to the factory preset 4 1 No Power Does proper DC 12 V appear at DC jack connected to CN102 Check SMPS PCB and CN816 Yes No Does proper DC 5 V appear at Pin 3 of IC10...

Страница 15: ...pear at Pin 94 of IC101 Does the pulse appear at Pin 10 of IC105 or Pin 1 of IC104 7 8 9 No Does the sync pulses appear at Pins 20 and 22 of IC192 Does the sync pulses appear at Pins 34 and 39 of IC192 Replace IC192 or check its related circuit 18 19 20 1 Replace IC301 or check its related circuit Replace LCD Panel No Do the sync pulses appear at Pins 22 23 25 and 26 of IC310 Do the sync pulses ap...

Страница 16: ... RMS 2 12 V 6 CN301 5 20 CH1 RMS 1 18 V 7 IC101 94 CH1 RMS 3 5 V 8 IC105 10 CH1 RMS 3 1 V 9 IC104 1 CH1 RMS 4 56 V 10 IC301 2 CH1 RMS 2 3 V 11 IC301 3 CH1 RMS 3 25 V 12 IC301 54 CH1 RMS 2 35 V 13 IC301 55 CH1 RMS 200 mV 14 IC301 56 CH1 RMS 50 mV 18 IC192 20 CH1 RMS 1 24 V 19 IC192 22 CH1 RMS 400 mV 20 IC192 34 CH1 RMS 4 4 V 1 IC192 39 CH1 RMS 3 6 V ...

Страница 17: ...s Don t Work Check the buttons SW861 SW866 Does the DC level change at Pins 11 and 12 of IC401 when you push the front panel button Yes No Replace IC305 Yes Yes No There is video but no OSD Replace IC307 or check its related circuit Replace IC305 4 4 No OSD While pushing a front control button does any pulse appear at Pin 12 of IC307 No Do sync signals appear at Pins 5 and 10 of IC307 15 16 17 WAV...

Страница 18: ...Does the DC 5 V appear at Pin 4 of IC803 Pin 5 of CN806 Does the sound input signal appear at Pins 6 and 11 of IC803 Yes No Yes No Check IC803 and related circuits Do the sound signals appear at Pins 3 and 14 of IC803 Yes No Check C815 CN813 R821 R822 ZD803 on the Audio PCB Check CN814 CN815 outputs Does the DC 2 5 V bias appear at Pin 16 of IC503 Yes No ...

Страница 19: ...aker Yes Yes No No 4 7 Microphones Don t Work Check the PC s sound program and compatibility Connect the cable between the PC and monitor Does the PC s sound program operate well Is the connection between the PC and monitor secure Yes No Yes No Check the connection between CN805 on the Audio PCB and the Internal Microphone Is the Internal Microphone connector attached Yes No Check Q802 and related...

Страница 20: ...5 Exploded View Parts List 5 2 Multimedia Pivot base RN15MST TOSHIBA PANEL ...

Страница 21: ...5 Exploded View Parts List 5 4 Multimedia base RN15MST TOSHIBA PANEL ...

Страница 22: ...5 Exploded View Parts List 5 6 Pivot base RN15MST TOSHIBA PANEL ...

Страница 23: ...5 Exploded View Parts List 5 8 Simple base RN15MST TOSHIBA PANEL ...

Страница 24: ...5 Exploded View Parts List 5 10 Wire frame base RN15MST TOSHIBA PANEL ...

Страница 25: ... TP 2012 C113 2203 000204 C CERAMIC CHIP 100NF 10 25V X7R TP 2012 C114 2203 000204 C CERAMIC CHIP 100NF 10 25V X7R TP 2012 C115 2404 000123 C TA CHIP 10uF 20 16V TP 6032 2 9mm C116 2203 000260 C CERAMIC CHIP 10NF 10 50V X7R TP 2012 C117 2203 000204 C CERAMIC CHIP 100NF 10 25V X7R TP 2012 C118 2203 000260 C CERAMIC CHIP 10NF 10 50V X7R TP 2012 C119 2203 000204 C CERAMIC CHIP 100NF 10 25V X7R TP 201...

Страница 26: ...0uF 10 16V LZ BK 8x10 5 3 5 C167 2402 000168 C AL SMD 100uF 20 16V GP TP 8 3x8 3x6 3mm C168 2203 000260 C CERAMIC CHIP 10NF 10 50V X7R TP 2012 C169 2402 000168 C AL SMD 100uF 20 16V GP TP 8 3x8 3x6 3mm C172 2402 000168 C AL SMD 100uF 20 16V GP TP 8 3x8 3x6 3mm C173 2409 000124 C ORGANIC 100uF 10 16V LZ BK 8x10 5 3 5 C175 2404 000123 C TA CHIP 10uF 20 16V TP 6032 2 9mm C176 2402 000168 C AL SMD 100...

Страница 27: ...0 25V X7R TP 2012 C321 2203 000204 C CERAMIC CHIP 100NF 10 25V X7R TP 2012 C322 2203 000204 C CERAMIC CHIP 100NF 10 25V X7R TP 2012 C323 2203 001723 C CERAMIC CHIP 4 7pF 5 50V NPO TP 2012 C324 2203 000204 C CERAMIC CHIP 100NF 10 25V X7R TP 2012 C325 2203 000204 C CERAMIC CHIP 100NF 10 25V X7R TP 2012 C326 2203 000204 C CERAMIC CHIP 100NF 10 25V X7R TP 2012 C327 2203 000204 C CERAMIC CHIP 100NF 10 ...

Страница 28: ...04 000151 C TA CHIP 1uF 20 16V TP 3216 C370 2404 000151 C TA CHIP 1uF 20 16V TP 3216 C371 2404 000123 C TA CHIP 10uF 20 16V TP 6032 2 9mm C372 2203 000260 C CERAMIC CHIP 10NF 10 50V X7R TP 2012 C389 2203 000204 C CERAMIC CHIP 100NF 10 25V X7R TP 2012 C390 2203 000204 C CERAMIC CHIP 100NF 10 25V X7R TP 2012 C401 2203 000260 C CERAMIC CHIP 10NF 10 50V X7R TP 2012 C402 2404 000123 C TA CHIP 10uF 20 1...

Страница 29: ... 75V 600mA SOT 23 TP D113 0402 000553 DIODE RECTIFIER SS24 40V 2 0A DO 214AA D114 0402 000553 DIODE RECTIFIER SS24 40V 2 0A DO 214AA D402 0401 001056 DIODE SWITCHING MMBD4148SE 75V 600mA SOT 23 TP D404 0401 001056 DIODE SWITCHING MMBD4148SE 75V 600mA SOT 23 TP FT100 3301 001145 CORE FERRITE BEAD AB 4 5x1 6x1 6mm FT101 2901 001114 FILTER EMI SMD 25VDC 2 0ADC 100nF 3 2x1 6x1 FT102 2901 001114 FILTER...

Страница 30: ... OR GATE SOP 14P 150MIL Q IC192 BN13 00002A IC ASIC XB LCD FG60A018HM_L18 QFP 48P AUTO IC301 1205 001407 IC BUFFER GMFC1 QFP 208P PLASTIC 3 6V IC302 1105 001165 IC DRAM 416S1020 512Kx16BITx2 TSOP 50P IC303 1105 001165 IC DRAM 416S1020 512Kx16BITx2 TSOP 50P IC304 1105 001165 IC DRAM 416S1020 512Kx16BITx2 TSOP 50P IC305 0904 001222 IC GRAPHIC CONT GMZ1 QFP 208P 65MHz TR P IC307 BN09 00001A IC OSD PR...

Страница 31: ... 5 1 10W DA TP 2012 R127 2007 000300 R CHIP 10KOHM 5 1 10W DA TP 2012 R129 2007 000822 R CHIP 390OHM 5 1 10W DA TP 2012 R130 2007 000290 R CHIP 100OHM 5 1 10W DA TP 2012 R131 2007 000290 R CHIP 100OHM 5 1 10W DA TP 2012 R134 2007 000468 R CHIP 1KOHM 5 1 10W DA TP 2012 R136 2007 000872 R CHIP 4 7KOHM 5 1 10W DA TP 2012 R137 2007 000872 R CHIP 4 7KOHM 5 1 10W DA TP 2012 R138 2007 000872 R CHIP 4 7KO...

Страница 32: ... 47KOHM 5 1 10W DA TP 2012 R415 2007 000941 R CHIP 47KOHM 5 1 10W DA TP 2012 R416 2007 000941 R CHIP 47KOHM 5 1 10W DA TP 2012 R417 2007 000290 R CHIP 100OHM 5 1 10W DA TP 2012 R418 2007 000290 R CHIP 100OHM 5 1 10W DA TP 2012 R419 2007 000290 R CHIP 100OHM 5 1 10W DA TP 2012 R420 2007 000290 R CHIP 100OHM 5 1 10W DA TP 2012 R421 2007 000290 R CHIP 100OHM 5 1 10W DA TP 2012 R422 2007 000290 R CHIP...

Страница 33: ...TP 2012 RA101 2011 000002 R NETWORK 22ohm 5 1 16W L CHIP 8P TP RA102 2011 000002 R NETWORK 22ohm 5 1 16W L CHIP 8P TP RA103 2011 000002 R NETWORK 22ohm 5 1 16W L CHIP 8P TP RA104 2011 000002 R NETWORK 22ohm 5 1 16W L CHIP 8P TP RA105 2011 000002 R NETWORK 22ohm 5 1 16W L CHIP 8P TP RA106 2011 000002 R NETWORK 22ohm 5 1 16W L CHIP 8P TP RA107 2011 001015 R NETWORK 1Kohm 5 1 16W L CHIP 8P TP RA108 2...

Страница 34: ... 1V 5 200mW SOT 23 ZD104 0403 000579 DIODE ZENER BZX84C5V1 5 1V 5 200mW SOT 23 ZD105 0403 000579 DIODE ZENER BZX84C5V1 5 1V 5 200mW SOT 23 ZD401 0403 000579 DIODE ZENER BZX84C5V1 5 1V 5 200mW SOT 23 6 Electrical Parts List 6 10 SyncMaster 570BTFT 580BTFT Loc No Code No Description Specification Remarks ...

Страница 35: ...p SWITCH TACT 15V 20mA 160gf 50gf 6x3 8mm S SW805 3404 000247 sw_tact4p SWITCH TACT 15V 20mA 160gf 50gf 6x3 9mm S SW806 3404 000248 sw_tact5p SWITCH TACT 15V 20mA 160gf 50gf 6x3 10mm S 6 Electrical Parts List SyncMaster 570BTFT 580BTFT 6 11 Loc No Code No Description Specification Remarks 7 2 Sub PCB Parts LCD BN07 00005A LCD PANNEL LTM150XS L02 331 3 257 9 15 9 TN VERTICAL STRIPE 0 297 0 297 P CO...

Страница 36: ...6 Electrical Parts List 6 12 SyncMaster 570BTFT 580BTFT Memo ...

Страница 37: ...GMZ1 VOLUME TONE CTRL LVDS x 2 TFT LCD PANEL MICOM and CONTROL PART FRAME MEMORY H V R G B 12V R G B 8 8 8 R G B 8 8 8 R G B 6 6 6 DOT_CLK H V DOT_CLK H V EN DOT_CLK 5 V_S 3 3 V_S VCC 5 V_PLL 5 V_ADL H DOT_CLK H V LM4863 Audio Amp Speaker SyncMaster 330TFT 530TFT ...

Страница 38: ...Memo 7 Block Diagrams 7 2 SyncMaster 570BTFT 580BTFT ...

Страница 39: ...5 6 KEY LED VCC KEY2 GND GND CN401 1 2 3 4 5 6 KEY LED VCC KEY2 GND GND CN861 CN881 CN862 1 2 3 4 1 2 3 4 GND PWR VCC LED PWR GND VCC LED 1 2 12 V GND 1 2 RIGHT RIGHT 1 2 LEFT LEFT 8 7 6 5 4 3 2 1 LEFT_AMP GND RIGHT_AMP MIC_EN 5 V RIGHT_IN 5 V LEFT_IN CN841 1 2 3 4 5 6 7 8 LEFT_AMP GND RIGHT_AMP MIC_EN 5 V RIGHT_IN 5 V LEFT_IN CN806 CN801 CN815 CN814 1 2 3 12 V 12 V GND CN102 CN816 1 2 MIC_GND MIC...

Страница 40: ...SyncMaster 570BTFT 580BTFT ...

Страница 41: ...9 2 ...

Страница 42: ...SyncMaster 570BTFT 580BTFT ...

Страница 43: ...9 4 ...

Страница 44: ... 768 75 Hz Table 9 8 IC403 Unit Vrms 1 2 3 4 5 6 7 8 GND GND GND GND 5 03 5 03 GND 5 03 pin MODES 1024 x 768 75 Hz Table 9 9 IC404 Unit Vrms 11 12 13 14 15 16 17 18 19 20 21 5 NC 5 5 Pulse Pulse 5 NC NC Pulse Pulse Clock Clock 5 NC 3 8 5 0 5 5 GND NC 32 33 34 35 36 37 38 39 40 41 42 Unit Vrms ...

Страница 45: ...5 1 SyncMaster 570STFT 580STFT 5 Exploded View and Parts List 5 1 Simple base 570STFT ...

Страница 46: ...5 2 MultiMedia base 570STFT 5 Exploded View Parts List SyncMaster 570STFT 580STFT 5 2 ...

Страница 47: ...10 Schematic Diagrams 5 3 SyncMaster 570STFT 580STFT 5 3 Pivot MultiMedia base 570STFT ...

Страница 48: ...5 Exploded View Parts List SyncMaster 570STFT 580STFT 5 4 5 4 Angle Pivot base 570STFT ...

Страница 49: ...10 Schematic Diagrams 5 5 SyncMaster 570STFT 580STFT 5 5 Wire frame base 570STFT ...

Страница 50: ...5 6 Simple base 580STFT 5 Exploded View Parts List SyncMaster 570STFT 580STFT 5 6 ...

Страница 51: ...10 Schematic Diagrams 5 7 SyncMaster 570STFT 580STFT 5 7 MultiMedia base 580STFT ...

Страница 52: ...5 8 Pivot MultiMedia base 580STFT 5 Exploded View Parts List SyncMaster 570STFT 580STFT 5 8 ...

Страница 53: ...5 9 Angle Pivot base 580STFT 10 Schematic Diagrams 5 9 SyncMaster 570STFT 580STFT ...

Страница 54: ...5 10 Wire frame base 580STFT 5 Exploded View Parts List SyncMaster 570STFT 580STFT 5 10 ...

Страница 55: ...9 1 SyncMaster 570STFT 580STFT 9 Schematic Diagrams 9 1 DAC IO Part Schematic Diagram 5 7 6 ...

Страница 56: ...9 Schematic Diagrams SyncMaster 570STFT 580STFT 9 2 5 IC201 94 CH1 RMS 3 5 V 6 IC106 9 CH1 RMS 3 1 V 7 IC105 1 CH1 RMS 4 56 V ...

Страница 57: ...9 2 ZOOM FRC Part Schematic Diagram 9 Schematic Diagrams 9 3 SyncMaster 570STFT 580STFT 8 1 11 11 9 2 3 4 ...

Страница 58: ...MS 2 8 V 3 IC304 26 CH1 RMS 2 12 V 4 CN301 1 16 CH1 RMS 1 18 V 8 IC301 141 CH1 RMS 2 3 V 9 IC303 20 CH1 RMS 1 24 V 10 IC303 22 CH1 RMS 400 mV 11 IC303 34 CH1 RMS 4 4 V 1 IC303 39 CH1 RMS 3 6 V 12 IC302 12 CH1 RMS 2 2 V 13 IC302 5 CH1 RMS 1 7 V 14 IC302 10 CH1 RMS 4 3 V ...

Страница 59: ...GND GND 5 03 5 03 GND 5 03 pin MODES 1024 x 768 75 Hz Table 9 9 IC404 Unit Vrms 1 2 3 4 5 6 7 8 9 10 11 12 13 14 15 16 17 18 19 20 21 0 5 0 5 5 5 4 62 0 5 5 GND 5 5 NC 5 5 Pulse Pulse 5 NC NC Pulse Pulse Pulse GND Pulse 5 5 0 0 5 5 0 Clock Clock 5 NC 3 8 5 0 5 5 GND NC 22 23 24 25 26 27 28 29 30 31 32 33 34 35 36 37 38 39 40 41 42 pin pin MODES 1024 x 768 75 Hz 1024 x 768 75 Hz MODES Table 9 7 IC4...

Страница 60: ...Samsung Electronics Co Ltd September 1999 Printed in Korea Code No BN68 00084A ...

Отзывы: