background image

Setting Guide

Samsung Electronics

Service Manual

7-1

7

7

7. Setting Guide

7.1 Printer overview

These are the main components of your machine:
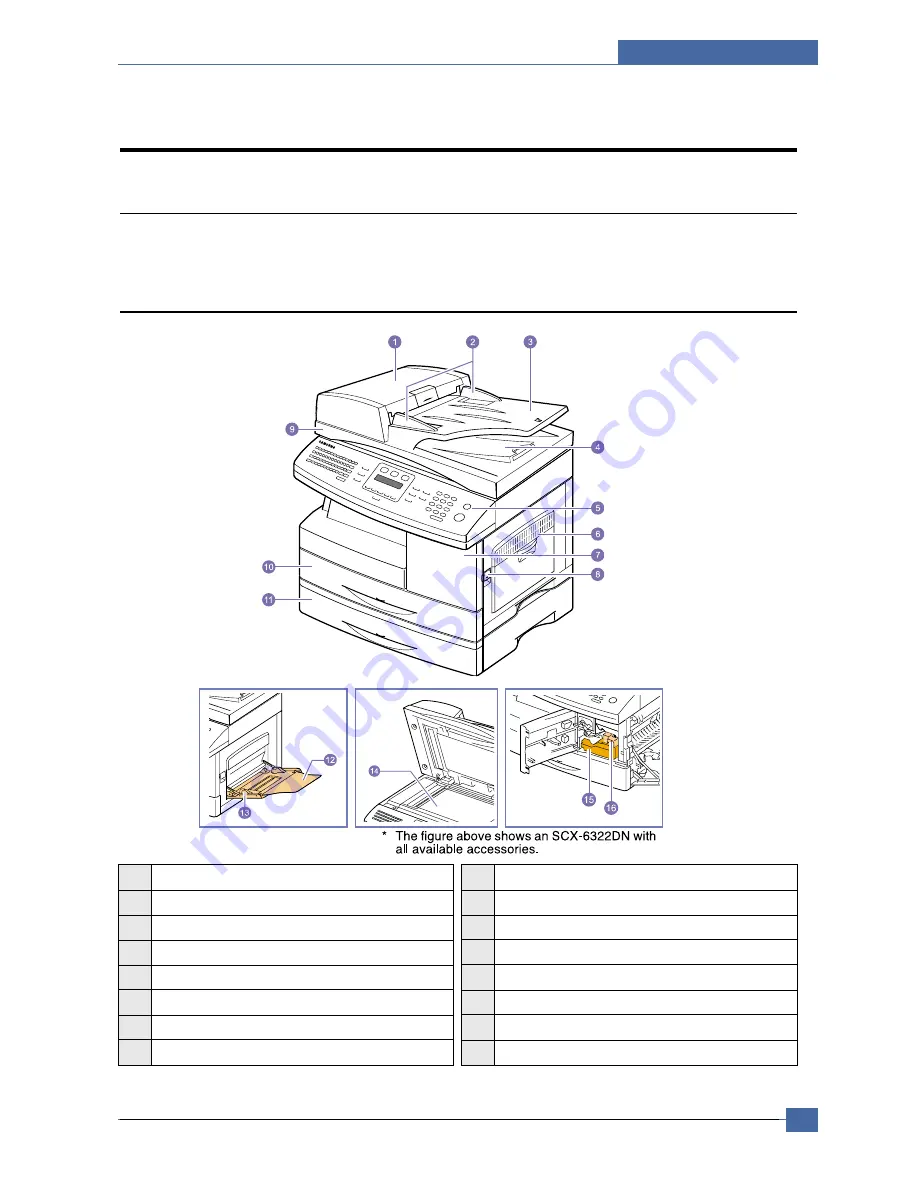
7.1.1 Front view


ADF (Automatic Document Feeder)1

document width guides 

document input tray 

document output tray 

control panel 

multi-purpose tray 

front cover 

release lever 

scanner lid

10 

tray 1

11 

optional tray 2

12 

multi-purpose tray extension

13 

multi-purpose tray paper width guides

14  scanner glass

15 

toner cartridge

16 

drum cartridge

1. SCX-6122FN has the ADF function, while SCX-6322DN uses the duplex ADF function.

Summary of Contents for SCX-6122FN

Page 1: ...r 1 2 document width guides 3 document input tray 4 document output tray 5 control panel 6 multi purpose tray 7 front cover 8 release lever 9 scanner lid 10 tray 1 11 optional tray 2 12 multi purpose tray extension 13 multi purpose tray paper width guides 14 scanner glass 15 toner cartridge 16 drum cartridge 1 SCX 6122FN has the ADF function while SCX 6322DN uses the duplex ADF function ...

Page 2: ... Service Manual Setting Guide 7 2 7 1 2 Rear view 1 ADF connector 2 extension telephone socket EXT 3 telephone line socket LINE 4 parallel port 5 USB port 6 network port 7 power receptacle 8 power switch 9 output support ...

Page 3: ...and scrolls through the available menus 10 Scroll buttons Scroll through the options avail able in the selected menu and increase or decrease values 11 OK Confirms the selection on the screen 12 Back Sends you back to the upper menu level 13 Status Shows the status of your machine 14 Darkness Adjusts the document brightness for the current copy job 15 Original Type Selects the document type for th...

Page 4: ...nd install a new one A paper jam has occurred To solve the problem The front cover is open Close the front cover There is no paper in the tray Load paper in the tray The toner cartridge installed is not a genuine cartridge and you selected Stop at the NonGenuine Toner prompt The lifespan of the toner cartridge is reached and you selected Stop at the Toner Exhausted prompt The machine has stopped d...

Page 5: ...on providing you with information on how to print documents with your machine on various operating systems and how to use the supplied software utilities Note You can access the user s guides in other languages from the Manual folder on the printer software CD Network Printer User s Guide Contained on the network utilities CD provides you with information on setting up and connecting your machine ...

Page 6: ...e display language Setting the date and time Changing the default mode Setting sounds Entering characters using the keyboard Entering characters using the number keypad Using the save modes Setting print job timeout Menu overview The control panel provides access to various menus to set up the machine or use the machine s functions These menus can be accessed by pressing Menu Refer to the followin...

Page 7: ...s four digits Hour 01 to 12 12 hour mode 00 to 23 24 hour mode Minute 00 to 59 You can also use the Scroll buttons to move the cursor under the digit you want to correct and enter a new number 5 To s el ect AM or PM for 12 hour format press the or button or any number button When the cursor is not under the AM or PM indicator pressing the or button immediately moves the cursor to the indicator You...

Page 8: ...m the telephone line through the speaker such as a dial tone or a fax tone With this option set to Comm which means Common the speaker is on until the remote machine answers You can adjust the volume level using On Hook Dial Ringer Adjusts the ringer volume For the ringer volume you can select Off Low Mid and High Speaker ringer key sound and alarm sound 1 Press Menu until System Setup appears on ...

Page 9: ... on the keyboard Entering numbers You can enter the numbers by using the number keypad on the right side of the control panel Entering symbols You can enter symbols by pressing the buttons on the upper part of the keyboard To enter upper symbols on buttons press and hold the Shift button and the symbol button simutaneously which you want to enter Entering international characters You can enter the...

Page 10: ...ter is printed on the same button move the cursor by pressing the right Scroll button and then press the button labeled with the letter you want The cursor will move to the right and the next letter will appear on the display You can enter a space by pressing 1 twice 3 When you have finished entering letters press OK Keypad letters and numbers Correcting numbers or names If you make a mistake whil...

Page 11: ...y turns off when it is not in actual use to reduce power consumption and extend the life of the lamp The lamp automatically wakes up after some warm up time when you start scanning You can set the length of time for which the scan lamp waits after a scan job is completed before it switches to the power save mode 1 Press Menu until System Setup appears on the bottom line of the display and press OK...

Page 12: ...pported operating systems The following table shows the network environments supported by the machine IPX SPX Internet Packet eXchange Sequenced Packet eXchange TCP IP Transmission Control Protocol Internet Protocol DHCP Dynamic Host Configuration Protocol BOOTP Bootstrap Protocol ...

Page 13: ...ars and press OK 4 Press OK when IP Address appears 5 Enter a byte between 0 and 255 using the number keypad and press the Scroll buttons to move between bytes Repeat this to complete the address from the 1st byte to the 4th byte 6 When you have finished press OK 7 Repeat steps 5 and 6 to configure the other TCP IP parameters subnet mask and gateway address 8 Press the Scroll buttons until Primary...

Page 14: ...2 Press the Scroll buttons until NetWare appears and press OK 3 Press the Scroll buttons until the desired frame type appears Auto Automatically senses and limits the frame type to the first one detected 802 2 Limits the frame type to IPX over IEEE 802 2 with IEEE 802 3 frames All others will be discarded 802 3 Limits the frame type to IPX over IEEE 802 3 frames All others will be discarded Ethern...

Page 15: ...ting appears and press OK 3 Press OK when Yes appears to restore the network configuration 4 Power the machine off and back on 7 5 7 Printing a network configuration page The Network Configuration page shows how the network interface card on your machine is configured 1 Press Menu until Network appears on the bottom line of the display and press OK 2 Press the Scroll buttons until Network Info app...

Reviews: