background image

LCD TV

LE32M6
LE40M6

Owner’s Instructions

Before operating the unit,

please read this manual thoroughly,

and retain it for future reference.

BN68-00956E-02

ON-SCREEN MENUS

PC DISPLAY

PICTURE IN PICTURE (PIP)

TELETEXT

This device is a Class B digital apparatus.

Register your product at

www.samsung.com/global/register
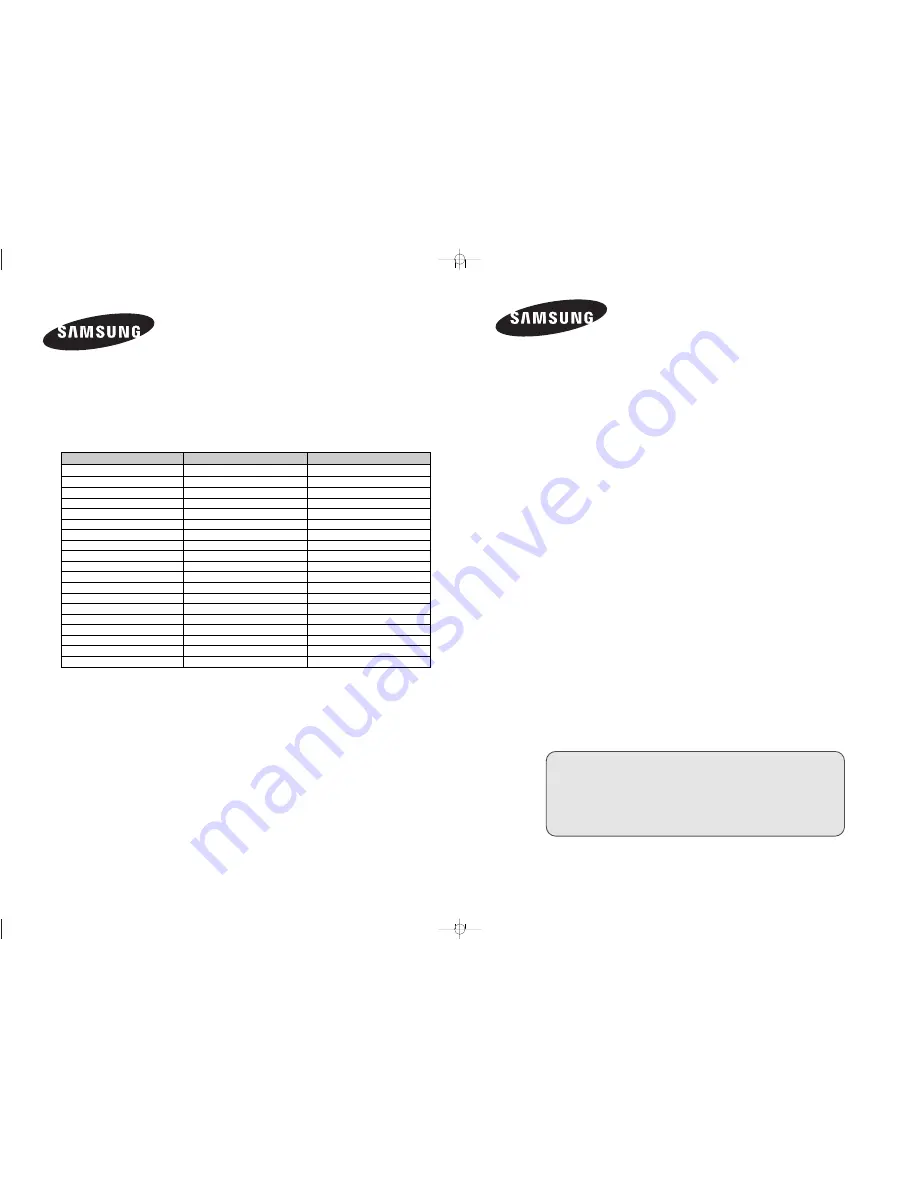
Country

BELGIUM
CZECH REPUBLIC
DENMARK
FINLAND
FRANCE
GERMANY
HUNGARY
ITALIA
LUXEMBURG
NETHERLANDS
NORWAY
POLAND
PORTUGAL
SLOVAKIA
SPAIN
SWEDEN
U.K
RUSSIA
UKRAINE

Customer Care Center 

02 201 2418
844 000 844
38 322 887
09 693 79 554
08 25 08 65 65 (€ 0,15/min)
01805 - 121213 (€ 0,12/min)
06 40 985 985
199 153 153
02 261 03 710
0900 20 200 88 (€ 0.10/min)
231 627 22
0 801 801 881
80 8 200 128
0850 123 989
902 10 11 30
08 585 367 87
0870 242 0303
8-800-200-0400
8-800-502-0000

Web Site

www.samsung.com/be
www.samsung.com/cz
www.samsung.com/dk
www.samsung.com/fi
www.samsung.com/fr
www.samsung.de
www.samsung.com/hu
www.samsung.com/it
www.samsung.lu
www.samsung.com/nl
www.samsung.com/no
www.samsung.com/pl
www.samsung.com/pt
www.samsung.com/sk
www.samsung.com/es
www.samsung.com/se
www.samsung.com/uk
www.samsung.ru
www.samsung.com/ur

Contact SAMSUNG WORLD-WIDE

If you have any questions or comments relating to Samsung products, 
please contact the SAMSUNG customer care centre. 

BN68-00956E-02Cover.qxd  12/1/05  6:12 AM  Page 1

Summary of Contents for LE26M5

Page 1: ... 15 min 01805 121213 0 12 min 06 40 985 985 199 153 153 02 261 03 710 0900 20 200 88 0 10 min 231 627 22 0 801 801 881 80 8 200 128 0850 123 989 902 10 11 30 08 585 367 87 0870 242 0303 8 800 200 0400 8 800 502 0000 Web Site www samsung com be www samsung com cz www samsung com dk www samsung com fi www samsung com fr www samsung de www samsung com hu www samsung com it www samsung lu www samsung ...

Page 2: ...ixed for an extended period of time the amount of light transmission will also remain varied and as a result the borders may leave traces Digital Ready TV When you select the wide screen 16 9 mode to watch an SD grade digital broadcast and the Set Top Box output is 1080i Digital Ready TV When the TV receives HD grade signals and the Set Top Box output is 1080i When you watch a digital HD grade bro...

Page 3: ...borders at the left right and the center of the screen remain fixed for an extended period of time the amount of light transmission will also remain varied and as a result the borders may leave traces When you watch a DVD CD or a video in wide screen 21 9 format on a wide screen 16 9 TV When you connect a computer or a game console to the TV and select the 4 3 screen mode If you connect a DVD play...

Page 4: ...and Play 13 Choosing Your Language 14 SETTING THE CHANNELS Storing Channels Automatically 15 Storing Channels Manually 16 Editing the Channels 18 Sorting the Stored Channels 19 Assigning Channels Names 20 Fine Tuning Channel Reception 21 SETTING THE PICTURE Changing the Picture Standard 22 Adjusting the Custom Picture 23 Changing the Colour Tone 24 Resetting the Picture Settings to the Factory Def...

Page 5: ...Your PC Software Based on Windows XP 47 Adjusting the PC Screen Automatically 48 Coarse and Fine Tuning of the Image 49 Changing the Image Position 50 Initializing the Image Settings 51 USING THE TELETEXT FEATURE Teletext Decoder 52 Displaying the Teletext Information 52 Selecting a Specific Teletext Page 53 Using Fastext to Select a Teletext Page 54 Setting Up Your Remote Control 55 RECOMMENDATIO...

Page 6: ... menu Press to change channels Also press to highlight various items on the on screen menu Without the Remote Control You can turn on TV by using the Channel buttons Power Press to turn the TV on and off Power Indicator Blinks and turns off when the power is on and lights up in stand by mode Remote Control Sensor Aim the remote control towards this spot on the TV Light Detecting Sensor Adjusts bri...

Page 7: ...l Power Input Whenever you connect an audio or video system to your set ensure that all elements are switched off When connecting an external device match the colour of the connection terminal to the cable Side Panel Jacks Rear Panel Jacks ...

Page 8: ...on the rear of your set and the other ends to corresponding audio out connectors on the DTV or DVD Connecting External A V Devices Connect RCA or S VIDEO cable to an appropriate external A V device such as VCR DVD or Camcorder Connect RCA audio cables to R AUDIO L on the rear of your set and the other ends to corresponding audio out connectors on the A V device Headphone may be connected to the he...

Page 9: ...se the DVI to HDMI cable or DVI HDMI Adapter for the connection and the R AUDIO L terminal on DVI for sound output Connecting Computer Connect the D Sub cable to PC PC IN on the rear of your set and the other end to the Video Card of your computer Connect the stereo audio cable to AUDIO PC IN on the rear of your set and the other end to Audio Out of the sound card on your computer Connecting AUDIO...

Page 10: ...n Off Refer to page 27 Sound mode selection Refer to page 34 Sound effect selection Refer to page 35 Volume increase Volume decrease Refer to page 33 PIP FUNCTIONS Refer to pages 31 32 SOURCE Input source selection SWAP Interchange the main and sub picture SIZE PIP size selection POSITION PIP position selection Previous channel Available source selection Refer to page 46 Use to see information on ...

Page 11: ...page P Teletext previous page Teletext Function Refer to pages 52 54 for details Teletext display mix both teletext information and the normal broadcast Teletext sub page Teletext cancel Teletext hold Teletext mode selection LIST FLOF Teletext reveal Teletext index Teletext size selection Teletext store ...

Page 12: ...ool dry place if you won t be using the remote control for a long time The remote control can be used up to about 23 feet from the TV Assuming typical TV usage the batteries last for about one year If the remote control doesn t work Check the following 1 Is the TV power on 2 Are the plus and minus ends of the batteries reversed 3 Are the batteries drained 4 Is there a power cut or is the power cor...

Page 13: ...time you will be asked to choose language in which the menus are to be displayed see page 14 4 To switch your set off press the POWER button again Placing Your Television in Standby Mode Your set can be placed in standby mode in order to reduce the power consumption The standby mode can be useful when you wish to interrupt viewing temporarily during a meal for example 1 Press the POWER button on t...

Page 14: ...d digit must be pushed immediately after the first Failure to do this will result in a single digit channel being displayed Used to increase the volume Used to decrease the volume MUTE Used to switch the sound off temporarily To turn the sound back on press this button again or press the button MENU Used to display the Used to return to the on screen menu system previous menu or normal viewing EXI...

Page 15: ...antenna input is displayed with the OK selected 4 Press the ENTER button Result The following areas are available Belgium France Germany Italy Netherlands Spain Sweden Switzerland United Kingdom Eastern Europe Others 5 Select your Country by pressing the or button Press the ENTER button Result The Auto Store menu is displayed with the Start selected 6 Press the ENTER button Result The channel sear...

Page 16: ...oosing Your Language When you start using your set for the first time you must select the language which will be used for displaying menus and indications 1 Press the MENU button Result The main menu is displayed 2 Press the or button to select Setup Result The options available in the Setup group are displayed 3 Press the ENTER button 4 Press the or button to select Language Press the ENTER butto...

Page 17: ...witzerland United Kingdom Eastern Europe Others 5 Press the ENTER button 6 Press the or button to select Auto Store Press the ENTER button Result The Auto Store menu is displayed with the Start selected 7 Press the ENTER button to search the channels The sub menu is changed from Start to Stop with channel search started Result The search will end automatically Channels are sorted and stored in an ...

Page 18: ...ss the ENTER button again To assign a programme number to a channel find the correct number by pressing the or button and then press the ENTER button You can also set a programme number by pressing number buttons on the remote control 6 Press the or button to select Colour System and then press the ENTER button Select the colour standard required by pressing the or button repeatedly and then press...

Page 19: ... frequency range until the first channel or the channel that you selected is received on your screen 10 Press the or button to select Store Select OK by pressing the ENTER button Result The channel and associated programme number are stored 11 Repeat steps 8 to 10 for each channel to be stored Channel mode P Programme mode When tuning is completed the broadcasting stations in your area will have b...

Page 20: ... the ENTER button Result The state of the current channel is displayed 4 Press the button to select channel that you wish to add or delete Result If the channel that you wish to edit is not in memory the Add is selected and displayed Otherwise if the channel that you wish to edit is in memory the Delete is selected and displayed 5 Press the ENTER button to add or delete channel 6 Press the MENU bu...

Page 21: ...vailable in the Channel group are displayed 3 Press the or button to select Sort Press the ENTER button Result The Prog Ch and Name are displayed 4 Select the channel number that you wish to change by pressing the or button repeatedly Press the ENTER button Result The selected the channel number and name are moved to right side 5 Press the or button to move to the position in which you would like ...

Page 22: ... 4 If necessary select the channel to be assigned to a new name by pressing the or button Press the ENTER button Result The selection bar is displayed around the name box 5 To Then Select a letter number or symbol Press the or button Move on the next letter Press the button Move back the previous letter Press the button Confirm the name Press the ENTER button The characters available are Letters o...

Page 23: ...the or button to select Fine Tune Press the ENTER button Result The horizontal bar is displayed 4 Press the or button to reach the required setting Press the ENTER button Result An asterisk appears on the right hand side of the channel number The channel number turns red To reset the fine tuning select Reset by pressing the or button and then press the ENTER button 5 When you are satisfied with th...

Page 24: ... Press the ENTER button again Result The options available in the Mode group are displayed 5 Press the ENTER button Result The Mode is selected 6 Select the required picture effect by pressing the or button repeatedly Result The following picture effects are available Dynamic Standard Movie Custom 7 When you are satisfied with the setting press the MENU button to return to the previous menu or pre...

Page 25: ...e or button Press the ENTER button Result The horizontal bar is displayed 6 Press the or button to reach the required setting Press the ENTER button 7 When you are satisfied with the setting press the MENU button to return to the previous menu or press the EXIT button to return to normal viewing The adjusted values are stored according to the selected Picture mode Each adjusted setting will be sto...

Page 26: ...atedly Press the ENTER button Result The following options are available Cool2 Cool1 Normal Warm1 Warm2 6 When you are satisfied with your choice press the EXIT button to return to normal viewing The adjusted values are stored according to the selected Picture mode You can return to the factory defaults picture settings 1 Press the MENU button Result The main menu is displayed 2 Press the or butto...

Page 27: ...e for DVDs or wide broadcasting Panorama Adjusts 16 9 to 4 3 in a natural way as for normal broadcasting Zoom Magnifies the 16 9 wide picture in the vertical direction to fit the screen size Select by pressing the or button Use the or button to move the picture up and down After selecting use the or button to magnify or reduce the picture size in the vertical direction 4 3 This is the default sett...

Page 28: ... may appear on the screen 1 Press the MENU button Result The main menu is displayed 2 Press the or button to select Picture Result The options available in the Picture group are displayed 3 Press the ENTER button 4 Press the or button to select Digital NR Press the ENTER button 5 Press the or button to select On Press the ENTER button 6 Press the EXIT button to return to normal viewing ...

Page 29: ...played 3 Press the ENTER button 4 Press the or button to select DNIe Demo and then press the ENTER button Press the or button to select On Press the ENTER button DNIe Demo Off DNIe Demo mode is deactivated DNIe Demo On The right hand side of the screen shows improved DNle image The left hand side of the screen shows the original image You can also select these options by simply pressing the DNIe b...

Page 30: ...ess the ENTER button Result The sources are displayed in the following order Blue Green Pink Standard Custom 6 Press the or button to select Detail Control and press the ENTER button Select a source of the sub picture by pressing the or button and press the ENTER button Result The sources are displayed in the following order Pink Green Blue Reset 7 Press the or button to reach the required setting...

Page 31: ... options available in the Picture group are displayed 3 Press the ENTER button 4 Press the or button to select Dynamic Contrast Press the ENTER button Result The Dynamic Contrast menu is displayed 5 Select On by pressing the or button Press the ENTER button 6 When it has finished press the EXIT button to return to normal viewing This function doesn t work when source is in PC mode or PIP is set to...

Page 32: ...roup are displayed 3 Press the ENTER button 4 Press the or button to select Brightness Sensor Press the ENTER button Result The Brightness Sensor menu is displayed 5 Select On by pressing the or button Press the ENTER button Result Brightness on the screen is adjusted automatically according to brightness of surrounding environment 6 When it has finished press the ENTER button to return to the pre...

Page 33: ... the sub picture by pressing the or button and press the ENTER button Result The sources are displayed in the following order When the main picture is set to TV Ext 1 Ext 2 AV S Video Component only HDMI can be selected and when the main picture is set to PC HDMI TV Ext 1 Ext 2 AV S Video Component can be selected 7 Press the or button to select Swap To interchange the main picture and the sub pic...

Page 34: ...s Description PIP Used to operate On Off function of PIP directly SOURCE Used to select a source of the sub picture SWAP Used to interchange the main picture and the sub picture When the main picture is in the video mode and the sub picture is in the TV mode you might not hear the sound of the main picture when pressing the SWAP button after changing the sub picture channel At this time reselect t...

Page 35: ...e increases until you release the button The cursor moves to the right to indicate the volume Press the button to decrease the volume Result A horizontal bar is displayed and the volume decreases until you release the button The cursor moves to the left to indicate the volume Additional sound adjustments are available on your set For further details refer to pages 34 to 39 ...

Page 36: ... as before and the Mute indication disappears Selecting the Sound Mode You can set the sound mode by pressing the DUAL button When you press it the current sound mode is displayed on the screen If the receiving conditions deteriorate listening will be easier if the mode is set to Mono If the stereo signal is weak and automatic switching occurs switch to Mono Default Automatic change DUAL 1 Automat...

Page 37: ...he previous menu or press the EXIT button to return to normal viewing You can also select these options by simply pressing the S MODE Sound Mode button on the remote control The sound settings can be adjusted to suit your personal preferences 1 Press the MENU button Result The main menu is displayed 2 Press the or button to select Sound Result The options available in the Sound group are displayed...

Page 38: ... the or button to select Sound Result The options available in the Sound group are displayed 3 Press the ENTER button 4 Press the or button to select SRS TSXT and then press the ENTER button 5 Select the required option by pressing the or button Press the ENTER button Result The sources are displayed in the following order Off 3D Mono Stereo 6 Press the EXIT button to return to normal viewing You ...

Page 39: ...output when the modulation signal is high or by raising the sound output when the modulation signal is low 1 Press the MENU button Result The main menu is displayed 2 Press the or button to select Sound Press the ENTER button Result The options available in the Sound group are displayed 3 Press the or button to select Auto Volume Press the ENTER button 4 Press the or button to select On Press the ...

Page 40: ...u Prolonged use of headphones at a high volume may damage your hearing You will not receive sound from the speakers when you connect headphones to the system Selecting the Internal Mute If you want to hear the sound through separate speakers cancel the internal amplifier 1 Press the MENU button Result The main menu is displayed 2 Press the or button to select Sound Result The options available in ...

Page 41: ...und Result The options available in the Sound group are displayed 3 Press the ENTER button 4 Press the or button to select Sound Select and then press the ENTER button Result Main and Sub are displayed You can select this option when the PIP is in On 5 Select the Sub by pressing the or button Press the ENTER button Result You can listen to the sound of the sub picture To listen the sound of the cu...

Page 42: ...ions available in the Setup group are displayed 3 Press the or button to select Time Press the ENTER button Result The Time menu is displayed with Clock Set selected 4 Press the ENTER button 5 To Press the Move to Hour or Minute or button Set the Hour or Minute or button Press the ENTER button 6 When you are satisfied with the setting press the MENU button to return to the previous menu or press t...

Page 43: ...ess the or button repeatedly and cycle through the preset time intervals Off 30 60 90 120 150 180 Press the ENTER button Result The TV automatically switches to standby mode when the timer reaches 0 6 To cancel the sleep timer function select Off by pressing the or button and then press the ENTER button 7 Press the EXIT button to return to normal viewing You can set the sleep timer by simply press...

Page 44: ...ton Result The Time menu is displayed with Clock Set selected 4 Press the or button to select On Timer Press the ENTER button Result The On Timer menu is displayed 5 Set the time channel and volume level at which you wish the set to be switched on To Press the Move to Hour Minute Programme and Volume or button Set Hour Minute Programme and Volume or button Move to Activation or button Select Yes t...

Page 45: ...lt The options available in the Setup group are displayed 3 Press the or button to select Child Lock Press the ENTER button Result The options available in the Child Lock group are displayed 4 Press the ENTER button again Result The Child Lock is selected 5 Press the or button to select On Press the ENTER button 6 Press the or button to select Programme Press the ENTER button 7 Press the or button...

Page 46: ...t Blue Screen Press the ENTER button 4 Press the or button to select On Press the ENTER button 5 Press the EXIT button to return to normal viewing English 44 Setting the Blue Screen Mode You can hear melody sound when the television is powered on or off 1 Press the MENU button Result The main menu is displayed 2 Press the or button to select Setup Press the ENTER button Result The options availabl...

Page 47: ...ice by pressing the or button Press the ENTER button 4 Repeat step 1 Press the or button to select Edit Name Press the ENTER button Result The options available in the Edit Name menu are displayed 5 Select the device that you wish to edit by pressing the or button Result The following options are available Ext 1 Ext 2 AV S Video Component PC HDMI 6 Press the ENTER button 7 Select the required devi...

Page 48: ...ton Result The edited device and audio status are displayed on top left of the set 3 Press the SOURCE button until the required input source is selected If you change the external source while viewing pictures might take a short period of time to be switched TV mode can be selected by pressing the TV or button on the remote control but you cannot select it by pressing the SOURCE button Viewing Pic...

Page 49: ...our computer manufacturer or Samsung Dealer 1 First click on Control Panel on the Windows start menu 3 When the control panel window appears click on Display and a display dialog box will appear 2 When the control panel window appears click on Appearance and Themes and a display dialog box will appear 4 Navigate to the Settings tab on the display dialog box The correct size setting resolution Opti...

Page 50: ...lt The main menu is displayed 2 Press the or button to select Setup Press the ENTER button Result The options available in the Setup group are displayed 3 Press the or button to select PC Press the ENTER button Result The options available in the PC menu are displayed 4 Press the or button to select Auto Adjustment Press the ENTER button Result The screen quality and position are automatically adj...

Page 51: ...r button to select Setup Press the ENTER button Result The options available in the Setup group are displayed 3 Press the or button to select PC Press the ENTER button Result The options available in the PC menu are displayed 4 Press the ENTER button again Result The Image Lock menu is selected 5 Press the or button to select Coarse or Fine Press the ENTER button Result The horizontal bar is displ...

Page 52: ...roup are displayed 3 Press the or button to select PC Press the ENTER button Result The options available in the PC menu are displayed 4 Press the or button to select Position Press the ENTER button Result You can adjust the image Position 5 Press the or button to adjust horizontal position Press the or button to adjust vertical position Press the ENTER button 6 Press the MENU button to return to ...

Page 53: ...select Setup Press the ENTER button Result The options available in the Setup group are displayed 3 Press the or button to select PC Press the ENTER button Result The options available in the PC menu are displayed 4 Press the or button to select Image Reset Press the ENTER button Result You can initialize all image setting to the factory default values 5 Press the MENU button to return to the prev...

Page 54: ... 1 Using the or button select the channel providing the teletext service 2 Press the TTX MIX button to activate the teletext mode Result The contents page is displayed It can be redisplayed at any time by pressing the MENU button 3 Press the TTX MIX button again Result The screen will split into two This Double Teletext feature lets you view the actual broadcast and teletext information separately...

Page 55: ...quence To freeze the display on a given page press the PRE CH Press the PRE CH button again to resume 3 Using the various display options To display Press the Both teletext information and TTX MIX the normal broadcast Hidden text INFO answers to quiz games for example The normal screen INFO again A secondary page SLEEP by entering its 4 digit number The next page Page Up The previous page Page Dow...

Page 56: ...y pressing the TTX MIX button 2 Press the coloured button corresponding to the topic that you wish to select The available topics are listed on the status information line Result The page is displayed with additional colour coded information that can be selected in the same way 3 To display the Press the Previous page Red button Next page Green button 4 When you have finished press the PIP button ...

Page 57: ... screen 3 Press the SET button on your TV s remote control 4 Using the number buttons on your remote control enter three digits of the VCR code listed on page 58 of this manual for your brand of VCR Make sure you enter three digits of the code even if the first digit is a 0 If more than one code is listed try the first one 5 Press the Power button on the remote control Your VCR should turn on if y...

Page 58: ...f cable box Make sure you enter three digits of the code even if the first digit is a 0 If there is more than one code listed try the first one 5 Press the Power button on the remote control Your cable box should turn on if your remote is set up correctly If your cable box does not turn on after set up repeat steps 2 3 and 4 but try one of the other codes listed for your brand of cable box If no o...

Page 59: ...and of DVD Make sure you enter three digits of the code even if the first digit is a 0 If there is more than one code listed try the first one 5 Press the Power button on the remote control Your DVD should turn on if your remote is set up correctly If your DVD does not turn on after set up repeat steps 2 3 and 4 but try one of the other codes listed for your brand of DVD If no other codes are list...

Page 60: ...21 036 056 059 008 007 018 021 026 036 037 062 018 007 026 037 008 062 064 021 056 071 072 021 036 056 059 021 036 019 026 039 053 017 019 002 021 035 041 043 057 068 000 018 024 018 019 006 024 028 029 041 048 051 020 034 045 015 027 033 044 021 025 036 056 059 003 019 029 051 052 VCR Codes Brand Hitachi Panasonic Phlips Pioneer RCA Samsung zenith Code 025 030 003 022 027 037 044 019 021 023 028 ...

Page 61: ...ce that is affecting the set and move it further away Plug your set into a different mains socket Check the direction location and connections of your aerial This interference is often due to the use of an indoor aerial Replace the remote control batteries Clean the upper edge of the remote control transmission window Check the battery terminals Check that the signal cable is firmly connected to t...

Page 62: ...ket Set Bracket Screw 8EA Wood Screw 7EA Anchor 7EA Screw 3EA Installation Guide How to assemble the Wall Mount Bracket 1 Mark the location of hole on the wall Drill a hole of 35mm depth on the marked location Fix anchors on each hole on the wall Connect wall bracket to the wall with wood screws after fitting anchors into the wall bracket Note If the bracket is not firmly fixed to the wall LCD TV ...

Page 63: ...he rear side of the TV set only model LE40M6 applied Attach the set bracket onto the rear side of the TV set and secure the screws For 40 inches model attach the bracket into the two holes with the two screws removed in step 6 above 3 Insert three Hangers of the set bracket into the grooves of the wall bracket Fix set bracket and wall bracket with screws Note Before installing the set on the wall ...

Page 64: ...nglish 62 Installing the Stand 1 Place the TV faced down on a soft cloth or cushion on a table 2 Attach the stand to the TV set as shown in the picture 3 Use the four screws to tightly fix the stand 2 3 ...

Page 65: ...eavy stationary object The Kensington lock is a device used to physically fix the system when using it in a public place The locking device has to be purchased separately The appearance and locking method may differ from the illustration depending on the manufacturer Please refer to the manual provided with the Kensington lock for proper use The place of the Kensington Lock may be different depend...

Page 66: ...arate TTL P or N H V Separate TTL P or N Video Signal 0 7 Vp p 75 ohm 0 7 Vp p 75 ohm TV Colour System PAL SECAM B G D K PAL SECAM B G D K I I I L L NTPB AV3 58 4 43 I I I L L NTPB AV3 58 4 43 Sound System BG DK I L BG DK I L Video Colour System PAL NTSC SECAM PAL NTSC SECAM Video System CVBS S VHS RGB CVBS S VHS RGB SCART 1 Video Input Output 1 0 Vp p 75 ohm 1 0 Vp p 75 ohm RGB Input 0 7 Vp p 75 ...

Page 67: ...z 15kHz at 3dB Response A V 80Hz 20kHz at 3dB A V 80Hz 20kHz at 3dB Sound Output 10 W X 2 10 W X 2 3D Surround SRS TruSurroundXT SRS TruSurroundXT Stereo Nicam A3 Nicam A2 Both screen position and size will vary depending on the type of PC monitor and its resolution The table below shows all of the display modes that are supported Mode Resolution Horizontal Vertical Pixel Clock Sync Polarity Frequ...

Page 68: ...n input Pin Signal 12 13 Video chassis return RGB red 14 15 RGB red input 16 Blanking signal RGB switching 17 Video chassis return 18 Blanking signal ground 19 Video output 20 Video input 21 Screening chassis return PC Input Connector 15Pin Pin Signal 1 Red R 2 Green G 3 Blue B 4 Grounding 5 Grounding DDC 6 Red R Grounding 7 Green G Grounding 8 Blue B Grounding Pin Signal 9 Reserved 10 Sync Ground...

Page 69: ... for long periods of time unplug it from the wall outlet and disconnect the antenna or cable system This will prevent damage to the set due to lightning and power line surges Before connecting the AC power cord to the DC adaptor outlet make sure the voltage designation of the DC adaptor corrsponds to the local electrical supply Never insert anything metallic into the open parts of this apparatus D...

Page 70: ...ctronics U K Ltd Unit C Customer Care Centre Stafford Park 12 TELFORD Shropshire TF3 3BJ Tel 0870 242 0303 Fax 01952 297617 UNITED KINGDOM Wiring the Mains Power Supply Plug UK Only Warranty Card IMPORTANT NOTICE The mains lead on this equipment is supplied with a moulded plug incorporating a fuse The value of the fuse is indicated on the pin face of the plug and if it requires replacing a fuse ap...

Page 71: ...This page is intentionally left blank ...

Page 72: ...or human health from uncontrolled waste disposal please separate this from other types of wastes and recycle it responsibly to promote the sustainable reuse of material resources Household users should contact either the retailer where they purchased this product or their local government office for details of where and how they can take this item for environmentally safe recycling Business users ...

Reviews: