background image

User Guide • Benutzerhandbuch

Guide d’utilisation • Manuale per l’utente

Guía del usuario

All-in-One Printers • All-in-One Drucker • Imprimantes multifonctions
Stampanti multifunzione • Impresoras multifunción

Color Inkjet Multifunction


CJX-1050W Series

Summary of Contents for CJX-1050W

Page 1: ...ndbuch Guide d utilisation Manuale per l utente Guía del usuario All in One Printers All in One Drucker Imprimantes multifonctions Stampanti multifunzione Impresoras multifunción Color Inkjet Multifunction CJX 1050W Series ...

Page 2: ......

Page 3: ...se and affordable inks to provide high quality pictures and documents Resources Support is available Go to www samsung com printer for answers to questions software upgrades and more If you prefer you can chat online send us an e mail or call for technical support Go to www samsung com printer ...

Page 4: ......

Page 5: ...regarding Samsung products contact the Samsung customer care center Country Region Customer Care Center Web Site FRANCE 01 48 63 00 00 www samsung com printer GERMANY 01805 SAMSUNG 726 7864 0 14 min www samsung com printer ITALY 800 SAMSUNG 726 7864 www samsung com printer ...

Page 6: ...aper 9 2 Networking Your Printer 13 Connecting to a wireless network 13 Before you connect 13 Connecting to a wireless network using the Wi Fi Setup Wizard 13 Setting up an IP address 18 Viewing the network configuration 19 Printing the network configuration 20 Adding a wireless network connection to a USB connected computer 21 Changing from USB to a wireless connection 21 ...

Page 7: ...ring supplies 58 4 Maintaining Your Printer 59 General care and cleaning 60 Cleaning the scanner glass and document backing 60 Replacing ink cartridges 63 Updating the software and printer firmware 68 Updating if your printer is connected to a computer with WINDOWS OS 68 Updating if your printer is connected to a computer with MAC OS 70 Monitoring and adjusting printer performance 71 Checking ink ...

Page 8: ...ations and features 85 Print performance 85 Photo printing features 85 Copy document features 86 Copy photo features 87 Scanning features 87 Paper input tray features 88 Ink cartridges 88 Connectivity 90 Software support 90 Physical specifications 91 System requirements 92 Computer with WINDOWS OS 92 Computer with MAC OS 92 Paper types supported 93 Paper sizes supported 94 ...

Page 9: ... Information 97 Safety Information 97 LCD Screen Safety 100 Ink Cartridge Safety 100 Declaration of Conformity European countries 101 Correct Disposal of This Product Waste Electrical Electronic Equipment 103 ENERGY STAR Qualified 104 ...

Page 10: ......

Page 11: ...Components Printer Overview This printer lets you print copy and scan pictures and documents 1 1 Left paper edge guide 2 Paper guard 3 Paper input tray 4 Right paper edge guide 5 Paper output tray 6 Output tray extender ...

Page 12: ...Printer Overview 2 EN 7 8 11 10 9 7 Scanner glass 8 Scanner lid 9 Control panel 10 Memory card slot 11 Wi Fi connectivity LED ...

Page 13: ...Printer Overview 3 EN 14 15 12 13 210 12 Access door 13 Printhead with ink cartridges installed 14 USB port 15 Power cord connection port ...

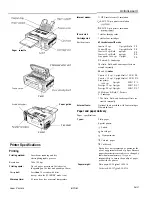
Page 14: ...Printer Overview 4 EN Control panel 1 2 3 4 5 6 7 8 5 9 10 ...

Page 15: ...croll through pictures 5 Zoom buttons Enlarge or reduce the size of the displayed picture 6 Rotate button Changes the orientation of the displayed picture 7 Start button Begins copying scanning printing maintenance tasks and file transfer 8 OK button Selects a menu item accepts a zoom setting or allows you to continue with the current operation 9 Back button Displays the higher level screen in the...

Page 16: ...C OS you can use Print Manager Software to order supplies and configure your printer from your computer Configuring printer settings To set or change basic printer settings 1 Press Menu 2 Press to select Printer Settings then press OK 3 Press to select one of the following settings Date and Time Press OK then press to select Year Month Day Hour or Minute Press or to change the values press OK when...

Page 17: ...ry or region then press OK Reset All Settings see Resetting factory defaults page 71 NOTE Resetting factory defaults does not change the date and time language country region or network settings Printer Info Press OK to view the Firmware Version number press OK when you are done 4 Press Back to return to the Main Menu Paper For the best photo printing results use KODAK Photo Papers which are optim...

Page 18: ...ard stock 110 lb 200 gsm max Envelopes most standard types Labels all commercially available inkjet varieties on 8 5 x 11 in or A4 sheets Iron on transfers all inkjet varieties on 8 5 x 11 in or A4 sheets Paper sizes Minimum size Maximum size English units 4 x 6 in 8 5 x 14 in Metric units 10 x 15 cm 22 x 36 cm ...

Page 19: ...Printer Overview 9 EN Loading paper 1 Lift the input tray 2 Pull out the output tray until it is fully extended ...

Page 20: ...Printer Overview 10 EN Loading plain paper The input tray capacity is 100 sheets of plain paper To load plain paper 1 Fan and stack the paper ...

Page 21: ...Printer Overview 11 EN 2 Make sure the left and right paper edge guides are in the plain paper position then insert the paper into the input tray ...

Page 22: ...er 1 Remove any plain paper from the tray 2 Insert the paper short side first into the input tray with the logo side facing toward the tray and the glossy side toward you IMPORTANT If the photo paper is loaded the wrong way the image quality will be affected 3 Move the paper edge guides until they touch the paper ...

Page 23: ...rts Wi Fi Protected Setup WPS NOTE If you have specific questions about your router see your router manufacturer s documentation for more information Connecting to a wireless network using the Wi Fi Setup Wizard You can use the Wi Fi Setup Wizard on the printer to connect to your wireless network Read the following procedures and use the one that is appropriate for your network setup This section ...

Page 24: ...ork information in the spaces below using the correct uppercase and lowercase letters Network Name SSID _______________________________________________ Security String case sensitive _________________________________________ 1 Press Menu 2 Press to select Network Settings then press OK 3 With Wi Fi Setup Wizard selected press OK NOTE The Wi Fi radio turns on when you select Wi Fi Setup Wizard The ...

Page 25: ...ss OK If there are more networks than can be shown on the LCD a page down symbol appears in the bottom right of the display 4 Press to select your network then press OK If you don t see your network in the list or if you want to change your network select Rescan for Wireless Networks then press OK NOTE If the name of your network is not listed make sure your wireless router is turned on and within...

Page 26: ... Wi Fi Protected Setup WPS you can use WPS Connect WPS lets you configure your printer for a wireless network by pressing buttons or entering a PIN To connect to a network using WPS 1 Press Menu 2 Press to select Network Settings then press OK 3 With Wi Fi Setup Wizard selected press OK NOTE The Wi Fi radio turns on automatically when you select Wi Fi Setup Wizard 4 With WPS Connect selected press...

Page 27: ...necting IMPORTANT Before you press OK on the printer make sure you know where the router s push button is or where to enter the generated PIN If necessary consult your Internet service provider or router device manufacturer s documentation for more information 6 When the confirmation message appears press OK When the printer is successfully connected the Wi Fi connectivity LED stops blinking and s...

Page 28: ...printer All IP address entries have the following format 000 000 000 000 Within each three digit grouping the number must be right justified If an address or subnet mask has only one or two characters between the periods include one or two leading zeros in front of that number For example The address as it may appear in your documentation How to enter the address in the printer menu 149 89 138 149...

Page 29: ...bers Consult your Internet service provider or network administrator for more information Viewing the network configuration To view the network configuration and verify that you are connected to your wireless network 1 Press Menu 2 Press to select Network Settings then press OK 3 Press to select View Network Configuration then press OK The wireless or Ethernet network settings appear on the LCD in...

Page 30: ...and the word CONNECTED 4 To scroll through the information press 5 When you are done press OK Printing the network configuration To print the current network configuration 1 Load plain paper into the printer see Loading plain paper page 10 2 Press Menu 3 Press to select Network Settings then press OK 4 Press to select Print Network Configuration then press OK ...

Page 31: ...inter control panel press Menu 3 Press to select Network Settings then press OK 4 Press to select View Network Configuration press OK then confirm that the IP Address is not 0 0 0 0 5 If you have not already done so connect your printer to your wireless network 6 Select Start All Programs Samsung Samsung Printer Setup Utility If your wireless all in one printer example Samsung CJX 1050W 0034 is no...

Page 32: ...ber for example Samsung CJX 1050W 0034 If your printer is connected to a computer with MAC OS 1 Unplug the USB cable from your printer and computer 2 On the printer control panel press Menu 3 Press to select Network Settings then press OK 4 Press to select View Network Configuration press OK then confirm that the IP Address is not 0 0 0 0 5 Select Apple System Preferences 6 Under Hardware select P...

Page 33: ...ents To print a document from your computer 1 Open the document 2 Select File Print 3 In the Print window select your SAMSUNG Printer 4 Choose the pages to print number of copies etc then click OK on a computer with WINDOWS OS or Print on a computer with MAC OS 3 ...

Page 34: ...NDOWS OS To print two sided documents from a computer with WINDOWS OS 1 Load paper into the paper input tray 2 Open the document you want to print then select File Print 3 In the Print dialog box make sure that SAMSUNG CJX 1050W Series AiO is selected then click Properties 4 Select the Layout tab 5 In the Two sided printing field select Manual Instructions provided then click OK 6 Click OK 7 When ...

Page 35: ...n list select Paper Handling 5 In the Pages to Print drop down list select Odd Only 6 In the Page Order drop down list select Reverse 7 Click Print 8 When the odd pages have finished printing remove them from the output tray 9 Turn the printed pages over and place into the input tray top edge down and printed side away from you 10 Select File Print 11 In the Copies Pages drop down list select Pape...

Page 36: ...n follow the on screen instructions On a computer with either MAC OS or WINDOWS OS you can print pictures from picture editing or photo management software Printing pictures from a memory card Your printer accepts the following memory cards SD Card SDHC Card MMC Card MEMORY STICK Variations of the memory cards above that require an adapter for example MEMORY STICK Duo miniSD and microSD IMPORTANT ...

Page 37: ...ture you want to print 3 Use the Zoom Rotate and Navigation buttons to edit your picture as needed 4 Press OK to select your picture 5 Repeat steps 2 through 4 for each same size picture you want to print 6 Select a print size a Press Back b Press to select Print Size c Press to navigate to the size picture you want to print 7 Press Start to begin printing ...

Page 38: ... pictures on a memory card Your printer can help you locate pictures on a memory card by the date the picture was taken or last saved To locate pictures 1 Insert the memory card into the memory card slot 2 Press Menu 3 Press to select View Print Photos then press OK 4 Press to select Find Photos then press OK 5 In the View by Date menu press to select Year Month or Day press or to select the speci...

Page 39: ...ee Loading photo paper page 12 and move the paper edge guides until they touch the paper IMPORTANT Always load the paper short side first The printer automatically detects the orientation of the picture whether it s portrait or landscape and prints accordingly If the photo paper is loaded in the wrong direction the image will be cut off and the paper may jam If the paper is loaded with the wrong s...

Page 40: ...ard slot memory card slot 3 Press or to display the picture you want to print 4 Press Start to begin printing The printer prints one 4 x 6 in 10 x 15 cm picture IMPORTANT To prevent loss of data from your memory card do not remove it from the printer while printing ...

Page 41: ...m as the default To print a picture or pictures using settings other than the default settings 1 Load photo paper with the glossy side toward you see Loading photo paper page 12 and move the paper edge guides until they touch the paper 2 Insert the memory card into the memory card slot A picture appears on the LCD memory card slot 3 Press or to select the picture you want to print then press OK ...

Page 42: ...ss OK to select the picture for printing press Back to display the Print Photos Options menu Find Photos Press OK then select a year month and or day to view photos by date that they were taken press OK to view the photo s press Back to display the Print Photos Options menu Transfer All to PC To transfer all the pictures on the memory card to your computer press OK then Start Your printer and comp...

Page 43: ...ze 2 x 3 3 5 x 5 4 x 6 default 4 x 7 4 x 8 5 x 7 4 x 12 8 x 10 8 5 x 11 or A4 If the selected copy size is smaller than the paper in the paper tray the printer automatically arranges the pictures to best fit the paper size Plain Paper Quality Normal default Good quality output prints faster than Best Best The highest quality Draft The fastest print speed ...

Page 44: ...tion in contrast in different areas of the picture Add Date to Prints No default Yes Prints the date of the picture s the date the picture was taken or last edited in a corner of the print Save as Defaults No Yes To save the settings as the new default press OK With Yes selected press OK 7 When you have finished changing settings press Start to begin printing IMPORTANT To prevent loss of data from...

Page 45: ... paper or US letter or A4 paper in the main paper tray 1 Insert the memory card into the memory card slot memory card slot 2 Press or to select the panoramic picture you want to print then press OK 3 Press Back for Print Photos Options 4 Press to select Print Size then press to select 4 x 12 5 Press Start ...

Page 46: ...ized by the printer If you choose to print tagged pictures they will be printed according to the default settings on your printer unless otherwise specified by the tag from the camera NOTE Refer to your camera user guide to determine whether your camera supports tagged also marked or DPOF functionality To print tagged pictures 1 Load photo paper with the glossy side toward you see Loading photo pa...

Page 47: ...Basic Functions 37 EN 2 Insert the memory card into the memory card slot memory card slot 3 When the Print tagged images message appears press Start ...

Page 48: ...default settings see Resetting factory defaults page 71 or you can adjust the quantity size quality and brightness of your copies see Save as Defaults page 41 Using the default settings to copy a document The default settings are either the factory default settings or defaults that you have set on the printer To copy a document using the current default settings 1 Lift the scanner lid and place th...

Page 49: ...ing a document To copy a document using settings other than the default settings 1 Lift the scanner lid and place the document face down in the right front corner of the scanner glass 2 Close the lid 3 Press Menu 4 With Copy Document selected press OK 5 Press to select an option then press or to change the setting ...

Page 50: ...s black and white grayscale Copy Size Same Size default The copy is the same size as the original Fit to Page The printer detects the size of the original on the scanner glass and the size of the paper in the paper tray and automatically reduces or enlarges the original so that the copy fits on the paper 20 to 500 Reduces down to 20 or enlarges up to 500 of the original size ...

Page 51: ...Draft or Normal Draft The fastest print speed but the lowest quality Photo Paper Quality Auto default The printer detects photo paper in the paper tray and sets Best quality automatically Brightness Normal 3 to 3 Normal is default Lightens or darkens the copy Normal is no change from the original 3 is the darkest 3 is the lightest Save as Defaults No Yes To save the settings as the new default pre...

Page 52: ... Copy Document selected press or to select a number 5 Press Start to begin copying Enlarging or reducing a document To enlarge or reduce the size of the copy 1 Lift the scanner lid and place the document face down in the right front corner of the scanner glass 2 Close the lid 3 Press Menu 4 With Copy Document selected press OK 5 Press to select Copy Size 6 Press or to select an enlargement or redu...

Page 53: ...pying Copying a photograph You can copy a photograph using the default settings or you can adjust the quantity size quality and brightness of your copies Using the default settings to copy a photograph You can copy a document using the default settings see Resetting factory defaults page 71 or you can adjust the quantity size quality and brightness of your copies see Save as Defaults page 34 To co...

Page 54: ...ings 1 Lift the scanner lid and place the photograph face down in the right front corner of the scanner glass 2 Close the lid 3 Press Menu 4 Press to select Copy Photo then press OK 5 Press to select an option then press or to change the setting Copy Photo Option Settings Description Quantity 1 default to 99 The number of copies that print Color Color default Prints full color Black White Prints b...

Page 55: ...u select If the selected copy size is smaller than the paper in the paper tray the printer automatically arranges the pictures to best fit the paper size Plain Paper Quality Normal default Good quality output prints faster than Best Best The highest quality but the slowest print speed eliminates the banding effect that sometimes occurs when printing Draft or Normal Draft The fastest print speed bu...

Page 56: ...3 Lightens or darkens the copy Normal is no change from the original 3 is the darkest 3 is the lightest Preview No default Yes To see a preview of the photograph on the LCD select Yes Save as Defaults No Yes To save the settings as the new default press OK With Yes selected press OK a For photo paper quality copies load photo paper into the printer see Loading photo paper page 12 6 Press Start to ...

Page 57: ...oto then press OK 5 Make sure Quantity is selected 6 Press or to select a number 7 Press Start to begin copying Enlarging or reducing a photograph To enlarge or reduce the size of the copy 1 Lift the scanner lid and place the photograph face down in the right front corner of the scanner glass 2 Close the lid 3 Press Menu 4 Press to select Copy Photo then press OK 5 Press to select Copy Size 6 Pres...

Page 58: ...ce the photograph face down in the right front corner of the scanner glass 2 Close the lid 3 Press Menu 4 Press to select Copy Photo then press OK 5 Press to select Brightness 6 Press to select a number below zero for a darker copy or press to select a number above zero for a lighter copy 7 Press Start to begin copying ...

Page 59: ...program on the computer such as Print Manager Software is recommended because it gives you more options Before you begin scanning Make sure that the printer is connected to a computer using a USB cable or wireless network see Chapter 2 Networking Your Printer If you plan to scan directly from the printer control panel you may change the scan settings as described below Changing the scan settings f...

Page 60: ...Under the Program List heading click next to the currently selected program 3 From the drop down list select the program in which you want the scanned files to open b To adjust settings for scanning documents select the Document tab then select an option for each setting Setting Options Scan As Black and white Color Grayscale File format pdf rtf available only when connected to a computer with WIN...

Page 61: ...matically Save specify Base name by default scanned files are names scan1 scan2 and so on Location folder where the scanned files will be saved c To adjust settings for scanning pictures select the Picture tab then select an option for each setting Setting Options Scan As Color Black and white File format jpg bmp tif ...

Page 62: ... EN Setting Options Resolution dpi 75 150 200 300 600 Quality When connected to a computer with WINDOWS OS Best for E mail Normal High Maximum When connected to a computer with MAC OS a slider bar with Least Medium Best ...

Page 63: ...ly Save specify Base name by default scanned files are names scan1 scan2 and so on Location folder where the scanned files will be saved NOTE Before you save a scanned file you will be able to preview it in Print Manager Software crop and sharpen the image and adjust color if desired On a computer with WINDOWS OS see the Print Manager Software Help icon for instructions 4 When you are finished mak...

Page 64: ...AC OS and Print Manager Software select the Tools tab click Scan Application then follow the on screen instructions NOTE If you are not using Print Manager Software open a program that allows you to scan then follow the instructions Scanning multiple pictures simultaneously Using Print Manager Software you can scan multiple pictures simultaneously and save them as separate files When scanning mult...

Page 65: ... instructions NOTE Click the Help icon for additional instructions Scanning multiple pictures when connected to a computer with MAC OS To scan multiple pictures simultaneously and save them as separate files 1 Lift the scanner lid and place the pictures face down on the glass leaving space between the pictures 2 Close the lid 3 Open Print Manager Software then select your printer 4 Select the Tool...

Page 66: ...ol panel 1 Lift the scanner lid and place the original document or picture face down in the right front corner of the scanner glass 2 Close the lid 3 Press Menu 4 Press to select Scan then press OK The Scan Options menu appears on the LCD 5 Press to select an option then press or to change the setting ...

Page 67: ...ile is sent to the computer on the wireless or Ethernet network Memory Card The scanned file is sent to the memory card in the memory card slot Scan What Document default Sets the scan settings for scanning a document see Changing the scan settings for scanning from the control panel page 49 Photo Sets the scan settings for scanning a photograph see Changing the scan settings for scanning from the...

Page 68: ...anned file to Print Manager Software Save as Defaults No Yes To save the settings as the new default press OK With Yes selected press OK 6 Press Start to make a scan The scanned file appears at the destination you specified Ordering supplies You can order ink cartridges online To order supplies make sure that your computer is connected to the Internet then 1 Open Print Manager Software 2 Select Or...

Page 69: ...n t turn off the power strip The printer does not need to be turned on but should be plugged in For optimal performance keep the printer connected to a computer that is powered on and has the Samsung Print Manager Software installed or keep the printer powered on and connected to the Internet through a wireless network Keep the printhead and ink cartridges in the printer at all times to help preve...

Page 70: ... tray free of dust dirt and other foreign objects Keep the printer supplies away from direct sunlight and out of high temperature environments Do not allow chemicals to come into contact with the printer Cleaning the scanner glass and document backing The scanner glass can get smudged and minor debris can accumulate on the white document backing under the scanner lid Periodically clean the scanner...

Page 71: ... the scanner glass and document backing under the scanner lid 1 Turn off the printer and unplug it from the power outlet 2 Lift the scanner lid 3 Wipe the glass with a soft cloth or sponge slightly moistened with a nonabrasive glass cleaner ...

Page 72: ... soap and warm water 6 Dry the document backing with a chamois or lint free cloth NOTE If the document backing needs further cleaning use isopropyl rubbing alcohol on a soft cloth then wipe thoroughly with a cloth moistened with water to remove any residual alcohol 7 When you finish cleaning plug in the printer and press the on off button to power on the printer ...

Page 73: ...idge is out of ink the printer LCD displays a message stating that the black or color ink cartridge needs replacing You can order ink cartridges online Open Print Manager Software and select Order Supplies IMPORTANT Do not use refilled ink cartridges To replace an ink cartridge 1 Make sure your printer is on 2 Lift the printer access door and wait for the carriage to move to a position where you c...

Page 74: ...Maintaining Your Printer 64 EN 3 The ink cartridges are located in the printhead 2 1 0 Printhead Color ink cartridge Black ink cartridge 4 Pinch the tab on the ink cartridge 2 1 0 ...

Page 75: ...our Printer 65 EN 5 Lift the ink cartridge out of the printhead 6 Remove the new ink cartridge from its bag IMPORTANT To prevent the printhead from drying out insert the ink cartridge into the printhead immediately ...

Page 76: ...Maintaining Your Printer 66 EN 7 Remove the protective cap from the cartridge 8 Insert the ink cartridge into the printhead 2 1 0 ...

Page 77: ...Maintaining Your Printer 67 EN 9 Press down on the ink cartridge tab until you hear a click 2 1 0 10 Close the printer access door ...

Page 78: ...e and firmware updates you may update manually using the following procedure Updating if your printer is connected to a computer withWINDOWS OS To update the software 1 Make sure that your computer is connected to the Internet 2 Select Start All Programs Samsung Samsung AiO Printer Tools 3 Under Printer Resources click Check for Software Updates to check whether software updates are available 4 If...

Page 79: ...f Samsung CJX 1050W Series AiO Connected does not appear in the lower left corner click Select then click Refresh List and choose your printer from the list click Install Samsung Printer and follow the on screen instructions 5 Under Printer Resources click Check for Printer Firmware Updates 6 If there are updates click Next and follow the on screen instructions IMPORTANT Do not turn off or unplug ...

Page 80: ...screen instructions for updating your software To update the firmware 1 Make sure that your computer is connected to the Internet 2 Connect the printer to the computer with a USB cable or wirelessly if not currently connected 3 Open Print Manager Software 4 Select the Tools tab 5 Click Check for Printer Firmware Updates 6 If there are updates follow the on screen instructions IMPORTANT Do not turn...

Page 81: ... cartridges so you know when it s time to order replacement cartridges NOTE You can order ink cartridges online Open Print Manager Software and select Order Supplies Resetting factory defaults To reset defaults to the factory default settings 1 Press Menu 2 Press to select Printer Settings then press OK 3 Press to select Reset All Settings then press OK 4 When you see the message This will reset p...

Page 82: ...cing the printhead is not a regular maintenance procedure Replace the printhead only if you receive a new printhead from Samsung To replace the printhead 1 Make sure your printer is on 2 Lift the printer access door and wait for the carriage to move to the access position ...

Page 83: ...Maintaining Your Printer 73 EN 3 Remove both ink cartridges and set them aside 2 1 0 210 4 Unlatch the used printhead by lifting the button in the center of the carriage ...

Page 84: ...aining Your Printer 74 EN 5 Lift the used printhead out of the carriage 6 Remove the new printhead from its bag CAUTION Do not touch the copper contacts on the pringhead as doing so may damage the pringhead ...

Page 85: ...g Your Printer 75 EN 7 Remove the plastic protective cap Copper contacts IMPORTANT Be careful not to scratch or touch the copper contacts while inserting the printhead 8 Place the new printhead into the carriage ...

Page 86: ...Maintaining Your Printer 76 EN 9 Push firmly against the target label of the printhead until you hear a loud snap 10 Insert the black ink cartridge into the printhead 210 ...

Page 87: ... ink cartridge until you hear it click into position 2 1 0 12 Repeat steps 10 11 for the color ink cartridge 2 1 0 2 1 0 13 Close the printer access door The printer detects the new printhead Follow the instructions on the LCD to calibrate your printer ...

Page 88: ......

Page 89: ...nds Turn on the printer Use the following information to help troubleshoot problems with your printer Problem Possible Solutions Printer does not power on Make sure you are using the power cord that came with your printer Make sure the power cord is connected to the AC adapter it is plugged into an outlet or power strip and that the LED on the AC adapter is lit 5 ...

Page 90: ...ter then reconnected or if power to the printer was interrupted If you are using a wireless connection check that the printer is connected to your wireless network To check a On the printer press Menu b Press to select Network Settings then press OK c Press to select View Network Configuration then press OK Check that the Active Connection Type is WiFi and that the IP Address is not zeros your rou...

Page 91: ... are installed correctly when you hear them click into place Print quality For best results use KODAK Paper or a paper with the COLORLOK Technology logo on the package Make sure the paper is loaded correctly See Loading plain paper page 9 and Loading photo paper page 11 Clean the printhead Press Menu Press to select Maintenance then press OK Press to select Clean Printhead then press OK Calibrate ...

Page 92: ...click into place Paper jam Open the printer access door and gently remove any paper from inside the printer Make sure the paper in the tray is free of tears or creases Make sure you do not overload the input paper tray If you cannot access the paper from the front gently pull the jammed paper up from the paper input tray Error codes messages Go to http www samsung com uk support download supportDo...

Page 93: ...dicates Wi Fi status Power light Power light What it means Off The printer is turned off Press the on off button to turn on power The printer does not have power Make sure that the power cord is plugged into the back of the printer and into an electrical outlet and that the electrical outlet has power Blinking The printer is busy Wait for the printer to finish the task On The printer is ready ...

Page 94: ...s intermit tently The Wi Fi radio is turned on and the printer cannot find any available wireless networks within range or the Wi Fi radio connection has been interrupted or is too weak to send signals to and from the printer To find and connect to an available wireless network within range press OK turn the Wi Fi radio off and run the Wi Fi Setup Wizard see Connecting to a wireless network page 1...

Page 95: ...74 ESAT 7 ipm ISO IEC 24374 ESAT 4 6 ipm Print technology Continuous tone thermal inkjet Print quality modes Draft Normal and Best on plain paper Photo quality mode on photo paper Photo printing features Quantity 1 to 99 Print sizes 2 x 3 in 5 x 8 cm 3 5 x 5 in 9 x 13 cm 4 x 6 in 10 x 15 cm 4 x 7 in 10 x 18 cm 4 x 8 in 10 x 20 cm 4 x 12 in 10 x 30 cm Panoramic 6 ...

Page 96: ...edia Auto detect plain paper and photo papers Optimize image quality for KODAK Photo Papers with barcode Image enhancement Image Enhancement Technology with Print Manager Software Add date to prints No default Yes Color Black and white or color Scene balance On default Off Copy document features Color Black and white or color Quantity 1 to 99 copies Copy sizes Same Size Fit to Page 20 to 500 Plain...

Page 97: ... 5 x 5 in 9 x 13 cm 4 x 6 in 10 x 15 cm 4 x 7 in 10 x 18 cm 4 x 8 in 10 x 20 cm 4 x 12 in 10 x 30 cm Panoramic 5 x 7 in 13 x 18 cm 8 x 10 in 20 x 25 cm US Letter 8 5 x 11 in 22 x 28 cm A4 8 3 x 11 7 in 21 x 30 cm Quality Automatic Brightness 3 to 3 Scanning features Scanner type Contact Image Sensor CIS Maximum scan size 8 5 x 11 7 in 22 x 30 cm ...

Page 98: ...lopes Tray size 4 x 6 in to 8 5 x 14 in 10 x 15 cm to 22 x 36 cm Ink cartridges Ink life The number of pages may be affected by operating environment printing interval media type and media size Based on ISO 24712 5 COVERAGE PATTERN SeeA sample of 5 COVERAGE PATTERN reduced to 33 page 89 supplied with the machine INK M210 About 250 sheets supplied with the machine INK M215 About 430 sheets supplied...

Page 99: ...orem ipsm dolor sit amet consectuer Duis autem vel eum iriure dolor in hendreritin vulputate velit cesse ea commodo molestie Nam liber tempor cum soluta nobis eleifend option cogue nihil consequat velillum Dolore eu zril feugiat nulla facilisis at vero eros accumsan et iusto odio dignissim qui blandit praesent domg id quod mzim plerat facer posim aum Integer sagittis lacus vel nulla Morbi convalli...

Page 100: ...eed Protocols supported USB 2 0 High Speed for connection to computer only DPOF Tagged image printing Wi Fi Technology supported 802 11b g n WPA WPA2 WPS and WEP Software support Application support Third party image management applications optical character reader OCR support for documents Media support Plain paper photo paper envelopes greeting cards and labels Scanner support TWAIN and WIA WIA2...

Page 101: ... supply Manufacturer and model Chicony Power Technology Co Ltd model A10 018N3A Output 36 V DC at 0 5 A Dimensions 16 5 x 6 7 x 12 6 in 420 x 170 x 320 mm L H x D Weight 12 7 lb 5 7 kg Operating range 5 C 41 F to 35 C 95 F 15 to 85 RH Full image quality environ mental range 15 C 59 F to 30 C 86 F and 20 to 80 RH Energy efficiency ENERGY STAR Qualified All in One Printer ...

Page 102: ...CPU INTEL CELERON Processor Clock speed 1 2 GHz Memory 512 MB RAM Available hard disk space 500 MB available Interface USB 2 0 High Speed Removable drive CD ROM Computer with MAC OS Computer Minimum Operating system MAC OS X 10 5 or later CPU PowerPC G4 G5 or INTEL based MAC Clock speed 1 2 GHz Memory 512 MB RAM Available hard disk space 200 MB available ...

Page 103: ...orted Plain paper 16 to 24 lb 60 to 90 gsm Photo paper Up to 12 mil 290 gsm Card stock 110 lb index max 200 gsm Envelopes 20 to 24 lb 75 to 90 gsm Labels All commercially available inkjet varieties on 8 5 x 11 in and A4 size sheets Iron on transfers All commercially available inkjet varieties on 8 5 x 11 in and A4 size sheets ...

Page 104: ...ive 7 3 x 10 5 in 18 x 27 cm US Letter 8 5 x 11 in 22 x 28 cm US Legal 8 5 x 14 in 22 x 36 cm Custom sizes from 4 to 8 5 in 10 to 22 cm wide and 6 to 14 in 15 to 36 cm long Labels A4 8 3 x 11 7 in 21 x 30 cm US Letter 8 5 x 11 in 22 x 28 cm Index card stock 4 x 6 in 10 x 15 cm cards 5 x 7 in 13 x 18 cm index cards Iron on transfers A4 8 3 x 11 7 in 21 x 30 cm US Letter 8 5 x 11 in 22 x 28 cm ...

Page 105: ...ated long 11 x 22 cm 4 3 x 8 7 in US 7 3 9 x 7 5 in 10 x 19 cm US 9 3 9 x 8 9 in 10 x 23 cm US 10 4 1 x 9 5 in 10 5 x 24 cm Photos 4 x 6 in 10 x 15 cm 4 x 7 in 10 x 18 cm 4 x 8 in 10 x 20 cm 4 x 12 in 10 x 31 cm 5 x 7 in 13 x 18 cm 8 x 10 in 20 x 25 cm US Letter 8 5 x 11 in 22 x 28 cm A4 8 3 x 11 7 in 21 x 30 cm ...

Page 106: ......

Page 107: ... Use only the power cord that comes with the product or an approved power cord greater or equal to H05W F 2G 0 75mm2 Using another power cord may cause fire and or shock Do not use the included power cord with any other equipment 6 If an operating instruction appears to conflict with safety information heed the safety information You may have misunderstood the operating instruction If you cannot r...

Page 108: ...s voltage points creating a risk of fire or shock Never spill liquid of any kind onto or into the machine 14 To reduce the risk of electric shock do not disassemble the machine Take it to a qualified service technician when repair work is required Opening or removing covers may expose you to dangerous voltages or other risks Incorrect reassembly could cause electric shock when the unit is subseque...

Page 109: ...om lightning If possible unplug the AC power and telephone for the duration of the lightning storm 18 Do not install the machine on a wet place This may raise a risk of fire or shock 19 CAUTION For electrical safety reasons disconnect from telecommunications network before touching metal conductive parts 20 CAUTION To reduce the risk of fire use only No 26 AWG or larger telecommuni cation line cor...

Page 110: ...p and water If the liquid crystal solution gets into your eyes flush your eyes immediately with water If any discomfort or change in vision persists after washing seek medical attention immediately Ink Cartridge Safety Keep all ink cartridges out of the reach of children If ink gets on your skin wash with soap and water If ink gets into your eyes flush your eyes immediately with water If any disco...

Page 111: ...ouncil Directive 73 23 EEC Approximation of the Member States related to low voltage equipment January 1 1996 Council Directive 89 336 EEC 92 31 EEC approximation of the Member States related to electromagnetic compatibility March 9 1999 Council Directive 1999 5 EC on radio equipment and telecommunica tions terminal equipment and the mutual recognition of their conformity A full declatation defini...

Page 112: ...s Gerät ist nicht für die Benutzung im unmittelbaren Gesichtsfeld am Bildschir marbeitsplatz vorgesehen Um störende Reflexionen am Bildschirmarbeitsplatz zu vermeiden darf dieses Produkt nicht im unmittelbaren Gesichtsfeld platziert verden Noise emissions for this equipment do not exceed 70 dBa This equipment is not intended for use in the workplace in accordance with BildscharbV regulations Das G...

Page 113: ... environment or human health from uncontrolled waste disposal please separate this from other types of wastes and recycle it responsibly to promote the sustainable reuse of material resources Household users should contact either the retailer where they purchased this product or their local government office for details of where and how they can take this item for environmentally safe recycling Bu...

Page 114: ...elay time in 0 5 hour increments up to 4 hours Increasing the delay time may result in reduced energy savings ENERGY STAR and the ENERGY STAR mark are registered U S service marks As an ENERGY STAR partner SAMSUNG has determined that this product meets ENERGY STAR Guidelines for energy efficiency For more information on the ENERGY STAR program see www energystar gov ...

Page 115: ......

Page 116: ...www samsung com printer ...

Reviews: