background image

10

 · Overview

Getting to know your Monitoring system

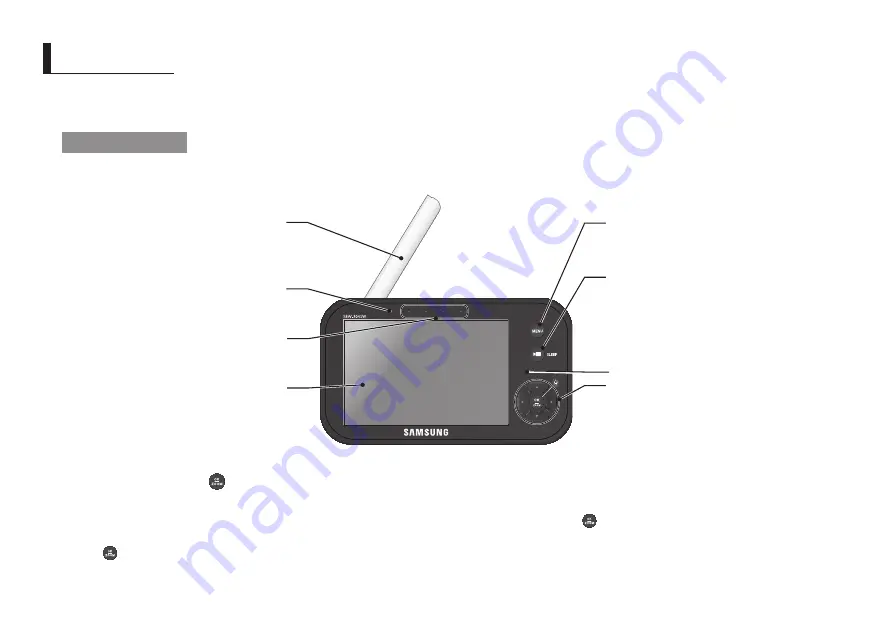
Wireless Monitor

After opening the box, fully charge the monitor before use. After initial charge, recharge as needed.

Front Controls


—

Navigation Controls /   Button

Viewing Mode

: The following controls are used while watching live video from the camera:

• 

Press the [

$

] or [

%

] button to adjust camera’s framing upwards or downwards.

• 

Press the [

_

] or [

+

] button to adjust camera’s framing to the left or right.

• 

Press [   ] button to turn on/off the night light.

• 

While in zooming, use [

$

/

%

/

_

/

+

] button to move the screen around.

Menu Mode

:  Use the [

$

/

%

/

_

/

+

] button arrows to navigate in Menu Mode.  

Press the [   ] button to confirm the menu selection.

 o

VerVIeW


Power Led

Indicator turns green when powered.  

When battery is charging, this LED will in green color.

4.3” LCd Screen

Displays video from the camera.

Sound Level Leds

Flashes when sound is detected.

MeNu Button

Press to access from video monitor mode to menu 

mode operation. In menu mode, press this button will go 

back to monitor mode with save from selection.

SLeeP Button

Used to turn on / off the screen by press this button. 

User can turn on the video again by pressing any buttons. 

If camera is disconnected, monitor screen would be 

turned on automatically in Sleep mode.


Monitor Antenna


Receives and sends signals from or to the camera.


Microphone


When there are pairing between monitor and camera, 
There is a function of transmission of audio only. 

Navigation Controls / oK/Night light Button


1. 

Used to navigate while in Menu Mode.


2. 

Used for PTZ operation and Night Light while in


Viewing Mode.


Summary of Contents for BrilliantVIEW SEW-3041W

Page 1: ...or turns green when powered When battery is charging this LED will in green color 4 3 LCD Screen Displays video from the camera Sound Level LEDs Flashes when sound is detected MENU Button Press to acc...

Page 2: ...ces the sound transmitted from the camera s Kick Stand Use to hold the monitor onto a table ON VOX OFF TALK DC 6V Power Input Connect the included AC power adapter to power and or charge the monitor b...

Page 3: ...ht levels where the camera is placed IR LEDs Infrared LED s provide viewing in no low light conditions Microphone Receives sounds for the area near the camera and transmits sound from the camera to th...

Page 4: ...source or direct sunlight Avoid installing the camera where there are thick walls or obstructions between the camera and the monitor STRANGULATION HAZARD Keep cord out of child s reach NEVER place ca...

Page 5: ...ge 0 C 40 C Operating Humidity Range 85 RH Environment Rating Indoor use only Item Details Wireless Camera Pan Angle 300 Tilt Angle 110 Regulation Compliance FCC CE RoHS Compliance Yes for CE version...

Page 6: ...e monitor 2 Remove obstructions between the monitor and camera 3 Adjust the monitor antenna to vertical position No sounds even with both units turned on 1 Make sure that the power adapter is connecte...

Page 7: ...nic accessories should not be mixed with other commercial wastes for disposal Correct disposal of batteries in this product Applicable in the European Union and other European countries with separate...

Page 8: ...This template is used to install the camera on the wall TEMPLATE CAMERA FRONT Screw holes for the Camera installation...

Page 9: ...a TEL 82 70 7147 8740 60 FAX 82 31 8018 3745 SAMSUNG TECHWIN AMERICA Inc 100 Challenger Rd Suite 700 Ridgefield Park NJ 07660 Toll Free 1 877 349 3149 www samsungsv com SAMSUNG TECHWIN EUROPE LTD Sams...

Reviews: