S.E.M. Ergo IP-10, User Manual
The S.E.M. Ergo IP-10 is a versatile and ergonomic product designed to enhance user productivity. For easy setup and usage, make sure to download the free User Manual from our website. Discover all the functionalities and features of the S.E.M. Ergo IP-10 by accessing the manual today.
Share
Download


Reviews:
No comments
Related manuals for Ergo IP-10

100
Brand: Radio Corporation Of America Pages: 44

JAMBOX
Brand: Jawbone Pages: 13

Energy XD2
Brand: iDance Pages: 36

ANTIGUA MT31
Brand: CABASSE Pages: 16

Party System 2000
Brand: EDISON Professional Pages: 7

Balboa 10
Brand: JBL Pages: 4
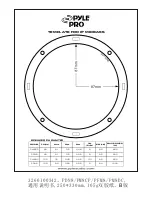
PM8DC
Brand: Pyle Pro Pages: 1

TranzitBLU HF ISFM2351
Brand: iSimple Pages: 12

Sonos One Stand
Brand: Floyd Pages: 10

417-8H LF SPEAKER
Brand: Altec Pages: 4

SP953
Brand: Sylvania Pages: 7

42-707-141
Brand: anko Pages: 2

M200MKIII+
Brand: HiVi Pages: 6

336700
Brand: Goodmans Pages: 11

NS-BT007
Brand: Nextar Pages: 8

FT10LED
Brand: Fenton Pages: 16

EXPEDITION XP150
Brand: Samson Pages: 14

CSP 406T/EN
Brand: Fbt Pages: 8


