background image


Russound | 1 Forbes Road Newmarket, NH 03857 | 603.659.5170 | www.russound.com


©2020 Russound/FMP, Inc. All rights reserved. Russound is a registered trademark of Russound/FMP, Inc. The Russound logo 
is a trademark of Russound/FMP, Inc. All other trademarks are the property of their respective owners. 


XTSPlus Update Process 


For the steps below you will need: 


A PC running Windows 10 or Windows 7 on 64-bit 


USB A-Type to Micro USB Cable 


POE Ethernet or 12VDC power connection 


Phillips Screwdriver (#0) 


Note: Step 5 below will need an internet connection, but only needs to be done once and can be done offsite 

with a computer and XTSPlus so that when you visit the customer you do not need an internet connection to 

update the XTSPlus. 


Step 1 – Verify the firmware version of the XTSPlus 


a) From the Now Playing Screen, 

tap the Settings icon

 in the top right 


b) From the Settings Menu, 

scroll down and tap the “About Russound XTS” option


c) 

Confirm the Version Number

.    


IMPORTANT: The update process below is only for units with versions lower than 

10.02.05


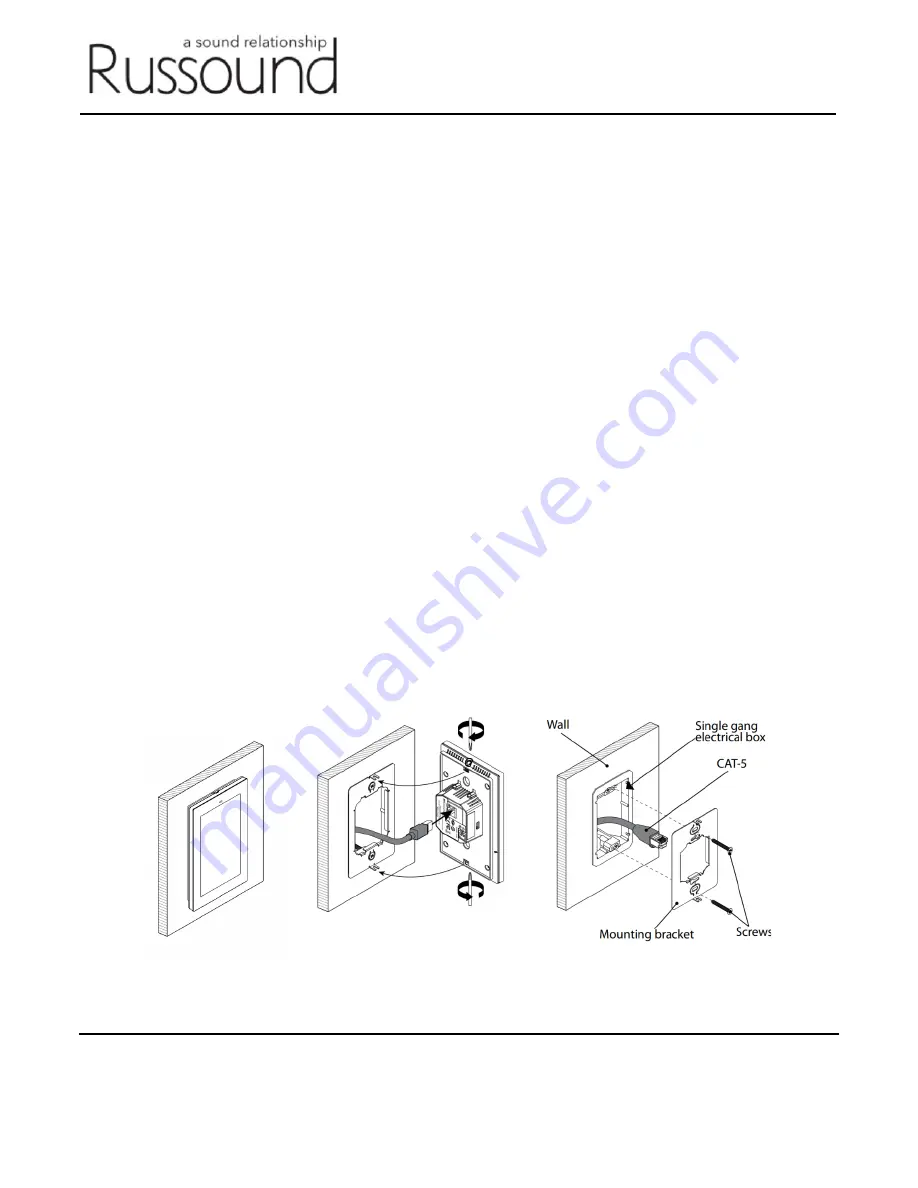
Step 2 – Remove the XTSPlus touchscreen from the wall 


If mounted in a wall, remove the XTSPlus touchscreen while leaving the power connection still attached. 


The Phillips Screwdriver (#0) is used to loosen the captive locking screws 


Summary of Contents for XTSPlus

Page 1: ...onnection but only needs to be done once and can be done offsite with a computer and XTSPlus so that when you visit the customer you do not need an internet connection to update the XTSPlus Step 1 Verify the firmware version of the XTSPlus a From the Now Playing Screen tap the Settings icon in the top right b From the Settings Menu scroll down and tap the About Russound XTS option c Confirm the Ve...

Page 2: ... of the USB cable to the Micro USB port on the back side of the touchscreen b Attach the other end to a free USB port on a Windows 10 or Windows 7 PC c Windows will start the device detection and driver installation process This may take a few minutes depending on the speed of your computer and speed of your Internet connection Step 4 Verify the Driver has been installed correctly a In the Windows...

Page 3: ...pdates russound com xtsplus XTSPlus ADB Update zip Note This step only needs to be done once and can be done in advance so that when you visit the customer you do not need an internet connection to update the XTSPlus Step 6 Install the Firmware Update a Using File Explorer browse to the download location on your PC and extract the zip file contents A Folder will be created that contains the necess...

Page 4: ...ound FMP Inc The Russound logo is a trademark of Russound FMP Inc All other trademarks are the property of their respective owners d A pop up window may appear saying that Windows protected your PC Click on More Info and then on the next pop up click on Run Anyway e Double click upload ota xtsplus bat script A command prompt window should show temporarily ...

Page 5: ...ty of their respective owners f A pop up window may appear saying that Windows protected your PC Click on More Info and then on the next pop up click on Run Anyway g The XTSPlus will now modify the update settings and reboot Step 7 Check For Updates On the XTSPlus go to Settings and tap Check For Updates and install the latest firmware update Wait for the update to finish It usually takes about 1 ...

Page 6: ...fy the Firmware Version a From the Now Playing Screen Press and Hold the Settings icon in the top right until Admin Settings appears b Tap Clear Cache and Data c The XTSPlus will return to the searching for devices screen d From the Settings Menu scroll down and select the About Russound XTS option e Confirm that the version is now showing 10 02 05 or higher Congratulations You re done All future ...

Reviews: