

Copyright © 2010 Ruckus Wireless, Inc.
Published September 2010, Part Number 800-70261-001 Rev B
MediaFlex
™
7211 802.11n
Outdoor Smart Wi-Fi Gateway
Quick Setup Guide
This
Quick Setup Guide
provides step-by-step instructions
for setting up your Ruckus Wireless MediaFlex 7211
802.11n Outdoor Smart Wi-Fi Gateway.
After completing the steps described in this Guide, you will
be able to use the Smart Wi-Fi Gateway to connect your
computer or wired network to your service provider’s
Wireless Broadband Network.
B
EFORE
Y
OU
B
EGIN
Before deploying your Ruckus Wireless device, please
check the Ruckus Wireless Web site for the latest software
and release documentation.
•
Release Notes are available at
http://support.ruckuswireless.com/documents
.
•
User Guides are available at
http://support.ruckuswireless.com/documents
.
•
Software Upgrades are available at
http://support.ruckuswireless.com/software
.
•
Open Source information is available at
http://support.ruckuswireless.com/open_source
.
P
ACKAGE
C
ONTENTS
•
MF7211-Outdoor unit
•
Ruckus Wireless PoE injector
•
Power adapter for the PoE injector
•
A packet that contains the side cover, two screws, and
two silicone screw caps
•
This
Quick Setup Guide
S
ETUP
R
EQUIREMENTS
•
A computer with a Web browser
•
Two CAT5 Ethernet cables
•
The PoE injector and power adapter that are supplied
with the device.
•
Your service provider’s Wireless Broadband Network
SSID and security settings. You will need to enter these
settings on the device’s Web interface to enable it to
connect to the Wireless Broadband Network service.
S
TEP
1: P
REPARE
THE
A
DMINISTRATIVE
C
OMPUTER
The administrative computer is the computer that you will
be using to access the device’s Web interface. To access
the Web interface, the administrative computer must be
configured to obtain an IP address automatically.
1
Power on your computer.
2
Go to the network connection settings.
•
On Windows 2000, click
Start
>
Settings
>
Network
, and then click
Dialup Connections
.
•
On Windows XP, click
Start
>
Settings
>
Control
Panel
>
Network Connections
.
3
Double-click the icon for Local Area Connection.
4
In the Local Area Connection Properties window, select
Internet Protocol (TCP/IP)
, and then click
Properties
.
5
Select
Obtain an IP address automatically
, and then
click
OK
to exit the TCP/IP Properties window.
6
Click
OK
to exit the Local Area Connection Properties
window.
S
TEP
2: C
ONNECT
THE
D
EVICE
TO
A
P
OWER
S
OURCE
AND
THE
A
DMIN
C
OMPUTER
1
Take out the PoE injector and power adapter that were
shipped with the device.
2
Connect the power jack to the
12VDC
port on the PoE
injector, and then connect the power adapter to a
power source or to a surge protector that is plugged
into a power source.
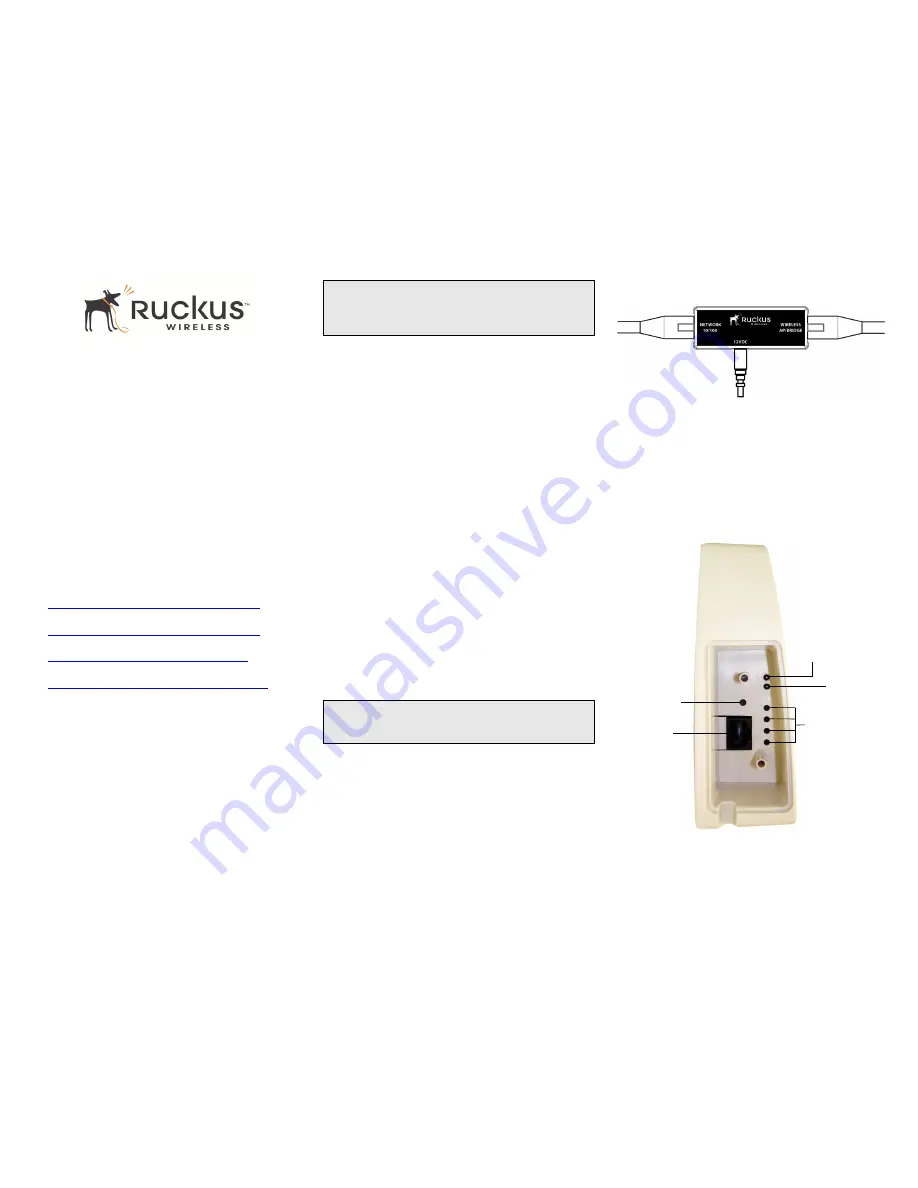
Figure 1. Connect the Ethernet cables and power adapter
to the PoE injector
3
Take one of the CAT5 Ethernet cables. Connect one
end of the CAT5 Ethernet cable to the Ethernet port on
your computer, and then connect the other end to the
NETWORK 10/100
port on the PoE injector.
4
Take the other Ethernet cable. Connect one end to the
WIRELESS AP/BRIDGE
port on the PoE injector, and
then connect the other end to the Ethernet port on the
device (see figure).
Figure 2. Side panel of the Outdoor Smart Wi-Fi Gateway
CAUTION!
The Outdoor Smart Wi-Fi Gateway is not 802.3af compliant.
You must use only the PoE injector and power adapter that
are supplied with the device.
CAUTION!
Use only the PoE injector and power adapter that are
supplied with this device.
Ethernet port
Reset button
Power LED
Ethernet LED
Air Quality LEDs


