INSTALLATION
KRONOS - RKR22D
Doc. # DR028-6 / 03-09-2019
www.rubi.ca - 1.888.988.RUBI (7824)
PIÈCES / PARTS
ÉTAPES / STEPS
Vérifiez que toutes les pièces de votre tête pluie
sont dans l'emballage.
Make sure you have all the parts in hand.
LISTE DES PIÈCES /
PARTS LIST
01
Robinet / Faucet
02
Base du robinet / Faucet base
03
Douchette / Handshower
04
Rondelle de caoutchouc / Rubber washer
05
Coude de douchette / Handshower elbow
06
Socle de douchette / Handshower base
07
Écrou de serrage / Nut
08
Flexible de douchette / Handshower hose
09
Ensemble d'attache / Fixing kit
10
Tuyaux d'entrées d'eau / Water inlet pipes
11
Flexible de raccord douchette / Handshower link hose
12
Embout de robinet - couleurs / Faucet insert - colors
01
02
03
04
05
04
06
07
09
10
11
08
12
03
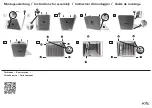
Placez la base du robinet et déposez le robinet
dans son emplacement.
Put the faucet base and drop the faucet
in place.
04
Insérez le "U" de caoutchouc ainsi que celui
de métal.
Insert the rubber "U" and the metal one.
05
Vissez l'écrou de fixation avec une clé.
With a wrench, firmly tighten the fixing nut.
02
Positionnez et vissez la tige de fixation au
corps du robinet en prennant soin de ne pas
endommager les filets.
Place and tighten the mounting rod to the
valve body make sure the threads remain
intact.
01
Insérez et serrez à la main le flexible de
raccord de douchette.
Insert and hand tighten the handshower
fitting hose.
06
Déposez le socle de la douchette en place.
Put in place the handshower base.
DISPOSITION
La douchette peut être installée à gauche ou à
droite du robinet.
Hand shower can be installed on the left or the
right side of the faucet.
PRÉPARATION / PREPARATION
Diamètre de perçage / Drilling diameter:
Robinet / Faucet:
1 1/2" (38 mm)
Douchette / Hand Shower:
1 1/4" (32 mm)
** Image à titre indicatif uniquement
** Image for illustrative purposes only.


