ROSE Bikes GmbH
Schersweide 4, 46395 Bocholt, Germany
Made in Taiwan, www.rosebikes.de
RÜCKSICHT S
1
2
3
4
DE // BEDIENUNGSANLEITUNG
RÜCKSPIEGEL // BEST.-NR.: 2323399
GEFAHR
Gefahr durch Fehlanwendung des Spiegels!
Durch Fehlanwendung des Spiegels können gefährliche Situationen im Straßenverkehr oder
Beschädigungen am Lenker entstehen.
• Die Montage darf nur von Personen mit entsprechendem Fachwissen und Erfahrung durchgeführt
werden. Im Zweifelsfall muss ein ausgebildeter Zweiradmechatroniker hinzugezogen werden!
• Prüfe die Bedienungsanleitung des Lenkerherstellers auf besondere Bestimmungen! Besonders bei
der Verwendung von Carbonlenkern können Ausschlüsse oder besondere Bestimmungen vorliegen.
• Durch Stöße auf den Spiegel kann der Lenker beschädigt werden. Prüfe nach Stürzen oder
Einwirkungen von Stößen auf den Spiegel den Lenker auf Beschädigungen.
• Verlasse dich nicht allein auf den Spiegel. Beobachte das Verkehrsgeschehen aufmerksam und führe
beim Abbiegen einen Schulterblick durch.
Allgemeines
Diese Bedienungsanleitung muss vor der ersten Verwendung deines Spiegels gelesen und verstanden
worden sein.
Bewahre diese Bedienungsanleitung für späteres Nachschlagen auf. Verkaufst oder verschenkst du deinen
Spiegel, muss diese Bedienungsanleitung beigelegt werden.
Kompatibilität / Bestimmungsgemäßer Gebrauch
Der Spiegel ist für die Montage an beiden Lenkerseiten eines Fahrrads bestimmt.
Der Spiegel ist mit Aluminium- und Stahllenkern kompatibel. Bei der Verwendung an Carbonlenkern
empfehlen wir die Freigabe des jeweiligen Herstellers zu erfragen. Der Spiegel darf nur an Rennradlenkern
montiert werden.
Übersicht
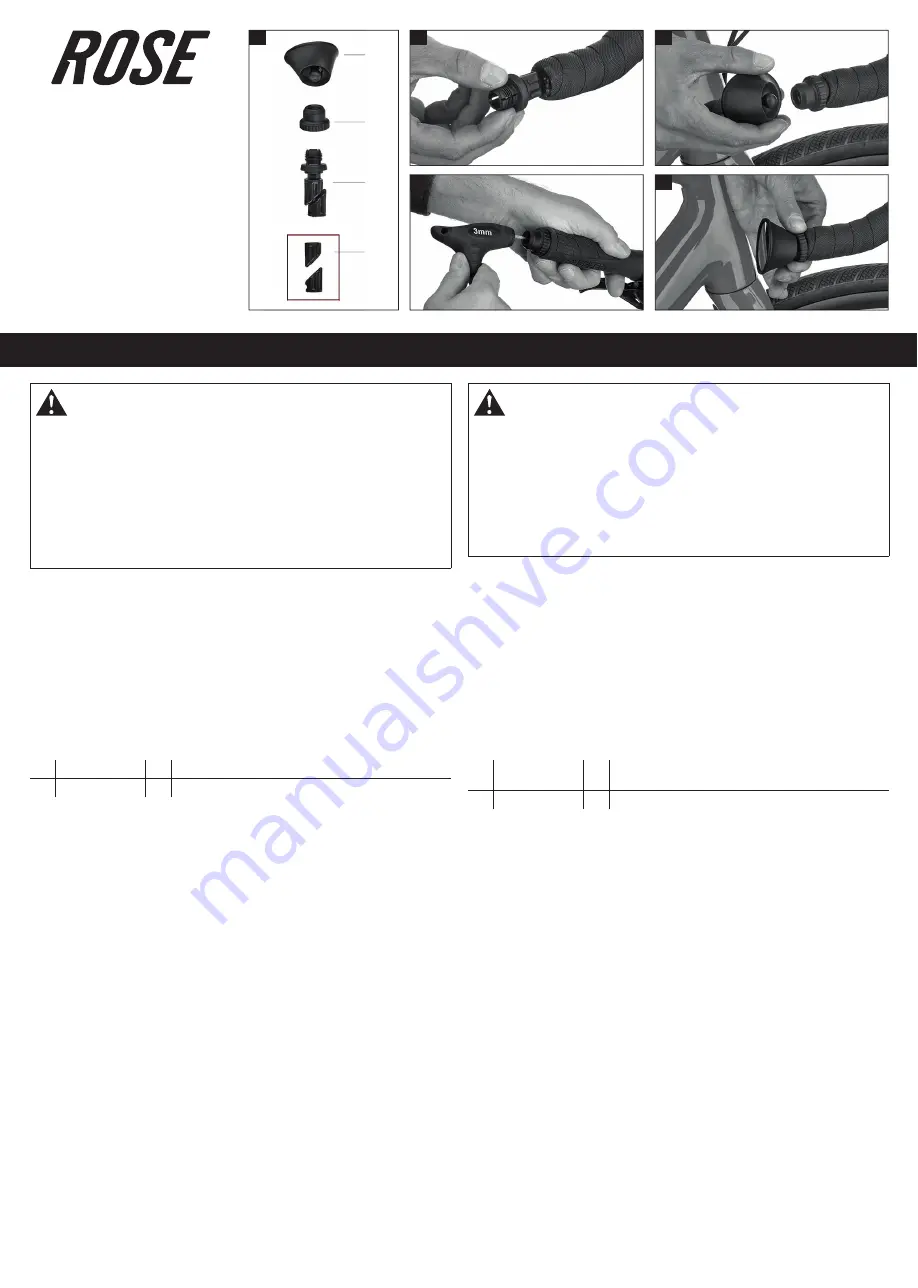
A1
Spiegelkopf
A3
Klemmteil mit Klemmkeil für Lenkerinnendurchmesser 18 bis 19 mm
A2
Klemmmanschette
A4
Klemmkeil für Lenkerinnendurchmesser 19 bis 21 mm
Montage
Es befinden sich zwei verschiedene Klemmkeile im Lieferumfang. Der kleinere Klemmkeil ist mit Lenkern
mit einem Innendurchmesser von etwa 18 bis 19 mm kompatibel, der größere Klemmkeil mit 19 bis 21 mm.
Wähle den für deinen Lenker passenden Klemmkeil aus.
1. Entferne den Lenkerendstopfen.
2. Reinige und entfette die Klemmfläche im inneren des Lenkers.
3. Ziehe den Spiegelkopf (A1) von Hand ab.
Der Spiegelkopf kann nur entfernt werden, wenn die Klemmmanschette (A2) gelöst ist.
4. Stecke den Klemmkeil des Spiegels in das Lenkerende (B).
5. Ziehe die Klemmschraube mit einem 3 mm Innensechskantschlüssel so fest an, dass der Klemmkeil
sicher geklemmt ist und sich mit mäßigem Kraftaufwand nicht verdrehen lässt (C).
6. Drehe die Klemmmanschette (A2) leicht von Hand auf und stecke den Spiegelkopf (A1) auf (D).
7. Setze dich auf das Fahrrad, stelle den Spiegel nach deinen Bedürfnissen ein und ziehe die
Klemmmanschette (A2) von Hand an (E).
Wartung und Pflege
Regelmäßige Wartung und Pflege sorgen für eine lange und zuverlässige Haltbarkeit sowie eine
uneingeschränkte Funktion. ROSE Bikes empfiehlt folgende Tätigkeiten:
→
Prüfe die sichere Klemmung des Spiegels.
→
Prüfe den Spiegel regelmäßig auf Beschädigungen. Ist keine einwandfreie Sicht gewährleistet oder
sitzt der Spiegel nicht mehr einwandfrei, muss er getauscht werden.
Diese Bedienungsanleitung ist zusätzlich unter rosebikes.de/Bedienungsanleitungen verfügbar.
A
B
C
E
D
EN // OWNER’S MANUAL
REAR-VIEW MIRROR // PROD. CODE: 2323399
DANGER
Misuse of the mirror may lead to dangerous situations!
Misuse of the mirror can cause dangerous situations in road traffic or damage to the handlebar.
• The mirror should only be installed by people with sufficient expertise and knowledge. If in doubt,
please consult a qualified bicycle mechanic!
• Check the handlebar manufacturer’s manual for specific information! Especially when using carbon
handlebars, there may be exclusions or specific provisions.
• Impacts against the mirror can damage the handlebar. Please check the bars for damage after a
fall or the effects of other impacts to the mirror.
• Don't rely on the mirror alone. Observe the traffic situation carefully and look over your shoulder
before every turn.
General information
Please read this manual carefully before taking the first ride with your new mirror and make sure you
understand everything.
Keep this manual for future reference. If you sell or give away your rear-view mirror, please also include the
owner’s manual.
Compatibility / Intended use
The mirror is designed to be mounted on either side of the bicycle handlebar.
The mirror is compatible with both aluminium and steel handlebars. When using carbon handlebars, we
recommend asking the respective manufacturer for compatibility. The mirror may only be mounted on road
bike handlebars.
Overview
A1
Mirror head
A3
Clamping part with clamping wedge for handlebar inner diameter
18 to 19 mm
A2
Clamping collar
A4
Clamping wedge for handlebar inner diameter 19 to 21 mm
Installation
There are two different clamping wedges included in the delivery. The smaller clamping wedge is compatible
with handlebars with an inner diameter of about 18 to 19 mm, the larger clamping wedge with 19 to 21 mm.
Select the right clamping wedge for your handlebar.
1. Remove the bar end plug.
2. Clean and degrease the clamping area inside the bar.
3. Pull off the mirror head (A1) by hand.
The mirror head can only be removed when the clamping collar (A2) is loosened.
4. Insert the mirror's clamping wedge into the end of the handlebar (B).
5. Tighten the clamp bolt with a 3 mm hex wrench until the clamping element is securely fitted and can no
longer be twisted with moderate force (C).
6. Slightly turn the clamping collar (A2) by hand and put the mirror head (A1) on (D).
7. Sit on the bike, adjust the mirror according to your needs and tighten the clamping collar (A2) by hand
(E).
Maintenance and care
Regular care and maintenance ensure high durability and reliability, as well as unlimited functionality.
ROSE Bikes recommends carrying out the following tasks:
→
Check that the mirror is securely mounted.
→
Regularly check the mirror for damages. If a perfect view is not guaranteed or the mirror is no
longer properly set, it must be replaced.
This manual is also available on rosebikes.com/manuals.


