Roland DP-990F, Owner'S Manual
The Roland DP-990F is a top-of-the-line digital piano offering exceptional performance and a rich, authentic sound. With its extensive array of features and specifications, this piano is perfect for professionals and music enthusiasts alike. Download the free user manual from our website to fully explore its capabilities.
Share
Download


Reviews:
No comments
Related manuals for DP-990F

MagicWatch MWE800
Brand: Waeco Pages: 212

KEYZ TUNGSTEN
Brand: G-Lab Pages: 2

ELECTRONIC KEYBOARD
Brand: Medeli Pages: 28
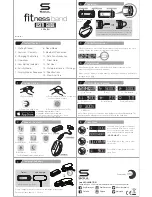
FITness band
Brand: Soul Pages: 2

00123512
Brand: Hama Pages: 27

LittleFingers
Brand: Datadesk Pages: 2

CVWX-A112
Brand: Chinavision Pages: 10

MS2000
Brand: Korg Pages: 28

Krome
Brand: Korg Pages: 400

TGA-490
Brand: Franklin Pages: 45

3116-66T42
Brand: Cross Technologies Pages: 16

BC 50
Brand: Garmin Pages: 10

GX-K1
Brand: ENHANCE Pages: 7

SXmini SL Class
Brand: Yihi Pages: 75

PCR-300
Brand: Edirol Pages: 2

ARC PICO BABY
Brand: Totally Wicked Pages: 9

UltraBoard 950
Brand: Bakker Elkhuizen Pages: 9

Genesis RX88
Brand: Natec Pages: 15


