background image


RJ760MD Drum Kit with MIDI 


User’s Guide 


Please read this user’s guide first before operating the unit and save it for 
future reference. 


Congratulations on your purchase of this Roll-up Drum kit. To get the most from your purchase, please take a few minutes to 
read these instructions. 


 1. Safety instructions 


This product should not be exposed to water by dripping or splashing and no objects filled with liquids, such as vases, 

should be placed near to the product.  Do not place the unit on a wet surface. 


Do not expose the product to temperatures above 35

°

C and keep it out of direct sunlight. 


This  product  has  no  user-serviceable  parts.  Do  not  attempt  to  repair  this  product  yourself.  Only  qualified  service 

personnel should perform servicing. 


Do not subject the plastic part of the product to harsh impacts.  Do not drop the product as this may result in damage. 


Disconnect the product from the power source before cleaning. Never handle the USB cable with wet hands as this could 

cause electric shock. Unplug the prod

uct when it will be unused for long periods of time. 


This product is designed for indoor use only. 


If the USB cable or power adapter needs to be replaced, ensure that the replacement complies with the manufacturer’s 

specifications.


2

. Preparation for use 


Unpack the drum kit carefully. We recommend that you save the box and packing materials in case you wish to store the 
drum kit. 

Before setting up the unit, verify that the following accessories are present:


CONTENTS: 


1 x RJ760MD Drum kit with MIDI 


2 x Pedals 


2 x Drum sticks 


1 x USB Power adapter 


1 x USB Power/Data cable 


1 x 3.5mm AUX input cable 


1 x Windows software CD 


1 x Printed user guide 


3. Power source 
 

Unwind the USB power cable to its full length; connect one end to the USB/DC 5V input on the rear of the drum kit. 
Connect the other end to the USB power adapter. Plug in the USB power adapter to a 110V power socket and switch on. 
Alternatively, the drum kit can be powered from a computer USB port using the USB power cable supplied. 


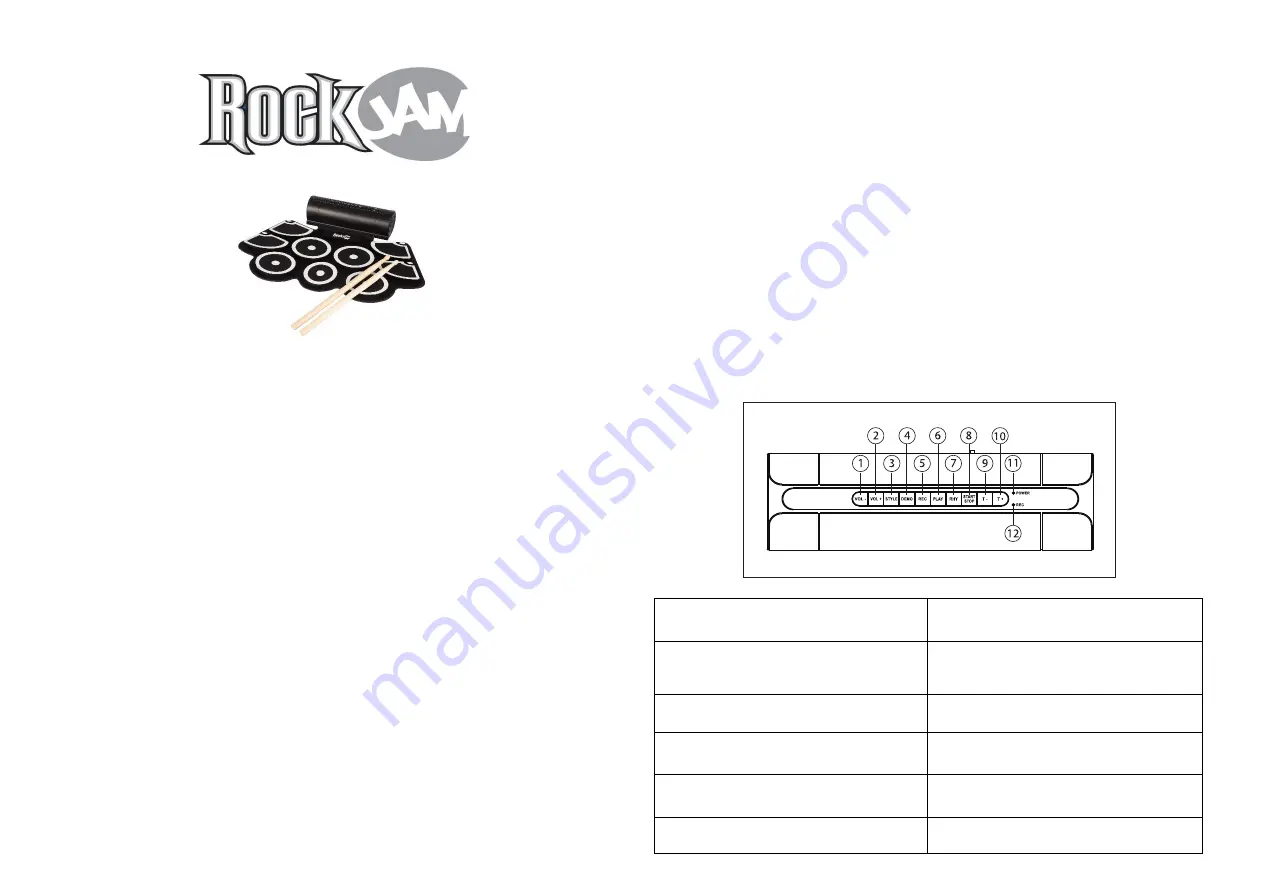
4.  Location of controls and indicators 


1 - VOL- :

 Press to reduce the output volume. There are 9 

volume levels available. 

7 – RHY:

 Press to cycle between the 9 available rhythms. 

2 – VOL+:

 Press to increase the output volume. 

 There are 

9 volume levels available.


8 – START/STOP:

 Press to start playback of the selected 

rhythm. Press to stop playback of the rhythm or demo song 
that is playing. 

3 – STYLE:

 Press to cycle between the 7 drum kit sounds 

available. 

9 – T-:

 Press to lower the tempo of the selected rhythm or 

demo song. 

4 – DEMO:

 Press to cycle between the 12 demo songs 

available. 

10 – T+:

 Press to raise the tempo of the selected rhythm or 

demo song. 

5 – REC:

 Press to start the record function. A maximum of 

336 beats can be recorded. 

11- POWER:

 Power indicator LED, lights red when 

switched on. 

6 – PLAY:

 Press to play back the recorded beats. 

12 – REC:

 Record indicator LED, lights green when 

recording. 

Summary of Contents for RJ760MD

Page 1: ...acking materials in case you wish to store the drum kit Before setting up the unit verify that the following accessories are present CONTENTS 1 x RJ760MD Drum kit with MIDI 2 x Pedals 2 x Drum sticks 1 x USB Power adapter 1 x USB Power Data cable 1 x 3 5mm AUX input cable 1 x Windows software CD 1 x Printed user guide 3 Power source Unwind the USB power cable to its full length connect one end to ...

Page 2: ... button to cycle through the 7 different drum kit sounds Hit the drums to test out the sounds available until you find the one that you like The default setting at power up is STYLE 1 1 Power On Off Switch Used to switch the drum kit on or off 4 Connect Headphones Earphones or to amplified speakers 2 Power adapter connection Use the USB power adapter supplied or power from a computer USB port NOTE...

Page 3: ... your drum kit Connect one end of the 3 5 mm jack cable supplied to the AUX input socket labelled MP3 located at the rear of the drum kit and the other end to your audio equipment iPhone iPod MP3 PC CD player etc This feature is great for practice and allows you to play along to a favourite music track NOTE Use the volume control of the connected device to adjust the playback volume of the music t...

Page 4: ...al Silicone FCC Compliance Statement FCC Class B Part 15 This device complies with Part 15 of the Federal Communications Commission FCC Rules Operation is subject to the following two conditions This device may not cause harmful interference This device must accept any interference received including interference that may cause undesired operation CAUTION Changes or modifications to this unit not ...

Page 5: ...d compruebe que los siguientes accesorios están presentes CONTENIDOS 1 x RJ760MD Kit de batería con MIDI 2 x Pedales 2 x Palos de batería 1 x USB Adaptador de corriente 1 x USB Cable de corriente 1 x 3 5mm Cable AUX de entrada 1x CD con Software para Windows 1 x Guía de usuario impresa 3 Fuente de energía Desenrolle el cable de alimentación USB en toda su longitud conecte un extremo a la entrada U...

Page 6: ...configuración de la batería alguno de los 7 sonidos diferentes Golpee los tambores para poner prueba los sonidos disponibles hasta que encuentre el que más le guste La configuración por defecto en el encendido es STYLE 1 1 Interruptor On off Se utiliza para encender o apagar el kit 4 Conector para auriculares o parlantes amplificadores 2 Conexión para adaptador de energía Use el adaptador de energ...

Page 7: ... batería Conecte una de las puntas del cable incluido de 3 5 mm a la entrada AUX etiquetada MP3 localizada en el dorso del kit de batería y la otra en su equipo de audio iPhone iPod Reproductor MP3 Reproductor de CD etc Esta característica es perfecta para practicar con sus canciones favoritas NOTA Modifique el volumen de la canción reproducida desde el dispositivo conectado ya que este no puede s...

Page 8: ...ón 336 beats salida MIDI entrada AUX Salida de Audio Peso 880g Material Silicona Cumplimiento de la FCC FCC Clase B Parte 15 Este dispositivo cumple con la sección 15 de la Comisión Federal de Comunicaciones FCC La operación está sujeta a las dos condiciones siguientes Este dispositivo no puede causar interferencias perjudiciales Este dispositivo debe aceptar cualquier interferencia recibida inclu...

Reviews: