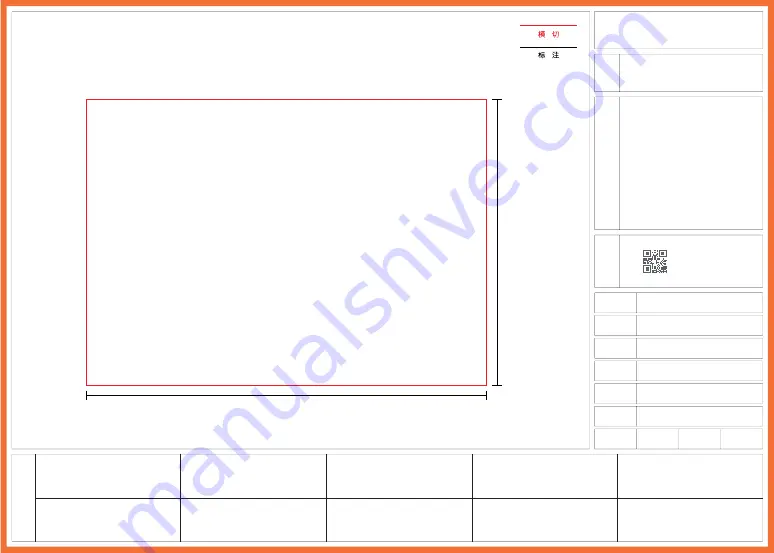
background image

石头科技产品包装图纸

北京石头科技有限公司

图纸
提供
单位


项目名称

RUBYS-E 说明书 FCC 版本

4.03.0249

V3.0

2020.07.21

刘超

料号

版本号

设计时间

设计师

设计师

比例

1:1

单位

mm

材质:105g 哑粉,骑钉
成品尺寸:182*130mm
页数:36P
参考色:PANTONE Cool Gray 11 C
                  PANTONE 185 C
尺寸偏差:±0.5mm
印刷偏位:±1mm

182mm

130mm


版本号:v2.0


修改时间:2020.07.17 修改点:buttont 
修改 button


修改人:刘超


版本号:v3.0


修改时间:2020.07.21


修改点:修改封底 BEIJING 字母加 I


修改人:刘超

Summary of Contents for S4 Max

Page 1: ... 4 03 0249 V3 0 2020 07 21 刘超 料号 版本号 设计时间 设计师 设计师 比例 1 1 单位 mm 材质 105g 哑粉 骑钉 成品尺寸 182 130mm 页数 36P 参考色 PANTONE Cool Gray 11 C PANTONE 185 C 尺寸偏差 0 5mm 印刷偏位 1mm 182mm 130mm 版本号 v2 0 修改时间 2020 07 17 修改点 buttont 修改 button 修改人 刘超 版本号 v3 0 修改时间 2020 07 21 修改点 修改封底 BEIJING 字母加 I 修改人 刘超 ...

Page 2: ...Roborock S4 Max Robot Vacuum Cleaner User Manual Read this user manual carefully before using this product and store it properly for future reference ...

Page 3: ...nly as described in this manual Use only manufacturer s recommended attachments Do not use with damaged cord or plug If appliance is not working as it should has been dropped damaged left outdoors or dropped into water return it to a service center Do not pull or carry by cord use cord as a handle close a door on cord or pull cord around sharp edges or corners Do not run appliance over cord Keep c...

Page 4: ...th another battery pack Use appliances only with specifically designated battery packs Use of any other battery packs may create a risk of injury and fire Turn off the appliance before making any adjustments changing accessories or storing appliance Such preventive safety measures reduce the risk of starting the appliance accidentally When battery pack is not in use keep it away from other metal o...

Page 5: ...ttempt to repair the appliance or the battery pack except as indicated in the instructions for use and care Place the cords from other appliances out of the area to be cleaned Do not operate the vacuum in a room where an infant or child is sleeping Do not operate the vacuum in an area where there are lit candles or fragile objects on the floor to be cleaned Do not operate the vacuum in a room that...

Page 6: ...que ou de blessure Ne pas exposer à la pluie Ranger à l intérieur Ne pas permettre aux enfants de jouer avec l appareil Une attention particulière est nécessaire lorsque l appareil est utilize par des enfants ou à proximité de ces derniers N utiliser que conformément à cette notice avec les accessories recommandés par le fabricant Ne pas utiliser si le cordon ou la fiche est endommagé Retourner l ...

Page 7: ...bles ou combustibles comme de l essence et ne pas faire fonctionner dans des en droits où peuvent se trouver de tells liquides Ne pas aspirer de matières en combustion ou qui dégagent de la fumée comme des cigarettes des allumettesou des cen dres chaudes Ne pas utiliser l appareil si le sac à poussière ou le filter n est pas en place Emêcher une mise en marche accidentelle S assurer que l interrup...

Page 8: ... médecin Le liquide projeté peut causer des irritations ou des brûlures Ne pas utiliser une batterie ou un appareil endommagé ou qui a été modifié Des batteries endommagées ou modifies peuvent avoir un comportement imprévisible pouvant causer un incendie une explosion ou un risque de blessure Ne pas exposer une batterie ou un appareil à la flamme ou à des températures excessives L exposition à une...

Page 9: ...ans une pièce où un nourrisson ou un enfant dort Ne pas utiliser l aspirateur dans un endroit où il ya des bougies allumées ou des objets fragiles sur le plancher à nettoyer Ne pas utiliser l aspirateur dans une pièce où il ya des bougies allumées sur les meubles que l aspirateur peut heurter ou se cogner accidentellement Ne pas laisser les enfants s assoir sur l aspirateur Ne pas utiliser l aspir...

Page 10: ...el CDZ11RR or CDZ12RR This device complies with part 15 of the FCC Rules This device contains licence exempt transmitter s receiver s that comply with Innovation Science and Economic Development Canada s licence exempt RSS s Operation is subject to the following two conditions 1 This device may not cause harmful interference and 2 this device must accept any interference received including interfe...

Page 11: ...nt to part 15 of the FCC Rules These limits are designed to provide reasonable protection against harmful interference in a residential installation This equipment generates uses and can radiate radio frequency energy and if not installed and used in accordance with the instructions may cause harmful interference to radio communications However there is no guarantee that interference will not occu...

Page 12: ...ded L antenne installée doit être située de facon à ce que la population ne puissey être exposée à une distance de moin de 20 cm Installer l antenne de facon à ce que le personnel ne puisse approcher à 20 cm ou moins de la position centrale de l antenne La FCC des éltats unis stipule que cet appareil doit être en tout temps éloigné d au moins 20 cm des personnes pendant son functionnement CAN ICES...

Page 13: ...e Holiday mode In this mode the robot will switch to Low Power mode to minimize power consumption This includes a dimming of the LED indicator and the stopping of all non charging related functions including cleaning remote control over WiFi and more To deactivate Holiday mode press and hold Recharge for 10 seconds until the LED indicator brightens ...

Page 14: ... least every three months to avoid the battery being over discharged Do not use the product when the temperature is higher than 40 C or lower than 4 C or there is any liquid or sticky substance on the floor Battery pack charging temperature Battery pack using temperature 20 C 60 C Less than 70 RH 20 C 45 C Less than 70 RH 20 C 20 C Less than 70 RH Storage 1month Long Storage 3months Long Storage 1...

Page 15: ...Press and hold to spot clean Note Press any button to pause cleaning returning to dock or spot cleaning On Off Press to start cleaning Press and hold to power on or off Power indicator White Battery level 20 Red Battery level 20 Flashing slowly Charging or starting up Flashing red Error ...

Page 16: ...14 Product Introduction Parts list Charging dock Power cable ...

Page 17: ...ustbin Robot Cover latch Dustbin latch Air filter WiFi indicator light Off WiFi disabled Slow flashing Waiting for connection Fast flashing Connecting Steady WiFi connected System reset Air vent Main brush cleaning tool Speaker ...

Page 18: ...Introduction Robot and sensors Recharge sensor Wall sensor Cliff sensor Omnidirectional wheel Charging contact Side brush Main wheels Main brush Main brush cover latch Bumper Laser distance sensor Vertical Bumper ...

Page 19: ...17 Product Introduction Charging dock Charging dock power indicator Locator beacon Power socket Charging contact Charging contact ...

Page 20: ...s becoming tangled in struck by or knocked over by the robot 1 If using this robot in a raised area always use a secure physical barrier to prevent accidental falls that may result in personal injury or property damage 2 Note When using the robot for the first time follow it throughout its whole cleaning route and watch for major obstacles The robot will be able to clean by itself in future uses ...

Page 21: ...mance always keep the robot charged The color of the power indicator indicates the battery level White Battery level 20 Red Battery level 20 Note The charging dock should have more than 0 5m 1 6ft of clearance on each side and more than 1 5m 4 9ft in the front If the power cable is vertical to the ground it may be caught by the robot causing the charging dock to be disconnected The charging dock i...

Page 22: ...gle Play or scan the QR code below then download and install the app Reset WiFi a Open the top cover of the robot to reveal the WiFi indicator light b Press and hold the button and the button until you hear the Resetting WiFi voice alert When the WiFi indicator light is flashing slowly the robot has entered network configuration mode Note If you cannot connect your phone to the robot reset the WiF...

Page 23: ...tarting cleanup Tidy away any cables on the ground including the power cable of the charging dock before cleaning to avoid losing power or damaging either the robot or the connected device If a cleanup finishes within 10 minutes cleaning repeats by default If the battery runs low before cleanup is complete the robot will carry out a top up charge before resuming cleanup from where it left off Paus...

Page 24: ... Placing the robot on the charging dock in an error state will stop the current cleanup Reset WiFi If your phone cannot connect to the robot because you have changed your router configuration forgotten your password or any other reason open the top cover to see the WiFi indicator light then press and hold the Spot Cleaning button and the Recharge button until you hear the Resetting WiFi voice aler...

Page 25: ...acles preventing the robot s access to the target rooms Note While cleaning the designated zone the robot may move outside zone borders Make sure that there are no cables or obstacles placed close to the cleanup zone Zone Cleaning Use the app to draw a specific zone for the robot to clean Pin n Go Use the app to set a destination for the robot to go to Cleaning mode Use the app to choose from Quie...

Page 26: ... due to continuous app development and upgrades Invisible Wall No go Zone Real time map updates Change cleaning mode View cleaning history Change robot voice Carpet Boost Part replacement schedule Remote control View robot status Robot location Do Not Disturb DND mode Firmware update Charging Dock The charging dock should be plugged in and placed against a wall on level ground with more than 0 5m ...

Page 27: ...ly to avoid damage to the main brush 1 Turn the robot over then unlatch and remove the main brush cover 2 Take out the main brush remove and clean its bearings 3 Remove the main brush cap rotating in the unlock direction 4 Use the supplied main brush cleaning tool to remove any entangled hair 5 Re install the cap and bearings following the lock direction 6 Re insert the main brush and secure the b...

Page 28: ...1 Open the dust bin lid as indicated by the arrow and pour out the contents 2 Fill the dust bin with clean water and close the cover Gently shake the dust bin then pour out the dirty water 3 Remove the filter and clean it with water Note To prevent blockage only use fresh water without cleaning liquid Note To avoid damage do not touch the surface of the filter with hands brushes or sharp objects ...

Page 29: ...h and tighten the screw 5 Leave the filter to dry before reinstalling it Note Allow the filter to dry thoroughly before use 24 hours of drying is recommended Alternating between two filters is recommended Battery The robot is equipped with a high performance lithium ion rechargeable battery pack To maintain battery performance keep the robot charged Note If the robot is to be left unused for an ex...

Page 30: ...eel Axle Bracket Restore factory settings If the robot is not functioning after a system reset turn it on then press the button and then press and hold the Reset button until you hear the Start restoring initial version voice alert The robot will then be restored to factory settings System Reset If the robot does not respond when you press a button or the robot cannot be shut down press the Reset ...

Page 31: ...r on the right of the robot 3 The charging contact on the bottom of the robot 4 Robot vacuum main wheel Firmware update Update the robot using the app Place the robot on the charging dock and ensure that the battery level is higher than 20 before updating The power indicator will flash white quickly during a firmware update Cliff sensor main wheel Charging contact Wall sensor ...

Page 32: ...350 x 350 x 96 5mm 151 x 130 x 98mm Battery Rated power 14 4V 5200mAh lithium battery 28W Weight Rated input Approx 3 3kg 100 240VAC Wireless connection Rated output Rated frequency WiFi Smart Connect 20VDC 1 2A 50 60Hz Rated voltage 14 4VDC Rated power 58W Charging time 6h Note The serial number is on a sticker on the underside of the robot ...

Page 33: ...roblem persists clean the cliff sensors This error may also be caused by a dirty cliff sensor Try wiping all sensors clean Error 5 Remove the main brush and clean the brush and bearing The main brush may be tangled up Remove and clean it Error 6 Remove and clean the side brush The side brush may be tangled up Remove and clean it Error 7 Look for anything stuck in the main wheels then move the robo...

Page 34: ...em The side brush module is experiencing a fault Reset the system Error 18 Vacuum fan error Reset the system The vacuum fan is experiencing a fault Reset the system Error 21 Vertical bumper pressed Release it and retry The vertical bumper has been pressed Relocate the robot and retry The recharge sensor is blocked by dust Wipe the dust off Error 22 Wipe the recharge sensor The charging dock is jam...

Page 35: ...open area The robot is too far from the charging dock Place it closer and retry Abnormal behavior Restart the robot Noise during cleaning The main brush side brush or main wheels may jammed Turn off the robot and clean them If the omnidirectional wheel is jammed use a screwdriver to remove it for cleaning Poor cleaning performance and or leaking dust The Dustbin is full and needs emptying The Filt...

Page 36: ...s not resume after recharging Make sure that the robot is not in DND mode DND mode will prevent cleanup When cleaning a space requiring a top up charge if the robot was placed manually on the Charging Dock before it is recharged automatically it will not be able to continue cleanup The robot cannot return to the charging dock after spot cleaning or when it has been moved manually After spot cleani...

Page 37: ...r Floor 6 Suite 6016 6017 6018 Building C Kangjian Baosheng Plaza No 8 Heiquan Road Haidian District Beijing P R CHINA For more product information visit our website www roborock com For after sales support email our after sales service team US Non Europe Support support roborock com Europe Support support roborock eu com ...

Reviews: