

1
eyeWAVE™ Wireless PIR /
Pet-Friendly Camera Detector
Model: RWX95CMP
Installation instructions
Installation Considerations
Do not install outside
Do not install near
windows
Do not install near vents
(air, heat, or AC)
Do not install near
ceiling fans
Do not install in extreme
temperatures
Do not install in direct
sunlight
Figure 1
Field of view: 90°
Max Detection Range: 39.4ft. (12m)
Installation Height: 7.2 to 8.2ft. (2.2 to 2.5m)
1 General Description
The eyeWAVE™ Wireless PIR Camera Detector is a battery powered PET-
Friendly PIR detector with integrated camera for visual verification and is
compatible with RISCO security systems.
2 Installation
Step 1: Preliminary Considerations
Select the mounting location for best coverage of the area that is to be
protected. It is recommended to install the eyeWAVE facing a door (so you
can observe the people that enter), in a living room or an area where there is
the possibility of a break-in.
For optimal installation, place the eyeWAVE a foot (30 cm) or more below
the ceiling and follow the Installtion Considerations for proper installation.
Step 2: Quick Device Allocation
The eyeWAVE must identify itself to the WiComm Smart Hub. This can be
performed either using the RISCO Express Wizard
(www.riscocloud.com/express) by adding the extra sensor at the time of the
Smart Hub system installation or later either by using the “Settings” on the
Web (www.riscocloud.com) or using the WiComm Smart Hub, as follows:
1. Press the
button on the WiComm Smart Hub for 5 seconds; the unit
beeps once as it enters Learn mode (all the LEDs also light up, one after
the other).
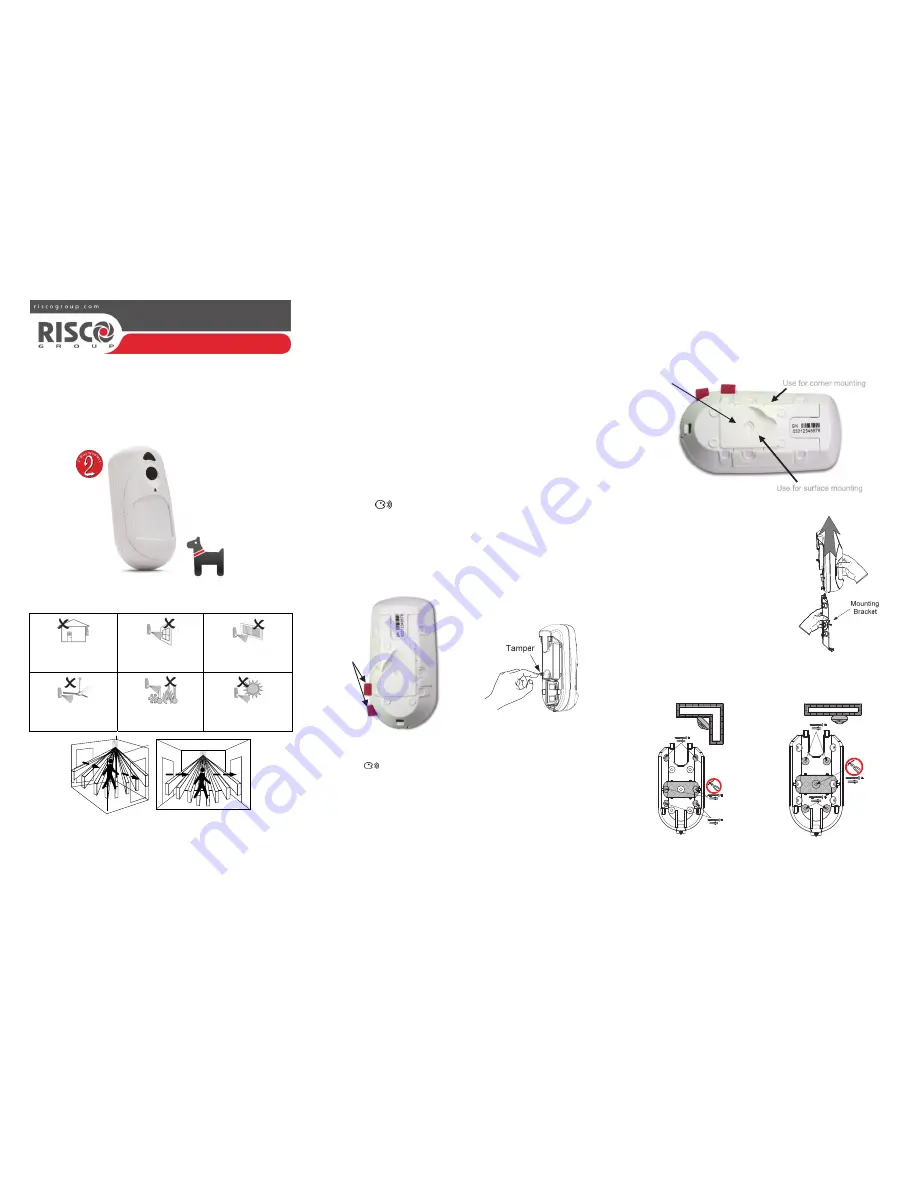
2. Slide the detector upward as shown in Figure 5.
3. Remove the red isolation strips to activate the batteries (see Figure 2).
4. Send a signal transmission from the detector by pressing the tamper switch
for at least 2 seconds (see Figure 3).
The WiComm Smart Hub beeps once to accept or beeps three times to
reject. Once accepted, the system announces the device type and its zone
(for example, “Detector, zone 1”).
Figure 2
Figure 3
5. Put back the mounting bracket.
6. To complete allocation, momentarily press the WiComm Smart Hub
button
. A short beep is heard and the LEDs stop flashing.
7. Mount the detector.
8. You can change the zone labels through the www.riscocloud.com
website (for details, see the Reference Manual).
Notes:
1. For future use, it is recommended to write down the detector description,
zone number, and installation location of each allocated detector.
2.
Tamper Switch:
After the eyeWAVE is allocted, removing the back cover
wil trigger a tamper alarm. To clear the alarm, press the Disarm buttom on
the keyfob or in your Smartphone application.
Step 3: Mounting the Detector
You can mount the detector either using screws or adhesive tapes for easy
mounting.
The detector can be mounted in a corner of a room or on a flat surface,
depanding on the required coverage area.
Mounting with Adhesive tape
Peel the adhesive tapes and attach to surface.
Figure 4
Mounting with Screws
1.
Slide the detector upward.
Figure 5
2.
Open the knockout holes of the mounting bracket, and use them as a
template for mounting.
Corner Mounting
Surface Mounting
Figure 6
Use for surface mounting
Use for corner mounting
Adhesive
tape
Red battery
isolation
strips


