background image

1 1

/

1/11

Summary of Contents for Thayer Crib

Page 1: ...1 1 1 11 ...
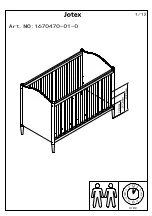
Page 2: ... When a child is able to pull to a standing position set mattress to lowest position and remove bumper pads large toys and other objects that could serve as steps for climbing out When child is able to climb out or reaches the height of 35 89cm the crib shall no longer be used and the child should be placed in a youth or regular bed Check this product for damaged hardware loose joints missing part...

Page 3: ... near a window or patio door where a child could reach the cord of a blind or curtain and the strangled Check this crib regularly before using it and do not use if any part is loose or missing or if there are any signs of damage Do not substitute parts Contact the manufacturer if replacement parts or additional instructions are needed Children can suffocate on soft bedding Do not place pillows com...

Page 4: ... ribbon around a child s neck such as hood strings or pacifier cords DO NOT suspend strings over a toddler bed for any pacifier cords A child using the toddler or daybed shall be at least 15 months of age and shall not weigh more than 50 lbs 22 7kgs WARNING ENTRAPMENT STRANGULATION HAZARD Infants have died in toddler beds from entrapment and strangulation Failure to follow these warnings and the a...

Page 5: ...n which the part is used Step 1 Side rail and end panel assembly Page 6 Step 2 Bottom frame assembly Page 7 Step 3 Mattress support assembly Page 8 Step 4 Hide unused holes Page 9 Step 5 Toddler rail assembly Page 10 and 11 SIDE RAIL END PANEL MATTRESS SUPPORT BOTTOM FRAME 5 11 TODDLER RAIL SOLD SEPRATELY ...

Page 6: ...bottom face of the side rails and end panels please checking and assembly correct follow the position Y1 as in DETAIL A1 STEP 1 2 Attach the side rail to the end panel by using allen bolts AA lock washers and plain washers Please see DETAIL B HARDWARE NEEDED FOR STEP 1 Allen Wrench 1 pc Lock Washers 1 4 12 pcs Plain Washers 1 4 12 pcs DETAIL B AA 1 4 x 2 1 2 Allen Bolt 12 pcs 6 11 Allen bolt AA lo...

Page 7: ...bottom of the crib by using allen bolts AA lock washers and plain washers See DETAIL C STEP 2 3 Turn the crib to an upright position See DETAIL D HARDWARE NEEDED FOR STEP 2 Allen Wrench 1 pc Lock Washers 1 4 8 pcs Plain Washers 1 4 8 pcs AA 1 4 x 2 1 2 Allen Bolt 8 pcs 7 11 DETAIL C Allen bolt AA lock washer and plain washer DETAIL D ...

Page 8: ...d height by adjusting the support arms The mattress support should be at it s highest setting for newborns then adjusted to the lower positions as the child grows and becomes mobile Once the child is able to stand the mattress support should be at its lowest position After assembly re tighten all bolts to a snug fit DO NOT OVER TIGHTEN HARDWARE NEEDED FOR STEP 3 BB 1 4 x 13 16 Allen Bolt 8 pcs Loc...

Page 9: ...port is in middle or lowest setting unused holes can hurt your child s fingers Use allen bolts CC provided to hide these holes See illustration in DETAIL G HARDWARE NEEDED FOR STEP 4 Allen Wrench 1 pc CC 1 4 x 1 2 Allen Bolt 8 pcs DETAIL G CC 9 11 ...

Page 10: ... of bolts on the bottom frame as in DETAIL I STEP 5 4 Remove all bolt on the front rail and all bolts on the end of the back rail Please see DETAIL J STEP 5 5 After removing the bolts gently remove the front rail and install the toddler rail Tighten all bolts into the back rail and toddler rail as in DETAIL K IMPORTANT Please re use all hardware that was removed previouly H I J K DETAIL H DETAIL I...

Page 11: ...See DETAIL M WARNING For the toddler bed the mattress support must be in lowest setting STEP 5 6 Unused holes can hurt your child s fingers Use Allen bolts EE provided Packed inside Toddler rail box to hide these holes See illustration in DETAIL N After assembly re tighten all bolts to a snug fit DO NOT OVER TIGHTEN Allen Wrench 1pc EE 1 4 x 1 2 BOLT 2 pcs HARDWARE FOR STEP 5 PACKED INSIDE TODDLER...

Reviews: