

ENGLISH
2
ENGLISH
3
ENGLISH
4
ENGLISH
5
ENGLISH
6
ESPAÑOL
7
ESPAÑOL
8
5. Presione y libere la tecla
TV
o
STREAMING
. La luz del indicador parpadea y luego
permanece iluminada.
6. Ingrese el código de cinco dígitos, usando la tecla
REVERSE
(para dígito 1),
PLAY/
PAUSE
(para dígito 2),
FORWARD
(para dígito 3),
PREVIOUS
(para dígito 4),
STOP
(para dígito 5) and
NEXT
(para dígito 6). Cuando cada dígito sea ingresado,
la luz del indicador parpadea.
Nota
: Si la luz del indicador parpadea múltiples veces, usted ha ingresado un código inválido.
Comience nuevamente desde el paso 2.
7. Apunta el control remoto al componente y presione la tecla
POWER
. El componente
debería apagarse.
Nota
: Si su componente no responde, intente con todos los códigos para sus marcas. Si los códigos
no funcionan o su marca no está listada, intente con el Método de Búsqueda de Código siguiente.
Búsqueda Automática de Código
Si su TV o reproductor de transmisión de video no responde después de que usted haya intentado con todos
los códigos de cinco dígitos para su marca, o si su marca no está listada, intente buscar su código vía el Método
de Entrada de Búsqueda de Código Automática. Para programar su control remoto vía el Método de Entrada de
Búsqueda de Código Automática, siga estos pasos:
1. Encienda manualmente el componente que quiere programar para que funcione con el
control remoto.
2. Presione y mantenga presionada la tecla
SET UP
hasta que la luz del indicador se
ilumine.
3. Libere la tecla
SET UP.
4. Presione y libere la tecla del componente que usted quiere controlar con el control
remoto —la tecla
TV
o
STREAMING
. La luz del indicador parpadea una vez y
permanece iluminada.
Importante
: Encuentre la tecla OK en su control remoto (no la presione todavía).
5. Presione la tecla
POWER
para comenzar la búsqueda de código automática.
El control remoto pasará automáticamente a través de todos los códigos en su colección de códigos uno a uno.
Un nuevo código es enviado cada 4 segundos y la tecla
POWER
parpadeará cuando el nuevo código sea enviado.
Esto puede llevarse varios minutos para completar, pero asegúrese de seguir observando su componente hasta
que éste se apague.
6. Tan pronto como el componente se apague, presione la tecla
OK
en 4 segundos. La luz
del indicador se apaga.
Nota
: Si usted espera más de 4 segundos para presionar
OK
, el control remoto pasa al código
siguiente - usted necesitará comenzar la búsqueda de código nuevamente desde el paso 1.
5. Press and release the
TV
or
STREAMING
key. The indicator light blinks and then
remains lit.
6. Enter the five-digit code, using the
REVERSE
(for digit 1)
, PLAY/PAUSE
(for digit 2)
,
FORWARD
(for digit 3)
, PREVIOUS
(for digit 4)
, STOP
(for digit 5)
and
NEXT
(for
digit 6) key. When each digit is entered, the indicator light blinks.
Note
: If the indicator light blinks multiple times, you’ve entered an invalid code. Start from step 2
again.
7. Aim the remote at the component and press the
POWER
key. The component should
turn off.
Note
: If your component does not respond, try all the codes for your brands. If the codes do not work
or your brand is not listed, try the Code Search Method that follows.
Auto Code Search
If your TV or streaming player does not respond after you have tried all the five-digit codes for your brand, or if your
brand is not listed, try searching for your code via the Auto Code Search Entry Method. To program your remote via
the Auto Code Search Entry Method, follow these steps:
1. Manually turn on the component you wish to program the remote to operate.
2. Press and hold the
SET UP
key until the indicator light turns on.
3. Release the
SET UP
key.
4. Press and release the component key you wish the remote to control—the
TV
or
STREAMING
key. The indicator light blinks once and remains lit.
Important
: Find the
OK
key on your remote (don’t press it yet).
5. Press the
POWER
key to start the auto code search.
The remote will automatically go through all the codes in its library one by one. A
new code is sent every 4 seconds and the
POWER
key will blink when the new
code is sent. This may take several minutes to complete, but make sure you keep
watching your component until it turns off.
6. As soon as the component turns off, press the
OK
key within 4 seconds. The
indicator light turns off.
Note
: If you wait longer than 4 seconds to press
OK
, the remote goes to the next code—you
will need to start the code search from step 1 again.
Manual Code Search
If your TV or streaming player does not respond after you have tried all the five-digit
codes for your brand, or if your brand is not listed, try searching for your code via the
Manual Search Entry Method. To program your remote via the Code Search Entry
Method, follow these steps:
1. Manually turn on the component you wish to program the remote to operate.
2. Press and hold the
SET UP
key until the indicator light turns on.
3. Release the
SET UP
key.
4. Press and release the component key you wish the remote to control—
TV
or
STREAMING
key. The indicator light blinks once and remains lit.
Important
: Find the
OK
key on your remote (don’t press it yet). You will need to press this key
quickly in step 6 below.
5. Press and release the
POWER
key until the component turns off.
Important
: You may have to press the
POWER
key up to 200 times.
6. As soon as the component turns off, press the
OK
key within 4 seconds. The indicator
light turns off.
Note
: If you wait longer than 4 seconds to press
OK
, the remote goes to the next code—you will need
to start the code search from step 1 again.
ENGLISH
Limited Lifetime Warranty
Voxx Accessories Corporation (the “Company”) warrants to you the original retail purchaser of this product that should it, under normal use and
conditions, be proven defective in material or workmanship during its lifetime while you own it, such defect(s) will be repaired or replaced (at the
Company’s option) without charge for parts and repair labor. To obtain repair or replacement within the terms of this Warranty, the product is to
be delivered with proof of warranty coverage (e.g. dated bill of sale), specifi cation of defect(s), transportation prepaid, to the Company at the
address shown below. Do not return this product to the retailer.
This Warranty does not cover product purchased, serviced or used outside the United States or Canada. This Warranty is not transferable and
does not extend to costs incurred for installation, removal or reinstallation of the product. This Warranty does not apply if in the Company’s
opinion, the product has been damaged through alteration, improper installation, mishandling, misuse, neglect, accident, or the simultaneous
use of different battery types (e.g. alkaline, standard or rechargeable).
THE EXTENT OF THE COMPANY’S LIABILITY UNDER THIS WARRANTY IS LIMITED TO THE REPAIR OR REPLACEMENT PROVIDED
ABOVE AND, IN NO EVENT, SHALL THE COMPANY’S LIABILITY EXCEED THE PURCHASE PRICE PAID BY PURCHASER FOR THE
PRODUCT.
This Warranty is in lieu of all other express warranties or liabilities. ANY IMPLIED WARRANTIES, INCLUDING ANY IMPLIED WARRANTY OF
MERCHANTABILITY OR FITNESS FOR A PARTICULAR PURPOSE SHALL BE LIMITED TO DURATION OF THIS WARRANTY. IN NO CASE
SHALL THE COMPANY BE LIABLE FOR ANY CONSEQUENTIAL OR INCIDENTAL DAMAGES WHATSOEVER. No person or representative is
authorized to assume for the Company any liability other than expressed herein in connection with the sale of this product.
Some states/provinces do not allow limitations on how long an implied warranty lasts or the exclusion or limitation of incidental or consequential
damage so the above limitations or exclusions may not apply to you. This Warranty gives you specific legal rights and you may also have other
rights, which vary from state/province to state/province.
U.S.A.:
Audiovox Return Center, 150 Marcus Blvd., Hauppauge, New York 11788
CANADA:
Audiovox Return Center, c/o Genco, 6685 Kennedy Road, Unit 3, Door 16, Mississauga, Ontario L5T 3A5
Troubleshooting
Problem: The remote does not operate your device.
• Make sure the remote is in the correct mode by pressing the corresponding device key (TV, STREAMING). This tells
the remote which device to operate.
• Remove any obstacles between the remote and the device. Make sure you’re aiming the remote at the device’s IR
sensor.
• Make sure the batteries are fresh and are properly installed. Replace the batteries with two new AAA batteries, if
necessary (see the Battery Installation section).
Problem: The remote can’t be programmed to operate your device.
• If you are testing the remote while programming it, you may be too far away from the device or at a wrong angle.
There must be an unobstructed path between the remote and the IR sensor on the device. Move closer and make
sure you point the remote at the device you’re trying to control.
• If you’re using the Direct Entry programming method to enter the codes for your brand and the unit is still not
functioning properly, try the auto, or manual search method.
• Make sure the batteries are fresh and are properly installed.
Problem: The remote doesn’t perform commands properly.
• Make sure the remote is in the correct mode by pressing the corresponding device key (TV, STREAMING ). This tells
the remote which device to operate.
Step 1: Install your batteries
Your universal remote requires two AAA alkaline batteries (not included).
To install the batteries:
1. Press and push the battery compartment cover to remove it.
2. Insert the batteries, matching the batteries to the (+) and (–) marks inside the battery compartment.
3. Push the battery cover back into place.
Battery Precautions:
• Do not mix old and new batteries.
• Do not mix alkaline, standard (carbon-zinc) or rechargeable (nickel-cadmium) batteries.
• Always remove old, weak or worn-out batteries promptly and recycle or dispose of them in accordance with Local and National
Regulations.
FCC Statement:
This device complies with part 15 of the FCC Rules. Operation is subject to the following two conditions: (1) This
device may not cause harmful interference, and (2) this device must accept any interference received, including
interference that may cause undesired operation.
Note: This equipment has been tested and found to comply with the limits for a Class B digital device, pursuant to
part 15 of the FCC Rules. These limits are designed to provide reasonable protection against harmful interference in
a residential installation. This equipment generates, uses and can radiate radio frequency energy and, if not installed
and used in accordance with the instructions, may cause harmful interference to radio communications. However,
there is no guarantee that interference will not occur in a particular installation. If this equipment does cause harmful
interference to radio or television reception, which can be determined by turning the equipment off and on, the user is
encouraged to try to correct the interference by one or more of the following measures:
• Reorient or relocate the receiving antenna.
• Increase the separation between the equipment and receiver.
• Connect the equipment into an outlet on a circuit different from that to which the receiver is connected.
• Consult the dealer or an experienced radio/TV technician for help.
Caution: Any Changes or modifications not expressly approved by the party responsible for compliance could void the
user’s authority to operate this equipment.
Industry Canada Regulatory Information
CAN ICES-3 (B)/NMB-3 (B)
Avis d’Industrie Canada
CAN ICES-3 (B)/NMB-3 (B)
Step 2: Program your Remote
Direct Code Entry
To program your remote to control up to two components, follow these steps:
1. Manually turn on the component you wish to program the remote to operate.
2. Find the five-digit code for your brand of TV or streaming player in the enclosed code
lists.
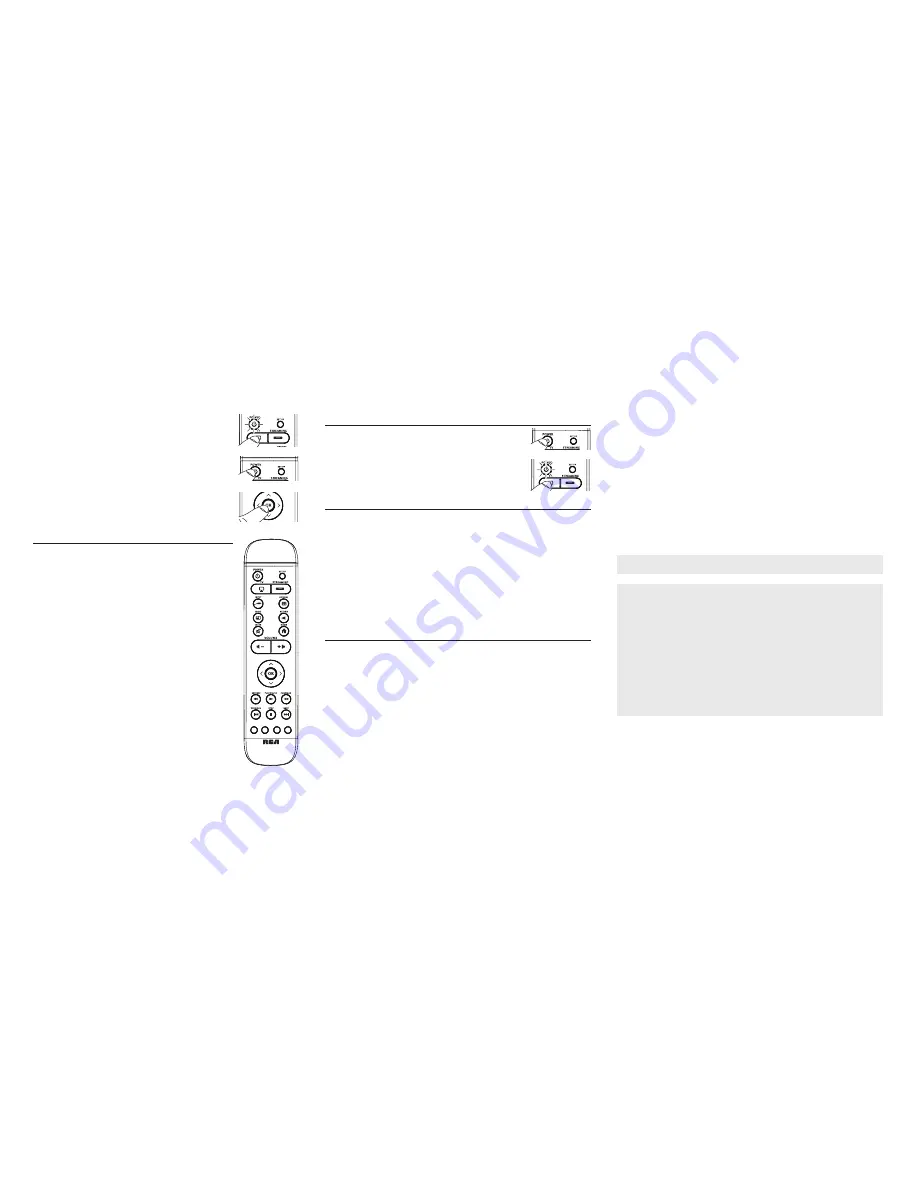
3. Press and hold the
SET UP
key until the indicator light turns on.
4. Release the
SET UP
key.
ESPAÑOL
For more information, please visit www.rcaaudiovideo.com
Consumer Help Line: 1-800-420-7968
Tour of the Remote
In most cases, the keys on this remote perform the same functions as the keys on your
original remotes once you’ve programmed this remote to operate your components.
Illuminated
POWER
key serves as an indicator light to provide feedback. It also turns
your devices on and off.
SET UP
puts the remote in code programming mode.
Device keys (
TV, STREAMING
) put the remote in the right mode to control your device.
The
INPUT
toggles through your TV input choices.
OPTIONS, RETURN,
and
HOME
perform the same functions as on your original
streaming player remote.
MENU
puts the remote in menu mode; it also accesses the same features as the key on
your original remote in menu mode.
MUTE
and
/-
keys adjust TV volume.
Arrow keys
and
OK
act as navigation and selection keys in device guides and menu
systems when the remote is in menu mode.
REVERSE, PLAY/PAUSE, FORWARD, PREVIOUS, STOP
and
NEXT
keys control
playback on your streaming player.
Red, green, yellow,
and
blue
keys access additional features on your streaming player.
IMPORTANT:
Because this remote controls more than one device, you must first “tell” the remote
which device you wish to operate. That means, if you wish to operate your TV, you must first press
the
TV
key to put the remote in the TV Mode. The remote stays in that device mode until you press a
different device key. For example, if your remote is in TV Mode and you want to operate the streaming
player, you must press the
STREAMING
key to change device modes.
Master Power
By default, each time you press the
POWER
key, this remote automatically turns on or off
the devices you’ve programmed it to operate. For example, if you want to turn both your TV
and streaming player on at the same time, all you have to do is press the
POWER
key on
this remote (if you’ve already programmed the remote to operate these devices). A single
press will also turn them off.
If you want to turn just one of the devices on or off, press the key for the device you
want to turn on/off, and then press
POWER
within 3 seconds. For example, if you want
to turn just your TV on, press the
TV
key on this remote, and then press
POWER
within
3 seconds.
Code Retrieval
1. Press and hold the
Code Search
key until the LED lights up.
2. Press Device key you desire to check code number. LED flashes and remains on.
3. Press
Code Search
key and LED goes off.
4. Starting with
REVERSE
(1) key, press and release each word/number on the keypad in the following order: 1-5. The
word/number that causes the LED to blink is the first number of the code. As you find each number of the code,
write it down for reference. Then start with Word/Number 1 again.
Reverse = 1
Play/Pause = 2
Forward = 3
Previous= 4
Stop = 5
Next = 6
5. Repeat step 4 until you have retrieved all five numbers. After the fifth number is retrieved, the LED will turn off.
Tip:
To exit the code retrieval at any time press
TV
or
Streaming
key.
Digit 1
Digit 2
Digit 3
Digit 4
Digit 5
Digit 6
• You may have pressed an invalid key for the mode the remote is in.
• There is a possibility that a programmed code may only be able to control some of your device features (for
example, only turns a device on and off). To confi rm that the device key is programmed with the correct code for
maximum functionality, test the device. Attempt to control a variety of the device’s functions with the remote. If some
of the features of your devices don’t work, try programming the remote with a different code in the list using the
Direct Code Entry Method, until you fi nd the code that allows the remote to control the majority of your device’s
functions. Different codes can provide different levels of functionality.
Problem: The POWER key does not light when you press a key.
• You may have pressed an invalid key for the mode the remote is in.
• Make sure the remote is in the correct mode by pressing the corresponding device key (TV, STREAMING). This tells
the remote which device to operate.
• Make sure the batteries are fresh and are properly installed. Replace the batteries with two new AAA batteries, if
necessary (see the Battery Installation section).
Problem: The device’s menu does not appear on the TV screen.
• Make sure you have connected the device to your TV properly and selected the correct input. (See your devices’
Owner’s Manuals for proper connection procedures.)
• Make sure the remote is in the correct mode by pressing the corresponding device key (TV, STREAMING). This tells
the remote which device to operate.
• Menu access isn’t supported for all brands. You may need to use your original remote control to access menu
functions for some devices.
Paso 1: Instale sus baterías
Su control remoto requiere dos baterías alcalinas tamaño AAA (no incluidas).
Para instalar las baterías:
1. Presione y empuje la cubierta del compartimiento de baterías para removerla.
2. Inserte las baterías, haciendo que las mismas coincidan con las marcas (+) y (–) dentro del compartimiento de
baterías.
3. Empuje la cubierta de baterías de regreso nuevamente a su lugar.
Precauciones para las baterías:
• No mezcle baterías viejas y nuevas.
• No mezcle baterías alcalinas, estándar (carbono-zinc) o recargables (níquel-cadmio.
• Retire siempre inmediatamente las baterías viejas, débiles o gastadas y recíclelas o elimínelas de conformidad con las regulaciones
locales y nacionales.
Información FCC :
Este aparato obedece las especificaciones de la Parte 15 de las regulaciones FCC. Las funciones están sujetas a
las siguientes condiciones: 1) Este aparato no puede causar interferencias dañinas, y 2) este aparato puede recibir
cualquiera interferencia, incluyendo aquellas que puedan causar funciones no deseadas.
Nota: Se probó este equipo y podemos afirmar que cumple con las restricciones establecidas para un dispositivo
digital Clase B, de acuerdo con la Sección 15 de la Reglamentación de FCC. Estas restricciones fueron designadas
para brindar una protección razonable frente a la interferencia perjudicial en una instalación residencial. Este equipo
genera, usa y puede irradiar energía de radiofrecuencia y, si no está instalado o no se lo utiliza de acuerdo con
las instrucciones, puede ocasionar interferencias perjudiciales para las comunicaciones de radio. Sin embargo, no
existe ninguna garantía de que no se vaya a producir una interferencia en una instalación particular. Si este equipo
produce una interferencia perjudicial con la recepción de la radio o la televisión, lo cual podría determinarse apagando
y encendiendo el equipo, se le pide al usuario que intente corregir la interferencia siguiendo una o varias de las
siguientes medidas.
• Vuelva a orientar o cambie de lugar la antena receptora.
• Aumente la separación entre el equipo y el receptor.
• Conecte este equipo a un tomacorriente en un circuito diferente al que esté conectado el receptor.
• Consulte al distribuidor o a un técnico experimentado de radio y televisión para solicitar asistencia.
Precaución: Cualquier cambio o modificación no expresamente aprobados por la parte responsable por el
cumplimiento podría invalidar la autoridad del usuario para operar este equipo.
Información Regulatoria de la Industria Canadiense
CAN ICES-3 (B)/NMB-3 (B)
Paso 2: Programe su control remoto
Entrada Directa de Código
Para programar su control remoto para controlar hasta dos componentes, siga estos pasos:
1. Encienda manualmente el componente que quiere programar para que funcione con el
control remoto.
2. Encuentre el código de cinco dígitos para la marca de su TV o reproductor de
transmisión de video en las listas de código anexas.
3. Presione y mantenga presionada la tecla
SET UP
hasta que la luz del indicador se ilumine.
4. Libere la tecla
SET UP.
Dígito 1
Dígito 2
Dígito 3
Dígito 4
Dígito 5
Dígito 6


