Ratoc Systems PCIFW1U, User Manual
The Ratoc Systems PCIFW1U User Manual offers comprehensive instructions and guidelines for seamless installation and optimal utilization of our product. Download this manual for free from manualshive.com to unlock the full potential of your PCIFW1U device, ensuring hassle-free operations and maximizing your user experience.
Share
Download


Reviews:
No comments
Related manuals for PCIFW1U

eDynamo
Brand: Magtek Pages: 245

MSR206
Brand: Unitech Pages: 2
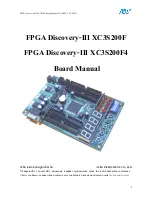
Discovery-III XC3S200F
Brand: Apex Instrument Pages: 18

Powered RS-232 2-Port PCI Card
Brand: National Instruments Pages: 11

AX1D
Brand: ATCOM Pages: 15

3DForce6800
Brand: Jaton Pages: 37

ADIO1600 Series
Brand: ICS Advent Pages: 72

3907740
Brand: Global American Pages: 14

OMNI 3300
Brand: E-Chex Pages: 2

VS8801
Brand: Sealey Pages: 49

Intense3D Wildcat 4105
Brand: Intergraph Pages: 22

XtremeRGB-Ex4+
Brand: EMS Imaging Pages: 12

303506
Brand: CSL Pages: 28

300223
Brand: CSL Pages: 28

KCR-210
Brand: KlipXtreme Pages: 9

Ultra HotConnect 8945
Brand: Adaptec Pages: 2

IB-CR301-U3
Brand: Icy Box Pages: 8

IB-CR403-C3
Brand: Icy Box Pages: 12


