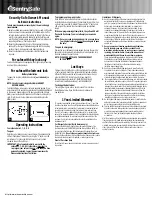
background image

RAPiD Safe 2600KP

Item No. 98177
Exterior:  10.7"x  8.7" x 2.9"
Interior:  7.0" x 7.7" x 2.2"

Power:  12 V 1.0A or four (4) AA batteries 

(batteries not included)

1

2

4

5

6

7

3

Not Pictured:

•  Owner’s Manual
•  Warranty Card

RAPiD Safe 2700KP

Item No. 98172
Exterior:  12.7" x 8.7" x 2.9"
Interior:  9.0" x 7.7" x 2.2"
Power:  12 V 1.0A or four (4) AA batteries 

(batteries not included)

3

Table of Contents 

Warnings and Important Information ................................................. Page 2
Items Included........................................................................................ Page 3
Setup and Operation ............................................................................. Page 4
Warranty .................................................................................................. Page 9
Product Registration and Service ...................................................... Page 10
Frequently Asked Questions ............................................................... Page 10
Mounting Template ............................................................................... Page 11

Items included with your RAPiD

®

 Safe

1.  RAPiD

®

 Safe 2600KP or RAPiD

®

 Safe 2700KP

2.  Wall Power Supply
3.  One (1) RFID Adjustable Wristband

 (No. 98141)

4.  Two (2) RFID Adhesive Decals 

(No. 98168)

5.  One (1) RFID Key Fob Tag 

(No

98167)

6.  Two (2) Circular Barrel Keys
7.  Security Cable

16-HMC-0113 Instructions Rapid Safes 2600KP-2700KP - INSIDE PGS-4A.indd   3

8/25/16   4:14 PM

Summary of Contents for 2600KP

Page 1: ...tents Warnings and Important Information Page 2 Items Included Page 3 Setup and Operation Page 4 Warranty Page 9 Product Registration and Service Page 10 Frequently Asked Questions Page 10 Mounting Te...

Page 2: ...t and insert the power jack through the square hole in the bottom of the safe With the battery door closed plug the AC power supply into the back of the front panel The cord should be routed to the le...

Page 3: ...your RFID tag within 1 of the center of the RFID reader to open the safe Keypad Tones On Off Press and hold the H button on the keypad for 5 seconds until the light turns off to toggle sound on and of...

Page 4: ...the red program button Press and release the button to begin programming a RFID tag The first available program location will begin to blink 3 Hold the RFID tag within 1 of the illuminated RFID reader...

Page 5: ...a previously programmed RFID tag or key code The safe ships with a default code and should be reprogrammed before first use 2 Locate the red program button to begin programming your key code The firs...

Page 6: ...they are operational 2 To confirm erasing procedure press and release the program button again All five LEDs will blink three times to visually confirm all RFID tags have been removed All RFID tags w...

Page 7: ...PT AS IS OTHERWISE EXPRESSLY SET FORTH IN THE ABOVE LIMITED WARRANTY HORNADY SECURITY MAKES NO OTHER REPRESENTATIONS OR WARRANTIES OF ANY KIND WHETHER EXPRESSED OR IMPLIED BY OPERATION OF LAW OR OTHER...

Page 8: ...lost my keys Can I get a replacement For security reasons Hornady WILL NOT provide replacement barrel keys for the RAPiD Safe Consult a locksmith if needed Where can I find the serial number The seri...

Page 9: ...allation Thisequipmentgenerates usesandcanradiateradiofrequency energyand ifnotinstalledandusedinaccordancewiththeinstructions maycause harmfulinterferencetoradiocommunications However thereisnoguaran...

Reviews: