


Power On/Off
WPS Button
Mode Selector
Reset Pinhole Button
WAN/LAN Port
LAN Port
01
03
08
02
09
10
04
05
06
Package Contents
• 1 x WiFi Extender/AP/Router (the device)
• 1 x Instruction Manual
• 1 x RJ45 Cable
1
2
3
4
5
6
7
8
9
10
11
11
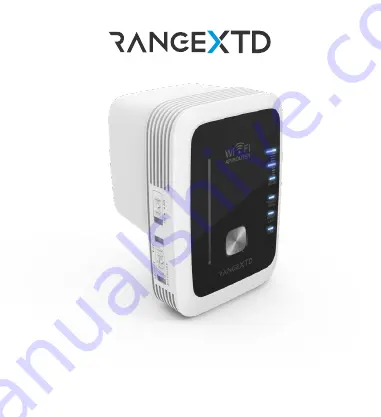
3 Stage WiFi Signal
Indicators
Power/WPS LED
Indicator
WAN/LAN LED Indicator
LAN Indicator
AC Power Plug
LED Indicators
POWER/WPS
LAN
WAN/LAN
ON:
The Device is power on
OFF:
The Device is not receiving electrical power
Slow Flashing:
The Device WPS waiting client connection
Fast Flashing:
The Device connecting to your AP/Router
ON:
The Ethernet port is connected
OFF:
The Ethernet port is disconnected
Flashing:
Data transferring
ROUTER MODE
WAN
ADSL
07
ON
ON
ON
ON
Flashing
ON
ON
ON
ON
ON
OFF
OFF
OFF
OFF
OFF
Mode
AP/Router
Repeater
Description
Wi-Fi Signal output power 100%
Excellent reception
signal strength 50% to 100%
Good reception
signal strength 25% to 50%
Weak reception
signal strength below 25%
Disconnected
URL:
192.168.7.234
Login Password:
admin
Wi-Fi SSID:
RANGEXTD
WiFi Key: None
WPS Button:
Press once to initiate WPS mode, press and hold WPS button for 6 seconds to
activate WPS search mode on your device (on Repeater Mode).
Reset Pinhole Button:
Press and hold 3 Seconds to reset the device.
Introduction
Hardware Overview
Default Setting
Setting up a Wireless Infrastructure Network
For a typical wireless setup at home (as shown below), please do the following:
LAN
Router
WIRELESS AP MODE
WIRELESS REPEATER MODE
Getting Started
WiFi Signal Strength Indicators
(refer to the diagram on the right)
1
3
2
4
6
5
7
8
9
10
Instruction Manual
WiFi
Range Extender
RangeXTD is best used on Repeater Mode by extending your existing 802.11n
wireless WiFi signal to black spots around your home or workplace. On Router
Mode It can also be used as a WiFi router when wired to your modem or on AP
Mode when wired to your existing wireless router. RangeXTD supports 2.4G
wireless network connection, and it can support 2.4G transmission speeds of up
to 300Mbps. It has 2X built-in antennas and provides excellent wireless
performance, transmission rates and stability technology automatically avoids
channel conflicts using its channel selection feature.
The device is connected to a DSL or cable
modem and works as a regular wireless
router. This mode is fit for an environment
where Internet access from DSL or cable
modem is available for one user but more
users need to share the Internet.
The device copies and reinforces the existing
wireless signal to extend the coverage of the
signal. This mode is especially useful for a
large space to eliminate signal-blind spots.
This mode is best for a large house, office,
warehouse or other spaces where the
existing signal is weak.
The device is connected to a wired network
then transforms the wired Internet access into
wireless so that multiple devices can share the
Internet. This mode is best used when there is
intereference between rooms like a basement.
Extend wired connection from router to device
in basement to gain wireless signal to that area.
V.2
The mode selector on the device must be set to the
“Repeater”
position for Repeater Mode.
Plug the device into a wall socket. Turn on the device.
Press the WPS button for
1-2
seconds on the device. The WPS LED
will slowly flashing for approx. 2 minutes.
Within these 2 minutes, please press the WPS button of your
Wireless Router directly for
2-3
seconds. (For further details, please
read the operating instructions for your wireless router.)
1.
2.
3.
4.
The device will then automatically connect to your wireless router and copy the
wireless key settings. The device's WiFi password will be the same as your AP/
Router. After you have finished rebooting, please go to your smart device (ie:
phone, computer, TV, TV box, etc) WLAN setting to connect to the new SSID.
Router
Click on the network icon ( or )
on the right bottom of your desktop.
You will find the signal called
RANGEXTD.
Click on
‘Connect’
then wait for a few seconds.
After logging in, you will see the web page below, click on the
“Repeater”
button
to start setup.
.
When connected, open your web
browser and enter
192.168.7.234
in
the browser address box. This
number is the default IP address for
this device.
Plug the Device into a wall socket. Turn on device. Connect your
computer / laptop with the Device with RJ45 Cable.
From the list, select a WiFi SSID. After having selected a WiFi
SSID, you must then key in the password of that wireless router.
You can also give a new name for your RANGEXTD repeater.
When entered, click on the “
Apply
” button to configure and reboot.
After the reboot, please go to your device WLAN setting, connect to
the new WiFi SSID.
The login screen below will appear. Enter the default password
“admin”
and then click
‘Login’
.
The mode selector must be set to
the
“Repeater”
position for
Repeater Mode. Plug the device
into a wall socket. Turn device on.
Configure via Web Browser (if no WPS button on router)
If your wireless router does not support WPS,
you can configure the WiFi
Repeater Mode by connecting it with your smartphone/tablet/computer/laptop with
enclosed RJ45 cable or wirelessly.
Router
RangeXTD Wireless devices
LOGIN
English
Password
Wizard
Internet
WiFi AP/Router
User-PC
Repeater
Device Information
SSID
Channel
Security
Password
Save/Reload Setting
Upgrade Firmware
Reboot Device
RANGEXTD
AUTO
NONE
192.168.7.234
192.168.7.1
Enable
IP Adress
Gateway
DHCP
Firmware Version
UpTime
Build Time
WR18_V110.
0 Day, 00:01:28
2020-12-03 18:38
Repeater Mode
Wireless
LAN
Management
Status
A1.
A4.
A6.
B1.
B2.
A5.
A2.
A3.
Follow process A3 to A6 to configure the Device.
Quick and Easy
Configure via WPS Button
This is the easiest way to configure the device. First, check whether your
wireless router supports WPS. For further details, please read the operating
instructions for your wireless router. If your router does not have a WPS
button, skip this page and follow the next page “Configure via Web Browser”.
Tips:
If you want to keep the stable connection between your router and RangeXTD on
REPEATER
mode, please install the device at a suitable position.
You can find a suitable position by checking the signal indicator on the device, if the LED
is below 2 levels, please find new location.
CONFIGURING THE WIFI REPEATER MODE
11
Use the AP Mode to obtain a “wireless access point”. The wireless end
devices will connect to the RANGEXTD in this mode. You can also use
this mode, for example, to make a formerly non-wireless-enabled router
wireless-enabled.
CONFIGURING THE WIFI AP MODE
LAN
Router
STEPS
B. Configure the Wi-Fi Repeater Mode with RJ45 Cable.
A. Configure the WiFi Repeater Mode wirelessly
1
1
2
2
3
3
Internet
Scan the below QR code for video instructions.
RangeXTD
Wireless devices
Internet
To restore factory default settings, press and hold the RESET pinhole button
for 10 seconds and then release, the indicators will all turn off. After you reset
your device, unplug the it for 3 seconds. Plug it back in and wait about 30
seconds, then check your WiFi network for the network called ‘RANGEXTD’
on your computer or mobile device.
*If your device is already configured to your network, you cannot access the
default IP address (
192.168.7.234
). You must reset the device to access
again.
Resetting RANGEXTD
placeholder only
placeholder only
placeholder only
placeholder only
尺寸: 100 x 92mm
105銅版紙彩色, 折疊
FRONT SIDE
PROPERTY OF DFO GLOBAL
VER 2.0 Jan 05, 2021
RangeXTD WiFi Extender IM
CONFIDENTIAL DOCUMENT


