Radionics D6600 NetCom, System Manual
The Radionics D6600 NetCom System Manual is an essential resource for understanding and maximizing the capabilities of your equipment. This comprehensive manual is available for free download from manualshive.com, providing you with the necessary instructions and information to optimize your Radionics D6600 NetCom experience.
Share
Download


Reviews:
No comments
Related manuals for D6600 NetCom

U1000
Brand: C4i Pages: 8

MMAC-5FNB
Brand: Cabletron Systems Pages: 21

ZT-2510 Series
Brand: ICP DAS USA Pages: 8

NI 9426
Brand: National Instruments Pages: 17

NI PCIe-8255R
Brand: National Instruments Pages: 16

NI 9403
Brand: National Instruments Pages: 23

R3000 Series
Brand: M86 Security Pages: 46
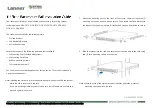
NCA-2510
Brand: Lanner Pages: 2

DeltaFire 500
Brand: WaiLan Pages: 27

PLS342
Brand: Abocom Pages: 2

RS-232/422/485 Serial Card CE 3PXCC4A
Brand: B&B Electronics Pages: 47

CNPS7700 LED
Brand: ZALMAN Pages: 9

TPMS1209T02-ER
Brand: S&T Pages: 28

XETK-S22.0
Brand: ETAS Pages: 84

Trusted T8833
Brand: Rockwell Automation Pages: 21

BeBoPr++
Brand: AES Pages: 44

Home Base F5L049ea
Brand: Belkin Pages: 59

SP3362F
Brand: MicroNet Pages: 49


